roadtripper
Active Member

Posts: 311 
Likes: 116
Currently Offline
|
Post by roadtripper on May 6, 2017 20:30:48 GMT -8
Are you talking about ripping 3/4 ply to the 3", 4" etc? If a pc of ply is say 30 bucks thats about a buck a bd.ft. which is not that different than #2 pine. If you use pocket screws at the butt joints like seems to be common here i dont think you'll get such a good grab in the edge of the ply compaired with the pine. Personally I would say ripping ply wouldn't be worth it.....but thats just my opinion. Good luck on the project!
|
|
roadtripper
Active Member
Posts: 311
Likes: 116
Currently Offline
|
Post by roadtripper on Apr 18, 2017 13:53:28 GMT -8
Going to try and bring this up to date as I have some down time out of town. No guarantee on pictures. Just missing something there.
So far has been very enjoyable even though the time involved is mind boggling. And building stuff is really all I know how to do. I see posts where some do this completely in a few weeks... beyond me. Guess I do too much head scratching on how to do something a little better, stronger, cleaner?
I removed all the skins. Saved all but the top which will go on as one sheet. Found some wide and long and the .032 through a guy Steve at hv told me about.
Rebuilt all 4 corners, beefed up the studs and blocking in a few spots, re did some of the skirting and the rear 2' of floor, and total new roof. On the roof I made mostly new rafters (used poplar) and all new paneling (oak). Some is 1/8 and some 1/4 as was the old. The old wasn't too bad, was just luan with a fake oak paint job on it and after going that far just couldn't live with it. Keeping most of the cabinet framework but did almost all new oak face frames. Going to re use drawers and doors but re skin with new 1/8 oak. By the way our local small town supply has 1/8 and 1/4 oak and birch ----very nice stuff--- in stock all the time at under 25 bucks a sheet.
Took out and re did all the windows and they are ready to go back in when the time comes.
still a lot to do but think I can have phase one ----clean, safe, strong with new 12 v and water soon. Then out for some fishing.
Will try and get some pictures up, otherwise I guess use you're imagination. I know most of you have been through all this and can picture it. And thank you all for the tips so far....from my questions and from what I pick up browsing through.
|
|
roadtripper
Active Member
Posts: 311
Likes: 116
Currently Offline
|
Post by roadtripper on Apr 18, 2017 12:34:17 GMT -8
Nice work! Curved work is fun. I too am stuck on the one picture at a time but hit your link and looks like you have a string up. Im working with Flickr. Will stay tuned.
|
|
roadtripper
Active Member
Posts: 311
Likes: 116
Currently Offline
|
Post by roadtripper on Apr 18, 2017 8:02:23 GMT -8
Not sure of what's appropriate but on my old traveleze the body is 15' long and 92" wide and overall is about 17'5". From what i can tell they called it a seventeen footer. Seemed to handle real nice when i brought it home.
|
|
roadtripper
Active Member
Posts: 311
Likes: 116
Currently Offline
|
Post by roadtripper on Apr 18, 2017 7:31:46 GMT -8
Good score. Know what you mean about the rubber necking. They seem to be rare on the nice back country yards, but saw a beauty couple days ago in a junky yard by a freeway .....zip by at 75 and no way to stop.
|
|
roadtripper
Active Member
Posts: 311
Likes: 116
Currently Offline
|
Post by roadtripper on Apr 10, 2017 20:27:48 GMT -8
Thanks for reinforcing what i was thinking. Putty tape it is then.
|
|
roadtripper
Active Member
Posts: 311
Likes: 116
Currently Offline
|
Post by roadtripper on Apr 8, 2017 12:36:53 GMT -8
Thanks to you both for the reply. That ebay link looks good. I'll give him a try. And glad to hear the rubber only on the cargo door. Makes sense to me. Lots of opinions on the tape. Probably all good in the right places, if fresh and good temp. when installed. Sounds like clean up on the smooth paper stuff a little tricky. I'm amazed at how soft some of the original (55 year old) was on my demo.
|
|
roadtripper
Active Member
Posts: 311
Likes: 116
Currently Offline
|
Post by roadtripper on Apr 8, 2017 6:46:34 GMT -8
All the windows and access doors are cleaned up and rebuilt and it's almost time to put them back in. From what I see in all these posts the putty tape with the crinkle paper is the way to go, not the smooth paper stuff. I don't live in an area where you can just walk in and buy some, so its order time. From the pics at vts it looks like that's not what I want. On line camper world has what looks right....the 1/8 x 1" is about 10 bucks a roll. Any other options on where to go? Amazon?
Question 2: on the access doors I got replacement rubber that goes over the flange, front and back.
The description says the rear rubber is the seal. When I took the original off there was the rubber and putty tape. Seems like these would work against each other, both being soft ? Is the new rubber seal alone enough?
Thanks very much.
|
|
roadtripper
Active Member
Posts: 311
Likes: 116
Currently Offline
|
Post by roadtripper on Apr 8, 2017 6:36:06 GMT -8
I just redid all my windows and have 3 that are fixed. Getting that alu. angle out with out wrecking it can be impossible and I talked with the guys that sell all the hehr seals. He said glass is easier to get than the new angles so I busted out the glass, cleaned up the alu., put in new seal tape they supplied , installed new glass (not that expensive) and popped the old angles back in. Worked great...and while I was at it I ordered the glass tempered because it seemed safer for where it is. Be sure and get the right thickness glass. mine was 1/8". Some is 3/16 (and the 3/16 can not be tempered i hear).
|
|
roadtripper
Active Member
Posts: 311
Likes: 116
Currently Offline
|
Post by roadtripper on Mar 25, 2017 20:42:00 GMT -8
Lady W. No, only the rear 2 feet. I took out the fiber pan, the floor joists and 2 feet of ply. Can't say it was easy but was necessary. Actually the 1/2" black fiber pan wasnt so hard. Just ripped it out in pieces. I made small hard rubbet pads to put between the frame amd ply and new bolts where i could.. still trying to figure a way to add new protection and insulation.. im going to try and get a bunch of pics up soon. I have trouble getting more than 1 up per post, so have been putting it off.
|
|
roadtripper
Active Member
Posts: 311
Likes: 116
Currently Offline
|
Post by roadtripper on Mar 25, 2017 6:21:14 GMT -8
Just completed the frame and roof rebuild of my traveleze. I used a variety of woods for different reasons....some being what I had around the shop in clear dry scraps. I did use one Doug fir Pressure treat for the rear most joist where I needed some strength. It's shimmed off the frame 1/2" with rubber to fill the void of the old belly mat. And has galvanized bolts and screws. I used poplar on roof for strength and mostly pine elsewhere. Depends on where you live what kind. West we have ponderosa and sugar. Doug fir is probably strongest but poplar is pretty strong too. KD fir is quite expensive. Back in the day they made hand split shakes around here from sugar pine so it's very durable....and a joy to work with.
|
|
roadtripper
Active Member
Posts: 311
Likes: 116
Currently Offline
|
Post by roadtripper on Mar 6, 2017 7:02:49 GMT -8
Hi, I'm right there with you....just a few steps ahead and mine was very similar. just pick a corner and don't take too much off at once. The suggestion to temporarily replace a piece of metal occasionally is right on. Line up old staple holes. Even on sound wood add or replace screws sometimes as the old can be rusty or loose. I added additional backing in a few places for better reattaching and for a few new eyebrows. I'm also redoing roof and am up to that now. Very satisfying to see things strong again. I used dry "hem fir" 2x2's , dry df 2x4 , dry pine and various dry scraps from my shop. Poplar is great where you need strength....not too expensive and long lengths without knots are not hard to find. Great workspace you have! Have fun.
|
|
roadtripper
Active Member
Posts: 311
Likes: 116
Currently Offline
|
Post by roadtripper on Mar 2, 2017 21:36:21 GMT -8
A few notes of agreement from my current project. I know, i need to start postong some pics. But anyway i now have ALL the metal off. Roof will be new, sides reused. Not hard but takes time. Lots of time. Go slow and dont rip too much wood out at once. Even with pictures you wont remember where it goes ...especially those pieces that come out in crumbs. Dont assume one side is exactly like the other. Dont assume anything is square. Have fun.
|
|
roadtripper
Active Member
Posts: 311
Likes: 116
Currently Offline
|
Post by roadtripper on Feb 20, 2017 13:54:27 GMT -8
The pic is the corner of one of the sliding windows in my door. (See: can I get this door apart). To get the glazing out should I pry the corners open or drill out the dimples in the bottom corners. The top rail is a bit more complicated as it has the catches for the slide involved. I looks like the 1/8" rubber channel on vts will fit. Thanks. 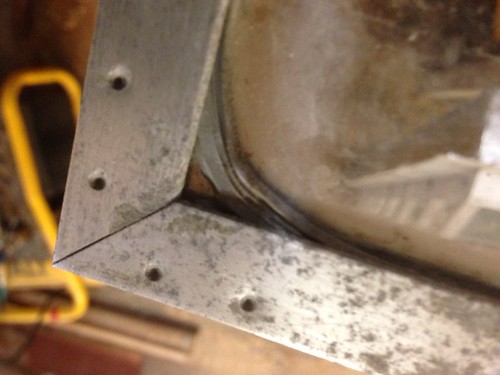 IMG_3929 IMG_3929 |
|
roadtripper
Active Member
Posts: 311
Likes: 116
Currently Offline
|
Post by roadtripper on Feb 18, 2017 20:39:38 GMT -8
Well it was a little harder than that. Instead of welded corners there are heavy alu "L" brackets pressed inside of each corner. I hacksawed the bottom corners apart and still had to beat the bottom rail off with a steel block and hammer. The metal sheets on each side of the bottom panel were also pressed in (to seal them I guess) so I had to use a hammer and heavy putty knife and carefully pry the seam open enough to slide the two panels out. The weather strip around the edges was also pressed in and took over an hour to get out. Am attaching a picture of that. I cant find any on the sites that have all the window rubber. May have to get creative. After I insert some new sheets of alu and fill the 1 1/4 " thick void with rigid insul. or maybe even wood (probably cedar) I'll screw the bottom corners together and try to somewhat re seal things with the rubber mallet. Not that anything else on these projects is that easy anyway, right? Thanks if anyone has any ideas on this weartherstrip. 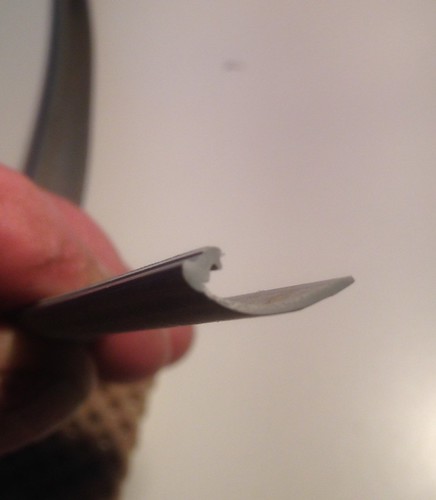 FullSizeRender-5 FullSizeRender-5 by P. Michael Grayum, on Flickr |
|


