roadtripper
Active Member

Posts: 311 
Likes: 116
Currently Offline
|
Post by roadtripper on Feb 11, 2017 19:10:55 GMT -8
Thank you both. Headed out of town for a few but will try that as soon as i get back.
|
|
roadtripper
Active Member
Posts: 311
Likes: 116
Currently Offline
|
Post by roadtripper on Feb 10, 2017 19:02:34 GMT -8
The door on the TravelEze is in good shape but for the weatherstrip and the exterior lower panel. Thought I could take it apart and replace the small alu front panel and put new weather strip in the seam between the front and back. It looks like the two were crimped solid all around and there is no separating them. Don't know if this type is specific to this trailer, but all my windows are Hehr, just like everyone elses. Thanks, if anyone knows. 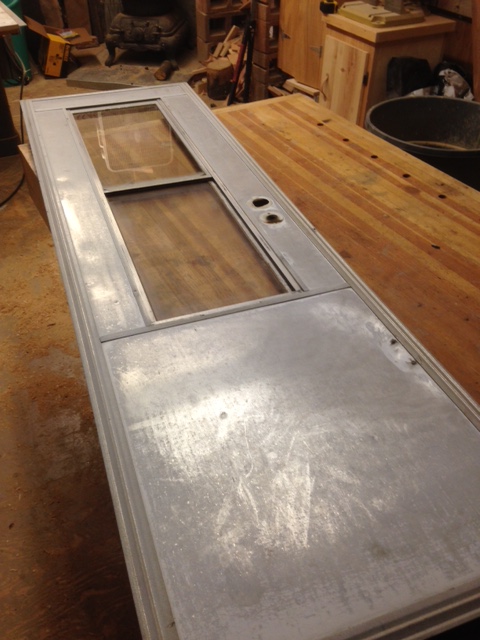 IMG_3819 IMG_3819 by P. Michael Grayum, on Flickr |
|
roadtripper
Active Member
Posts: 311
Likes: 116
Currently Offline
|
Post by roadtripper on Feb 9, 2017 7:33:42 GMT -8
Yea, I second mobiltec's thought on a thread for this. I have a couple questions. I have a few compressors for my carpentry, and one in my wood shop that is a 2hp (I think) and about 12 gal tank. I can't read the tag on it about output. This one was given to us used. Anyway, I 've been reading about low vol. and high vol sprayers. Your new one is high vol looks like. Seems to be arguments both ways. Which is best for novice painters and which would maybe get by with the compressors I have? Thanks for your input and posts---seems to have stirred up a lot of interest.
|
|
roadtripper
Active Member
Posts: 311
Likes: 116
Currently Offline
|
Post by roadtripper on Feb 7, 2017 18:09:34 GMT -8
More thoughts. Exposed in the cabinet but runs inside the wall street side down under floor. Didn't just look under floor but if there is a fitting it will be exposed. My main line under trailer is 1/2 " black pipe through framing front to rear. In the cupboard where it goes into the wall the bend is like a large "s" shape so there are no hard turns. At the lamp there is a 90 flare fitting, but this is easy to see.
|
|
roadtripper
Active Member
Posts: 311
Likes: 116
Currently Offline
|
Post by roadtripper on Feb 7, 2017 16:29:48 GMT -8
My traveleze has a lamp over the table but there is a bank of cabinets there and piping is inside and appears to run down to main line in wall with a gentle bend in cabinet.....no fittings I can see.
|
|
roadtripper
Active Member
Posts: 311
Likes: 116
Currently Offline
|
Post by roadtripper on Feb 6, 2017 7:26:58 GMT -8
Here is the whole thing. Gravel is just on grade about 2" thick to 12" thick at deepest to make parking area somewhat level across the wheels. Just get a load of 3/4 minus road base from your local quarry or batch plant. Road base packs down nice and hard. If your spot is already level you can just spread 2 or 3 inches of gravel perfectly flat and the bottom steel tube can set on it with long bars driven through. 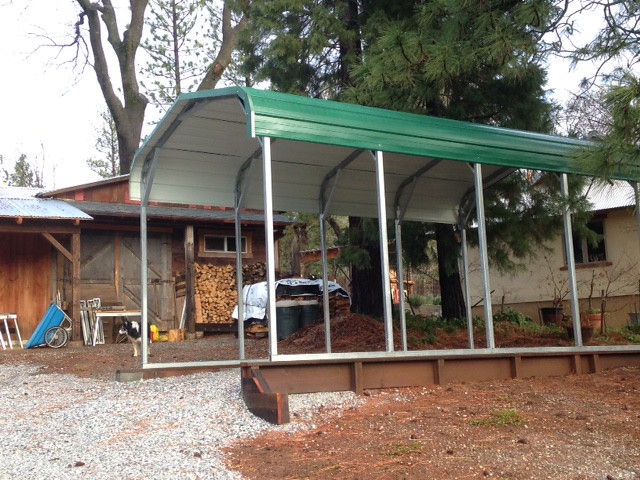 IMG_3708 IMG_3708 by |
|
roadtripper
Active Member
Posts: 311
Likes: 116
Currently Offline
|
Post by roadtripper on Feb 4, 2017 6:54:25 GMT -8
You should read "managing 12 volts" . Available at VTS or Amazon Prime . Will teach you how to get the most out of your battery system....and much more. Should be required reading in my opinion.
|
|
roadtripper
Active Member
Posts: 311
Likes: 116
Currently Offline
|
Post by roadtripper on Feb 3, 2017 20:30:20 GMT -8
Well looks like only one went up. The other side is similar but on grade and in lieu of the 4x4's are small conc. footings that the 2x6 is attached to. A concrete slab would be nice, but this works.
|
|
roadtripper
Active Member
Posts: 311
Likes: 116
Currently Offline
|
Post by roadtripper on Feb 3, 2017 20:25:16 GMT -8
|
|
roadtripper
Active Member
Posts: 311
Likes: 116
Currently Offline
|
Post by roadtripper on Feb 2, 2017 16:09:09 GMT -8
Yes Rod, will try and get some up soon.
|
|
roadtripper
Active Member
Posts: 311
Likes: 116
Currently Offline
|
Post by roadtripper on Feb 1, 2017 20:32:21 GMT -8
I'm replacing much of the plumbing in this project, which has a kitchen and bath. I've removed the old air pressure tank, the hot water heater, the toilet, the broken black waste tank, and an arm load of supply lines and some abs.
In phase I to get things going i'll install a new plastic water tank (20 gal max.) a new 6 gal propane heater and an on demand 12 volt water pump.
Using the existing lav. , shower and kit sink I'll tie the waste together to a hose fitting to fill a portable tank or out on the sand, depending on location. Will use porta-potty instead of toilet for now so now tank there.
Will plumb all new supply lines with pex. (no problem there)
So here's my question:
The water storage fills with a hose from a cap to the exterior, but when all is empty, how does water get to the hot tank?
Do you have to turn on a hot valve for the pump to push it to the hot tank or does it just over flow there? How does it get past the pump?
I've looked at the diagram at the start of this section and that is exactly what I pictured for layout, but I don't see how the water gets from cold tank to hot with out some kind of pressure. May be obvious if I had it all in front of me but I don't yet.
Thanks much.
|
|
roadtripper
Active Member
Posts: 311
Likes: 116
Currently Offline
|
Post by roadtripper on Feb 1, 2017 12:32:19 GMT -8
I recently got a metal carport put up. My location is on a slight cross slope so I built a 1 foot high pressure treat retaining wall on the down hill side with a 2x6 pt top plate lagged to it. On the uphill side, at grade, I put small 1cf footings about 5 feet apart very level with each other, set a simpson plate anchor in each and fastened a 2x6 pt to that. Plates on both sides are level with each other. The bottom of the structure is a 2 1/2" square galv. tube and we lagged that to the plates. Just went through those record breaking Jan storms here in northern CA and no problems. Hope this helps.
|
|
roadtripper
Active Member
Posts: 311
Likes: 116
Currently Offline
|
Post by roadtripper on Jan 31, 2017 18:37:41 GMT -8
I've been thinking about this since it was posted. Being new at these old trailers but old myself in building and woodworking I've a few ideas. First, I mostly agree with Larry about letting the wood breathe and keeping the moisture out in the first place. I've just taken the skin off the rear, one side, and part of the top. In the rear, the wood was pretty much gone, but on the side, including the skirt, everything looks good, in fact in many places the frame looks new. Trailer is a 62 TravelEZE.
Today I crawled under and replaced a bit of floor frame in the rear and used pressure treated doug fir.
I think if you paint, you should paint ends too, before you put things together. The butt ends let in more moisture and don't breathe out as well where they join another framing member.
I'm considering using a penetrating oil on the pieces (the whole rear frame and back corners) that I'm replacing. This might be better than a just surface coat of paint. There are many options like Thompson's, or any number of penatraing oils for decks, logs, fences, etc. Here in Northern Calif. I think Armstrong's is the best. On the directions it even says it's ok for play ground equipment, so once dry it's not too toxic.
If there is concern about touching the aluminum, or for just for a little extra protection in problem areas, there are many window flashing materials out now. These come in rolls of various width and are super sticky on one side.
|
|
roadtripper
Active Member
Posts: 311
Likes: 116
Currently Offline
|
Post by roadtripper on Jan 30, 2017 8:12:03 GMT -8
I"ve been wondering about that too. My Traveleze has kitchen (stove , cooktop, refer, and heater street side. Curb side is water heater with tank, cold water tank and waste tank. Everything is over or as close as possible to axle. I'm replacing much of this and will keep the same layout, because it looks like an attempt at balance. Im adding a 12 volt system it never had and the batteries are what I'm thinking about. The optimum 2 each 6 volt weigh about 120 lbs. It would take 120 pints of beer to off set that.
|
|
roadtripper
Active Member
Posts: 311
Likes: 116
Currently Offline
|
Post by roadtripper on Jan 25, 2017 21:36:21 GMT -8
Why don't you get one sheet of 1/8 ply and a sheet of 1/2 or 3/4 cdx ply and jig saw the radius you think you want and see how the 1/8 bends around it. Play with the radius one way or the other till you get something that feels good.
|
|


