roadtripper
Active Member

Posts: 311 
Likes: 116
Currently Offline
|
Post by roadtripper on Jan 19, 2017 10:30:59 GMT -8
Thanks. Will stay tuned.
|
|
roadtripper
Active Member
Posts: 311
Likes: 116
Currently Offline
|
Post by roadtripper on Jan 19, 2017 8:22:22 GMT -8
Yea you are thinking! How bout a sketch?Last night I found a 2 year old thread here...
don't remember exactly where...on same subject..... One idea a was fabric one and I have an awning rail over front window. Not sure how it would do at 65 though.
|
|
roadtripper
Active Member
Posts: 311
Likes: 116
Currently Offline
|
Post by roadtripper on Jan 18, 2017 20:20:14 GMT -8
Thanks for the question. I'll be looking at this. I too am just starting a 62 (TravelEZE) and the front window is big. Trailer is an inch under 8'wide and window is most of it. And no guard. Since I've just decided to replace the top skin, I've been thinking of making one with a scrap of the old, and some alu angle or square tubing...easy to get. And there are arm supports available on several rv supply sites. The window on my Dodge pick up just got smacked bad the other day, so could be a good thing to figure out.
|
|
roadtripper
Active Member
Posts: 311
Likes: 116
Currently Offline
|
Post by roadtripper on Jan 16, 2017 12:05:08 GMT -8
After the foam is in, the router should cut a nice tidy groove through studs and foam for the wire. Tack a 1x4 guide on the wall for any long straight runs. I've seen the electricians do this on ICF houses I've worked on.
|
|
roadtripper
Active Member
Posts: 311
Likes: 116
Currently Offline
|
Post by roadtripper on Jan 16, 2017 8:06:59 GMT -8
Yea, they are wicked little devices but great. I'v used them in log work...like shaping copes, and even in shaping little alcoves in the walls of my straw bale house. Wear leather gloves! On the notches for the wire, your router with a 3/8 bit set about 1/2 deep would work pretty good too.
|
|
roadtripper
Active Member
Posts: 311
Likes: 116
Currently Offline
|
Post by roadtripper on Jan 15, 2017 9:22:39 GMT -8
One can Never have too many clamps. With those pipe clamps, you can buy shorter pipe nipples down at the hardware store and use the clamp parts for shorter clamps too, when needed. If they are old and crusty, clean the threads up with a little WD40. I often call a clamp "cheap help" as it can hold something in place while you use your hands for the chore at hand.
|
|
roadtripper
Active Member
Posts: 311
Likes: 116
Currently Offline
|
Post by roadtripper on Jan 14, 2017 7:27:17 GMT -8
Hey, thanks for the help. The links show some good and encouraging stuff. So plenty to do with the next round of bad weather headed this way next week. Guessing that acid is available down at the hardware store?
|
|
roadtripper
Active Member
Posts: 311
Likes: 116
Currently Offline
|
Post by roadtripper on Jan 14, 2017 7:24:04 GMT -8
Thanks for input. I'm thinking it will be just like Larry's video of the 57 re roof...only a little wider. The existing is in about 4 pieces, but the seams look permanent, not like those on the siding. And the crank up vent right in the middle should give it some stability, dont you think? But if it flaps, we'll see.
|
|
roadtripper
Active Member
Posts: 311
Likes: 116
Currently Offline
|
Post by roadtripper on Jan 13, 2017 20:27:46 GMT -8
I have a nice large pile on the bench of j rail, awning rail, window trim, baggage doors, eyebrows and many interior parts...and no plastic. There must be info in here on what kind of elbow grease to use and other tips, if someone could point me there. Was kind of neat taking off things like the hand hold, light fixtures, etc. and seeing on the backs "made in Chicago" or a number of other places besides China. And the little faucet on the lav said "made in Italy". Gone are the days. Thanks.
|
|
roadtripper
Active Member
Posts: 311
Likes: 116
Currently Offline
|
Post by roadtripper on Jan 13, 2017 20:18:53 GMT -8
I've decided, for a half dozen reasons, to go with new roof skin. The majority of existing is smooth, and I'm almost 8'wide, so I'll go with a 8' x continuous heavy alu roll. My layout requires no folded seam at either end. I've watched the proper videos on how to, but was wondering a couple things. Larry cuts a little "v" every 2 or 3 inches on the curve. On mine, where the radius front and rear is pretty steep, it looks like the factory used a crimp tool there with no cuts. Maybe Larry's method is smoother though. Also, I thought I caught a post somewhere where vikx sometimes puts thin putty tape under the fold as well as under the trim. Or did I just imagine that?
Finally, when I took off all the existing upper trim today, seems in many places the existing putty tape (55 years old) hadn't really stuck that well to the paint side. Wouldn't it be better to lightly sand first? Thanks
|
|
roadtripper
Active Member
Posts: 311
Likes: 116
Currently Offline
|
Post by roadtripper on Jan 13, 2017 6:43:58 GMT -8
Hi, Thanks, and yes I've read your outside-in info and have seen the picture, and watched the videos. Soon as I posted my picture of this I thought it might look like inside out to some, but it's not. The whole rear skin is loose for but 2 screws, and one side is loose near the rear, with the first bottom piece off behind the wheel. What you see is a view from the interior closet where the water heater was I removed through the exterior. All cabinets are still in place and all paneling except a couple of square feet that you see that had just vanished. It was raining yesterday (last 2 weeks actually) and I was just waiting for that to end before I let the skin off---maybe today I'm hoping. Thanks for keeping an eye on us new guys.
|
|
roadtripper
Active Member
Posts: 311
Likes: 116
Currently Offline
|
Post by roadtripper on Jan 12, 2017 17:37:37 GMT -8
So first day of getting down and dirty. Demo in the rear where the most obvious problems are. Do you ever uncover stuff and wonder, "What in the world were they thinking?." I think a couple of places might have leaked since it rolled off the assembly line. Well, we'll fix er'. (we hope). 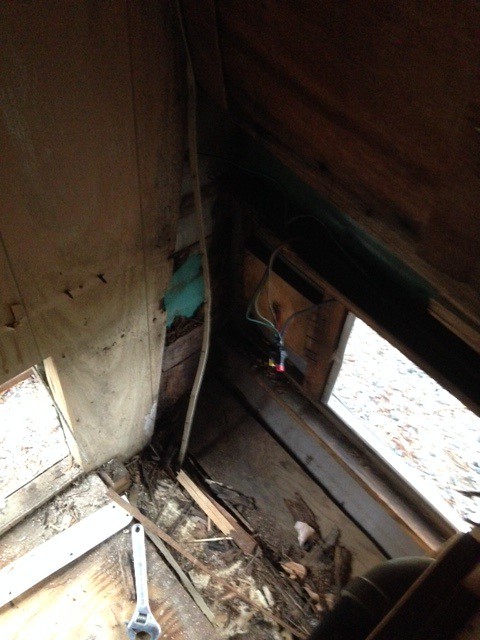 rear demo rear demo by P. Michael Grayum, on Flickr |
|
roadtripper
Active Member
Posts: 311
Likes: 116
Currently Offline
|
Post by roadtripper on Jan 11, 2017 7:34:21 GMT -8
Finally got her home in a lull in the storm the other day. She's parked under a new carport cover but it's been raining sideways ever since. The rear sheet comes off as soon as the sun comes out for phase one re-frame. 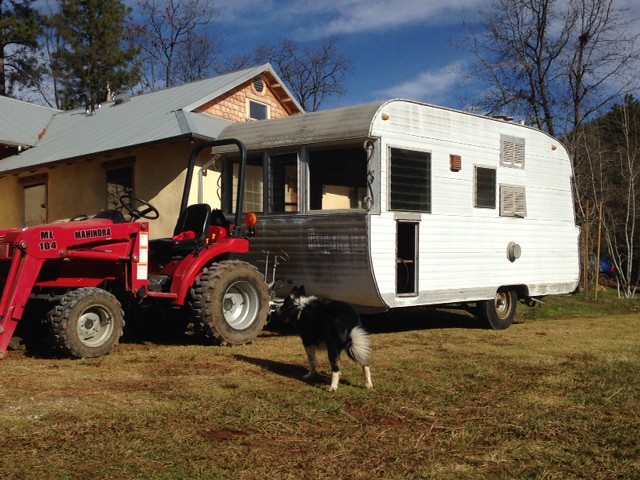 trailer comes home trailer comes home by P. Michael Grayum, on Flickr |
|
roadtripper
Active Member
Posts: 311
Likes: 116
Currently Offline
|
Post by roadtripper on Jan 4, 2017 10:45:19 GMT -8
Will toss in an experience about a skin ground. I have a small propane heater with a 12v supply to start and it runs a fan. Works great, but started having problems and when rebuilding some cabinets found the unit was grounded to the skin where the vent goes through the side by a screw was that rattled loose (drove me crazy and the find was basically an accident). Anyway, ran a solid ground wire straight to the 12 volt bar and never a problem again. On my current project where I'll be adding a 12 volt system I'll run ground wires for everything.
|
|
roadtripper
Active Member
Posts: 311
Likes: 116
Currently Offline
|
Tarps
Dec 30, 2016 7:33:22 GMT -8
Post by roadtripper on Dec 30, 2016 7:33:22 GMT -8
I know good tarps are hard to find so I thought i'd pass this along. Check out reefindustries.com. I got this contact from our local mill that custom cuts and dries lumber. They say these tarps, made to any size you want, are the best they have found to protect their large stacks of kiln dried sugar pine and yellow pine. They get 2 or 3 years use and they are located on a mountain ridge that really gets hammered by weather. Pretty pricey, but worth it these guys say.
|
|


