|
|
Post by Teachndad on Apr 9, 2020 10:40:51 GMT -8
Hi Friends, Came across this article. www.boler-camping.com/portfolio/history-of-the-boler/ It's a history of the boler fiberglass trailer. While not stick and tin, they do go back to the late 60's, so I guess we could call it vintage. If you have some time on your hands, it's worth a read, but it is rather long. I skimmed after a while. I liked reading the history of the name and how it originated. It's well written and interesting. There is a reason why boler is spelled without a capital B. Be well. Rod |
|
|
|
Post by Teachndad on Apr 9, 2020 6:05:38 GMT -8
I like to hit it with a laminate roller when it's all down. Datac, Thanks again for your detailed description on how you glued on the veneer.  Is this a laminate roller?  Do you only use one hand to roll out the veneer after glueing? Seems to me that you would have to mount the cabinet to a table to use both hands, so it wouldn't move. Do you always roll with the grain? Cheers, Rod |
|
|
|
Post by Teachndad on Apr 8, 2020 5:44:56 GMT -8
Funny you ask, I didn't want it to mildew in the garage so I temporarily stored the sheets in (my wife's) living room...for a year. Hey NC, Well, that's what I really didn't anticipate. You have posted another picture of other parts in your living room, but I thought, "No, he wouldn't put the sheets in his living room, would he?". You did!  What ever happened to the "Happy wife, Happy life"? Your wife must me amazing. I get flak for having trailer parts in the carport, LOL. Have a great day. Rod |
|
|
|
Post by Teachndad on Apr 7, 2020 22:07:38 GMT -8
Good stuff, NC, But here's the really important question, LOL. Where are you storing and how are you storing the left over sheets of paneling? Nice way to get around the problem of not finding decent paneling.  Special order through a domestic mill.  Cheers, Rod |
|
|
|
Post by Teachndad on Apr 7, 2020 13:02:29 GMT -8
|
|
|
|
Post by Teachndad on Apr 7, 2020 4:48:42 GMT -8
Hi PT,
WOW, I love it. Thanks for taking us out to the world that we remember...
You inspired me to change my avatar with your landscape picture with the gorgeous clouds.
Be well and thanks for posting such great stuff.
Rod
|
|
|
|
Post by Teachndad on Apr 7, 2020 4:39:32 GMT -8
|
|
|
|
Post by Teachndad on Apr 6, 2020 20:45:24 GMT -8
Hi Friends,
I did end up cutting the tabs from the side pile weather stripping after the new one was inserted.So, the D-Seal goes all the way across to the ends of the groove. BTW, it helps a little to have the glass out when you install the side pile weather stripping. The rewatch of Larry's video helped.
Rod
|
|
|
|
Post by Teachndad on Apr 6, 2020 20:38:15 GMT -8
Thank you DATAC,
Awesome response to my question! Thank you for the time you took to furnish all that information.
Cheers,
Rod
|
|
|
|
Post by Teachndad on Apr 6, 2020 6:40:04 GMT -8
Hello Friends, I finished up this window today! 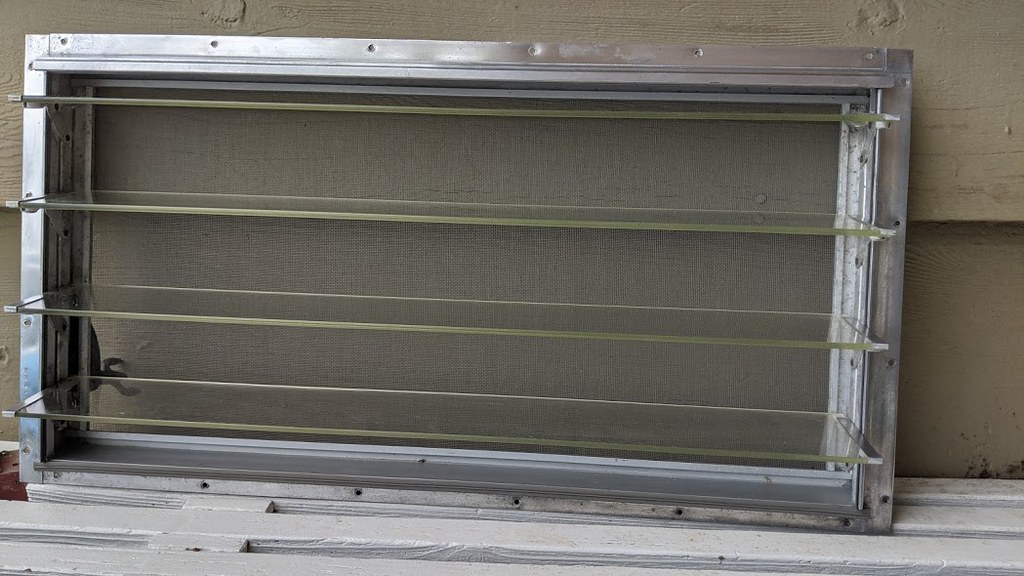 I had some snags along the way. The lower D–Seal is a pain in the neck to install.  The D-Seal from Vintage Trailer gaskets seemed to fit at the start in the clean grooves, but got stuck 4” in. I added some water based lubricant and restarted. It helped a little, but I could only move it 1/8” at a time in the groove from one end to the other. It took me almost 30 minutes to insert the lower D- Seal across the window frame "walking" it a tedious 1/8" at a time or less. Lower seal installed at bottom of the picture after side pile weather stripping was installed. 
The top D- Seal was just as hard to do. Ask yourself if you really want to do this. You will have to remove two screws on each corner. Not a problem really, unless they shear... Two of them sheared! They appeared only to have some surface rust on them. I guess I was wrong. Luckily, I was left with one on each corner. I replaced the screws that came out on each corner with new ones and coated them with Locktite Blue. Luckily, I was left with one on each corner.
I re-sealed every corner and gap with gutter seal when it was all done. The gutter seal, once dry, helped the overall frame integrity by greatly stiffening up the corners making up for the loss of that second sheared screw. Once the window is finally installed in the window wall opening, it will be very stiff.
This image shows the sheared screw hole filled with gutter seal.

Make sure if you take these screws out, you install the D- Seal BEFORE you screw the corners back together and seal it with gutter seal. Ask me how I know?... The image below shows the upper D- Seal installed. This photo is actually of the underside of the top of the window frame but turned upside down so I could take the picture. You can barely tell, but the underside of the top part of the window frame is painted. It was my way of dealing with really bad oxidation. I was happy with the results. The D- Seal runs horizontally just above my finger tip. 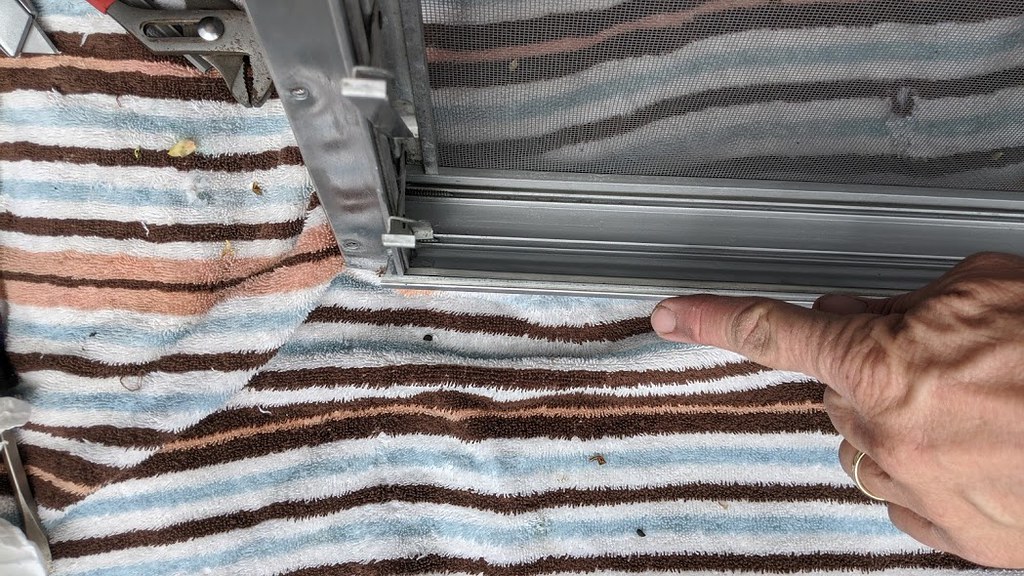 On a good note, the side pile weather stripping from Vintage Trailer Gaskets went in the side grooves with hardly any fuss. Make sure you put the glass panes in the window after the seals are all installed. It makes it easier to slide in the side pile weather stripping. On a good note, the side pile weather stripping from Vintage Trailer Gaskets went in the side grooves with hardly any fuss. Make sure you put the glass panes in the window after the seals are all installed. It makes it easier to slide in the side pile weather stripping.
BTW, I listed two models of Jalousie windows in the title. Mine is a model 4 J 30 which is very similar in size and construction to the model 1626 that Larry restores in his Repairing a Jalousie Window video. The key difference is how the screen is mounted.
Cheers,
Rod
|
|
|
|
Post by Teachndad on Apr 6, 2020 6:02:18 GMT -8
Hi Vikx,
I haven't heard a word recently. Maybe someone else has more recent news.
I heard it was still in discussion a few weeks ago. A lot has changed since then. Since many school districts in California will be closed for the remainder of the school year into June, I would assume that it will be called off. We have only 5 weeks until the scheduled Pismo Rally, I personally doubt things will turn around anytime soon with regards to Corbid 19. Large assemblies are banned anyway.
I was really looking forward to the rally.
Rod
|
|
|
|
Post by Teachndad on Apr 6, 2020 5:33:29 GMT -8
Hello Friends, This update includes information on two important windows on Andy. The front window assembly was a subproject in itself. Below is the front window assembly with no glass, no gaskets and new screens.  I wanted to re-screen the two square sub-assemblies as seen below.  In order to get access to the screen material, I needed to drill out rivets along the top edge. The riveted back frame supports needed to be removed as well by drilling out the mounting rivets. I used the galvanized screen material available at VTG. I cleaned up the aluminum and hand polished the exterior surfaces and replaced all of the back frame gaskets. I also sealed up all gaps with gutter seal. I lost one of my small window push out sashes and had to scavenge another one. This image shows the new back frame gaskets glued and installed and the use of Clecos to keep things together for riveting. 
 Front window duel pane assembly gasket dry fit. Front window duel pane assembly gasket dry fit. by
Here are the tools that were used to re-rivet. These include a rivet cutting tool, Cleco Pliers, rivet gun, rivet bucks behind the frame and a rivet squeezer. All were needed. Did I mention the tailgate on my truck is a great work platform?

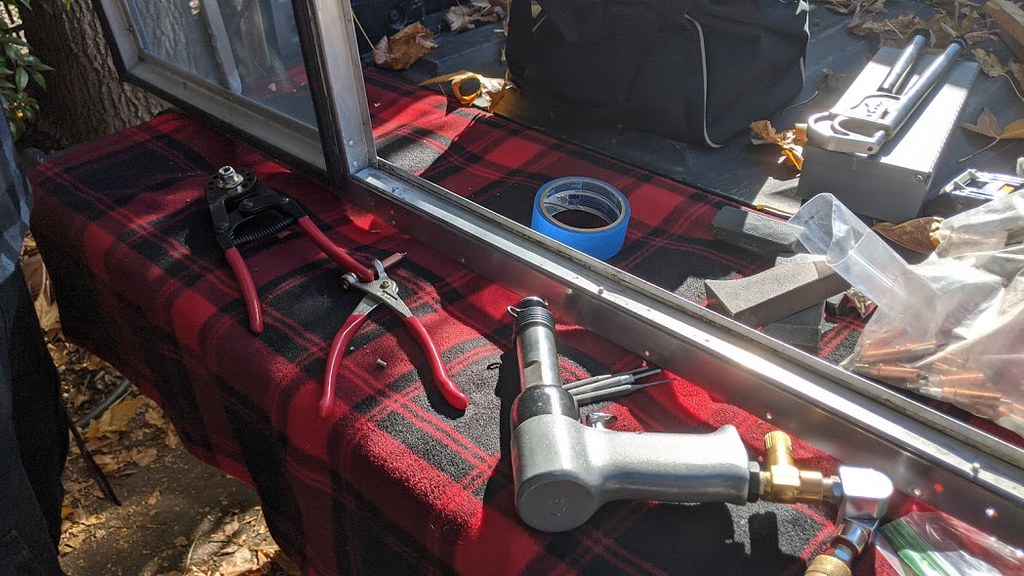
Image shows cleaned window sashes before and after hand polishing.

Here is what the front window assembly looked like before when as it was when I purchased Andy:
Here it is now minus the glass.
 Front window assembly after riveting Front window assembly after riveting by
The 2 square sub-assemblies had to be re-riveted on to the main frame with a rivet gun because they were mounted with flush rivets typically used in aircraft. I had a friend who’s son is an aircraft mechanic. He helped me to re-rivet the sub-assemblies together to the main frame. Before we riveted, I applied 1/16" thick butyl putty tape to the rear flange of the square sub assemblies. I wish I had used 1/8" thick butyl putty tape.
During the repair, I found nearly all the rivets in the main frame were loose or popped. We replaced nearly all of them. We used semi-tubular rivets to mend the mainframe. Finding the right size rivets took some trial and error in ordering.
Next Steps:
1. The glass panes in the push out windows still need to be added in all four subframes. I am going to buy new glass. The glass will need to be installed and each sash re-assembled with new window seal.
2. I need to add the solid glass pane in the middle of the front window assembly.
After all that..., I also finished Andy’s kitchen jalousie window. I replaced the screen and both the top and bottom D- Seals. I also replaced the side pile weather stripping. I chose to spray paint the interior facing parts of the of the window frame because the oxidation was so bad. I was happy with the the color. Thanks JP.
There were no mounting screws to fasten the crank operator, so that had to be remedied.
Link HERE Here is the window before Hehr model 4 J 30. 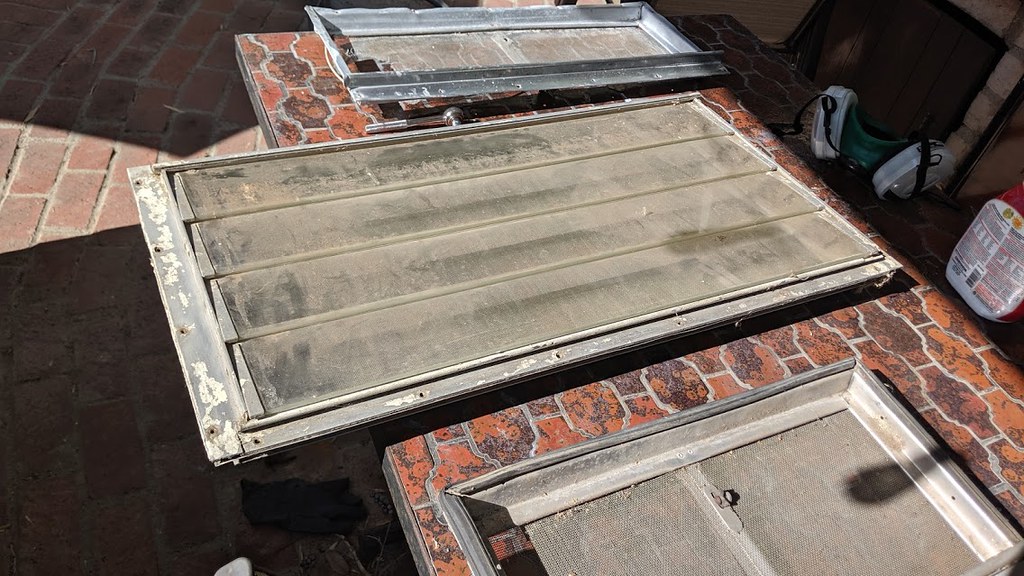
After
 For more details on the challenges to working on this jalousie window go HERE
Cheers,
Rod
|
|
|
|
Post by Teachndad on Apr 5, 2020 14:45:26 GMT -8
Hi,
The diameter is 16 1/2" with a 5 hole rim with a tire sized at T125 90R15 96M. The spare in the image above is one I pulled off the net at random.
I hope that helps.
Rod
|
|
|
|
Post by Teachndad on Apr 5, 2020 7:20:08 GMT -8
Great opinions!
How about this idea? If you could get it for $300, get it home(safely) and then tear into it. If it looks like it's just going to be too much work and expense, salvage the stove,the windows along with the much coveted wings. I am sure you could easily get your money out of it by selling all of those. This assumes you have the time. For some of us, that's a commodity we don't have enough of.
BTW, are those "new" tires trailer tires or car tires?
Then take the trailer chassis to the dump or scrap dealer or sell that too to someone who can make it into a utility trailer.
Just another opinion.
Rod
|
|
|
|
Post by Teachndad on Apr 4, 2020 12:22:03 GMT -8
Aaaahhhhh! It's a time capsule!! I just love the condition of the inside
Your trailer is a wonderful find.
Rod
|
|


 Special order through a domestic mill.
 The D-Seal from Vintage Trailer gaskets seemed to fit at the start in the clean grooves, but got stuck 4” in. I added some water based lubricant and restarted. It helped a little, but I could only move it 1/8” at a time in the groove from one end to the other. It took me almost 30 minutes to insert the lower D- Seal across the window frame "walking" it a tedious 1/8" at a time or less.