|
|
Post by Teachndad on Aug 5, 2023 6:03:38 GMT -8
Peter,
This helps volumes! Thank you for taking the time to answer all my questions. I found the comments regarding the stressing on the frame very interesting! Thanks again for sharing!
Restore ON!
Rod
|
|
newin62
Active Member

Posts: 167
Likes: 141
1962 Shasta Airflyte
Currently Offline
|
Post by newin62 on Aug 6, 2023 12:02:39 GMT -8
Peter, This helps volumes! Thank you for taking the time to answer all my questions. I found the comments regarding the stressing on the frame very interesting! Thanks again for sharing! Restore ON! Rod Hi Rod, I had to experiment quite a bit with the spring length and tension. The springs have a significant curve in them and create an arch in the middle when mounted. The tighter the tension, the flatter the arch. I wanted a fairly flat arch so the seat didn't have too much of a bump in the middle. I roughly cut the first spring to what I thought was the right length and experimented with the clip placement and tension until I had about 1" of arch in the middle of the spring. The seat springs were longer than the backs and required more tension to bring the arch down. There is probably about 20lbs of tension on each spring so with 9 springs each, it adds up and puts a lot of stress on the frame. Peter  This is what the benches look like from underneath. The black cloth in the middle that's sewed to the cover hinge required quite a bit of tension as well in order to pull the cover down at the hinge. |
|
newin62
Active Member
Posts: 167
Likes: 141
1962 Shasta Airflyte
Currently Offline
|
Post by newin62 on Aug 10, 2023 2:45:30 GMT -8
I test fit the Girard tankless water heater. It fits very nicely under the sink with enough room for all the plumbing. I am now working on the propane connections to it plus the stove, fridge, furnace and the dinette lantern.  Outside with cover  Inside is tight but there is enough room for a standard trap and drain behind the heater. |
|
newin62
Active Member
Posts: 167
Likes: 141
1962 Shasta Airflyte
Currently Offline
|
Post by newin62 on Sept 17, 2023 7:03:22 GMT -8
I managed to get all the gas lines, electrical, drainage piping and holding tanks installed. My plan is to use an outdoor shower and pump the water from a custom shower pan to the grey water tank. The largest gray tank I could find that would fit under the trailer and still give me enough clearance is a 32 gallon Icon tank. The largest fresh water tank I could find that fits under the dinette bench and still leave enough room for the electrical panels, converter and LiFePO4 battery is an 18 gallon tank I found on Amazon. 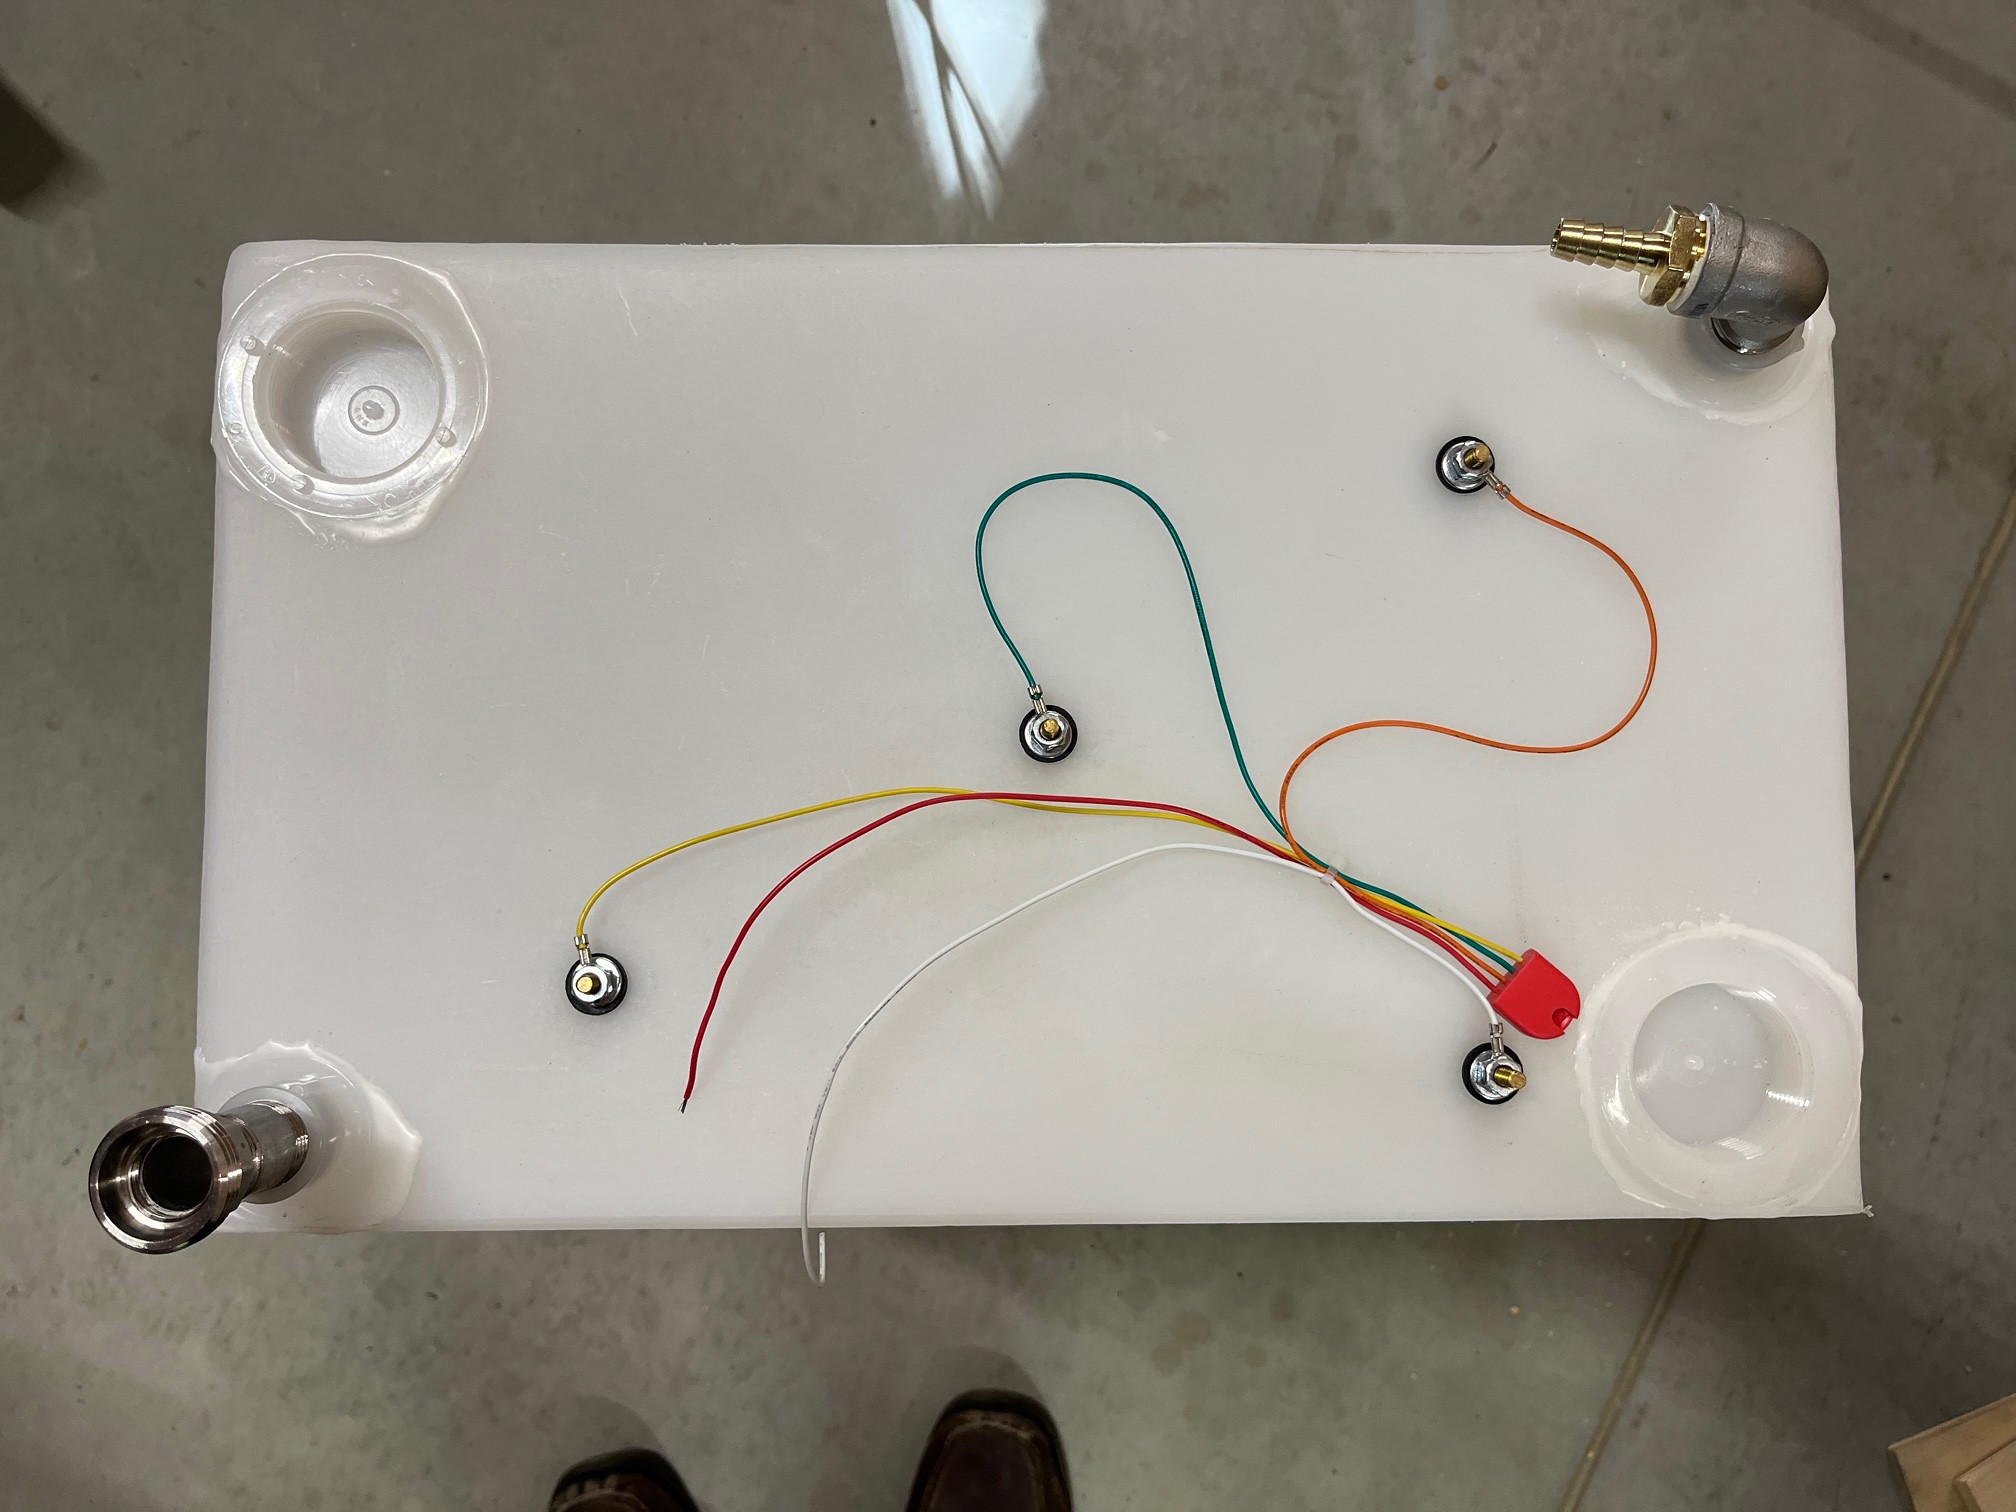 Fresh water tank with level sensors installed. Stainless steel tank fittings.  Gray tank street side, 1" x 3/16" aluminum angle used to support the tank perimeter. It fits perfectly between the first two frame cross members in front of the axle.  Gray tank curb side, level sensors installed and connected.  Tank level monitor panel with pump switch. |
|
WhitneyK
Active Member
Posts: 492 
Likes: 169
'67 Shasta Compact
Currently Offline
|
Post by WhitneyK on Sept 20, 2023 14:49:47 GMT -8
Really liking your idea on hanging the gray water tank.
|
|
newin62
Active Member
Posts: 167
Likes: 141
1962 Shasta Airflyte
Currently Offline
|
Post by newin62 on Sept 28, 2023 16:34:53 GMT -8
Got the insulation installed.  The foil covered foam is 3/4" in the walls and 1-1/16" in the ceiling. |
|
|
|
Post by Teachndad on Sept 28, 2023 19:25:27 GMT -8
This is sooo cool!
Get it? Insulation. Cool.😎
No pun intended.😆😜
Nice and tidy. Just what I have come to expect from this build.👊
Rod
|
|
newin62
Active Member
Posts: 167
Likes: 141
1962 Shasta Airflyte
Currently Offline
|
Post by newin62 on Oct 9, 2023 3:36:42 GMT -8
The street side skin went back on first so I can complete the outside plumbing and electrical connections. I installed the new city water inlet below the counter and the temperature controlled faucet for the outdoor shower right beside it. The old plumbing vent will stay the same but the side drain outlet below it will now be used as an inlet for the outdoor shower pan pump out. I won't bother drilling out the range hood vent as it didn't do much anyway and I would rather have the extra room in the upper cabinet. I'll seal the hole in the siding before I cover it with the louvered grill again.
 Street Siding Street Siding |
|
|
|
Post by Teachndad on Oct 9, 2023 5:05:28 GMT -8
The SKIN IS ON!  Peter, I noticed the clamped 2 x 4 above the front window opening. What is it's purpose? It's been there for a while. Cheers, Rod |
|
newin62
Active Member
Posts: 167
Likes: 141
1962 Shasta Airflyte
Currently Offline
|
Post by newin62 on Oct 9, 2023 5:54:44 GMT -8
I noticed the clamped 2 x 4 above the front window opening. What is it's purpose? It's been there for a while. Cheers, Rod Hi Rod, The flat memory in the curved 1/8" birch ply caused the 1x3 window header to bow out in the middle by about 3/8". I clamped the 2x4 to it to force it back. The 2x4 was slightly bowed the other way and it seems to have worked. I'm leaving the 2x4 there as long as possible before the front window is installed to hopefully prevent it from bowing back out again. Peter |
|
|
|
Post by Teachndad on Oct 9, 2023 8:42:30 GMT -8
Hi Peter,
Okay, that's what I thought. I asked because the condition you describe was similar to the crossmember above the front window of my '57 Westerner. During the demo phase, it became quite prominent once the front window was removed. The offset was much greater than 3/8", but there were also bent frame issues that were possibly adding pressure to the opening. I would think your window once installed will offer some strength to mitigate any remaining offset. I will keep your 2 x 4 concept in mind for that part of my rebuild if needed.
Thank you, and Cheers,
(Keep up the great work!)
Rod
|
|
newin62
Active Member
Posts: 167
Likes: 141
1962 Shasta Airflyte
Currently Offline
|
Post by newin62 on Oct 20, 2023 17:13:28 GMT -8
Unfortunately I was unable to reuse the curb side skins or the roof on my Shasta. The skins were badly damaged from neglect and the roof was seriously sagged in the middle. Hemet Valley will ship to Canada but the international shipping, import duties, the Canadian 13% sales tax and our 72 cent dollar make it very expensive. I was able to find a local supplier that had .025 aluminum in 4x8 sheets for $75 a sheet and I had my local HVAC shop form the seams and the breaks. Although I now have a short vertical seam above and below the door it was worthwhile compromise. The only roofing material I could find locally is the .040 thick truck body stuff. I read Wisconsin Joe's post explaining how he did it so at $35 per lineal foot I thought I would give it a try. Besides being thick, heavy and hard to bend, the biggest issue I had with using it was the lack of a seam at the ends as I didn't want to have the fasteners showing. My solution was to make a modified 3 piece S-lock which is explained below.  The vertical seams above and below the door are barely noticeable. The nice thing about the roof in a roll is that it retains the curved shape and hugs the roof without any strapping on it yet. The hard part was unrolling it that way.  To make the S-lock I folded 1" over on a 3" strip of scrap aluminum.  I folded 1"on the ends of the roof metal as well and inserted the folded strips which gave me a 1" nailing flange.  I then sandwiched the seam between two blocks of hardwood and clamped it in several places to flatten it and lock it together.  This is what the completed seam looks like with the lower panels inserted. It doesn't have the customary ridge but it's nice and neat with no fasteners showing.  This is the folding tool I used. It does 1" on one side and 3/8"on the other. The fold took a bit of persuasion and all of my weight to get the folds flat. I folded the ends of the roof while it was on the floor so I could put all of my weight into it. |
|
WhitneyK
Active Member
Posts: 492
Likes: 169
'67 Shasta Compact
Currently Offline
|
Post by WhitneyK on Oct 20, 2023 19:02:35 GMT -8
To make the S-lock I folded 1" over on a 3" strip of scrap aluminum. I folded 1"on the ends of the roof metal as well and inserted the folded strips which gave me a 1" nailing flange. I then sandwiched the seam between two blocks of hardwood and clamped it in several places to flatten it and lock it together. This is what the completed seam looks like with the lower panels inserted. It doesn't have the customary ridge but it's nice and neat with no fasteners showing. This is the folding tool I used. It does 1" on one side and 3/8"on the other. The fold took a bit of persuasion and all of my weight to get the folds flat. I folded the ends of the roof while it was on the floor so I could put all of my weight into it. That seam lock is a great idea Peter. Thanks for passing that along. I used the same .040 aluminum on my TD build and it is more than a little difficult to manipulate. Whitney |
|
newin62
Active Member
Posts: 167
Likes: 141
1962 Shasta Airflyte
Currently Offline
|
Post by newin62 on Oct 29, 2023 1:47:15 GMT -8
Three hundred screws later, the awning rail and J-rails are installed. Spent the better part of an afternoon sanding all the paint off but they were in very good condition. Except for the windows it's now waterproof.  After reading all of the dire warnings about fridge ventilation, I decided to use new fridge vents as the original upper was only a thin strip with very few narrow openings in it. Although I have a Norcold fridge, I used Dometic vents as I was able to adapt the openings to them with less effort. They should blend in better once painted with the rest.  Street side J-rail.  The new threshold is made from .040 aluminum and the rest of the door jamb is made from .025. I installed both the aluminum and wood jamb with screws only as the right side wood jamb would need to be removed if I ever need to get the fridge out. |
|
newin62
Active Member
Posts: 167
Likes: 141
1962 Shasta Airflyte
Currently Offline
|
Post by newin62 on Nov 15, 2023 15:41:51 GMT -8
I have been working on a bunch of little things which seem to take more time than the bigger things.  I managed to fit the water tank, battery, shore power inlet, 110 volt breaker box, 12 volt fuse panel, power converter and battery shut off switch under the street side dinette bench. On the right side is the 20 amp cigar plug so it is handy to the dinette table. The lead acid battery is temporary so I can get up and running while I decide which LiFePO4 battery to buy. The elbow on the top left side of the water tank is the vent. I'm still trying to figure out where to run it to.  New entry door with a proper mortise for the latch and foam insulation this time.  The original screen door cleaned up really nice. I installed new screens using the original splines which were still soft and pliable.  The Bargman door latch cleaned up nicely as well.  The grab handle is new. I got it from VTS about 5 years ago when they bought up the Shasta reissue parts.  Got a new stainless steel door retainer clip from VTS. I looks just like the original without all the rust!  The big front window is finally in. The fixed pane on the right was broken and I'm still waiting on glazing tape from VTS.  I was able to reuse the aluminum trim that goes around the large front window. The wood was so rotten up front that the nails came out without bending the metal. Unfortunately the rest of the window trim didn't do that well so I made new trim for all of the other windows with a bench top metal break. The interior light fixtures have 12 volt warm white Edison style LED bulbs in them. A sample of the curtain fabric is on the table.  USB and USB-C phone and computer charger with a switch beside it to turn it on.  New home made aluminum trim around the rear windows.  The Fantastic Fan and all the wood trim strips covering the seams are installed. Except for the fixed side dinette windows and the curtains I'm now done inside. |
|


/Campers/67%20Shasta?preview=2019-02-03+18.01.00.jpg)

