John Palmer
Senior Member
 Hi, From a vintage trailer guy located in Santa Ana, CA. It's good to see lots of activity here.
Posts: 1,625 
Likes: 575
Currently Offline
|
Post by John Palmer on Sept 18, 2020 14:23:46 GMT -8
If you use two layers of 3mm Birch, you will not need to go through all of the magic.
I've bent 3mm Birch down to a 4" radius with steam, water, and tie down straps for a round corner closet wall.
The problem you have bending modern plywood is they use all different kinds of crap as the filler ply's. and this causes the irregular stress points.
I'm not sure that all of the normally accepted carpentry practices translate directly to trailer building. I would not use kerfing on plywood. I would not use veneer on a trailer.
John
|
|
|
|
Post by vikx on Sept 18, 2020 19:59:15 GMT -8
Almost all of my trailers seem to have veneer but also good quality plywood. It's hard to find decent wood anywhere these days.
|
|
|
|
Post by wisconsinjoe on Sept 19, 2020 6:13:04 GMT -8
I have consistently found quality 2x lumber by searching stacks of PRE-CUT studs (8, 9, and 10 footers) that are actually shorter to accommodate top and bottom plates. Not as many non-professionals use these and they don't get picked through as much. And because they are geared to pro builders, I suspect that manufacturers attempt to use better lumber there. The higher price is not that much more, so it always seems good to me.
The lumber I've been using on the build is almost all clear and either quarter sawn or rift sawn. About 70% of the boards in the stack were that way.
|
|
John Palmer
Senior Member
Hi, From a vintage trailer guy located in Santa Ana, CA. It's good to see lots of activity here.
Posts: 1,625
Likes: 575
Currently Offline
|
Post by John Palmer on Sept 19, 2020 18:23:08 GMT -8
Almost all of my trailers seem to have veneer but also good quality plywood. It's hard to find decent wood anywhere these days. Yes, old wood it always much nicer than anything we can buy today. I realize that all plywood is really just veneer. What I have a problem with is applying a new sheet commercial purchased veneer and applying it to a door, drawer face, or a curved corner cabinet. It looks just perfect when its finished, then in a short time it starts to pucker up, and develop bubbles. I think it's a problem with the glue layer between the backer (paper/cardboard?) and the veneer. I did a closet wall, left it in my shop, and within a week it puckered. My friend had the same issue on his round corner cabinets. The moisture and drying cycles inside a travel trailer are very extreme, compared to building a cabinet that will live inside a climate controlled home. John |
|
|
|
Post by vikx on Sept 19, 2020 20:23:46 GMT -8
I tried that type of veneer and had the ripples. Very disappointing.
Joe, I can move the veneer discussion to a new thread if you like...
|
|
|
|
Post by wisconsinjoe on Sept 21, 2020 5:04:51 GMT -8
I tried that type of veneer and had the ripples. Very disappointing. Joe, I can move the veneer discussion to a new thread if you like... You can leave it here with the rest of my unconventional stuff. I will soon be posting pics of my first piece of kerfed plywood applied to the trailer. It went well, no cracks, smooth bend. |
|
|
|
Post by wisconsinjoe on Oct 2, 2020 19:23:33 GMT -8
I've had a fruitful couple of weeks where I blocked out a bunch of time to work on the camper. I've been thinking of this project for several years. Actually, ever since I opened up the roof on our vintage Friendship Vacationaire and noticed the original construction methods. I have to admit that I was pretty shocked to see "bad engineering" with roof rafters being only rough cut 1x3s laid on the flat side. Of course they were deeply sagged. After sistering on new straighter ones, I got it into my mind that surely I could design and build a better engineered version. Now its time to put up or shut up. But once I really got into this project, I've gained much appreciation for the general design of such an efficient living space in such a small footprint. Nevertheless, I did think there was room for improvement. I'd start with the roof. Instead of 1x rafters, I'd use 2x2s. And, I'd reinforce them with aluminum. I scored on Craigslist some 1.5 x 1.5 (quarter inch thick) aluminum box channel that I sistered onto the 2x2s. I was amazed at how much stiffness it added to the 7 foot span of 2x2. Wishing I had more of that material, I returned to the metal recycling business for more and discovered some much lighter (1/8 inch walled) open channel. I sistered some of this onto the 2x2s either on both sides or just one, depending on where I thought I needed more strength. I found that gave nearly the same impressive stiffness as using the heavier and more expensive box channel. The other thing I did was laying out the straight run of roof rafters as a complete unit, rather than setting rafters and filling in between with "curbing." I used a 2x2 on each side with notches cut 3/4" into the "curb rail" and screwed the whole thing together as a unit. You can see it suspended from the shed rafters in the picture as well as temporarily clamped in place, where I could mark with tape inside to show placement of the rafters for laying out the screws once the ceiling material is put in place.  20201002_213027 20201002_213027 by Joe Mirenna, on Flickr  20201002_213242 20201002_213242 by Joe Mirenna, on Flickr |
|
|
|
Post by wisconsinjoe on Oct 2, 2020 19:47:26 GMT -8
Another thing I realized when designing this from scratch is that framing should not necessarily run vertically as house stud wall construction is done. Rather, it makes more sense to have as much horizontal framing to stiffen up the wall that is longer than tall. That's why I used 3" wood horizontally and 1.5 inch (2x2) wood vertically where plywood sheets join or at the sides of windows. The curve framing baffled me until I realized I could gain some strength triangulation by cutting from wider 2x material. The upper curves needed something wider so I glued some trimmed down 2x6 ears and connected them into a continuous wider unit with 3/4 inch plywood. That will give me a place to mount marker lights and a channel to run wiring to them through the wall. All of this was done by starting with a full size drawing on taped together sheets of plywood. From that I was able to make smaller templates to be able to accurately copy each of the four curve framing pieces. BTW, those templates are going to come in handy as I build in the shop separate "rafter panels" to accommodate the runs around the four curves and the two shorter straight sections of front and rear.That's my next task. Here are some pics showing the installation of the front and back bulkhead cabinets. I like how they add considerable strength and stiffening like a truss beam. You can also see the first sheets of curved paneling at front and rear, created by accurately kerfing the back side of the 1/4 inch pre-finished birch plywood. Although the kerfing (at one inch intervals) does show a bit of "faceting" in side reflecting light, for the most part you notice the smooth curve. Because of that success, I decided to run that material as the ceiling, like most vintage campers. Originally I thought I'd use a long sheet of painted aluminum because the bend would be simple. But once I figured the extra expense compared to the plywood ($25/sheet), and seeing the kerfing success of the lower sheets, I decided to go with the kerf bent plywood. Plus, the steepest curves will be hidden behind the front and rear bulkhead cabinets in case any problems show up.  20201002_213204 20201002_213204 by Joe Mirenna, on Flickr  20201002_145430 20201002_145430 by Joe Mirenna, on Flickr  20201002_145306 20201002_145306 by Joe Mirenna, on Flickr |
|
|
|
Post by wisconsinjoe on Oct 2, 2020 20:23:41 GMT -8
As a builder of everything in a house from rough framing to finish work, I appreciate how these campers are built from the inside out, meaning the cabinetry comes early. I also love how the cabinets are integral to the strength, adding stiffness and squareness to a basic long box on wheels. There is beauty in the timeless design of placing the heavier kitchen and pantry/storage unit in front of the wheels in order to keep the trailer from waving sideways when towed. These cabinets are made with walnut face frames and birch side walls. Normally I’m not a big fan of contrasting woods, but in this case I like how the face frames mimic structural post and beam work, because in many ways each of those cabinets add considerable overall strength. Because I’m always looking for efficiency, I designed the pantry cabinet to have multiple doors on two adjacent sides. Facing the dinette there will be a set of rather shallow shelves for food and other items. I’m a fan of shallow cabinets because things don’t get lost in the back easily. On the other hand, I’m left on the adjacent side with deep shelving and a narrow front. However, that was designed for each of the 6 shelves to hold two plastic baskets of a standard size found at Target and other places. With our Friendship Vacationaire, we found those baskets the easiest way to organize our personal belongings.  20201002_145533 20201002_145533 by Joe Mirenna, on Flickr  20201002_145610 20201002_145610 by Joe Mirenna, on Flickr  20201002_145640 20201002_145640 by Joe Mirenna, on Flickr Now I'm ready to add the gimp to the rest of the trailer and complete the ceiling and rafter assembly. Soon its going to look like a real camper. And then, it's off to designing a bed system and building the remaining kitchen base cabinet to hold the stove and refrigerator. BTW, we are NOT installing a sink and water system. Why? Because we like CAMPING. We do dishes and wash up outside the trailer, as well as doing most of our cooking there. I won't finish before the snow flies, but the trailer is well protected from elements in the shed. A lot of finish work (doors, drawers, etc) can be done in the shop. And wiring and insulating can be done in cold weather without too much suffering. Hope to skin it come spring. |
|
John Palmer
Senior Member
Hi, From a vintage trailer guy located in Santa Ana, CA. It's good to see lots of activity here.
Posts: 1,625
Likes: 575
Currently Offline
|
Post by John Palmer on Oct 2, 2020 20:35:44 GMT -8
Before you get too far along with your project. you might want to figure out where you want to mount your side clearance lights. Run a router up the outside of that thick corner wood give yourself a slot to run the 14ga hot and ground wires, and then prewire your lights. After you run the wire, just use some duct tape to hold it in place until you get to the new siding step.
John
|
|
|
|
Post by wisconsinjoe on Oct 3, 2020 7:11:10 GMT -8
Thanks John. The clearance lights will mount on the 3/4 inch plywood pocket-screwed to the outer plane of the curved framing. I have a 3/4 inch wall chase for the wiring. But I like the idea of routering a channel if I have a problem getting wires from side walls to the roof plane. Just don't want Tu o drive a J-rail screw into it.
|
|
|
|
Post by wisconsinjoe on Oct 12, 2020 6:07:38 GMT -8
With the rest of the ceiling ready to go on, I just needed apply the gimp. That is one of the great little details that make these campers look so cool. It's really just a trick to hide the imperfections when fitting curves, but it's so satisfying. However, there is a learning curve. In the sharp corners where a 90 degree is met, I had to miter the end cuts. However, it's difficult to get it right. The mitered seam looks clean when applied, but when the ceiling pushes down on it, that gap opens up. I bet the pros here know instinctively how to to "undercut" the miter so it seams nicely when compressed. It's a minor imperfection that I can live with. My more success gimp story is fitting it on rounded corners. I made my face frames with radius corners specifically with gimp in mind. And, wow, it finishes it out nicely.  20201008_173307 (1) 20201008_173307 (1) by Joe Mirenna, on Flickr 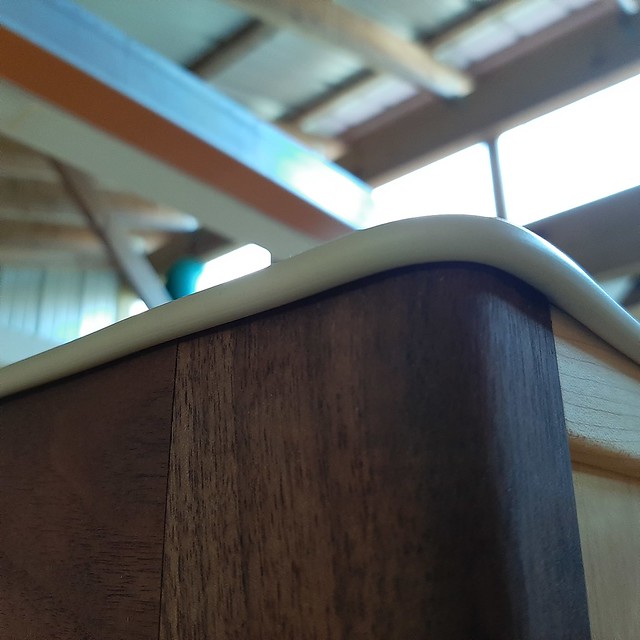 20201008_173254 (1) 20201008_173254 (1) by Joe Mirenna, on Flickr  20201012_084914 20201012_084914 by Joe Mirenna, on Flickr |
|
|
|
Post by wisconsinjoe on Oct 12, 2020 6:34:14 GMT -8
FINALLY,I'm ready for my ceiling. I started with the two easy flat sections, stapling them to the side wall framing. Then, I lowered my rafter assembly and clamped in place before pre-drilling and screwing solidly in place. I waited to attach the end parts though because I wanted to slip the curved ceiling panels under that framing. So, I just placed a temporary shim to leave room. Once the panel is in place, the shim is removed and the panel is safely captured.  20201010_111707 20201010_111707 by Joe Mirenna, on Flickr  20201010_120708 20201010_120708 by Joe Mirenna, on Flickr  20201010_120544 20201010_120544 by Joe Mirenna, on Flickr I finished two of the four curved section rafter assemblies. Here are the lower front and back ones clamped in place and ready to be screwed to the framing.  20201011_154847 20201011_154847 by Joe Mirenna, on Flickr  20201011_155130 20201011_155130 by Joe Mirenna, on Flickr Now I was ready for the final curved ceiling sections. Fortunately I have plenty of workshop clamps and a buddy helper for this task. BTW, I'm going to make a separate thread about kerf bending, since it's kind of a controversial topic. Before the day ended, we popped in the door, using a minimum of screws. I want to be able to seal this up to keep vermin out and heat in while I continue working over winter. I registered the door solidly to the hinge framing so I'll be able to relocate screw holes after the skin is applied in the spring. 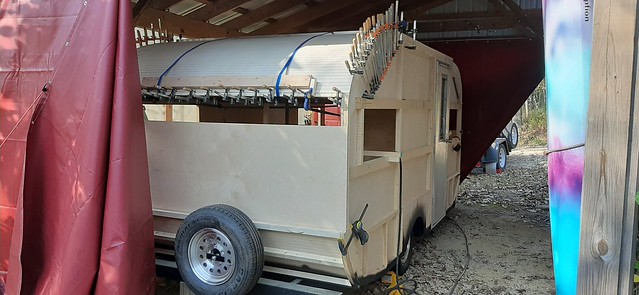 20201011_154629 20201011_154629 by Joe Mirenna, on Flickr 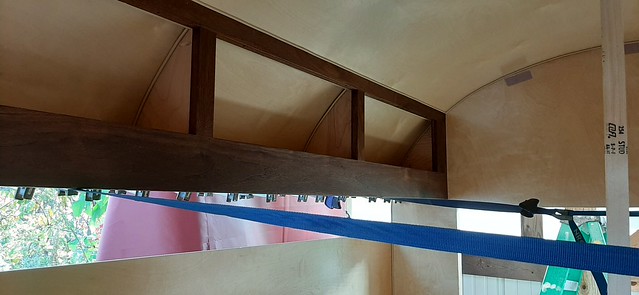 20201011_154646 20201011_154646 by Joe Mirenna, on Flickr  20201011_154813 20201011_154813 by Joe Mirenna, on Flickr |
|
John Palmer
Senior Member
Hi, From a vintage trailer guy located in Santa Ana, CA. It's good to see lots of activity here.
Posts: 1,625
Likes: 575
Currently Offline
|
Post by John Palmer on Oct 12, 2020 8:55:43 GMT -8
Joe, It's looking better all the time.
Your going to have a tough time fitting the metal skin around the frame tongue, and the large roll under of the body. Remind me when you get close to skinning the front, and we can discuss it.
Basically you have two options, make a tight fit (requires a templet), or a loose fit with a "U" shaped cover cap. You have several compound angles to deal with at that step. Even with a templet cut, you need to slide the bottom in first, then buckle the metal under to fit in the front "S" lock seam.
John
|
|
|
|
Post by vikx on Oct 12, 2020 10:58:36 GMT -8
Here's one solution:
<a data-flickr-embed="true" href="https://www.flickr.com/photos/53634851@N03/50463175012/in/dateposted-public/" title="004 j Birdie Half Moons (1)"><img src="https://live.staticflickr.com/65535/50463175012_bedacbe134_z.jpg" width="640" height="480" alt="004 j Birdie Half Moons (1)"></a><script async src="//embedr.flickr.com/assets/client-code.js" charset="utf-8"></script>
<a data-flickr-embed="true" href="https://www.flickr.com/photos/53634851@N03/50463174947/in/dateposted-public/" title="004 j Birdie Half Moons (2)"><img src="https://live.staticflickr.com/65535/50463174947_884c2f1155_z.jpg" width="640" height="480" alt="004 j Birdie Half Moons (2)"></a><script async src="//embedr.flickr.com/assets/client-code.js" charset="utf-8"></script>
<a data-flickr-embed="true" href="https://www.flickr.com/photos/53634851@N03/50463174792/in/dateposted-public/" title="004 j Birdie Half Moons (4)"><img src="https://live.staticflickr.com/65535/50463174792_916ea917bd_z.jpg" width="640" height="480" alt="004 j Birdie Half Moons (4)"></a><script async src="//embedr.flickr.com/assets/client-code.js" charset="utf-8"></script>
|
|


