|
|
Post by wisconsinjoe on Oct 12, 2020 17:38:56 GMT -8
That's a good idea John. In anticipation of that very problem, I thought I would simply create a very short piece that would start low (below the leading edge of floor plywood), rise up above the tongue and could be stapled in place. Then, my first real sheet of skin would rest flush to the tongue top, and be screwed to the framing and through the starter strip.
|
|
John Palmer
Senior Member
 Hi, From a vintage trailer guy located in Santa Ana, CA. It's good to see lots of activity here.
Posts: 1,625 
Likes: 575
Currently Offline
|
Post by John Palmer on Oct 12, 2020 19:55:20 GMT -8
That's a good idea John. In anticipation of that very problem, I thought I would simply create a very short piece that would start low (below the leading edge of floor plywood), rise up above the tongue and could be stapled in place. Then, my first real sheet of skin would rest flush to the tongue top, and be screwed to the framing and through the starter strip. We like to work from the middle of the roof skin out towards the ends, so any alignment error is minimized 1/2 on each end. If you start at one end you have to be very accurate to make sure you have any metal at the other end to bend over. John |
|
|
|
Post by vikx on Oct 12, 2020 21:19:08 GMT -8
I use the window pieces (on the side) to adjust for height. The roof goes on first, then the bottom front is tacked in place. A concise measurement is made and the window pieces cut accordingly. Gives several inches adjustment leeway.
Also, the bottom of the metal is curved under the last cross board so that it fits perfectly. I always screw the front and back bottom metal. That makes the attachment very secure.
|
|
|
|
Post by wisconsinjoe on Oct 13, 2020 6:37:38 GMT -8
I plan to copy the way the Friendship Vacationaire was built. That is, they didn't use hidden Pittsburgh joints on the skins. Rather, they just screwed in a nice even line from the outside. When we refurbished the camper with new paint, I replaced every (rusty) screw with a shiny new stainless steel one. Kinda like the industrial look.
Similarly, the roof plane was screwed so that first the back and front pieces were installed, and THEN the roof pieces overlapped the tops of those front/back pieces, and were screwed with putty tape to seal. We replaced that roof with a single piece of aluminum when we removed the old one to repair the one tiny bit of rot we found, adding a Fantastic Fan, and better insulation.
Planning to install basically the same way, except I want to use the over-the-edge roof system and J-Rail instead of the flush cut roof metal and the top screwed/putty-taped rail system of the original.
|
|
sawset
Junior Member

Posts: 72
Likes: 28
1958 Mobile Scout
Currently Offline
|
Post by sawset on Oct 14, 2020 16:32:45 GMT -8
The lapped seams I have seen had a very sticky adhesive between the flat surfaces. Not sure what you would use today, but it looked like some kind of Butyl Tape. Maybe worth checking: 3m weatherban 5354 Butyl rubber tape I found three sources that sell by the roll. The rest were by the case. Seems like comercial quality used by glaziers and other industrial purposes. Many positives on their spec sheet. Rshughs Graingers |
|
WhitneyK
Active Member
Posts: 492
Likes: 169
'67 Shasta Compact
Currently Offline
|
Post by WhitneyK on Oct 18, 2020 7:22:55 GMT -8
I know it's a little late Joe, but you did cut 2 of everything so you could save one as a pattern when you go into production?  Right? |
|
|
|
Post by vikx on Oct 18, 2020 10:27:58 GMT -8
Whitney, snide remarks aren't allowed...
Didya cut two??
|
|
|
|
Post by wisconsinjoe on Oct 18, 2020 20:48:41 GMT -8
I know it's a little late Joe, but you did cut 2 of everything so you could save one as a pattern when you go into production? Right? After redrawing and working out details of my design full scale on 4 taped together pieces of luan plywood, I traced with drafting paper the complex four different curve pieces (...3 others are flat planes). Made a luan pattern of those four and then final fabrication in twos. Careful measurement helps keep truer parallel shaped sides. Also used those same patterns to make new patterns for the curbing edges (or plates, as a carpenter might call those side "wall panel" connectors of "rafters/horizontal wall studs" or whatever the structural cross members are called. For the curved plates, actually cut 4 each from 5/8 plywood, glued/tacked/clamped in pairs. At 1-1/4", curb and rafters sit on bearing of wall/interior skin. There were four curved and three straight panel frames made (all identical width obviously), and each placed after interior wall skin stapled on. Been maintaining a 1/8" margin of error in opposing target lines for assembly. I'm going to post more pics of one of the curved sections after I complete it and install it soon (... tomorrow?). |
|
|
|
Post by wisconsinjoe on Oct 29, 2020 16:28:03 GMT -8
With cold weather coming on strong, I made a push to get the rest of the interior skin on with the rafters and curbing sections installed. All I had left was the two flat rear and front sections and the two top curved ones as well. I had glued up doubled 5/8 inch plywood curbs for the curved pieces that would allow both the curbing and rafters to sit on the 1-1/2 inch walls (with glued on 1/4 plywood finished interior). I found that my sheet cutting table made a great assembly stand for the curved sections that could easily be supported and clamped for assembly. 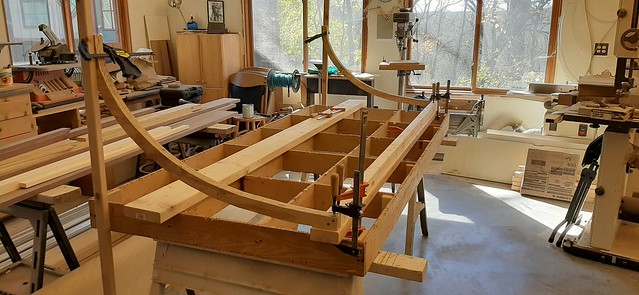 20201015_121831 20201015_121831 by Joe Mirenna, on Flickr  20201015_122958 20201015_122958 by Joe Mirenna, on Flickr  20201020_142812 20201020_142812 by Joe Mirenna, on Flickr Where I wanted some extra support and stiffness I sistered on either box or channel aluminum with screws spaced one foot on center. The flat sections were easier to build. I added in pocket hole screwed 3/4 inch plywood to house the tail and license plate lights, which would give a chase to run wiring in the insulated space between interior wall and exterior aluminum skin.  20201016_160210 20201016_160210 by Joe Mirenna, on Flickr Then it was pretty easy to set and clamp those sections in place, and screw them to the walls.  20201020_154104 20201020_154104 by Joe Mirenna, on Flickr Here is the last section ready to get dropped in place.  20201021_153804 20201021_153804 by Joe Mirenna, on Flickr I was kind of surprised how well everything fit. I was never off more than 1/8 inch from my target marks on the side of the walls. The only thing I'm worried about is there is a slight bowing up on the upper curved sections. If I sight along those "straight" sections of aluminum box tube, I can definitely see a curve, perhaps as much as a quarter inch as the kerfed finished ply wants to push up. Hope that doesn't cause disaster when attaching the roof skin. I'll be bringing that skin only as far as the tops of the front and back windows, so I hope the compound curve doesn't have far to cause problems. Yet another thing to figure out as it arises. It felt great to get the interior screwed to the rafters and all the windows covered in plastic to keep space heat inside. |
|
|
|
Post by wisconsinjoe on Oct 29, 2020 16:39:08 GMT -8
Next task is to get the finished floor down. I wish I had done that first, before the supporting interior walls and closet. But, we just couldn't agree on the material. After shopping and searching, we settled on the least expensive product that fit the colors of the soft interior surfaces. I'll be cutting down the foot square tiles to 10x10 and gluing down over a 1/4 inch ply base. Then it's going to look like a lot of interior finish work, my favorite part.  20201026_134131 20201026_134131 by Joe Mirenna, on Flickr  20201026_133814 20201026_133814 by Joe Mirenna, on Flickr The material is made by Armstrong. I like that the color goes all the way through the material. I'll be making a checkerboard pattern with a medium gray and the Colorado blue that will go well with the turquoise dinette seat fabric. |
|
John Palmer
Senior Member
Hi, From a vintage trailer guy located in Santa Ana, CA. It's good to see lots of activity here.
Posts: 1,625
Likes: 575
Currently Offline
|
Post by John Palmer on Oct 29, 2020 16:52:39 GMT -8
Joe, it's really looking good.
I would kill to have a shop like yours to turn big pieces of wood, into saw dust. Need a helper?
John
|
|
|
|
Post by wisconsinjoe on Oct 30, 2020 3:32:48 GMT -8
Uh... There is a slight weather difference between S California and Wisconsin. Sure about that? But yes, I do love my shop.
|
|
|
|
Post by wisconsinjoe on Nov 3, 2020 10:20:56 GMT -8
Got the VCT tile floor in. I was a bit anxious as always when attempting a new thing. These tiles are extremely affordable, so I see why they are a perfect choice. I cut the 12" tiles down to 10 inches on the table saw, which worked perfectly. Two things I recommend for this operation. First, always use a zero clearance blade insert AND a riving knife/splitter to prevent dangerous kickbacks. Second, use a pushboard to have a solid backup as the workpiece finishes through the blade. On a few first cuts without the backer, I noticed that the blade chipped out a tiny bit, leaving an unacceptable hole at the junction points of four tiles.  20201103_110559 20201103_110559 by Joe Mirenna, on Flickr I precut every piece and placed them on the quarter inch underlayment stapled to the plywood floor, and also filled cracks with spackle. Since it's been chilly, I had been running a space heater to keep the temperature in the 60s inside the camper. However, after spreading the adhesive and waiting for it to dry to readiness, I was dismayed that I was running out of light to install the tiles. After 5 hours, it STILL was not ready (when the yellow opaque adhesive turns clear and doesn't stick to your fingers). So, I simply waited until morning, and then 30 minutes later, the floor was in. That had to be the easiest and least smelly floor I ever put down. And cheap too!  20201103_110706 20201103_110706 by Joe Mirenna, on Flickr The basket weave pattern should go nicely with the turquoise dinette fabric. The Armstrong color Colorado Blue is actually more turquoise than the pic shows. The gray should compliment the aluminum and stainless steel hardware that will finish off the cabinets. The other thing I got done was milling up some strips of birch to cover interior plywood seams. This was the first time working with birch, and I found it to be very pleasant. It machines and sands easily. I did notice a lot of color variability. The first batch of strips came out pretty dark, so I picked a more blonde board and milled more. I just slapped on the second of four coats of one of my favorite finishes: MinWax Wipe-On Satin Poly. You can get two coats on per day, and there is never any drips to remove later. You'd think it was a spray lacquer.  20201103_110405 20201103_110405 by Joe Mirenna, on Flickr  20201103_110526 20201103_110526 by Joe Mirenna, on Flickr |
|
57 Trotwood
Active Member
Posts: 128
Likes: 67
Currently Offline
|
Post by 57 Trotwood on Nov 3, 2020 12:03:42 GMT -8
Will you be boxing in the wheel wells will plywood or just build you cabinets over and around them?
|
|
|
|
Post by wisconsinjoe on Nov 4, 2020 6:08:19 GMT -8
Will you be boxing in the wheel wells will plywood or just build you cabinets over and around them? I'm just building cabinets and bed around the wheel wells. That's how the Vacationaire is done, and I don't see the point in adding weight where it's not needed. I'll be posting some pics when I get the bed assembly done. |
|


/Campers/67%20Shasta?preview=2019-02-03+18.01.00.jpg)


