|
|
Post by wisconsinjoe on Sept 6, 2020 20:29:18 GMT -8
Gary, I believe I ran a bunch of pics and it's story in a previous post. Perhaps in a thread about "winter storage." We got our Friendship Vacationaire without forethought about storage (... a passion purchase). I suffer from CBS (compulsive builders syndrome) so built this before its first winter. There is a covered patio added as part of its structure. Great extra place to hang out on our property.
|
|
|
|
Post by wisconsinjoe on Sept 6, 2020 20:31:24 GMT -8
Please delete this post. I accidentally doubled my info from a previous post, but don't know how to delete this one.
|
|
Getnold
Active Member

Posts: 142 
Likes: 78
1957 Westerner Pony Express
Currently Offline
|
Post by Getnold on Sept 7, 2020 3:36:12 GMT -8
I've also removed leaf's from the spring packs so I can bottom out the suspension. Just be aware that what looks good on Jack stands might not be so good with weight on the axle I'm not sure what this means. Why would you want the suspension to bottom out? How do you know what size tire is the right size tire? Mine came with a certain size but I have no idea if they are what the manufacturer had on it originally. Also, I have a ton of leaves and a truck repair facility said don't change a thing. But I doubt it's factory. |
|
|
|
Post by wisconsinjoe on Sept 7, 2020 7:47:20 GMT -8
I had new wheel wells made at a local sheet metal fabricator (only $75 for the pair). The original axle was fitted with new wheel hubs and electric brakes, and I bought new aluminum wheels and radial trailer tires. BTW, I'm not trying to be completely vintage authentic. I'm using the best materials I can find with the lowest maintenance. I did cut out my opening in the wheel wells, jacked up the trailer, and removed a tire to see if I had clearance to remove it.
|
|
azshastanut
Active Member
Posts: 279 
Likes: 82
1957 Kenskill 16T
Currently Offline
|
Post by azshastanut on Sept 7, 2020 8:39:00 GMT -8
Thanks for the reminder on the photos. I remember when you first posted them and how impressed I was with what you had done.
|
|
ruderunner
Active Member
Posts: 471
Likes: 97
Currently Offline
|
Post by ruderunner on Sept 7, 2020 13:45:26 GMT -8
I've also removed leaf's from the spring packs so I can bottom out the suspension. Just be aware that what looks good on Jack stands might not be so good with weight on the axle I'm not sure what this means. Why would you want the suspension to bottom out? How do you know what size tire is the right size tire? Mine came with a certain size but I have no idea if they are what the manufacturer had on it originally. Also, I have a ton of leaves and a truck repair facility said don't change a thing. But I doubt it's factory. I'm only bottoming out the suspension during the build. Well, with the condition of roads in my area, there's a good chance of a bottom out at speed too. Better to know there's plenty of wheel well clearance while it's stationary. Removing the leaves is just a temporary thing. As for how I know my trailer is currently over tired, I have the original owner manual. As for what's original for yours? I don't know, others here can probably tell you though. |
|
|
|
Post by wisconsinjoe on Sept 8, 2020 5:04:27 GMT -8
Pretty excited getting the second wall on the trailer, thanks to two buddy helpers. Here is the wall all clamped up and waiting until morning to trim rout the plywood panels. Note the full scale template on the floor below (on which it was built from direct measurements).  20200906_194349 20200906_194349 by Joe Mirenna, on Flickr A closer look at the trailer bed plywood with wheel wells installed.  20200907_184154 20200907_184154 by Joe Mirenna, on Flickr Got her in the shed and tacked in place.  20200907_184255 20200907_184255 by Joe Mirenna, on Flickr A closer look.  20200907_184526 20200907_184526 by Joe Mirenna, on Flickr The task today is to build the main flat 8 foot section of roof rafters. I'll make it as a frame of 2x2s that will sit on top of the ceiling skin. Once installed, I'll sister in some 2x2 (1.5") aluminum tubing for added strength. BTW, I'm opting for using painted aluminum for the ceiling that will extend around the top curves. It is more easily available than 1/8" plywood and at 0.40 thick, quite a bit stronger. And really not too expensive. I want this to feel light and modern inside, and think it will go well with the light pre-finished birch plywood walls. I will use the plywood coming around the lower curves and up past the windows. I'll have to kerf the backside to bend around the curves, but fear it may still not bend nicely. At least that will be out of sight on the bottom area. |
|
oakback
Active Member
Posts: 263
Likes: 55
Currently Offline
|
Post by oakback on Sept 8, 2020 5:11:15 GMT -8
Thanks WhitneyK and oakback. Still have a lot of work to do before getting the title. Would like to see pics of your scratch builds. Are they posted at this site? There's a link in my signature, click "build thread". Your build is looking great! |
|
|
|
Post by wisconsinjoe on Sept 9, 2020 11:29:56 GMT -8
oakback, I just went through your build post. This is a ridiculous amount work and detail, isn't it? I'm encouraged by your weigh-in at 2,600 pounds. Our original Vacationaire was listed at 1,900 pounds. I'd be delighted if ours comes back under 3K.
I'm plugging along on mine. Thanks for looking.
|
|
oakback
Active Member
Posts: 263
Likes: 55
Currently Offline
|
Post by oakback on Sept 10, 2020 4:57:46 GMT -8
oakback, I just went through your build post. This is a ridiculous amount work and detail, isn't it? I'm encouraged by your weigh-in at 2,600 pounds. Our original Vacationaire was listed at 1,900 pounds. I'd be delighted if ours comes back under 3K. I'm plugging along on mine. Thanks for looking. Thanks! It sure is difficult trying to plan and know exactly where everything will end up being, before you can take the first few steps. If you're anything like me, you end up spending about as much time planning as doing. I've been thinking about upgrading our 3,500 axle to something stronger (and modern, more lugs, new brakes). We don't currently have onboard water or waste tanks, and if I were to add those, I think we would be close to our limit once loaded with gear. |
|
|
|
Post by wisconsinjoe on Sept 10, 2020 5:14:37 GMT -8
I had new wheel hubs installed on the old Jayco frame, with new electric brakes. I wanted modern aluminum (lower maintenance) wheels. I'm not planning to put in a water system. We found we never do dishes in the small sink in the Vacationaire. We have an outdoor system that is efficient. We realize that we are CAMPING, not house living. Similarly, we won't have a toilet or shower. We will have a "pea bucket" porta-pottie that will stash under a dinette bench. To us, the camper is a glorified tent with a dry bed, a place to sit inside (especially in bad weather) and a place to do a little cooking.
|
|
supermerle
Member
No matter where you go, there you are.
Posts: 47
Likes: 6
1964 Shasta 1500
Currently Offline
|
Post by supermerle on Sept 12, 2020 11:25:08 GMT -8
Looking good. I wish I'd have went your way during my build. keep the pic's coming!
|
|
|
|
Post by wisconsinjoe on Sept 13, 2020 6:44:10 GMT -8
Got tarps on the shed open ends, so getting ready for cold and wet weather. Now in the shop making cabinet carcasses. So interesting that the process calls for finish level work so early. By the time the ceiling goes on, I'll be well on my way.
Will have shop work pics coming soon.
|
|
|
|
Post by wisconsinjoe on Sept 18, 2020 7:35:12 GMT -8
I've been in the shop lately. I experimented with kerfing the backside of my prefinished birch 1/4 inch birch plywood until I could bend it around my profile without cracking or faceting.  20200912_141008 20200912_141008 by Joe Mirenna, on Flickr  20200912_141025 20200912_141025 by Joe Mirenna, on Flickr Now, I know that Larry advised against this practice, saying it would crack. But, I really wanted to use this particular plywood. I'm going to use it on the lower front and back areas so any imperfections would be hidden. I tried several depths and spacings until I found something that works. I mocked up a bend the same as my steepest on on the camper and clamped up to find my limits. I think the secret to this is to do the kerfing not on a table saw, but with a track saw. With the table saw, it is impossible to force the sheet evenly down onto the table and blade. With the track saw, you push the portable circular saw down onto the sheet. I made a flat cutting base for this purpose, and I'll describe it in detail in the "tool" section. |
|
|
|
Post by wisconsinjoe on Sept 18, 2020 7:44:58 GMT -8
Also in the shop I made the front and rear wall cabinets. I used walnut for the face frames because I had a bunch of it and some was milled from our property. I like that wood from Primrose Township Wisconsin is being used in our Primrose Vacationaire. The bottom rail is wider to accommodate space to visually hide and for wiring undercabinet lighting. They are built a bit heavier than what is in the original Vacationaire, but I like how they will add strength like a beam to the front and back. Right now I'm waiting for the Watco oil/varnish finish to cure before waxing. That is the finish I use on fine furniture, and I like it because it is super easy to repair if damaged. It is penetrating rather than a surface finish. 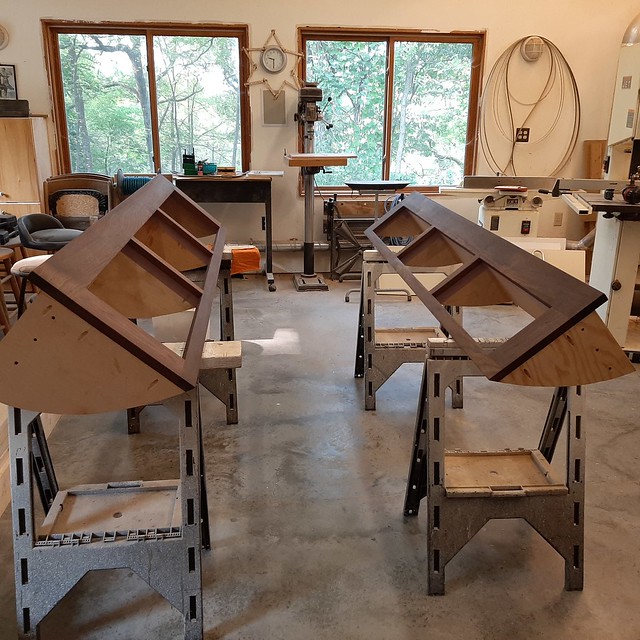 20200916_092946 20200916_092946 by Joe Mirenna, on Flickr |
|


