pdalber
Junior Member

Posts: 75 
Likes: 37
Currently Offline
|
Post by pdalber on Mar 21, 2021 12:22:39 GMT -8
|
|
pdalber
Junior Member
Posts: 75
Likes: 37
Currently Offline
|
Post by pdalber on Mar 18, 2021 9:36:15 GMT -8
That one is a sheet - I really like it and I'm looking at purchase options. Also, on another note, I finally found a source for 1/8" bending birch plywood in S Florida (and it's "only" an hour away). I'm actually pretty excited about that because I made A LOT of calls, and was beginning to think I wasn't going to find any.
|
|
pdalber
Junior Member
Posts: 75
Likes: 37
Currently Offline
|
Post by pdalber on Mar 17, 2021 5:07:31 GMT -8
|
|
pdalber
Junior Member
Posts: 75
Likes: 37
Currently Offline
|
Post by pdalber on Mar 16, 2021 9:24:30 GMT -8
I'm thinking of these patterns as well. They would not be as "busy" and the grays in the laminate look really nice with aluminum trim. My only concern would be if the browns would look good with the amber birch interior.   |
|
pdalber
Junior Member
Posts: 75
Likes: 37
Currently Offline
|
Post by pdalber on Mar 15, 2021 6:37:08 GMT -8
Flooring - in the images, VCT tiles are on the left and countertop laminate is on the right |
|
pdalber
Junior Member
Posts: 75
Likes: 37
Currently Offline
|
Post by pdalber on Mar 15, 2021 5:03:38 GMT -8
I'm trying to decide between the checkerboard pattern or a solid color. Thoughts?   |
|
pdalber
Junior Member
Posts: 75
Likes: 37
Currently Offline
|
Post by pdalber on Mar 14, 2021 18:18:26 GMT -8
It's been slow goinig on the Frolic lately, but progress is being made. I built the dinette seats and a new step was welded in place. The seats were made with 1"x2" framing with 1/4" birch on the front and 3/4" birch on top. I used maple to trim the front edge of the seat and I'll be adding a strip of maple to support the table (when the dinette is used as a bed). 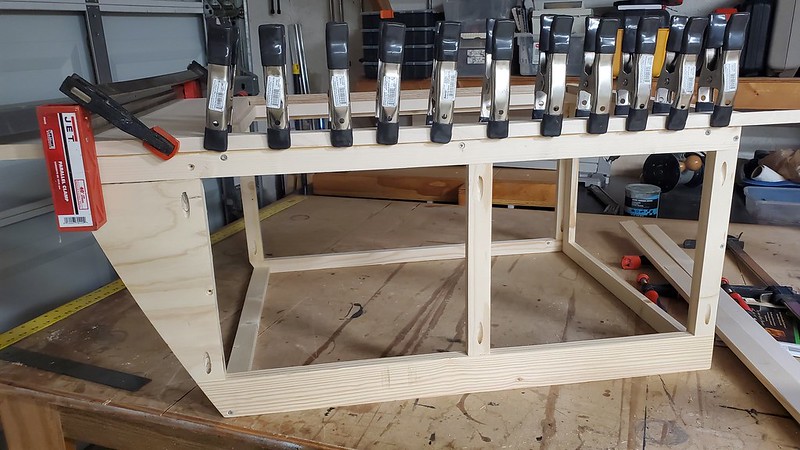 The ends will be finished off with a piece of birch plywood and aluminum trim.  I was able to cut the door into the top using a thin kerf blade on my table saw and finishing the cut in the corners with a jig saw. Birch edge banding helped tighten up the fit (and also made it look nice). 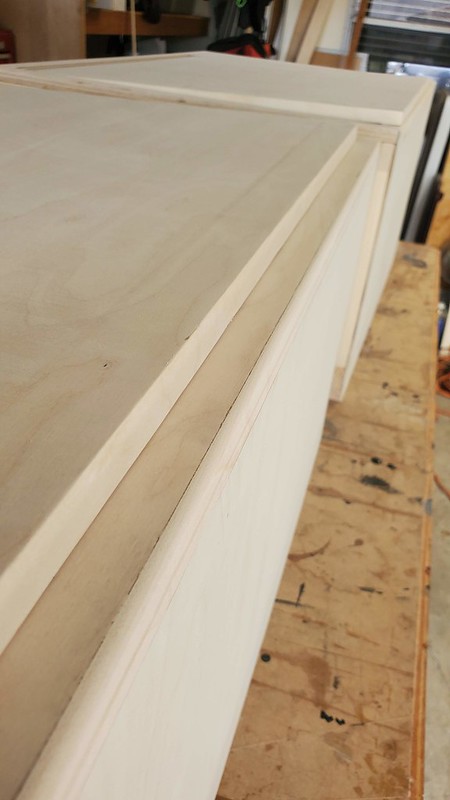 The original step was damaged beyond repair, so a new one was installed.    |
|
pdalber
Junior Member
Posts: 75
Likes: 37
Currently Offline
|
Post by pdalber on Feb 28, 2021 15:11:02 GMT -8
Weekend update - I made significant progress on the trailer project this weekend. After a trip to the lumber yard, and multiple trips to HD, I got to work on the floor. As with the rest of the build, I want stick to the original design, but with a some upgrades and modern materials. The original floor consisted of fiberboard-type paneling on the bottom, 2x2 framing with fiberglass insulation in the middle, and 5/8" plywood on top. I started by building the framing. I went with 2x3" lumber for increased strength and so I would have a little more room for glue and screws where the panels butted up against one another. After everything was squared up, I glued and stapled 3/16" masonite to the framing, then coated everything with fence post paint. 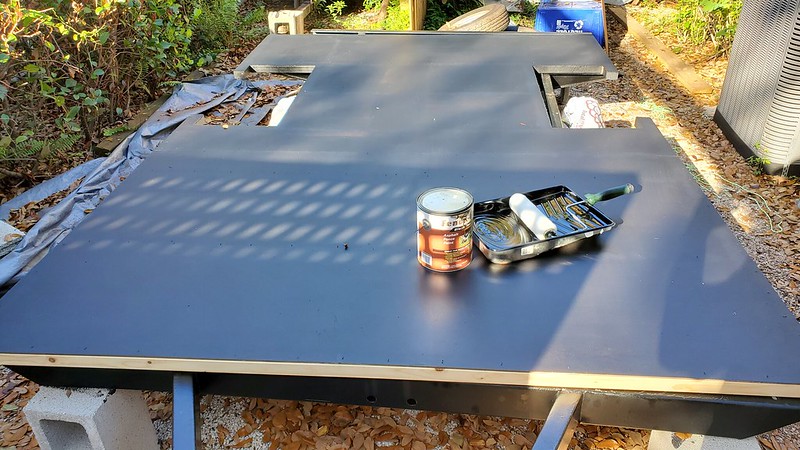 Once the paint had dried, I flipped the whole thing over and filled in the spaces between the framing with 1" rigid insulation.   Finally, I glued and screwed 3/4" marine plywood to the top. When installing the plywood, I made sure I had a square corner on the panel, lined it up along the edges of the framing, then used a track saw to cut along the other edge. The saw was quite possibly my best-ever Craigslist purchase. It's like having a portable table saw - nice, straight, and accurate cuts.   I used a jig saw to cut away most of the material in the wheel well area and then cleaned up the edges with a flush trim bit on my router. I had hoped to attach the wheel wells, but I ran out of steam.  The finished product is slightly thicker than the original, but we will be installing new skin, so the extra height won't be a problem. Now I just need the interior designer (my wife) to decide on flooring. |
|
pdalber
Junior Member
Posts: 75
Likes: 37
Currently Offline
|
Post by pdalber on Feb 27, 2021 16:50:03 GMT -8
I went with the 3/16" Masonite - pictures to follow tomorrow
|
|
pdalber
Junior Member
Posts: 75
Likes: 37
Currently Offline
|
Post by pdalber on Feb 26, 2021 15:19:51 GMT -8
|
|
pdalber
Junior Member
Posts: 75
Likes: 37
Currently Offline
|
Post by pdalber on Feb 23, 2021 10:14:19 GMT -8
My fiberboard was directly on top of the metal frame  2 2 |
|
pdalber
Junior Member
Posts: 75
Likes: 37
Currently Offline
|
Post by pdalber on Feb 23, 2021 7:48:27 GMT -8
I'm getting ready to start rebuilding the floor for my trailer and I want to recreate the original construction. It had 1/4-inch fiberboard-type material on the bottom, framing and insulation in the middle. and 5/8-inch plywood on the top (under the sheet flooring). My question is: What are the preferred modern materials to use in the rebuild? Sould I use masonite/hardboard for the bottom, or is 1/4-inch plywood a better option? Should I use marine plywood for the top, or will good-quality plywood suffice? I already have Tractor Supply fence post paint to coat the underside. Thanks in advance for the advice.
|
|
pdalber
Junior Member
Posts: 75
Likes: 37
Currently Offline
|
Post by pdalber on Feb 22, 2021 12:36:31 GMT -8
Nice Work PD! What's your timeline on this? How long ago did you start? Your progress is excellent. The board needs more share threads (like this). Are you planning on keeping the potty in your layout? Thank you for sharing. Rod Thank you! We've actually owned the camper for a couple of years but, for a number of reasons, only just recently started the restoration. Work has been underway for about the past month, and I don't really have a timeline for completion. I agree that the board needs more share threads. Reading the posts on VTT was incredibly helpful during the restoration of my first camper. I can only hope that, by sharing my progress on this build, I'll be able to help others with their projects. I do plan on keeping the potty. However, I'm not going to replace the black water tank. Instead, I'm going to keep the bathroom floor level with the rest of the trailer, and I'm going to install a portable toilet (I'm open to suggestions if anyone has experience with a particular model). I may also add a sink if I find a really small corner-mounted model. |
|
pdalber
Junior Member
Posts: 75
Likes: 37
Currently Offline
|
Post by pdalber on Feb 21, 2021 18:09:44 GMT -8
This weekend's progress was slow going. During the week, I took the original brake drums to a local shop to be sand blasted and machined. As it turns out, in today's throw-away culture, no one gets their brake drums or rotors turned anymore. Finding a machine shop to clean up the brake surfaces was more challenging than I anticipated - and more expensive. That said, they turned out really nice. Unfortunately though, old parts and new parts don't always fit together quite right. The old drums didn't match up quite right with a flange on the edges of the new brakes. I spent a couple hours today with a grinder making the appropriate adjustments and then painting the "resized" parts. In the end I had working brakes that look great. Here's the "before"  And the "after"  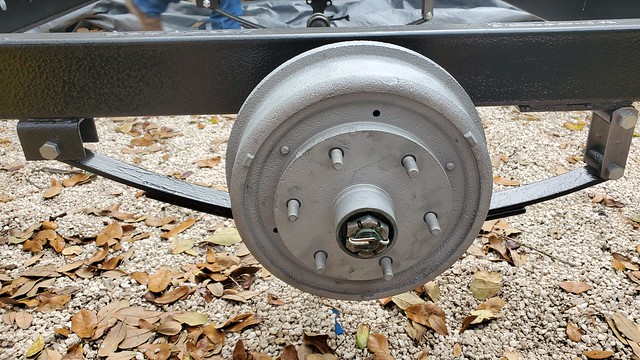 I also cleaned up the wheel wells, sprayed the tops with POR-15, and the bottoms with rubberized undercoating.   |
|
pdalber
Junior Member
Posts: 75
Likes: 37
Currently Offline
|
Post by pdalber on Feb 13, 2021 18:47:03 GMT -8
Looks like a new frame! Good work. Thank-you! I thought about taking it to a shop for media blasting. But, I get a certain level satisfaction from doing things myself. |
|


