charliemyers
Active Member

Posts: 181 
Likes: 58
Currently Offline
|
Post by charliemyers on Jun 21, 2018 12:28:43 GMT -8
I'd be interested in info about the round window too! My assumption is that one could use a square piece of glass, build some framework inside the door to hold it, and cut round holes in the door. But how would you go about sealing it?
|
|
charliemyers
Active Member
Posts: 181
Likes: 58
Currently Offline
|
Post by charliemyers on Jun 19, 2018 6:15:59 GMT -8
It works, but I really should have new ones. What are they called and where can I get them? If it's what I think it is, it's a "throat plate". If you have a router, make a copy of your existing throat plate out of MDF or something similarly stable. Drill holes where necessary and drive some headless hex head screws to use as levelers. Probably where the rubber feet you found are located. After you have it installed, clamp it down, turn on the table saw, and slowly raise the blade up through it to create the slot for the blade. You'll then have a "zero clearance throat plate" which will help reduce tear out on the bottom side of the materials that you cut and prevent small cutoff pieces from falling down through the slot. Edit: I guess you were talking about the rubber feet. I still stand by my answer though!  Save Save |
|
charliemyers
Active Member
Posts: 181
Likes: 58
Currently Offline
|
Post by charliemyers on Jun 18, 2018 9:08:45 GMT -8
I might be wrong (likely), but isn't the skin supposed to be flush with the edge of the wood on either side of the door? So if you slid the skins rearward so that the skin was flush with the door framing, would the front of the skin line up with the curbing? What would that do to the other alignment issues with the skin & framing?
Note that none of this is intended to directly help with your immediate issue with the skirt board, but rather just to make sure that everything else is generally in the right place before we address the skirt board. And other's have suggested jacking the wall up...which it might well need...but I don't see how that will help the skin alignment issue which seems to be more of a horizontal issue rather than vertical. Surely the camper didn't stretch or shrink though. But I'm still a rank beginner so the veterans are likely seeing something that I'm missing.
And at a bare minimum I'd definitely plan to entirely re-frame the baggage compartment if you don't end up having to rebuild the entire wall.
|
|
charliemyers
Active Member
Posts: 181
Likes: 58
Currently Offline
|
Post by charliemyers on Jun 18, 2018 5:32:18 GMT -8
then coat it with Johnson's Paste wax (for furniture) and use it. I'll 2nd that! All of the cast iron in my shop get this treatment. I leave a piece of cloth sitting in the container so that I don't have to look around for a rag when I need to use it. Save |
|
charliemyers
Active Member
Posts: 181
Likes: 58
Currently Offline
|
Post by charliemyers on Jun 11, 2018 18:54:00 GMT -8
Did some cars used to have separate wires for the brake and turn signal? That appears to be the situation covered by the last wiring diagram.
And you’re welcome Kaffi! Sorry to have dragged it off topic.
|
|
charliemyers
Active Member
Posts: 181
Likes: 58
Currently Offline
|
Post by charliemyers on Jun 11, 2018 18:47:07 GMT -8
Probably getting a little off the original topic, but here’s supposed to be an original wiring diagram for both versions of the light (not my picture): 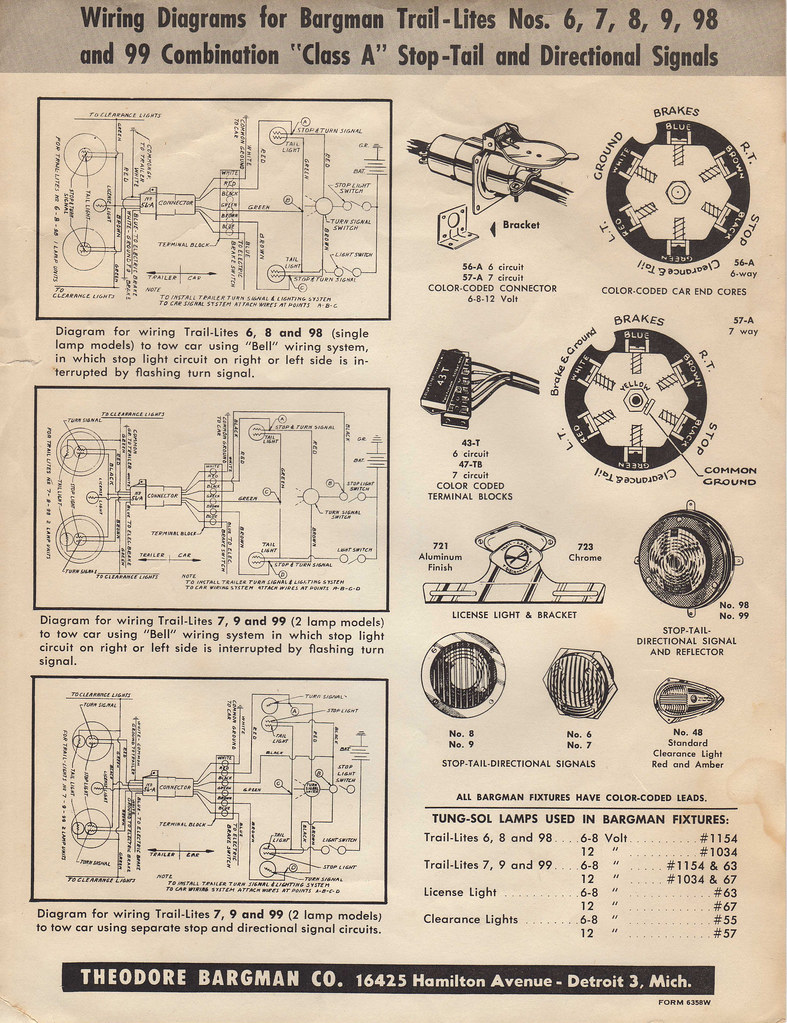 Someone will need to interpret it though because my eyes (or brain?) can’t quite make sense of it. |
|
charliemyers
Active Member
Posts: 181
Likes: 58
Currently Offline
|
Post by charliemyers on Jun 11, 2018 18:30:54 GMT -8
Thanks for the info Ten. Unfortunately it looks like VTS did not faithfully reproduce the “99” lense if it was originally as Ten describes. I have a brand new set of the “98” complete assemblies, and as the ad linked above mentions the lenses are marked “99”. These lenses do not have the clear spot that Ten mentioned, so keep that in mind if you order the “99” set (or lense) hoping to illuminate your license plate because it won’t work very well.
|
|
charliemyers
Active Member
Posts: 181
Likes: 58
Currently Offline
|
Post by charliemyers on Jun 11, 2018 4:44:35 GMT -8
Can someone clarify something for me regarding these lights? The "number 98" version of these has a single 1157 bulb which has filaments for both (1) running light and (1) brake/turn signal. Basically it's all that you need in a tail light. But the "number 99" version has two light sockets. One takes an 1157 bulb (which as mentioned has all that you need in a tail light), and it also has a socket for a "67" bulb. What's the 67 for? Is it an additional running light?
I've bought the "number 98" because I never saw the need for the extra bulb socket, but maybe that wasn't a good choice?
|
|
charliemyers
Active Member
Posts: 181
Likes: 58
Currently Offline
|
Post by charliemyers on Jun 8, 2018 6:42:06 GMT -8
So what sort of fuse could be used? The automotive ATC type fuses are readily available in 30 amp, and I'm sure that water tight holders are probably readily available for them as well, but I would think that they would be more susceptible to blow with short spikes in current and might cause nuisance tripping. But I'm curious too to see what you'd come up with.
|
|
charliemyers
Active Member
Posts: 181
Likes: 58
Currently Offline
|
Post by charliemyers on Jun 8, 2018 6:18:47 GMT -8
fuse idea would work but the insulation of the wire must be rated for the voltage. 6/3 SOOW up to 600V should fit the bill. But what sort of fuse? And how could it be made weatherproof? Sounds like the cost of such a dog bone might begin to approach that of a 6 gauge cord & installing a 50 amp inlet which is entirely overkill for a Shasta Compact even though my box is already rated to 60 amps. OK, never mind. I'll just drop that idea with hopes that I'll never need to adapt my 30 amp inlet to a 50 amp pedestal. Thanks for helping me work through that! |
|
charliemyers
Active Member
Posts: 181
Likes: 58
Currently Offline
|
Post by charliemyers on Jun 8, 2018 5:57:38 GMT -8
Have never seen a campground with only 50 amp service; I believe most will have 30 amp and 15 as well. The only time grounds would have 50 amp alone is in a big motor home dedicated lot. I've never seen one either, but apparently they're out there. I don't foresee me ever going to a campground that has 50 amp service only, but I can't foresee too terribly far into the future. Save |
|
charliemyers
Active Member
Posts: 181
Likes: 58
Currently Offline
|
Post by charliemyers on Jun 8, 2018 5:53:00 GMT -8
The only purpose for a breaker is to protect the wire it’s feeding. True, and thanks for the reminder that it's the dog that wags the tail rather than the other way around. If you are at a camp ground and hook a 10 gauge cord adapter to a 50 amp service then it’s pretty much null and void what happens inside the trailer. I guess that I kind of agree with that. Any wire that is run inside the camper should be protected with an appropriately sized breaker. That still leaves the cord & inlet unprotected, but my "main breaker" idea doesn't provide protection there either. OK, sounds like I was putting a false sense of security into this idea. But on the other hand you might could build a # 6 gauge cord and incorporate a 30 amp inline fuse on the hot But this on the other hand WOULD protect the cord & inlet...Hmmm...custom 50/30 dog bone to keep from having a $200 cord? |
|
charliemyers
Active Member
Posts: 181
Likes: 58
Currently Offline
|
Post by charliemyers on Jun 7, 2018 17:03:21 GMT -8
I read 'em all too.
|
|
charliemyers
Active Member
Posts: 181
Likes: 58
Currently Offline
|
Post by charliemyers on Jun 7, 2018 6:32:23 GMT -8
vikx please feel free to delete this if it's wrong...that's what the rules for this 110 Electrical say. I won't feel insulted or take it personally. This may be a slightly advanced 110 electrical topic, but it's a rather simple concept and is easy to deal with so I just want to toss this out there because I don't recall having come across a thread on VTT yet that deals with it (there probably are several posts, but I don't recall having seen one yet). Does anyone use a line breaker in their box as a "main" breaker? These subpanels that we use in campers usually lack a space for a main breaker, so I intend to feed the shore power into a line breaker in order to provide over current protection for the remainder of the circuits. When I install a new 120V distribution panel in my '61 Compact that I'm currently rebuilding, I'm planning for a 30 amp service. Say for example I go to a camp ground that happens to only have 50 amp service available (chances are slim, yes, but with the trend in today's megagigornomous RV's I can see where it can happen) and I use an adapter to connect my 30 amp inlet to the camp ground's 50 amp service...in the event of some sort of catastrophic electrical failure if I'm not protected by a 30 amp breaker in my box, then my next layer of protection is the 50amp breaker owned by the campground. Now some of you might think that I'm sounding like the sort that's planning for a zombie apocalypse, but short circuits and other phenomenon do happen with electricity. Not a lot thank goodness, but it happens. And when that happens, I don't want my camper to burn down and ruin my weekend. So how would I deal with it? Connect the incoming shore hot wire to a 30 amp line breaker. Connect the incoming shore neutral and ground wires to their respective buss bars. Use a 10 AWG (or larger) wire to jumper the two lugs in the breaker box as normal. Add any other "under 30 amp" breakers that I need for the circuits that I need. The total of your other breakers can add up to more than "main" breaker (completely acceptable by the code), but if your total draw exceeds the main breaker then that "main" breaker is going to trip which prevents your precious camper from becoming an instant heat source. Is there anything completely wrong with this approach? If so please set me straight. I'm about 90% certain that I saw a post on Repairing Yesterday's Trailers with a box wired this way (doesn't mean that it's right), there's at least one post on the "airforums" (Airstreams & kin...again, doesn't mean that it's right), and I've talked to a number of electricians (much closer to being right) that have told me that it's not only a good idea, but apparently thousands upon thousands of the more recent RV's & campers came from the factory wired like this. I'm not saying that this is a requirement or even a recommendation from the NEC (National Electric Code), but I do know that the NEC is all about making electrical "idiot proof" so that it's difficult for even advanced idiots to start a fire with your wiring. To me this is big step toward that goal. There might only be a .01% chance of a catastrophic event happening, but for an extra $10 for a "main" breaker with very little change in the way it's all connected...why not? If anyone would like pictures, I can find some from other sources to point you toward. Or maybe over the weekend I can mock up the new breaker box that I have to help explain it if this post is still up in a few days. Sorry this is so long! I don't often have too much to say, but I guess on this topic, I did.
|
|
charliemyers
Active Member
Posts: 181
Likes: 58
Currently Offline
|
Post by charliemyers on Jun 7, 2018 5:02:00 GMT -8
mel if it were me I'd replace the box and populate it with new breakers. But to address your question about the existing box you first need to figure out if the box has continuity with the buss bar that currently has the grounds connected. If it does, then the grounds can remain connected to it, and you'll need to install an isolated (has an insulating layer to keep it from touching your breaker box) buss bar for the neutral wires. If the existing buss bar does NOT have continuity with the box, then I'd install a buss bar that DOES contact the box, move the grounds to the new buss bar, and connect the neutral wires to the existing isolated buss bar. Edit: you'll also need a jumper wire to connect those two main lugs together. As it stands, only 1 breaker would be energized if you hooked it up without the jumper. I'd still replace the old breaker(s) with new ones if you can find them. Breakers can wear out, and they can be affected by exposure to the elements. If it wasn't wired correctly to begin with, you have no idea what kind of torture those breakers might have been subjected to. So in the end installing a SquareD box with widely available breakers might not be much more expensive than just buying new breakers for the existing box.
|
|


