|
|
Post by Teachndad on Dec 23, 2019 6:10:49 GMT -8
![]() Try as I might, I am not able to insert an image.... ![https://www.flickr.com/photos/160991744@N06/49179309662/in/dateposted-public/]() Actually it seems to have worked, kind of ![]() Nope, it worked once and then this is what I get.... ![https://www.flickr.com/photos/160991744@N06/49178607128/in/dateposted-public/]() Hi Dale, Follow the directions from the tutorial link that NCCamper posted above. Then go read this short thread. vintagetrailertalk.freeforums.net/thread/11078/flickr-update Copy the BBC code into the reply to post the photo. I hope this helps. Rod (and Reel) |
|
|
|
Post by Teachndad on Dec 22, 2019 5:17:57 GMT -8
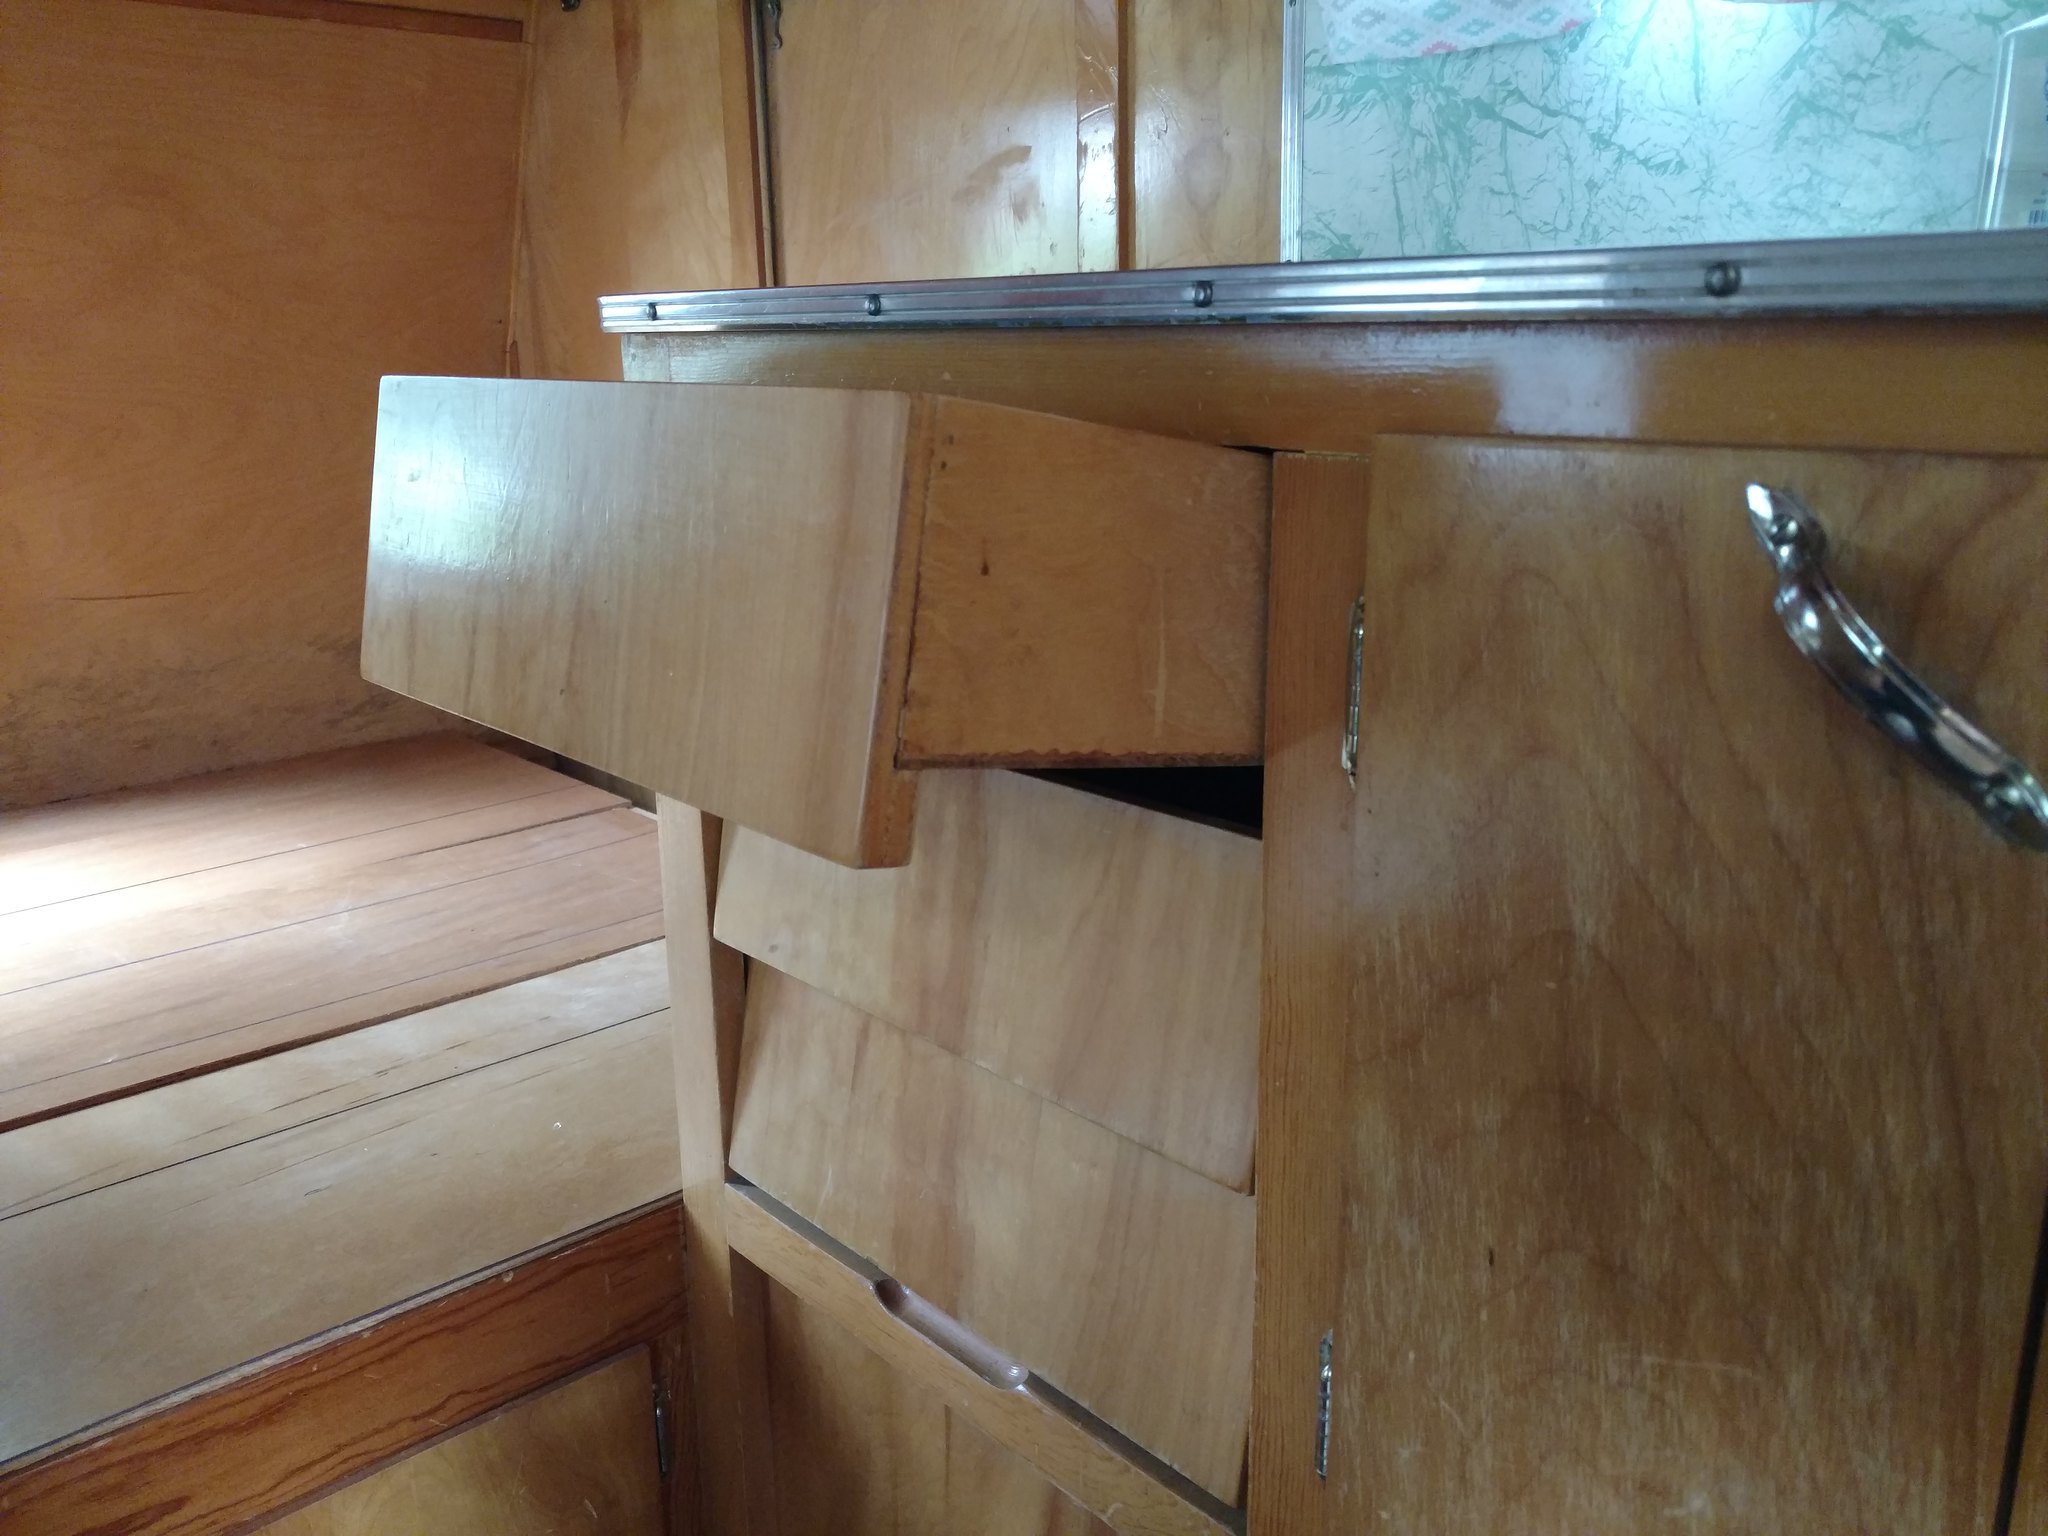
Yesterday I painted the Masonite that will go on the belly. Not a one day job, but that’s what’s goin on here. Couple years ago when I started the 62 traveleze restore, I did a total skin off rebuild, but not frame off. Some may remember pictures. I was able to do some floor framing repair and replace some of the bolts, thinking I’d do more under later. Since I’m changing springs and tires now, I’m up on blocks and decided to clean the rest up. I tore off all the old 1/2 black fiber, and old Fiberglas insulation. I was surprised at how clean and new most of the exposed wood was. I put up 1” rigid insulation—-the “direct burial” type. Where the old belly board was smashed between the wood and steel, I found I was able to remove all that scrap with a little gentle prying or a nudge from a bottle jack, and a small battery operated sawsall. In order to not have to cut the new board with joints at all steel frame members I can now slide larger pieces between and screw to the wood 2x2 framing. I’ll then take up any slack with some 1/4” hard rubber pads I made and replace most of the rest of the bolts. I painted the rough side down on the Masonite as it seemed it would adhere better. I used exterior primer and then 2 coats of exterior floor paint. I’ve used the black post paint, but using this because it goes on nice and will be easier to mark and cut full painted sheets. Seems to be going well. All but the lying on the cold wet gravel with all the crap falling in my face. Winter repairs are such fun. Man! That's a ton of work!! I love the lying on cold wet gravel part.  Pix? |
|
|
|
Post by Teachndad on Dec 21, 2019 6:15:58 GMT -8
|
|
|
|
Post by Teachndad on Dec 8, 2019 7:43:16 GMT -8
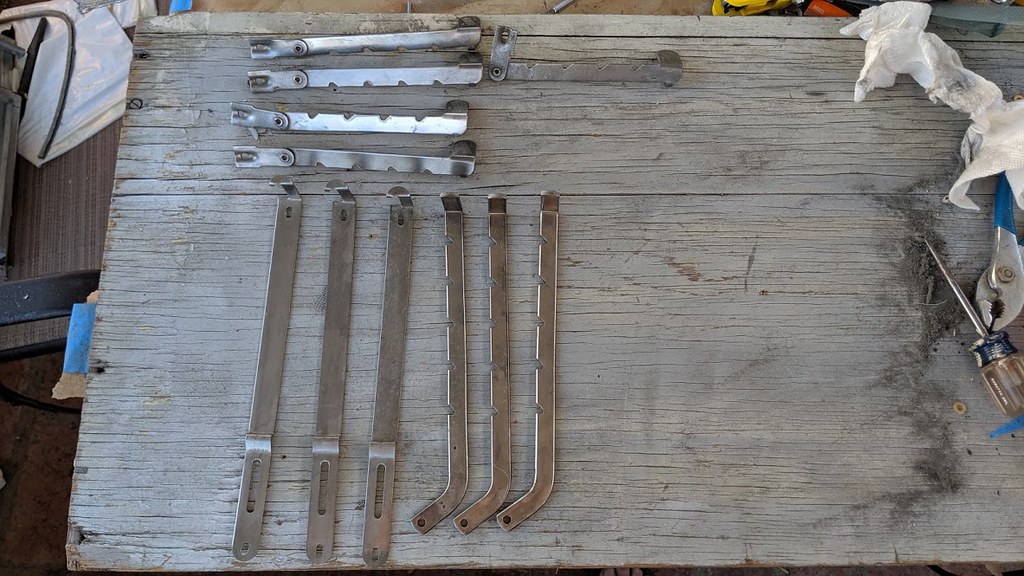
Hi Friends, Does trying count in this thread instead of doing? Yesterday I had everything laid out and prepared to replace worn and broken rivets on the main front window frame assembly for my Westerner. So, we go to the rivet squeezer and we find out the semitubular rivets I ordered are too short.  While a little frustrating, I sort of guessed it might happen. This project is about learning anyways. I should have ordered longer ones just in case. I will order longer ones this week and we will go at it again next week. We double checked lengths of other flush mount rivets and agreed to try next weekend. BTW, Thanks NCCamper for the positive comments on my windows in an earlier post.  Happy Restorations, Rod |
|
|
|
Post by Teachndad on Nov 11, 2019 14:45:44 GMT -8
Rod, Happy Veteran's Day (off). Assuming you'll be installing the benches in Andy, how will you support the dinette table in order to convert the front into a bed? Maybe the benches don't require any middle support or table? Wish I could have found the coveted Western themed material when doing my project. Anyway, will be following your progress. Cheers! Dan Hi Dan, Good question. As pictured, the benches don't need a middle support like the table. They "pivot" on top of the wooden bases distributing the load when you open them flat. My current plan is to remove the cushions from the top of the bases as I did in my pictures and then cut off the steel supports, but only if I can get the click clack mechanism inside the cushions to still function. Then, I would place the cushion on top of the curved seat bases in Andy's interior. That's the plan right now, but I am a year or two away from that point in the restoration. I may still keep the wooden base with the cushion as originally designed, but I really like Andy's curved seat bases more. I will cross that bridge when I come to it. Cheers, Rod |
|
|
|
Post by Teachndad on Nov 11, 2019 7:13:22 GMT -8
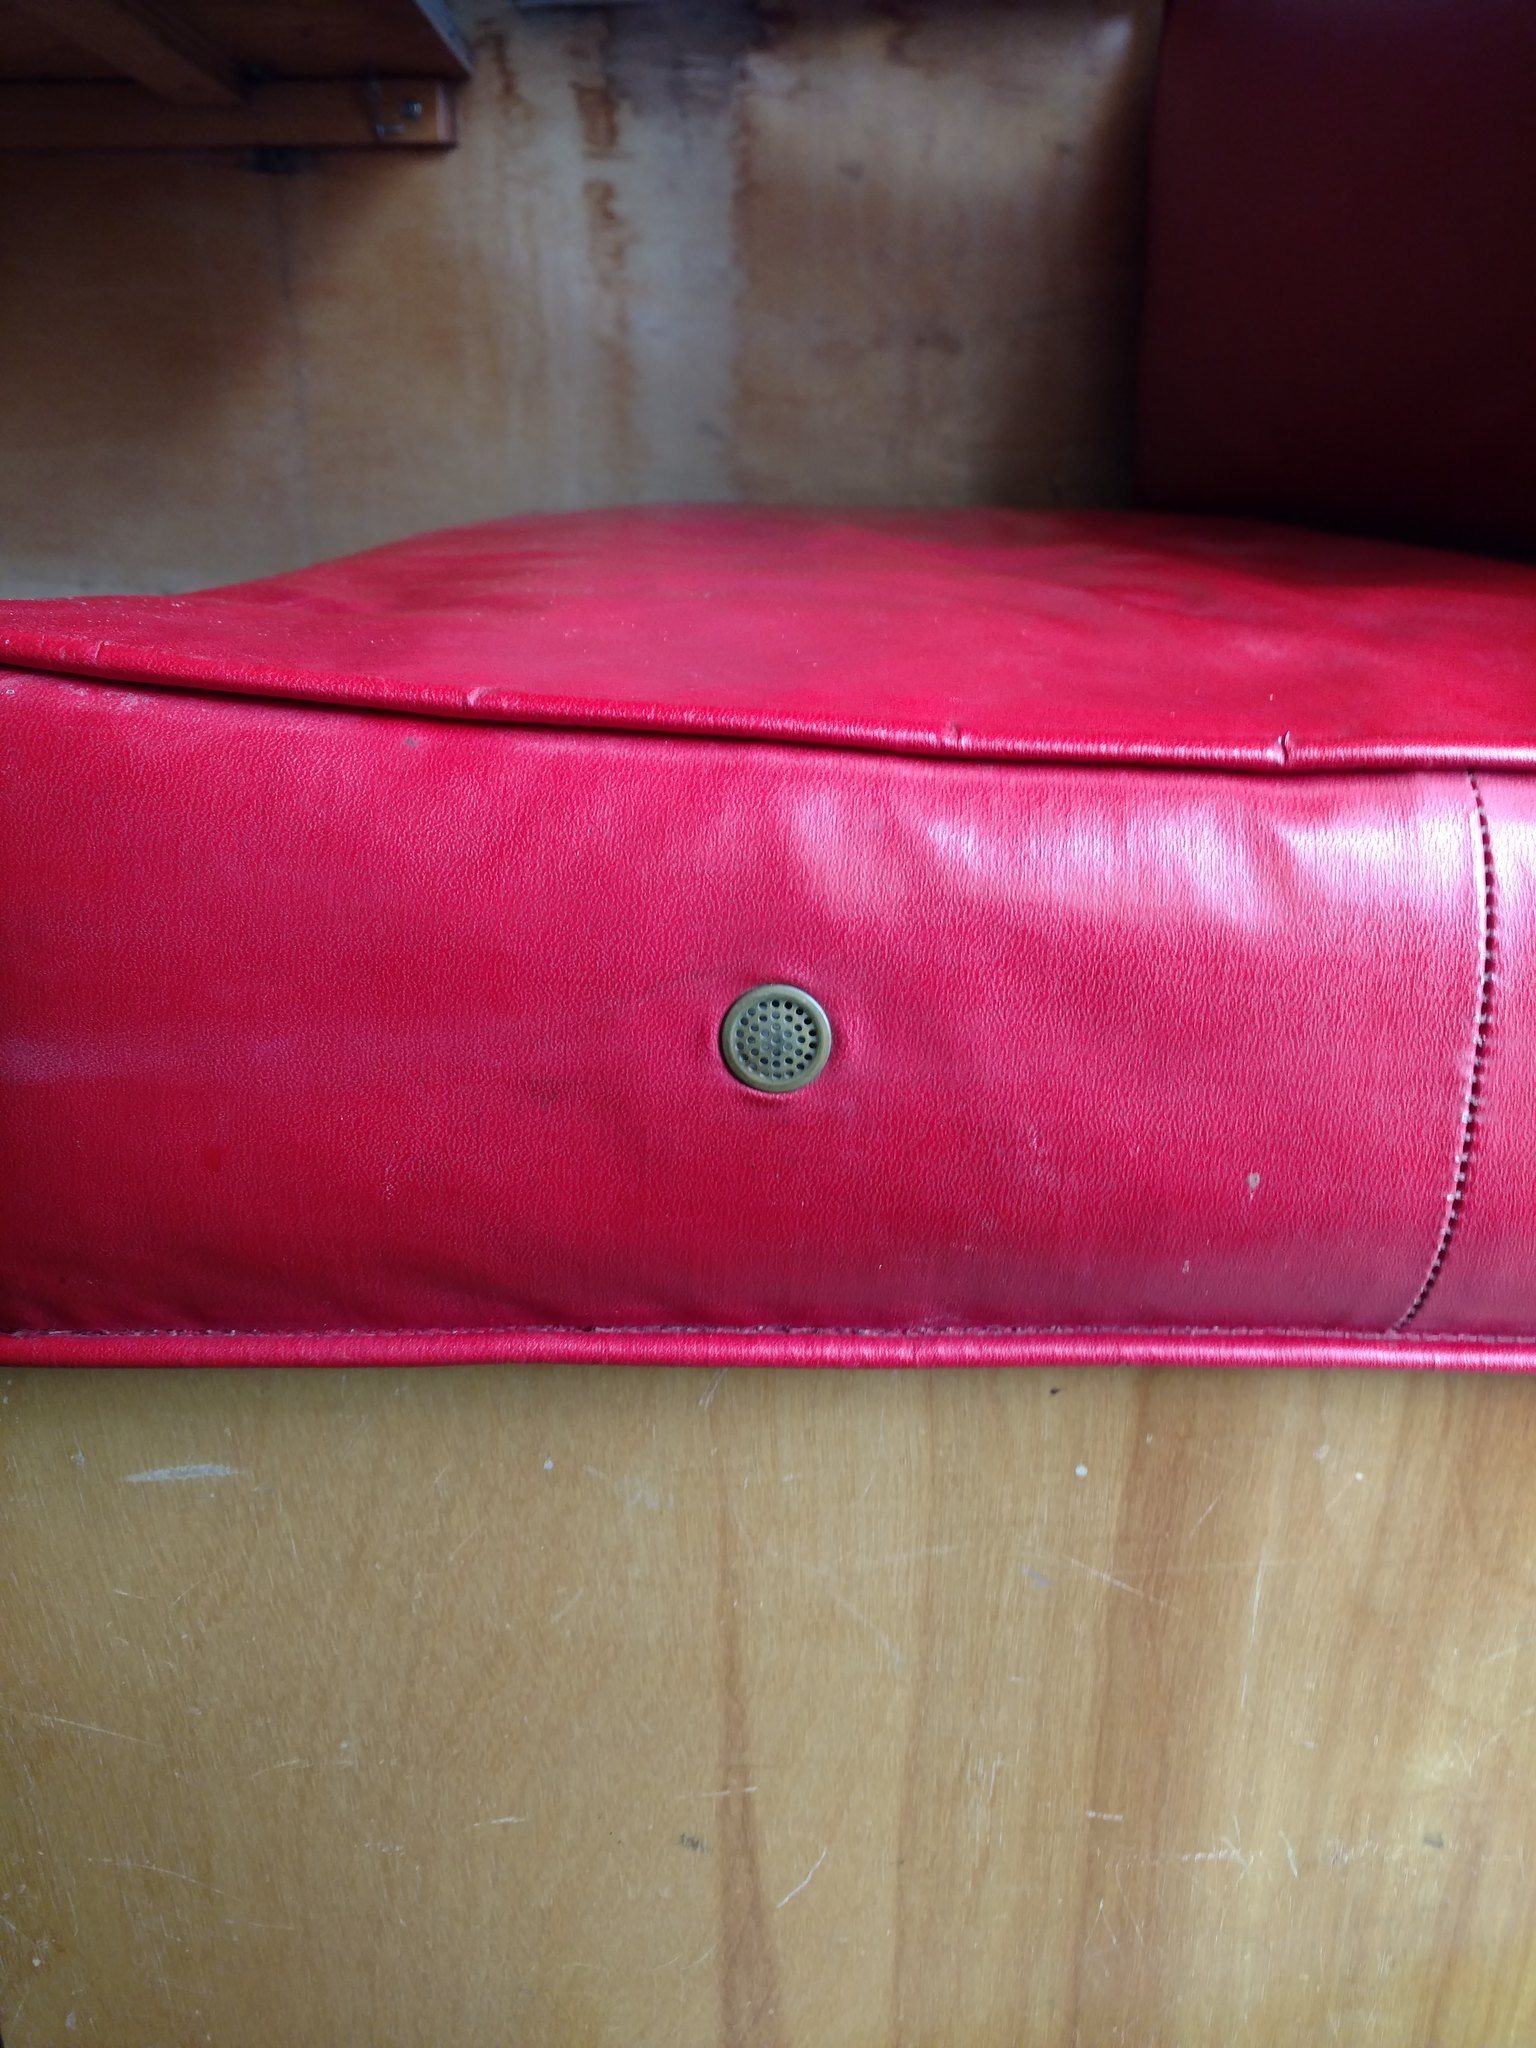
I wanted to share some information on the dinette benches that could be found in some Westerner travel trailers. Westerners were made from 1953 to 1958. Below, you can see how they were still installed in the original trailer, a model from 1955. These are believed to have been included in the Pony Express model. I am not sure if they were in the Deluxe model. This trailer was gutted and transformed into a mobile bar (not by me). I bought the benches from the owner because my Westerner didn’t have any benches when I bought it.  55 Westerner dinettes 55 Westerner dinettes I am including pictures below as well as a link to a short video. Not all Westerner travel trailers came with these particular benches. They are covered in an embossed naugahyde including Western symbols like saddles, horses, cacti, and cowboy hats. I had some problems posting photos from my shutterfly account in this thread. They came out blurry when linked. I left the direct link up if you wanted to see a more clear picture. Here is the pattern up close.  Westerner naugahyde pattern Westerner naugahyde pattern These particular benches were designed as small “click clack“ couches and they are not attached to the wall. They are self- supporting. When reclined to make a bed, you slid them away from the wall. The benches are composed of two main parts. The top “cushion” and the bottom support. link.shutterfly.com/yLPGHiP5i1   Note the offset of the legs. This was done because of the front radius of the trailer. Westerners have that” belly sag” up front as part of their canned ham design. The offset in the couch legs compensates for the belly or lower front curvature as seen below.  P1070135 P1070135 The cushion was bolted to the base that was also covered in the embossed vinyl.  link.shutterfly.com/OQu4bFCFj1 link.shutterfly.com/OQu4bFCFj1   Here you can see the cushion separated or unbolted from the base. They were using square nuts, not hexagonal. link.shutterfly.com/KhfBvQJFj1  The underside of the base was made with pegboard. link.shutterfly.com/3Q5DPRNFj1  Here is the underside of the cushion. They are formed with lateral springs for support. link.shutterfly.com/QSiydlG5i1  Then, covering the very bottom of the cushion was burlap. link.shutterfly.com/DdsvQxTFj1  Here is the click clack mechanism as best I can photograph it.  Here is a short video I made. www.youtube.com/watch?v=LdESKRg7lCM The support design appears to have changed by 1957 from the four support legs to a wooden curved edge base and the cushion sat on that. When arranged for sleeping, the table was dropped down on top of supports along one edge of each seat base. Then you pulled slid the cushions over the top.  P1070157 P1070157 In this picture of a 1957 Westerner, you can see the cushions on top of the bases. This would be what the curved base and cushions look like together for 1957. These particular cushions are covered with a yellow embossed naugahyde. 
Here are the dimensions for the benches.I will break it down into the wooden dinette base and the cushion on top. The wooden dinette base:
The wooden base section is really a box. Width of base (W)23 3/4" and (L) 35" and height is (H)5 ¾” or 23 ¾” x 35” x 5 ¾”. Add a 6 inch leg length and that gives you the distance of the top of the wooden base above the floor as 11 ¾”. Seat cushion measurements:Since the cushions have the sitting section and the upright or back support section, I will break those down into two different measurements. Seat cushion: 16" x 36" x 7” (7” is the height of the cushion) Upright or back cushion: 20" x 36" x 7” Since the back support hinges at the back of the seat cushion, the total height of the upright or back section is 7” plus 20” so that equals 27”. The total depth (rear to front) of the seat section is 16” plus 7”. So that equals 23” (from the wall). Happy Restorations, Rod |
|
|
|
Post by Teachndad on Oct 25, 2019 21:10:22 GMT -8
The benches below are the ones I bought as seen when they were still installed in the 1955 Westerner. It's now a mobile bar. Groovy seats. Did they detach from the wall? Hi NC, Yes, they are cool. These are mini click-clack couches. You have to pull the whole assembly (base and cushion) away from the wall and then click them down flat. They are self supporting and they did not attach to the wall. No wood slats for support in the reclined position. I wish I had a picture of them reclined, but I have already separated the cushions from the bases. Early plans were to place the cushions on the rounded bases of my Westerner instead of using them as pictured on the leg bases. I am planning to post a thread with some details on them within the next week or two including a short video and images. Cheers, Rod |
|
|
|
Post by Teachndad on Oct 25, 2019 20:58:57 GMT -8
Wow Rod! I am so impressed with your dedication. Andy deserves to take you camping, and you deserve to rest in his clutches safe from the elements! I have spent the morning reading this post thread, and I am inspired to start our rebuild. I will continue to watch your progress, and hope to cross paths someday out enjoying the great outdoors in our happy campers! Thank you Shekaye for the kind words. I am glad you enjoyed my restoration thread. Cheers, Rod |
|
|
|
Post by Teachndad on Oct 25, 2019 6:40:26 GMT -8
Thank you Teachndad!! This is great info! And the pic of the seats is awesome! I have bases, well only one at the moment, exactly like yours except only smaller in width. I may just go with good quality cushions instead of replicating the sprung seats to keep costs down. The less I have to hire the pros the better my budget will be. As far as the suspension goes I may just stick with the 7 leaves. It is a bit high but that may come in handy down the road. I will look forward to any info you can give me and if I can help you out, just ask! Thank you again! You are welcome. If you need any other help, send me a PM. I can also put you in touch with my friend Dan, who owns another 57 Westerner. We have been helping each other over the years. He has been a great help. Rod |
|
|
|
Post by Teachndad on Oct 25, 2019 5:39:55 GMT -8
The Aerocar trailer. Some images were not captured in the videos. Below are some of what I thought would be highlights. I also do a lot of guessing in my descriptions hoping to initiate some discussion. I based my assertion that it was a 1936 model on the serial number. I took a guess that the 36 was the year built.   Here is the nose all torn up.  We couldn’t figure out what those two small doors were for in the rear. The water tanks are behind those.  As you look inward, the first cabinet door on the right holds a water tank.  Here is the water tank once you open the cabinet door. Note the bicycle pump to build water pressure. There was still water inside the tank! You can see a water level gauge running from top to bottom on the outside of the tank. It’s the tube that looks white.  Reversing the view - This view looking out the rear door shows a rounded square rack in the ceiling surrounding the skylight. Notice the square in the ceiling. That’s actually a wire reinforced glass skylight covered with layers of dirt. We theorized that the wire rack in the ceiling was for hanging a shower curtain. The skylight could be opened for ventilation - during a shower?   Now look at the floor. You can see what looks like an aluminum framed rectangle. We theorized that was pulled up to take a shower because it’s directly under the square rack in the ceiling. It could be a shower pan.  This next image shows the undercarriage just below the rectangle in the kitchen floor. Look directly upward of center. You will see a horizontal pipe (at the end of the 2 x 6) venturing to the right and merging with another pipe from farther back probably for the sink drain. We thought the horizontal pipe running across the top of the image was for a drain from the shower pan.  The semicircular wood pieces that look like a round table top are the fender skirts that fit over the rear wheels. Notice also the wood “upside down” trapezoid. That’s most likely for stretching a tonneau cover over the trunk opening once the trunk lid is removed for towing. You can see the snap heads along the edge.  Here is the fender skirt wheel opening. Note the triangle tabs running around the perimeter of the fender well probably used for support and mounting.  We thought these bumper pieces were supposed to be at the rear of the trailer as they appear to be missing outside (as seen in the image above), put they might have been for the Pierce Arrow tow vehicle. There also appears to be a steamer trunk rack which we theorized was from the Pierce Arrow tow vehicle that was removed for towing.  We guessed that this metal sculpture may have been a radio antenna to the driver in the Pierce arrow, but we are rethinking that idea??  . Maybe it was just a sculpture? More likely there was a hard wire connection from below the nose where all the wiring was.   Here is the underside of the nose with all the wiring connections.  In looking at the nose wheel shaft, we couldn’t figure out how that long shaft that supports the nose was removed and then the “nose pin” was dropped into the 5th wheel inside the trunk of the Pierce Arrow.   We theorized there was some sort of lift that raised up the front of the trailer so that the pole could be removed and the “nose pin” could be dropped into the 5th wheel. For continuity, here is the 5th wheel in the trunk of the Pierce Arrow. 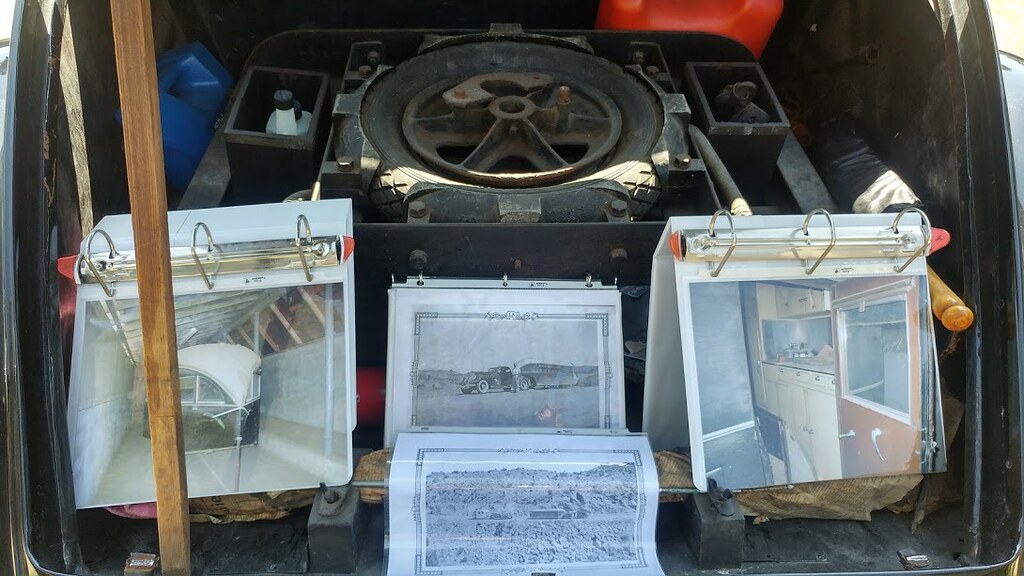 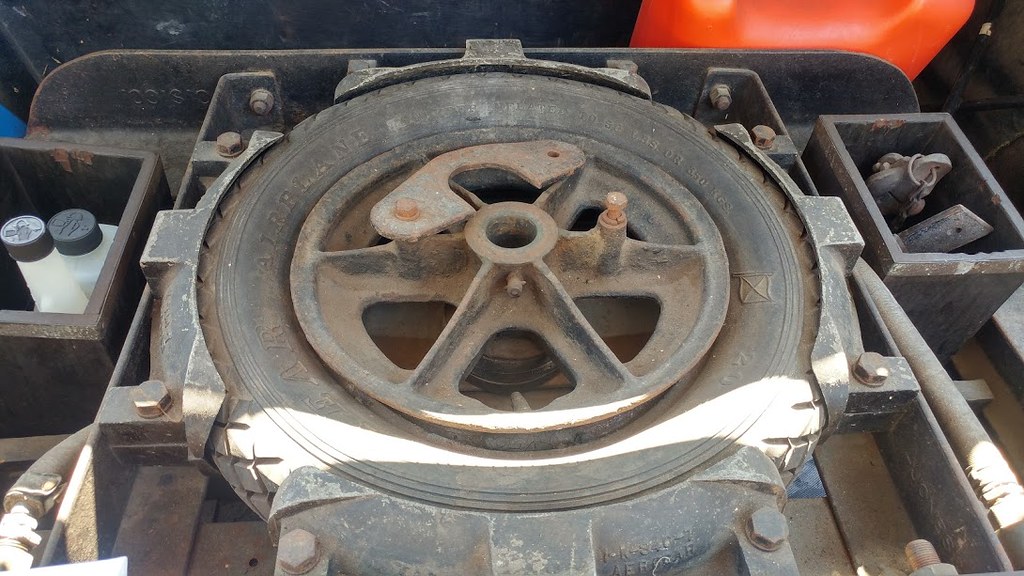 Check out this suspension! Check out this suspension!This is a view from the rear towards the front. I was just underneath the rear door entry. Look at the canvas in front of the closest end of the street side spring pack. That looks like fire hose material! I don’t know enough about suspension to figure out why. Anyone?  Now follow the spring pack all the way back till it ends. It’s hard to see, but the spring pack is mounted to the underside of the trailer through a @1” thick layer of canvas that actually looks like two ½” thick layers. It’s actually a horizontal but round disc shape sandwiched between two round steel mounting brackets. Why? Close up image is 2 images below.   You can see the same canvas sandwich at the end of the spring pack on this side of the trailer (curbside) And finally, what we think was the parking brake. It’s got a dead man handle on it like a train engine. Look at that lumber below the floor.   Finally, here is the loneliness shot showing this poor girl exposed to the elements all by herself on a bluff overlooking the Pacific Ocean.   Comments welcome especially regarding the suspension. Rod |
|
|
|
Post by Teachndad on Oct 20, 2019 21:04:31 GMT -8
I am sorry, but what didn't I follow?
I took Ruderunners advice and tested my tow vehicle.
I re-inserted the plug into the receptacle that Big Bill suggested several times and it had no effect.
Then I said I could get to the trailer on Veteran's Day and check it.
|
|
|
|
Post by Teachndad on Oct 20, 2019 20:47:49 GMT -8
Hi Getnold, I am too, LOL. Congrats on your new find and welcome to the vintage trailer restoration world! I can answer some of your questions right now, but have to double check on the dimensions of the cushions you requested later. From you avatar, it looks like your Westerner is sitting high. I always like to use the rule of thumb that the bearing cap on the axle is at the same height as the bottom of the wall. Your wall looks higher than that. A crawl under my frame just now confirmed your suspicions. I show only 5 leaves in the spring pack and eye to eye center to center is @27". A previous owner (PO) added two more leaves to increase the height. Maybe for dirt roads or it was a cheap way to add some height to the trailer body to clear driveway entrances or exits. Is there any arch remaining on the spring pack or are they flat? As for the cushions, mine didn't come with them either. I know another Westerner owner who didn't have any either. However, when he restored his 57 Westerner, he estimated his measurements for cushions he had made. His measurements were 38" across and 24 deep. These would be the back rest sections. But then he had two smaller sized cushions made that were 38" x 13 3/4". These were the sit portions. When lain flat, they total 75 1/2" across the trailer. Does your Westerner have dinette bases like these or are they gone as well? This was the interior dinette area of my 57 Westerner.  I have more info for you. 6 months ago, I acquired 2 original Westerner benches from a 1955 Westerner. They do not sit on dinette bases like in a 57. They have legs. The benches below are the ones I bought as seen when they were still installed in the 1955 Westerner. It's now a mobile bar. 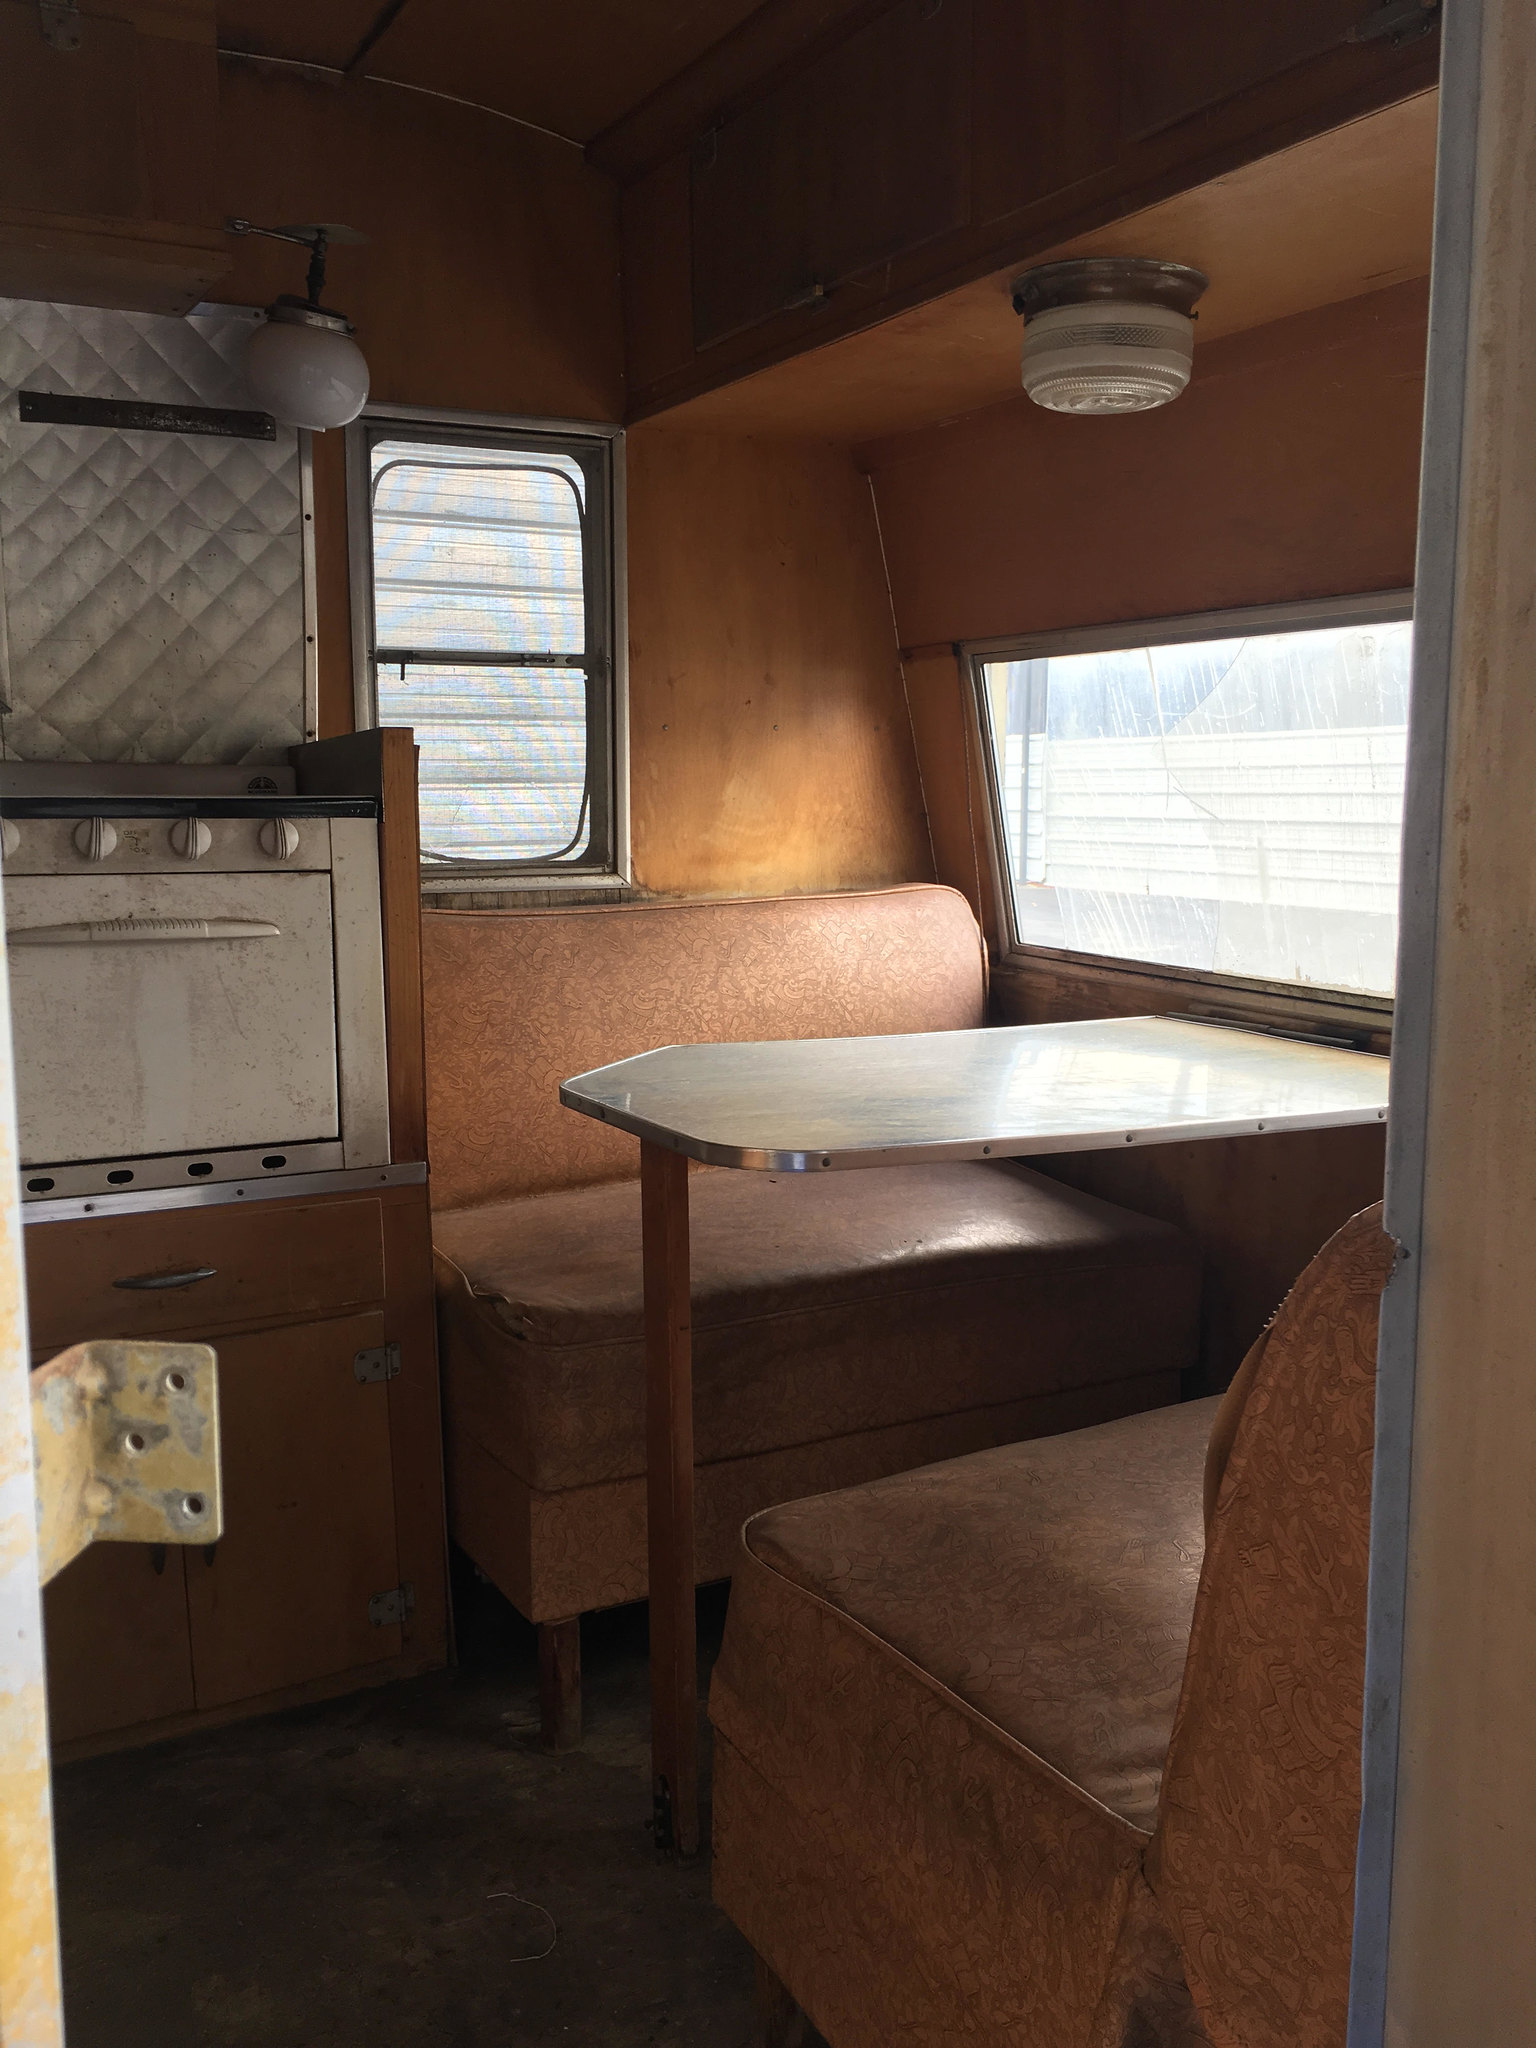 I can measure their height and width later this week. But there could be possible differences of an inch or so, just guessing. I can't tell you if they kept the same measurements year to year especially since they went from a click clack couch design with legs to a design with cushions sitting on bases. I hope that helps. I will post back as soon as I can get over to where those benches are stored and check the measurements. Let me know if you have any more questions. Cheers, Rod |
|
|
|
Post by Teachndad on Oct 19, 2019 21:58:35 GMT -8
|
|
|
|
Post by Teachndad on Oct 19, 2019 10:14:31 GMT -8
Great camper. Sort of odd sleeping with all those windows up front.
"They are looking for someone to restore the trailer."
Somebody to restore it for them or somebody to buy and restore it?
I only know that they were looking for someone to restore it. I took that as just to restore it and not sell it to them. I would hate to see it just sit in a barn or a garage the rest of it's life. It should go into a museum where people can see it. The problem is that the Pierce Arrow is extremely dated and I can't see it being used as a tow vehicle going to a vintage rally. On a flatbed yes, but ohhhhhhhhhhhhhhhhhhhhh so much work that would be. I have seen one modified with a lower tongue on it to be towed by a htich ball, but then it just looses everything for me. Cheers, Rod |
|
|
|
Post by Teachndad on Oct 19, 2019 9:02:15 GMT -8
Hi Chriss,
The first generation Ridge comes with a tow package. They all did. The wiring was stock and the the third fuse box is dedicated to the trailer, I believe. Everything I have read on the first generation Ridge was about how they designed it for towing. I am only presuming that the wiring for the trailer was designed for towing as well. But, you never know. I will look at the incoming wiring into that third fusebox to see the guage.
As for the trailer, it's under a tarp that takes me 30 minutes to re attach. Maybe on Veterans Day I can check.
Cheers,
Rod
|
|


 While a little frustrating, I sort of guessed it might happen.


 . Maybe it was just a sculpture? More likely there was a hard wire connection from below the nose where all the wiring was.