mobiltec
5K Member
 I make mistakes so you don't have to...
Posts: 9,822 
Likes: 3,749
1954 Jewel In Progress...
Currently Offline
|
Post by mobiltec on Jul 13, 2014 13:45:15 GMT -8
If the curbing is not also a full one inch in height to match up with the height of the rest of the framing then you will never get the buckles out. The roof has to be flat from one side to the other with no crown in the framing. Only reason they taper the ends down is so the toe nails don't stick up and put holes in the metal skin. Don't know if I am on the right track of the problem or not but that's the way I read your last post.
|
|
coloradoan
Active Member

Posts: 114 
Likes: 26
1959 Shasta Airflyte 16
Currently Offline
|
Post by coloradoan on Jul 13, 2014 14:06:45 GMT -8
What I don't understand is how the roof is "flat from one side to the other with no crown in the framing" if you're deliberately building a slight crown around the vent. That's all I did. And the vent is actually about 18" from the side. Boy, I do not want to take this all apart, but I will if I have to. |
|
coloradoan
Active Member
Posts: 114
Likes: 26
1959 Shasta Airflyte 16
Currently Offline
|
Post by coloradoan on Jul 13, 2014 14:16:24 GMT -8
But I'll try the stuffing idea first  It can't hurt. |
|
John Palmer
Senior Member
 Hi, From a vintage trailer guy located in Santa Ana, CA. It's good to see lots of activity here.
Posts: 1,629
Likes: 576
Currently Offline
|
Post by John Palmer on Jul 13, 2014 15:01:14 GMT -8
Ugh, I wish I would have thought to do the shimming method yesterday but now it's too late. I'm learning some lessons the hard way with this project.  You guys will probably cry when you see this (I know I did  ), but the mistake has been made, and I am in major need of some help! I cut the street side too short accidentally because I got carried away with my aluminum shears because I didn't have staples in that spot to guide me yesterday (and was going too fast). I am thinking maybe I can fold the roof over more on that part and lower the drip rail a little to cover it. Is that the best thing to do or is there some other trick I can do to fix this major screw up?? I'm so mad at myself for doing this to my new, beautiful skin!! The electric shears were awesome and made the job so much easier, but they were also a curse at the same time because they cut so fast that it's easy to make a mistake. I was also thinking I could shave off a little of the wood on both sides to make the gap smaller, but that would only take me so far. Advice is much appreciated!! 
Well.......I might try to remove both panels first.
Then move the top panel "up" to the point necessary to fix the roof edge Oops! You can add addition wood to the framing to give you something to staple the center seam too.
Is that dark area in the back, where you already cut the top of the side window? If it is, forget my above suggestion.
|
|
jannica
Active Member
Posts: 185
Likes: 26
Currently Offline
|
Post by jannica on Jul 13, 2014 17:17:50 GMT -8
Thanks John, but you're right, that's the window cut out that I started before screwing up the edge trimming.  |
|
mobiltec
5K Member
I make mistakes so you don't have to...
Posts: 9,822
Likes: 3,749
1954 Jewel In Progress...
Currently Offline
|
Post by mobiltec on Jul 13, 2014 17:22:36 GMT -8
If need be you can always over lap a little metal using a lap joint just to cover the exposed wood curbing and what ever. Seal the lap joint with gutter seal. Once the J rail is on it will be hard to notice. I've seen many repairs done this way when a tree branch takes out the top side of the trailer.
Coloradoan the crown on the vent does cause buckling a bit if it's in the center of the trailer but it is so negligible that by the time it get's to the sides it is dealt with as shown in the roof videos. Hard to explain here but I do show the method of dealing with it. However, if the framing is crowned on the top of the trailer it will never work. We've discussed this in other threads before when people had the idea to crown the ceiling joists for more run off and stronger roof. The metal just won't bend in two directions at once without a machine like a shrinker stretcher and I don't know if that would work either. Perhaps if the entire roof was stamped. In the Taking My Act On The Road series I show the framing done on the Forester. It is a full one inch. The ends are tapered only to keep the heads of the nails from protruding.
So I'm still not sure I understand you but could you tell me? Did you crown all the roof framing from the centers to the ends or just taper the last 6 inches or so of each end? If tapered at the ends only the curbing needs to be one inch also. Not 3/4 that it's tapered down to. Wish I could see more photos of the framing compared to the curbing.
|
|
jannica
Active Member
Posts: 185
Likes: 26
Currently Offline
|
Post by jannica on Jul 13, 2014 17:45:21 GMT -8
Thanks Larry, I think that plan might work better than me trying to fold over the roof to cover it. I wasn't sure if I could seal it properly but I'll do some more research and make sure I patch it as best as possible. I am definitely going to be more careful from now on!
By the way, I'm watching your videos now on installing the roof on the Westerner. Trying to make sure I'm following what you said about letting you make the mistakes so I don't have to. Hehe
|
|
jodybitzz
Active Member
Posts: 238
Likes: 87
1968 Shasta 1500
Currently Offline
|
Post by jodybitzz on Jul 13, 2014 18:24:01 GMT -8
After reading some of the posts above, I feel very fortunate that we didn't have any unfixable mistakes and we made great time skinning the whole trailer in 2 days! 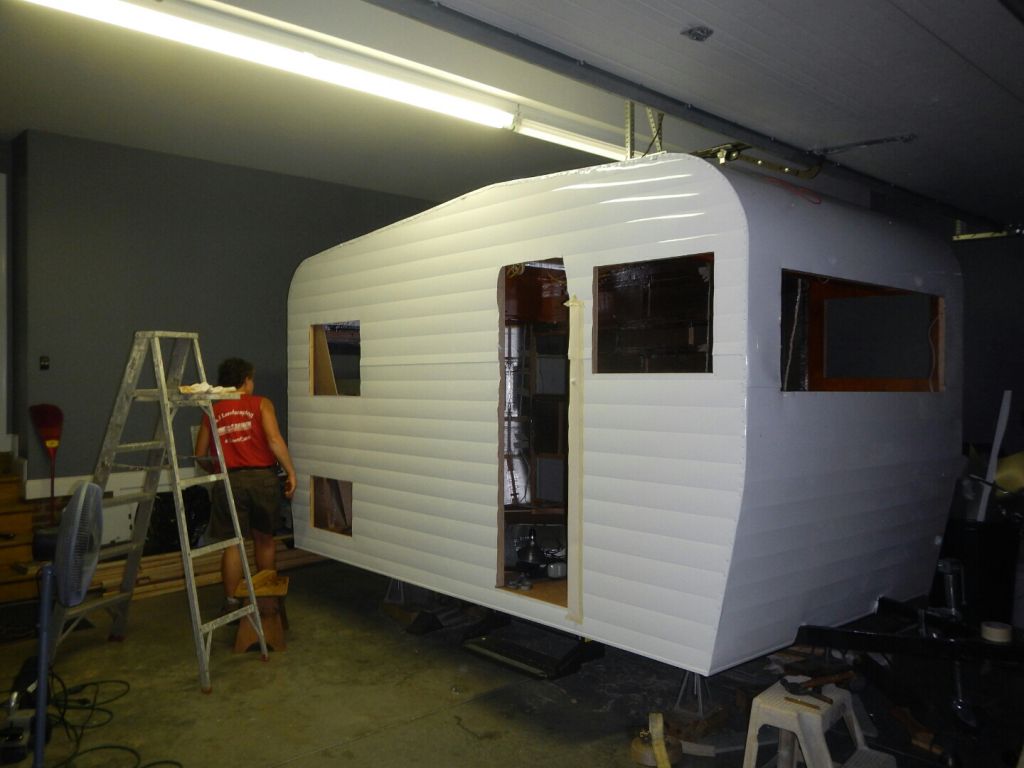 |
|
SusieQ
Global Moderator 
Posts: 4,781
Likes: 1,197
'62 Shasta Compact
Currently Offline
|
Post by SusieQ on Jul 13, 2014 18:26:20 GMT -8
WOW! It's beautiful!!!! Great job! So pristine and unblemished. Beautiful sight!
|
|
jannica
Active Member
Posts: 185
Likes: 26
Currently Offline
|
Post by jannica on Jul 13, 2014 18:33:02 GMT -8
After reading some of the posts above, I feel very fortunate that we didn't have any unfixable mistakes and we made great time skinning the whole trailer in 2 days! Looks great! Wish I could say the same for mine but maybe I will do better on my next trailer! I'm already thinking about which one I'll get next, this addiction has really taken hold. Lol Looks like you have a nice workspace there. My driveway and tiny garage are really starting to cramp my style. Haha |
|
mobiltec
5K Member
I make mistakes so you don't have to...
Posts: 9,822
Likes: 3,749
1954 Jewel In Progress...
Currently Offline
|
Post by mobiltec on Jul 13, 2014 18:33:40 GMT -8
It's a whole new trailer... all together... Nice job and congrats Jody.
|
|
jodybitzz
Active Member
Posts: 238
Likes: 87
1968 Shasta 1500
Currently Offline
|
Post by jodybitzz on Jul 13, 2014 19:37:20 GMT -8
After reading some of the posts above, I feel very fortunate that we didn't have any unfixable mistakes and we made great time skinning the whole trailer in 2 days! Looks great! Wish I could say the same for mine but maybe I will do better on my next trailer! I'm already thinking about which one I'll get next, this addiction has really taken hold. Lol Looks like you have a nice workspace there. My driveway and tiny garage are really starting to cramp my style. Haha We have been lucky to have a nice shop and garage to work in. However, our house has sold and we are closing at the end of August! So, we really need to get moving along with this "little project". I can't believe you are already thinking about your next one...... Glutton for punishment. . |
|
SusieQ
Global Moderator
Posts: 4,781
Likes: 1,197
'62 Shasta Compact
Currently Offline
|
Post by SusieQ on Jul 13, 2014 21:05:31 GMT -8
Is gutter seal paintable?
|
|
coloradoan
Active Member
Posts: 114
Likes: 26
1959 Shasta Airflyte 16
Currently Offline
|
Post by coloradoan on Jul 13, 2014 22:20:50 GMT -8
Coloradoan the crown on the vent does cause buckling a bit if it's in the center of the trailer but it is so negligible that by the time it get's to the sides it is dealt with as shown in the roof videos. Hard to explain here but I do show the method of dealing with it. However, if the framing is crowned on the top of the trailer it will never work. We've discussed this in other threads before when people had the idea to crown the ceiling joists for more run off and stronger roof. The metal just won't bend in two directions at once without a machine like a shrinker stretcher and I don't know if that would work either. Perhaps if the entire roof was stamped. In the Taking My Act On The Road series I show the framing done on the Forester. It is a full one inch. The ends are tapered only to keep the heads of the nails from protruding. So I'm still not sure I understand you but could you tell me? Did you crown all the roof framing from the centers to the ends or just taper the last 6 inches or so of each end? If tapered at the ends only the curbing needs to be one inch also. Not 3/4 that it's tapered down to. Wish I could see more photos of the framing compared to the curbing. Wish I had a good photo of the framing up there, but I'm realizing I've been racing to the finish line and completely neglected to document the roof framing properly! The rafters are straight and only tapered the last six inches or so, and I only did this on the two rafters on either side of the roof vent. All the other rafters are straight all the way across and there's no buckling anywhere else - just near the vent (both sides, although streetside is the worst). Does this help? I will watch the videos you mentioned about the Westerner roof. Don't think I've seen those. Thanks for all your help. Like I said, I'll do whatever it takes to make this right. I've come too far to have it screwed up now. |
|
|
|
Post by vikx on Jul 13, 2014 22:39:30 GMT -8
Pry too late but:  See the notches?  Cut notches in the overlap and staple. Seal every staple and notch SPARINGLY with Gutter Seal. |
|


 It can't hurt.


 ), but the mistake has been made, and I am in major need of some help! I cut the street side too short accidentally because I got carried away with my aluminum shears because I didn't have staples in that spot to guide me yesterday (and was going too fast). I am thinking maybe I can fold the roof over more on that part and lower the drip rail a little to cover it. Is that the best thing to do or is there some other trick I can do to fix this major screw up?? I'm so mad at myself for doing this to my new, beautiful skin!! The electric shears were awesome and made the job so much easier, but they were also a curse at the same time because they cut so fast that it's easy to make a mistake. I was also thinking I could shave off a little of the wood on both sides to make the gap smaller, but that would only take me so far. Advice is much appreciated!!


