charliemyers
Active Member

Posts: 181 
Likes: 58
Currently Offline
|
Post by charliemyers on Jun 21, 2018 12:28:43 GMT -8
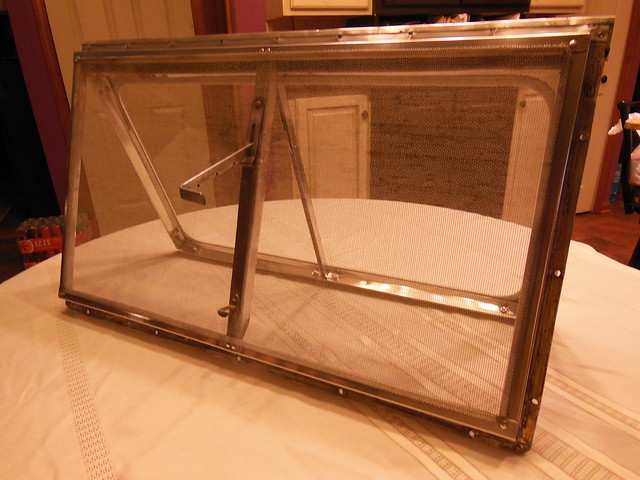
I'd be interested in info about the round window too! My assumption is that one could use a square piece of glass, build some framework inside the door to hold it, and cut round holes in the door. But how would you go about sealing it?
|
|
datac
Active Member
Posts: 339
Likes: 170
1957 Cardinal
Currently Offline
|
Post by datac on Jun 21, 2018 12:53:27 GMT -8
It's easy enough to cut glass to any shape you want, the hard part is finding the aluminum framework and trim. The only newish ones I've found have black or white plastic surrounds, which equals yuck.
|
|
CorvettCrzy
Full Member
Posts: 934 
Likes: 273
'58 Corvette, '64 Franklin
Currently Offline
|
Post by CorvettCrzy on Jul 11, 2018 19:35:48 GMT -8
datac Amazon - scoped them out about a year and half ago and there were a few to choose from. Checked back a month and only this one, but fortunately this is the one that had most reviews that were installed in an RV or van. In order to make it work on the thinner door, we scrapped the inside ring added some plywood as a backer and screwed through the wood into the window instead of alum. ring. Worked out well (no issues so far, 4700 miles was a good test). I'll add a couple of ext. and interior pics tomorrow.
|
|
CorvettCrzy
Full Member
Posts: 934
Likes: 273
'58 Corvette, '64 Franklin
Currently Offline
|
Post by CorvettCrzy on Aug 3, 2018 15:42:36 GMT -8
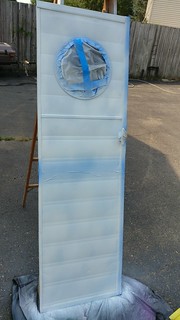
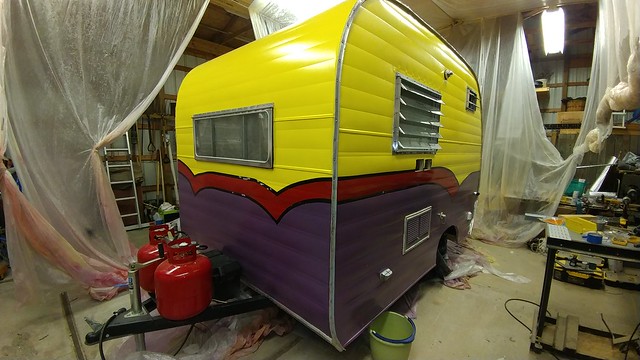
So we managed to get all the important stuff done before we left on our trip. We didn't have time to paint the door, finish the gaucho, and a few other odds and ends that were primarily cosmetic. As you can see the black Rustoleum rattle can stripe didn't hold up to the striping tape. Not sure why. Could have been too fresh. I decided to touch it up. We were pretty happy with the rest although we've decided the bottom needs a second coat which we'll do when we paint the door.
 Almost there, 3 days left before our trip. Almost there, 3 days left before our trip. by Corvett crzy, on Flickr  Grand T's Grand T's by Corvett crzy, on Flickr It was fun to finally see the awning up! 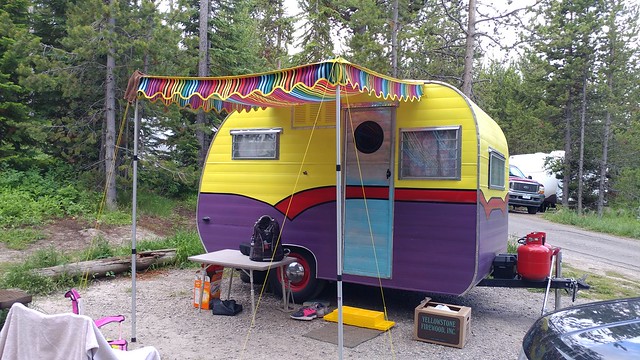 Signal Mountain Camp GT Signal Mountain Camp GT by Corvett crzy, on Flickr Another lesson to learn - put the skin on during a warm day, the warmer the better. Apparently in 110 degrees is stretches causing the ripples you see below. 98% of the ripples are gone now that we're back in sane weather. But I'm sure as soon as we vacation south they'll come back. Good to note that this was the original skin, so 60+ didn't make a difference? Now wondering if it was the wood?  Route 66 Wigwam Motel Route 66 Wigwam Motel by Corvett crzy, on Flickr I will update with interior pics once we get the gaucho done. Jim has been finishing things up since we've been back. Hopefully painting in the next week or so. |
|
CorvettCrzy
Full Member
Posts: 934
Likes: 273
'58 Corvette, '64 Franklin
Currently Offline
|
Post by CorvettCrzy on Aug 22, 2018 19:20:50 GMT -8
|
|
ynot119
New Member
Posts: 2
Currently Offline
|
Post by ynot119 on Sept 5, 2018 1:54:07 GMT -8
I know most of you could do this in your sleep, but this is my first finished project (sort of) and I'm pretty proud of it. I was going to wait to post my progress until I was finished with all the windows, but I couldn't resist.
 T25 by Corvett crzy, on Flickr T25 by Corvett crzy, on Flickr
 T27 by Corvett crzy, on Flickr T27 by Corvett crzy, on Flickr
 T21 by Corvett crzy, on Flickr T21 by Corvett crzy, on Flickr
Are these Woodlin windows? I have similar ones and I'm having a difficult time identifying them. Did you have trouble finding replacement gaskets? |
|
CorvettCrzy
Full Member
Posts: 934
Likes: 273
'58 Corvette, '64 Franklin
Currently Offline
|
Post by CorvettCrzy on Sept 5, 2018 16:53:56 GMT -8
ynot119 My windows are Hehr windows. I purchased my gaskets from Vintage Trailer Supply. However there's another website vintagetrailershop.com who has an impressive selection of seals and gaskets. You might want to try there.
|
|
charliemyers
Active Member
Posts: 181
Likes: 58
Currently Offline
|
Post by charliemyers on Sept 6, 2018 4:19:22 GMT -8
|
|
CorvettCrzy
Full Member
Posts: 934
Likes: 273
'58 Corvette, '64 Franklin
Currently Offline
|
Post by CorvettCrzy on Sept 20, 2018 16:49:54 GMT -8
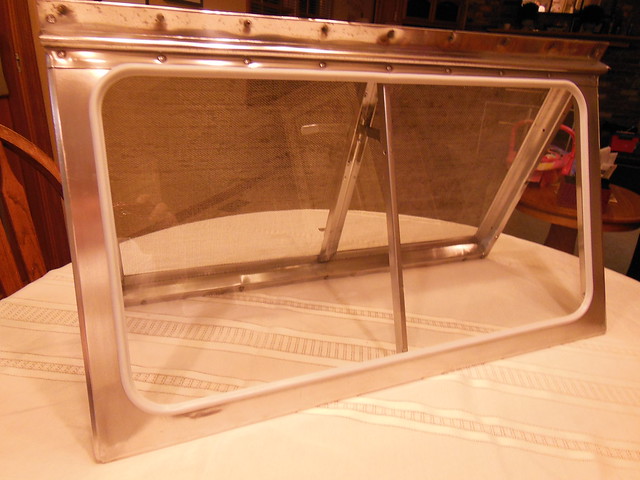
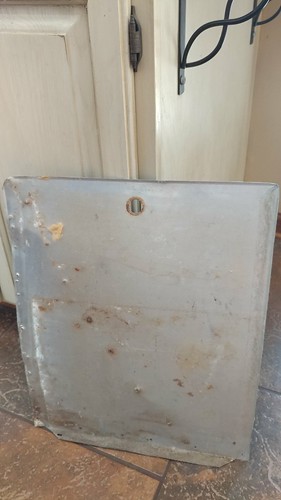
Have to find a way to replace this storage door. After much research, I'm thinking about just buying one! I like the look of the original better. But I've made trips to 2 junk yards with no luck. I am concerned that we cannot duplicate the slight radius around the edges, which in my opinion is what makes it look vintage.
 Storage door Storage door by Corvett crzy, on Flickr 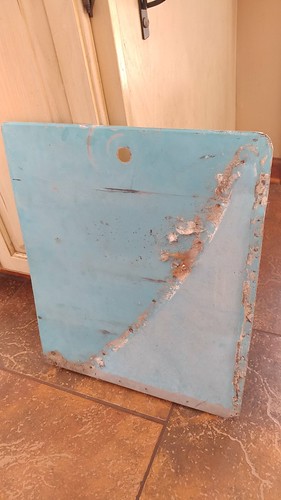 Storage door Storage door by Corvett crzy, on Flickr |
|
CorvettCrzy
Full Member
Posts: 934
Likes: 273
'58 Corvette, '64 Franklin
Currently Offline
|
Post by CorvettCrzy on Sept 20, 2018 17:02:19 GMT -8
Just when I thought we were finished with painting...... Jim just couldn't bear to look at the dents above the kitchen window he felt responsible for. Error of a novice, 5 years ago. So here we are, after some filler and more sanding, getting ready to paint again. When he first mentioned sanding with a disc sander, it struck fear in my heart. My immediate response was -- your going to ruin 60 year old skin. "You'll thin it out!" I said and damage it beyond repair I thought. I came here and asked if anyone had done it. Shared with him the it was ill advised from the experts. "It'll be fine", he said. It actually worked out ok. Mainly because he's a professional at sanding and he found some stuff I didn't know existed. Along with having the right tools for the job: You can see the bottom is sanded, very lightly, he only went through the top coat in areas where there was excess paint or damage.  Here we go again Here we go again by Corvett crzy, on Flickr Why did it work, these:  Disc sanding? Disc sanding? by Corvett crzy, on Flickr And the fact that there is a sponge type thing between the "net" and the disc of the sander. When very little pressure is applied the sponge compresses allowing you to adjust the pressure lightly. 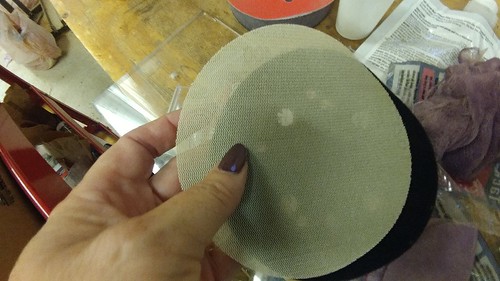 Disc sanding? Disc sanding? by Corvett crzy, on Flickr  Disc sanding? Disc sanding? by Corvett crzy, on Flickr The only issue I had was that it was unwise to try to get into the breaks and without sanding them, I was worried that adding an additional layer of paint would make them less obvious. And I don't want to lose my skin pattern. So I hand sanded the creases. 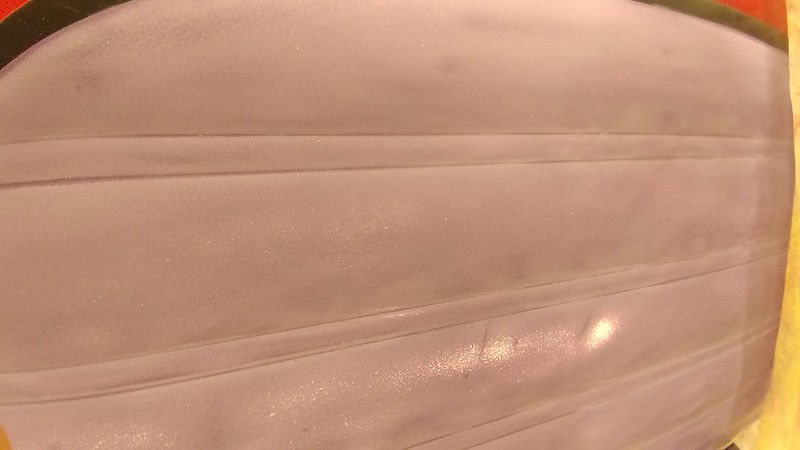 Disc sanding? Disc sanding? by Corvett crzy, on Flickr Almost ready! |
|
|
|
Post by vikx on Sept 20, 2018 19:11:30 GMT -8
Isn't re-painting just the peachiest???
|
|
n1james
New Member
Posts: 3
Likes: 2
Currently Offline
|
Post by n1james on Sept 24, 2018 5:51:34 GMT -8
Just checked the entire thread from the very beginning! I really dig this bright colored styling, looks very oldschool. Good luck with it!
|
|
|
|
Post by Teachndad on Jul 6, 2019 5:03:55 GMT -8
Hi Friends, This is a tale of perseverance and resourcefulness. I just finished reading the entire thread. You managed to overcome the obstacles.  Great job! Thank you for sharing your journey. Cheers, Rod |
|
CorvettCrzy
Full Member
Posts: 934
Likes: 273
'58 Corvette, '64 Franklin
Currently Offline
|
Post by CorvettCrzy on Jul 15, 2019 9:42:51 GMT -8
Hi Friends, This is a tale of perseverance and resourcefulness. I just finished reading the entire thread. You managed to overcome the obstacles. Great job! Thank you for sharing your journey. Cheers, Rod Thank you so much for your kind words! It has definitely been a labor of love, and maybe a little cursing at times. We have learned so much from all of you here, there is no way we could begin to thank everyone for all the knowledge that is shared on these pages. Whenever we had a problem, I just started searching, and found at least some information if not the exact answer we were looking for. I'm hoping that someone might read something here that might be a little help to them. |
|
CorvettCrzy
Full Member
Posts: 934
Likes: 273
'58 Corvette, '64 Franklin
Currently Offline
|
Post by CorvettCrzy on Jul 15, 2019 9:49:48 GMT -8
The journey continues for at least a bit longer and who knows if Petals will ever be "finished". I can see there is a danger that we might continue to think of "improvements" and alter her too much. But we still have a few things left and then I hope to focus my husband on our next project: Frankie! Over the winter we finished a few things: The Gaucho (it was a long process, Jim redesigned it many many times in his head, this was by far the part that took him the longest). He also built boxes to hide the wheel wells during this process.  2019 updates 2019 updates by Corvett crzy, on Flickr  2019 updates 2019 updates by Corvett crzy, on Flickr  2019 updates 2019 updates by Corvett crzy, on Flickr I finally finished two new eyebrows (1 for the window size change from plexi to Jalousie in the front curbside, and the little addition for the bunk on the street side). We will get those on this week. Still to go: figure out what to do for a storage door and possibly add a small gray water tank for the sink (the bucket wouldn't fit under on this last trip). And figure out how to attach my ice box door to the refrigerator, I just hate that ugly door in my vintage camper. |
|