|
|
Post by Teachndad on Jan 28, 2018 4:31:58 GMT -8
Hi Friends, I have been slowly working on building a new floor for my Westerner. As some of you may recall, the frame was rewelded to mitigate some frame sag. The result is an upward arch of the C-Channel from front to back, which culminates with a 3/8" drop at the base of the tongue. Off the board discussions supported the idea of just living with the drop and molding the floor over it rather than trying to shim and level it out for just 3/8". In order to keep the plywood sheets resting on the C channel and following the contour of the frame, I need to shave the sill boards. The C-Channel is 3 1/8" tall. I am looking for tips on how to shave the sill boards. I bought new wood for the sill boards yesterday and my frame is leveled out. I figured I could shave by first creating a pencil line by running a long straight edge across the tops of the C channel. Then, where the straight edge meets the sill board I would mark that point with the pencil. I just repeat that all the way down the length of the frame. The pencil line would be my cut guide. Now, here is my conundrum. Do I shave to the pencil line by sanding down with a belt sander, or do I cut first with a saber saw or a skill saw? Then I could hand sand smooth or take the belt sander and smooth things out. I have some scraps of 2 x 4 lying around that I can test on first. Just looking for the best solution. Maybe there is something better out there that I haven't considered. I don't have a table saw. BTW, I am adding additional support blocking under the floor along every frame cross member between the tops of the frame cross members and the bottom of the plywood floor. The photo below shows just the blocks between the inside of the frame. I will block over the outriggers as well. 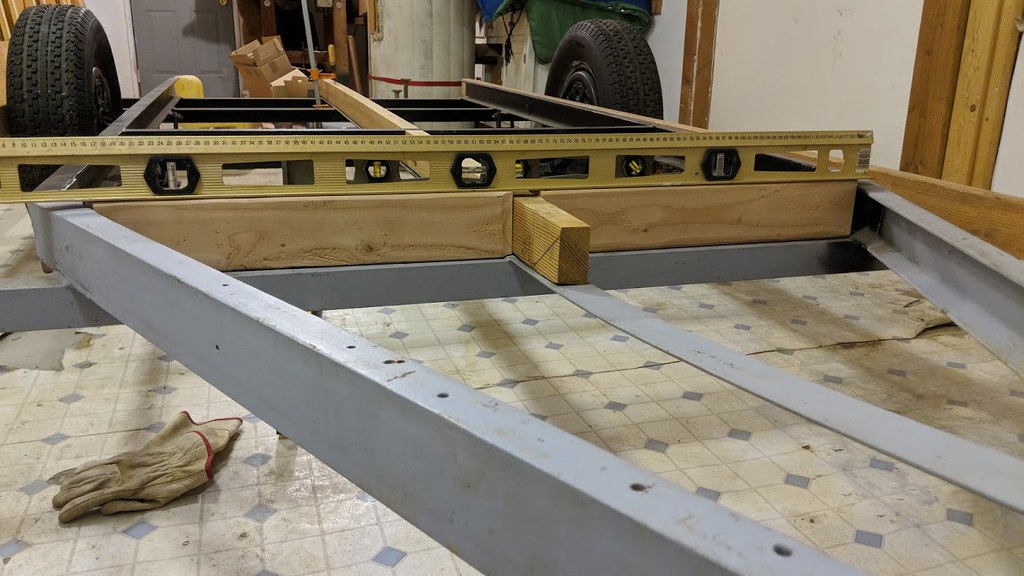 Thanks, Rod |
|
shastatom
Full Member
 I can chase women or fix campers, I choose to fix what I understand........... campers.
Posts: 745 
Likes: 419
Shasta 54,57 1500 58 Airflyte
Currently Offline
|
Post by shastatom on Jan 28, 2018 7:13:40 GMT -8
If you don't have a hand plane or a power plane or table saw or band saw, then I guess the methods you talk about would get you there. I would look at buying a hand plane at the least.
Or you can do what I do, I always look for a reason to buy a tool. This sounds like a good time to get a table saw.
|
|
roadtripper
Active Member
Posts: 311
Likes: 116
Currently Offline
|
Post by roadtripper on Jan 28, 2018 7:31:16 GMT -8
Hi Rod
If you are into buying another tool you could get a hand held power plane. Should be able to get a decent enough one for 60 to 100 bucks I’m guessing, maybe cheaper. You’ll find other places to use it too.
Scribe your line and plane to it. Practice on a scrap first. Taking a narrow cut with the skill saw and sander will workout harder to get a nice square cut.
A little trick for ripping with a skill saw...carefully follow your cut line for about 8 inches then stop. Hold the saw where it sits then clamp a small vice grip on the front of the saw base next to the board. Resume the cut with the vice grip following the side of the board as a guide.
Your gonna have a beauty there when you’re done.
|
|
maddan
Junior Member
Posts: 71
Likes: 21
57 Westerner
Currently Offline
|
Post by maddan on Jan 28, 2018 9:28:22 GMT -8
Hello fellow Westerner,
I had the same issue with my rebuild. I wasn't in to buying more tools, nor did I have access to a table saw. So I opted to rip the floor joists (2x4's) to match the height of the C-Channels (3 1/8"). I bought a new blade for my circular saw, designated for ripping. Prior to making a rip, I made sure each 2x4 was anchored securely on my plywood bench, either by fastening the 2x4 to the bench using counter-sunk screws, or a number of clamps, which would require repositioning during the cut. I set the rip guide on my circular saw to leave me with a 2x4 that measured 3 1/8" in height. The process worked fine, the finished joists were uniform in measurement. The cut sides were nice and flat. The key here was to secure your lumber before starting your rip, keep pressure to ensure your saw guide is tight against the side of the lumber being cut, and to go slow with your cut. I think using a sander or other method to shave the tops will result in an uneven top edge. Ripping the 2x4's will give you a nice straight edge along the top.
Good luck!
Dan
|
|
charliemyers
Active Member
Posts: 181
Likes: 58
Currently Offline
|
Post by charliemyers on Jan 28, 2018 10:19:31 GMT -8
Hello fellow Westerner, I made sure each 2x4 was anchored securely on my plywood bench, either by fastening the 2x4 to the bench using counter-sunk screws, or a number of clamps... If you decide to attack it with a skill saw, this is an excellent idea. Some people can get away with ripping narrow stock without doing this, but lots of people lose digits trying. In all my years of woodworking, I’ve learned that properly holding you work is one of the most important skills you can learn for safety as well as the quality of your work. |
|
Deleted
Posts: 0
Currently Offline
|
Post by Deleted on Jan 28, 2018 11:17:20 GMT -8
I agree with charliemeyers. Securely holding the work while moving the tool, or holding the tool/fence solid while moving the work, is absolutely necessary for obtaining a clean cut, and most importantly SAFETY!
I like the idea of purchasing a power planer. This is a relatively inexpensive tool that you will find many uses for once you have it in your cabinet.
|
|
mel
Senior Member
 1964 Shasta Airflyte
Posts: 1,729 
Likes: 523
Currently Offline
|
Post by mel on Jan 28, 2018 13:38:20 GMT -8
I used my table saw to cut mine down, but i had to cut more off than you do
|
|
kirkadie
1K Member
Posts: 1,156
Likes: 556
'69 Serro Scotty Hilander
Currently Offline
|
Post by kirkadie on Jan 28, 2018 14:29:12 GMT -8
A well sharpened hand plane will do that job in no time. No need for power cords, no danger of whirling blades, and since you are using soft wood 2Xs, easy to get into the zone. Quiet, slow breath, zen-ful work. Power tools have a habit of taking off to much wood. And those are short boards: 10 minutes tops to do em both.
|
|
Deleted
Posts: 0
Currently Offline
|
Post by Deleted on Jan 28, 2018 14:42:08 GMT -8
zen-ful meditation while hand planning. I like it.
|
|
|
|
Post by vikx on Jan 28, 2018 20:29:08 GMT -8
I use my circular saw to rip boards to fit all the time. The fastest way to do it. You can sand to smooth but it's not really needed on a floor joist.
|
|
Deleted
Posts: 0
Currently Offline
|
Post by Deleted on Jan 28, 2018 20:39:47 GMT -8
Maybe I have it wrong...I believe Rod is trying to shave a curvature in his sill board, not a straight line. I'd use a jigsaw and sand smooth if you don't have a good hand plane.
|
|
turbodaddy
1K Member
Posts: 1,086
Likes: 462
17' 1965 Fan "Sunseeker"
Currently Offline
|
Post by turbodaddy on Jan 29, 2018 5:14:08 GMT -8
How about a drawknife? $30 at Northern Tool.  |
|
Deleted
Posts: 0
Currently Offline
|
Post by Deleted on Jan 29, 2018 14:42:29 GMT -8
Great for shaving spokes...very elegant solution!
|
|
|
|
Post by danrhodes on Jan 29, 2018 20:11:49 GMT -8
Maybe not totally applicable to your situation, but these trailers are pretty floppy until the box is totally framed. In my case, I used pry bars, levers and jacks to get everything to meet up, every step of the way. Especially when installing my walls on my floopy floor, I jacked the floor up to meet the walls and let it all find equalibrium once attached.
|
|
|
|
Post by Teachndad on Jan 29, 2018 22:16:27 GMT -8
HI Everyone, Sorry about the late response. Been really busy messing with a house. Thank you for all the great responses! It’s nice to know there are different ways to get the job done. I was previously clueless. Going down the pike with no experience and having to navigate the arc in the frame was really intimidating. I wish my frame was flat. Probably the first of many wishes I will make on the way to completing my first trailer, LOL. While, I might someday seek out the zenful slow careful wood working that Kirk suggests, I am going to seek out the power planer. I think it’s more my speed at the tender age of 56. When the power planer was first suggested in the thread, I researched what it was - not knowing what it looked like or exactly what it did. For my situation and prior experience(lack of), I think it will do the best job. I found one with good ratings for $40 at HD and Amazon. I will need to practice, first. BTW, I am working with a full length 10’ sill board that runs from the rear of the floor all they way to the front of the floor. The wood crossing over the wheel well opening will be cut later. I have seen others do this. As for the 16 smaller pieces of wood that will provide the blocking under the floor, I had constructed a jig several weeks ago after watching some videos on how to cut a straight line with a skillsaw. Here is what it I built.  I screwed it down to a junk table I have. I was going to clamp and then screw the short blocking pieces to the jig using some countersunk holes and line up on a pencil line. It is as of yet, untested. Maybe I will use one of the methods described above. Thank you all, once again. Rod |
|


