Dad Rambles
Active Member
  
Posts: 246 
Likes: 140
62 Shasta Airflyte
Currently Offline
|
Post by Dad Rambles on Sept 20, 2016 3:22:26 GMT -8
Hi Daddy R, Nice job. I am soooooooo happy working with Flicker now. I will not go back to Photo bucket to set up my albums ever again. Your tutorial was spot on and a Godsend. Cheers  , Rod You are most welcome! Glad that that it worked out well for you. |
|
Dad Rambles
Active Member
  
Posts: 246 
Likes: 140
62 Shasta Airflyte
Currently Offline
|
Post by Dad Rambles on Sept 10, 2016 6:33:54 GMT -8
I haven't looked back on this one in a while, but man this thing is looking great! Seeing all the birch come together with the cool look outstanding! I bet you're itching to camp in it? I sure would be.
Keep up the great work!
|
|
Dad Rambles
Active Member
  
Posts: 246 
Likes: 140
62 Shasta Airflyte
Currently Offline
|
Post by Dad Rambles on Sept 8, 2016 5:55:23 GMT -8
Are you looking for a full sand to bare wood, or just to remove the clear and then "reactivate" the old to blend with the new amber? You have to be careful when sanding to "bare wood." Most of the wood in these trailers is ply and if you are a little too vigorous sanding, you'll get to the next ply down. Dont ask me how I know this. 10-4. I was trying to be as minimally invasive as possible. Thanks! Are you looking for a full sand to bare wood, or just to remove the clear and then "reactivate" the old to blend with the new amber? It's hard to tell without being there. But in most cases just a light sanding and then reactivation of the old shellac with new works great. The manufactures didn't use a clear coat over the amber. We like to use a couple of coats of clear because of the shine it gives. Personally I go with 3 coats amber and two coats clear on new wood. You can also sometimes just get away with a good rub down using denatured alcohol with scotchbrite pads and then go in with new shellac. It takes a little testing to see what will work for each individual case. I was kinda hoping this was the case. Mine isn't that bad, just some scuffs and nicks in the areas on the end sides on the panels next to those I'll be replacing. I might just have to give it a whirl with the scotchbite pad and see what happens. Thanks to you both. Brian |
|
Dad Rambles
Active Member
  
Posts: 246 
Likes: 140
62 Shasta Airflyte
Currently Offline
|
Post by Dad Rambles on Sept 8, 2016 5:07:37 GMT -8
The wood was originally sealed and stained with shellac. You probably want to sand it all down a bit and give it some more shellac. Are you looking for a full sand to bare wood, or just to remove the clear and then "reactivate" the old to blend with the new amber? |
|
Dad Rambles
Active Member
  
Posts: 246 
Likes: 140
62 Shasta Airflyte
Currently Offline
|
Post by Dad Rambles on Sept 1, 2016 16:58:33 GMT -8
For me and the way I understand how these things were built, glue has it's places in the canned ham designs. For instance the curbing or edging as it's usually called. Great place for glue. The framing joints not so much. I have used glue but for joints that don't involve framing pieces to framing pieces. They are going to move anyhow and rightly should have a little give. The old chassis' on these trailers were not rigid. So you can't put a rigid box on them or the box will break. The newer trailers are built on solid, rigid frames and you could build just about anything on them without fear of flex. So it just depends on where you are talking about and what you are gluing for. In the cabinets I use glue all the time. I back it up with screws though. Then there's the edge board or edging. (curbing) Oh and lately I've been pre-fabing the ceiling panels by gluing the frame boards to the panels before installation. I also shellac them before install. Makes putting them up easier because of the lack of sag in the middle and pre-shellac means no shellac running down your arm. You have to make sure to use something that will hold and not bleed through the paneling though. I've had good luck with Tite-Bond. I need to make videos on that subject. The framing joints are mainly what I am concerned about, and I think you answered my question precisely. I figured they might need a little give in them. I can see the curbing too.. seems like it would help to hold the lamination together so the screws in the J rail will bite into it. I'm thinking I will probably do my ceiling panels that way too. I really believe in finishing all that you can before you install it. I did everything that way on the TD i'm currently finishing up. It's great to assemble it and look up and it's all completely finished. Thanks for help.. I haven't done much on my trailer yet (well almost nothing), but I enjoy the research and planning, and asking questions here. That's half of the fun for me, the research and construction methods and how it all pieces together. Brian |
|
Dad Rambles
Active Member
  
Posts: 246 
Likes: 140
62 Shasta Airflyte
Currently Offline
|
Post by Dad Rambles on Sept 1, 2016 16:24:36 GMT -8
Looking for thoughts here. I preface this with my only experience with travel trailers as coming from building my teardrop(ish) design trailer in my profile picture. I glued (PL premium) and screwed, and nailed everything together. Its' solid as a rock. I realize thought that those aerodynamics are quite a bit different that a flat front, high vintage TT. In many of the builds here and other places it seems that most people don't use glue (at least not that I've seen) in the framing 1x material connections. Is this normal for vintage trailer repair? I know (at least I think) that the originals weren't built with glue as the seem to come apart rather easily, part-from-part. Is the lack of glue add to the "give" that is necessary to pull a box down the road at 60-70mph? OR Would it be better to tighten things up a bit by adding glue to the pocket hole joints when I replace the ends/sides like I'm going to have to do? OR leave it as is. mobiltec you got me thinking about this in one of your last videos where you talked about all the engineering that goes into trailers. I don't want to screw with that, but I do know there are some shortcomings that can be addressed when repairing things. Having said all that, I've never seen you use glue mobiltec, so I figured there must be a reason. Thanks, Brian |
|
Dad Rambles
Active Member
  
Posts: 246 
Likes: 140
62 Shasta Airflyte
Currently Offline
|
Post by Dad Rambles on Sept 1, 2016 7:29:41 GMT -8
I plan on using something under mine, although not tape because of the reasons mentioned. Probably OSI gutter sealant mainly because it sticks really well, and is readily available at HD or L's. I had good luck with it and OSI quad on the teardrop.
|
|
Dad Rambles
Active Member
  
Posts: 246 
Likes: 140
62 Shasta Airflyte
Currently Offline
|
Post by Dad Rambles on Aug 27, 2016 9:47:49 GMT -8
You're welcome, you're welcome, and your're welcome.
I really wish that google photos would allow the same functionality as flicker. I have all of my photos on my computer and phone set to backup to it, and it's unlimited. BUT 1TB is a lot of storage, and something that I guess I'll deal with when I have to.
Having said that there is a flickr app that will auto backup photos from your phone to your account when you are on wifi. It works pretty good as well.
BTW. I'm gunguy05 that posted in the other forum, I just changed my username to align with my blog and all my other social media stuff. Trying to keep it simple and uniform, if there is such a thing these days.
Brian
|
|
Dad Rambles
Active Member
  
Posts: 246 
Likes: 140
62 Shasta Airflyte
Currently Offline
|
Post by Dad Rambles on Aug 25, 2016 17:35:57 GMT -8
There was some talk about photobucket being difficult to use, so I thought I would write up a short tutorial on how to use Flickr. It's free, currently give 1TB of storage for free, and IMHO is much easier to use than PB. 1. So for starters you need to create an account on Flickr.com. I'm not going to go into all of that part of it, it's pretty simple, just follow the directions on the main page on how to create an account. 2. Once you have an account you need to upload photos. That is accomplished by clicking the "upload button" that looks like an up arrow in the cloud (green arrows below) 
3. Once you have done that you will come to this screen. You can either drag and drop photos from a folder on your computer to this screen, or you can just click "Add" at the top left and select photos and add them. 
4. Next you will see the screen below. From this point you can place the photos in an album if you like (left side of screen), or make a new album, or you can just hit upload (top right side of screen), then click "upload" again on the box that pops up in the middle of the screen to confirm this. 
5. After the photos are done uploaded, you will be taken out to the main screen or "photostream". Here all of your photos are loaded on the page. If you like, you can scroll down the page and see all of them. You can see the last photo that was uploaded in the upper left column. Click on the photo. (my last photo is in the green box below)

6. Here's the important part! - after you open the photo by clicking on it, it will open in a larger window. Click the "right turn arrow" in the lower right corner of the photo. (it's the red box with the arrows pointing at it below) 
7. Clicking that box will bring up the box to copy the code that needs to be pasted here on the forums. Cick on the"BB code" tab, select a size (I use medium ), and then copy the code by right clicking and selecting "copy" or holding down "ctrl C" on your keyboard. This will save the code.
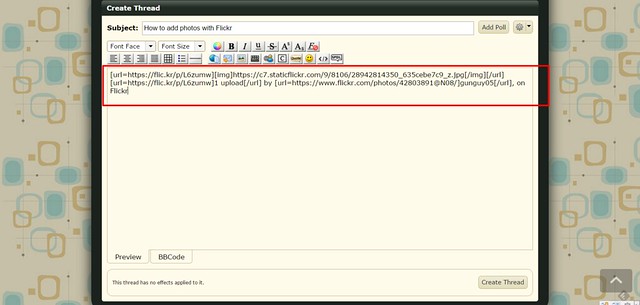
 8. Next, open the post or reply to a post, here, on the VTT forums. In the message box PASTE the code by either right clicking and selecting "paste" or holding down "ctrl V". AFter you do that you can toggle bewteen the "preview" tab and the "BB Code" tab, and the preview of the image should appear. It should be embeded in the message. 
7 - paste code in thread by gunguy05, on Flickr Note: The photo name, and your username will appear with the photo. If you want, you can delete that by clicking on it in the preview screen and deleting it out before you "create the thread" or "reply to post". |
|
Dad Rambles
Active Member
  
Posts: 246 
Likes: 140
62 Shasta Airflyte
Currently Offline
|
Post by Dad Rambles on Jul 20, 2016 6:10:37 GMT -8
I have to ask.. Is there any such rally similar to this in the fall, somewhere in the South? Have not heard anyone say so, so I assume not. But wanted to inquire. It seems like so much fun when the air is crisp, the fire warms you up and the colors around you are amazing. But, still want to see this one if I can, thanks! Checkout southern vintage trailer friends. They have a gathering every month (I think) throughout the year. Google them, they are on Facebook and have a regular website |
|
Dad Rambles
Active Member
  
Posts: 246 
Likes: 140
62 Shasta Airflyte
Currently Offline
|
Post by Dad Rambles on Jul 20, 2016 3:16:51 GMT -8
Thanks Dan. Didn't think it was the perfect solution. Cheap and perfect rarely intersect, but I like to try and keep the balance. I think this should be the quote of the week, or possibly of my life. I try to walk this very thin line as well. |
|
Dad Rambles
Active Member
  
Posts: 246 
Likes: 140
62 Shasta Airflyte
Currently Offline
|
Post by Dad Rambles on Jul 20, 2016 3:15:33 GMT -8
I use Google photos to backup everything I do on my camera, and on my phone automatically when I'm on Wi-Fi. But, it doesn't play real well with a lot of the forums that I frequent, so I do use Flickr for that.
|
|
Dad Rambles
Active Member
  
Posts: 246 
Likes: 140
62 Shasta Airflyte
Currently Offline
|
Post by Dad Rambles on Jul 19, 2016 11:36:18 GMT -8
Glad to hear that things went well for the trip. When we brought our's home..... that was butt tightening trip. I was on a "12" for the entire trip (about 6 or 7 hours)... I swear I looked in the rear view mirror and side mirrors 10 thousand times, just waiting on something to fly off or collapse.
Looks like you have a good start. I just subscribed to your YT channel. I will be looking forward to the updates. I do videos as well (of my 2nd teardrop now, soon to be 62 Airflyte restoration).
Good luck and keep us posted.
|
|
Dad Rambles
Active Member
  
Posts: 246 
Likes: 140
62 Shasta Airflyte
Currently Offline
|
Post by Dad Rambles on Jun 29, 2016 3:38:12 GMT -8
I third what was said above. If there is an open hot somewhere, you would want those electrons to flow through the frame and not through you. All grounds should be together so that the ground potential is equal and you are not part of that potential.
|
|
Dad Rambles
Active Member
  
Posts: 246 
Likes: 140
62 Shasta Airflyte
Currently Offline
|
Post by Dad Rambles on Jun 1, 2016 17:26:22 GMT -8
I have a set of those and they have worked great thus far. The thing I like about them is that the trigger speed is variable, like a drill. It makes very or is cuts possible if you take your time. They will practically walk their at right through the metal. I used them on .040 and had no issues.
|
|