sydneyc
New Member
Posts: 11
Currently Offline
|
Post by sydneyc on Sept 30, 2023 21:48:50 GMT -8
Hi,
I'm very very new to this world, I am now the proud owner of a 1966 Aristocrat Lo-liner that has been painted (poorly) and gutted by someone else. I'm ready to dive in and fix it up right, I've seen lots of info on how to go about from the outside, but not much on the interior... guess that's something to figure out once the outside is done! My main focus right now is to get out some of the denting and such on the outside, and figure out what to do when I see what kind of damage is under the skins. Unfortunately my area has rules against keeping campers in the driveway and it won't fit in my garage, so I'll be doing all my work at my local self-storage...luckily they seem cool with it. Wish me luck!
<img src="https://onedrive.live.com/embed?resid=8DC50AA298BEC8BE%2143144&authkey=%21AJmka4lDD0eOrZk&width=660" width="660" height="auto" />
|
|
|
|
Post by vikx on Oct 1, 2023 13:17:50 GMT -8
Welcome.
The skins come off first. The interior is rebuilt while the framing is bare. It's important that the cabinets and closet are in place (or rebuilt), as they help square the walls. There are several threads here on rebuilding and Loliner interiors.
|
|
sydneyc
New Member
Posts: 11
Currently Offline
|
Post by sydneyc on Oct 1, 2023 18:04:35 GMT -8
I'll just add this on, there were these weird panel things that had been put up, so I decided to take them down just to get an idea what was under, and do the skins all next weekend. I discovered that a lot of wood seems to be missing...? It doesn't look like some of the other photos I've seen on here. Looks like I have a long road ahead.
<img src="https://onedrive.live.com/embed?resid=8DC50AA298BEC8BE%2143328&authkey=%21AFyxPD9pSvtJTek&width=660" width="660" height="auto" />
<img src="https://onedrive.live.com/embed?resid=8DC50AA298BEC8BE%2143326&authkey=%21AJz1TZNFr9xDThA&width=660" width="660" height="auto" />
<img src="https://onedrive.live.com/embed?resid=8DC50AA298BEC8BE%2143323&authkey=%21AFVRB-KtGMwEDhU&height=660" width="auto" height="660" />
<img src="https://onedrive.live.com/embed?resid=8DC50AA298BEC8BE%2143321&authkey=%21ABiiXNn1eD9J8M4&height=660" width="auto" height="660" />
<img src="https://onedrive.live.com/embed?resid=8DC50AA298BEC8BE%2143320&authkey=%21AEjxdLfa_5KgvtY&height=660" width="auto" height="660" />
<img src="https://onedrive.live.com/embed?resid=8DC50AA298BEC8BE%2143318&authkey=%21ALJv_OjVp2A-G34&height=660" width="auto" height="660" />
<img src="https://onedrive.live.com/embed?resid=8DC50AA298BEC8BE%2143312&authkey=%21ACSZWXNbBAAtJoM&width=660" width="660" height="auto" />
|
|
|
|
Post by vikx on Oct 2, 2023 13:00:05 GMT -8
Not much original left. Hopefully, you find some photos of Loliner builds to help you. If you need more, PM me for my email address.
|
|
sydneyc
New Member
Posts: 11
Currently Offline
|
Post by sydneyc on Oct 2, 2023 20:48:00 GMT -8
Not much original left. Hopefully, you find some photos of Loliner builds to help you. If you need more, PM me for my email address. This might be a dumb question, but is there a source to find the measurements for rebuilding the walls? Because I have her parked in storage, I was thinking if I have the walls mostly built prior to lifting the skins it'll be smoother. I could build them in my garage and then take them over on a flat bed to assemble. |
|
|
|
Post by vikx on Oct 3, 2023 11:56:58 GMT -8
Make the walls to match the skins. You can do one at a time. Just lay the metal down and frame the wall to match. Don't forget to put backers for light fixtures and other appendages. (this can be done after you get the wall attached to the trailer)
Note: match both sides rather than making twins. Many walls were not the same from the factory.
|
|
sydneyc
New Member
Posts: 11
Currently Offline
|
Post by sydneyc on Oct 10, 2023 18:25:15 GMT -8
I feel like I'm getting more lost by the day... I'm fairly certain the roof will be salvageable but haven't been able to get up there to take the skins off because the walls are far too unstable and it feels unsafe. I only found one small spot that needs to be fixed on the floor. So I have a roof and floor that are useable but all the walls need to come down. I know that I need to get new aluminum for at least the door side and front, not sure about the rest.
I have no clue how to get the roof part down without the whole thing collapsing on itself. I'm also concerned about rust on the frame (photo below). How much is too much rust? I'm getting increasingly discouraged but at this point I think I need to see it through. What steps would you take from here? I already have the skin off the door side and rebuilt a new wall and paneling. But now what?
<img src="https://onedrive.live.com/embed?resid=8DC50AA298BEC8BE%2143375&authkey=%21AImBCgEXKGgDrqk&width=660" width="660" height="auto" />
|
|
|
|
Post by vikx on Oct 11, 2023 12:17:54 GMT -8
That is very minor rust, so it's good there. You can wire brush and paint to get it better. POR15 is a good product; I use Rustoleum Satin Black.
Support the inside of the trailer with 2 by 4s to allow access to the roof. You can roll it or float from side to side for repairs.
|
|
|
|
Post by Teachndad on Oct 13, 2023 6:12:59 GMT -8
Hi, It pains me to no end that people gut their trailers.  It really ruins them.  In most cases, if they had left it alone, the repairs would have been always easier. Enough said. I know this is overwhelming and very intimidating. Try to take it one step at a time. In the picture below, the roof has been floated. The J rail had been removed and then the staples that are underneath the J rail are removed and then the roof can be slid from one side to the other. You will need to support the walls with diagonal supports screwed into the floor and the walls or the window openings if the cabinets have been removed. 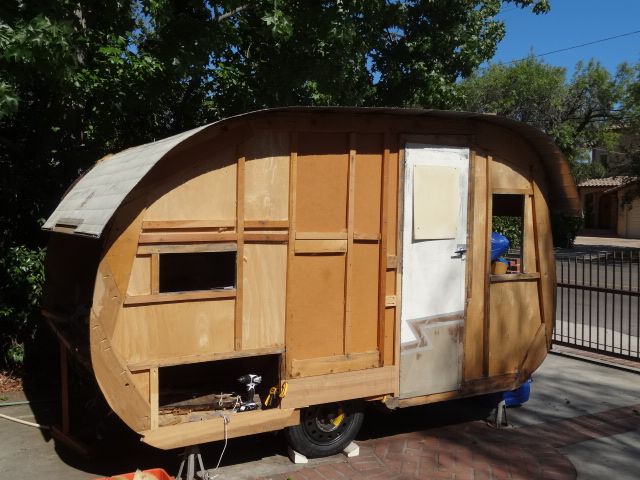 To roll the roof, you can see some pix in this thread. vintagetrailertalk.freeforums.net/thread/3598/andy-57-westerner-restoration-thread?page=1 scroll down to post #7. Here is a video that was made by Larry our long time contributor. youtu.be/6MB8-C6w3mU. It’s a 2 person operation to roll the roof and remove. Cheers, Rod |
|
|
|
Post by vikx on Oct 13, 2023 12:07:50 GMT -8
A floated roof is not necessarily "above" the trailer roof. A builder can leave it against the rafters and slip from side to side for repairs. If vent repairs are needed, the roof metal can be lifted with a 2 x 4. I use boards to support the float:  002 h Odette Floating the Roof (1) 002 h Odette Floating the Roof (1) by VK Lee, on Flickr |
|
sydneyc
New Member
Posts: 11
Currently Offline
|
Post by sydneyc on Oct 16, 2023 18:10:15 GMT -8
Luckily I was able to conquer the roof with some help from a friend! We rolled up the skin (the only skin on the trailer that won't need to be replaced) and were able to remove the actual frame and paneling of the roof which only has some teeny spots of rot I'm going to replace. I also moved it into a covered storage unit that has a wire grate top, so I think I'm going to try to use ratchet straps to suspend the roof frame so when it's time to put it back on it'll be much easier. Bad idea?
My biggest concern right now is this cylindrical metal tank on the inside, photos below (they're not focused on the tank itself, so it's only partially showing in them). When I moved the trailer I discovered there's still some liquid sloshing inside. My hope is that it's just old nasty water and not propane, not only would I be technically breaking the contract for the storage unit by having propane in there (even unknowingly), I also have no clue what to do with it or how to get it out...
<img src="https://onedrive.live.com/embed?resid=8DC50AA298BEC8BE%2143333&authkey=%21AAZ6vY7AAitEIA4&width=660" width="660" height="auto" />
Shows the "port" to the outside
<img src="https://onedrive.live.com/embed?resid=8DC50AA298BEC8BE%2143319&authkey=%21AF2SdkDYDuwvBI8&width=660" width="660" height="auto" />
It's just a little bit shown on the far right, not the flat one in the center.
<img src="https://onedrive.live.com/embed?resid=8DC50AA298BEC8BE%2143316&authkey=%21AHlXS6lrSjXm4L4&height=660" width="auto" height="660" />
Showing at bottom.
Any clue what it is? And if it is propane (which I'm fairly certain it is), now what?
|
|
|
|
Post by vikx on Oct 17, 2023 11:09:05 GMT -8
The tank is an old fresh water tank from a compression system. I would toss it and buy a new poly/ABS one. Cut the fill pipe and lift it out. There may be hold down screws and you might have to remove the bottom plumbing. Most of the water system can be done after structural repairs. The "fill" will need a backer, as well as the city water (garden hose) inlet.
|
|
sydneyc
New Member
Posts: 11
Currently Offline
|
Post by sydneyc on Oct 17, 2023 21:10:48 GMT -8
The tank is an old fresh water tank from a compression system. I would toss it and buy a new poly/ABS one. Cut the fill pipe and lift it out. There may be hold down screws and you might have to remove the bottom plumbing. Most of the water system can be done after structural repairs. The "fill" will need a backer, as well as the city water (garden hose) inlet. Phew! Glad to hear that, I heard sloshing and immediately freaked out. That makes me feel better, she's all tucked away and safe for the next couple weeks when I won't have much time to work on her, so I'll be trying to learn all about electrical things  Thanks for the help! |
|
|
|
Post by vikx on Oct 18, 2023 12:40:57 GMT -8
Electrical is done after the walls are framed and before insulation. If you use foam, it can be grooved for electrical with a multi tool.
There are 3 electrical systems that are separate: 120 volt system, 12 volt system and tow wiring/brake system. The tow wiring can be under the trailer. I use Junction boxes at the tongue and rear of the trailer for possible repairs.
Again, make sure the trailer is structurally sound before adding any electrical wiring.
|
|
sydneyc
New Member
Posts: 11
Currently Offline
|
Post by sydneyc on Oct 20, 2023 11:38:36 GMT -8
Electrical is done after the walls are framed and before insulation. If you use foam, it can be grooved for electrical with a multi tool. There are 3 electrical systems that are separate: 120 volt system, 12 volt system and tow wiring/brake system. The tow wiring can be under the trailer. I use Junction boxes at the tongue and rear of the trailer for possible repairs. Again, make sure the trailer is structurally sound before adding any electrical wiring. Oh yes, I meant more like I'm just studying and figuring out a plan for future. I'm not even close to adding it yet, just planning  |
|


 It really ruins them.
  In most cases, if they had left it alone, the repairs would have been always easier.
  Thanks for the help!