|
|
Post by blackguitar91 on May 7, 2023 7:13:49 GMT -8
Due to all of the helpful folks in this forum I passed on a gutted trailer and ended up with this massive project! It is a late 1960s Open Road and has been sitting in a field since ‘76. I went into this project knowing full well what I was getting into and knew that a very large portion would need to be repaired and replaced. I also knew that I would need to rely on others to help guide me along. I can post more photos in another thread if needed but this one will be primarily about the roof. I have run into a few things that I was not expecting and haven’t come across in all of my studying and research leading up to this project. Issue one was when we went to take the front, rear skins and roof off. The lower front panel came off just fine but after that every other seam was factory crimped and sealed including the rear skin. We ended up rolling the metal up from the rear bumper all the way to the front window. Issue two came up once we got the roof and insulation off. The two support beams (Sorry, the correct term escapes me right now!) that straddle each vent and the rear beam are 1 1/2” at the center and taper down to 3/4 at the side walls. The other four beams, one in front, one between the two vents and two behind the rear vent are all 3/4” all the way across. The roof sags very badly at all of the 3/4” beams. This seams like a poor design choice, wouldn’t it force water to pool up in the lower points? Especially if sitting for long periods of time. The short blocking that goes in between each beam to attach the roof to are 1” all the way around EXCEPT the four in between the two vents, they are 1 1/2”. Is there any reason these 4 should be wider than the rest of them? The roof vents sit flush on top of the roof. Most of the other videos and pictures I have seen have the vent boars “raised” 3/4” or so and the vent slips on over top of that. (Sorry I might not be explaining this part right). Questions: 1) Even with all of the hail damage and the roof metal being very “wobbly” does it need to be replaced? It appears to have no sealant or anything on it, just poorly constructed in the first place. 2) If I do have to replace the roof, is there anyway to salvage and use the remaining front and rear skins that are factory crimped and sealed to the roof? 3) Should I make all of the support beams 3/4 all the way across. Then rework the framing for the vents? OR do I make them all 1 1/2” tapered to 3/4”. OR do I rebuild it the same way it was and just not park it for 4 decades in the elements?? 4) Is there any reason not to have the same size blocking in between each support beam? Any help is much appreciated! Here is a link to the photos, I tried to figure out how to embed the photos on mobile but gave up. imgur.com/a/4dtpo1j |
|
|
|
Post by vikx on May 7, 2023 11:50:06 GMT -8
I got one photo of a trailer from your link. If you could post some pix of the seams between the roof and siding. I've not seen factory seamed siding/roof metal before. There may be a way to separate the pieces.
Hail damage is not good, as the dents can have pinholes. I would replace this metal.
I copy the original construction of the trailer and roof/rafters. Arched rafters provide some drainage; it's possible that the roof metal has stretched over the years. Also add shims to lift the roof vent(s). They should be about 3/4 inches higher than the rest of the rafters. Framing for a roof vent should be 1 1/2", to better support the vent.
All vintage trailers should be stored under cover. An open roof is ideal but even a tarp is better than nothing. The reason we find so much rot in our trailers is because they were left to the elements for decades.
|
|
|
|
Post by blackguitar91 on May 7, 2023 16:28:33 GMT -8
I have added a few more photos to the link. On the rear skin there is a piece of metal running the back of the two metal seams. There is some kind of adhesive in between the seams on the front side and on the backside between that extra piece and the back of the seams. The adhesive still seems to be tacky but cannot get it to separate. I chewed up one of the ends about trying to get it to separate while it was still on the trailer.
Not that it is off of the trailer I could unroll it and probably cut that metal strip in the back to make it easier deal with separating the adhesive.
|
|
nccamper
Administrator 
Posts: 7,745 
Likes: 2,872
1962 Forester- 1956 Shasta
Currently Offline
|
Post by nccamper on May 7, 2023 23:49:56 GMT -8
I couldn't open the photos. You’ll find tutorials showing how to link photos to your post here:
You might find photos that will help here: I'd start with the 1957 Shasta series. It's not exactly the same construction but the photos make a good reference material.
|
|
|
|
Post by blackguitar91 on May 8, 2023 5:25:03 GMT -8
I have tried everything I could think of to get photos to post on here properly from my iPhone. I followed that thread multiple times but some of the options are not the same on the Flickr App. I will play around with it later and/or set my desktop up. I have watched a lot of Mobiltecs videos over the past month or so and didn’t quite find what I am running into (I don’t think) I have changed some setting and will try this link one more time! I’m the meantime I will be working on getting photos to post the proper way. imgur.com/gallery/4dtpo1j |
|
|
|
Post by vikx on May 8, 2023 11:25:50 GMT -8
Sorry but I'm only seeing one side of your trailer, no more photos. A few cartoons, some videos, no more of the trailer..
One thing I've learned over the years is to COMPROMISE when doing a build. Nothing is going to be exact. My motto is MAKE IT WORK. If a rafter has to be moved, skin replaced, even the shape of the body changed, you can do that. The trailer needs to be roadworthy and watertight but not necessarily exactly as it began.
|
|
|
|
Post by blackguitar91 on May 8, 2023 14:25:21 GMT -8
<blockquote class="imgur-embed-pub" lang="en" data-id="a/4dtpo1j" ><a href="//imgur.com/a/4dtpo1j">1960s Open Road</a></blockquote><script async src="//s.imgur.com/min/embed.js" charset="utf-8"></script>
This is just me trying something a little bit different. Please ignore if it does not work!
|
|
|
|
Post by blackguitar91 on May 9, 2023 6:50:51 GMT -8
With the help of teachndad I think I finally have the hang of the photos! For now I will just post this photo and might follow up with more later one I get on my computer.  My main question with the roof is should I replace the 3/4” boards that are sagging with arched 1 1/2” all the way across. OR make it 3/4” boards all the way across the top and shim up just the area around the vents up to 1 1/2” (which is what I believe was mentioned earlier). Does anyone have a photo of their roof with the top off so I can see how it “should” look? |
|
|
|
Post by vikx on May 9, 2023 11:11:02 GMT -8
Definitely replace any sagging rafters. You can arch which helps with drainage. The stronger the board, the less sagging you will have. Also, be sure to use plywood across the trailer if you have to get on the roof. Looks like the past owner slept up there...
Vent shims
<a data-flickr-embed="true" href="https://www.flickr.com/photos/53634851@N03/52884560634/in/dateposted-public/" title="006 i NorCo Vent and wiring (5)"><img src="https://live.staticflickr.com/65535/52884560634_4379e94e6d_n.jpg" width="320" height="240" alt="006 i NorCo Vent and wiring (5)"/></a><script async src="//embedr.flickr.com/assets/client-code.js" charset="utf-8"></script>
<a data-flickr-embed="true" href="https://www.flickr.com/photos/53634851@N03/52884808495/in/dateposted-public/" title="002 f Rafters (2)"><img src="https://live.staticflickr.com/65535/52884808495_0e156aeaf6_n.jpg" width="320" height="240" alt="002 f Rafters (2)"/></a><script async src="//embedr.flickr.com/assets/client-code.js" charset="utf-8"></script>
|
|
|
|
Post by blackguitar91 on May 9, 2023 13:49:54 GMT -8
Perfect, thank you!
Definitely replacing the sagging boards, the trailer has sat in a field since ‘76 and has experienced a lot of weather. The way it is currently set up now, does that cause low spots in between the 1 1/2” boards? Is all of that sagging due to water being forced to pool up where the lower 3/“4 boards are?
If I arch the entire roof from 1 1/2” in the middle to 3/4” on the side walls do the vents still need to be shimmed any? Or can they just sit on the higher 1 1/2” boards like they are now?
|
|
shastatom
Full Member
 I can chase women or fix campers, I choose to fix what I understand........... campers.
Posts: 745
Likes: 419
Shasta 54,57 1500 58 Airflyte
Currently Offline
|
Post by shastatom on May 9, 2023 14:46:19 GMT -8
Before you replace the roof, I would get the side metal off. You may find more rot on the walls and need to repair that before doing the roof.
|
|
newin62
Active Member
Posts: 172
Likes: 141
1962 Shasta Airflyte
Currently Offline
|
Post by newin62 on May 9, 2023 15:50:00 GMT -8
If I arch the entire roof from 1 1/2” in the middle to 3/4” on the side walls do the vents still need to be shimmed any? Or can they just sit on the higher 1 1/2” boards like they are now? Perhaps your trailer was exposed to an excessive snow load at some point. Arching or shimming at the vent is a must but I would not arch the entire roof, especially at the front and back near where the roof curves. Sheet aluminum doesn't like compound curves and it may buckle when you try to fasten down the edges along the curve. Are all of the original cabinets still in the trailer? The rafters that span over the wardrobe and upper cabinets tend not to sag as much as they have some intermediate support. Instead of arching you could add steel reinforcing to the edge of the rafters to stiffen them. My 62 Shasta had 3/4" x 3/16" steel reinforcing screwed to the edge of two vulnerable rafters that were behind the wardrobe. Below is a pic that shows the original factory installed reinforcing on the first rafter behind the wardrobe. I had some sagging from snow load in the front of the trailer but the rafters at the rear that were reinforced held up quite well. 
|
|
|
|
Post by blackguitar91 on May 9, 2023 18:16:44 GMT -8
I have pulled the sides off, well at least one so far. I am only able to work on it a few hours a night. So far the curb side is much better than I expected! Definitely a few boards will need to be replaced on this side. 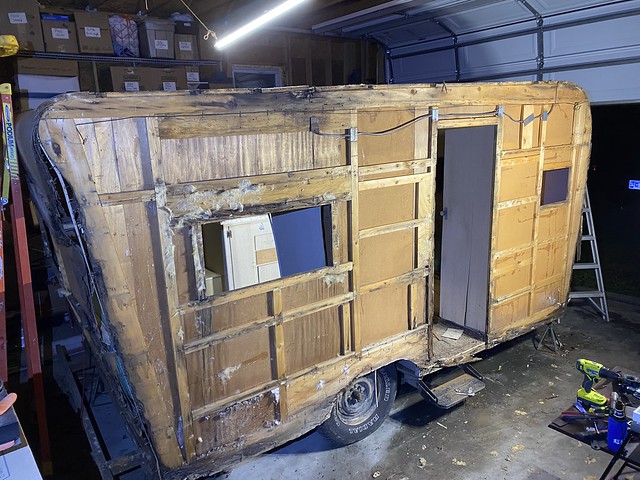
The rear will need some work too. Most of the cross pieces are not even attached to anything anymore.


The front is also not as bad as I thought it would be.

The cabinets are still installed currently, you can see the nails under the front board of this vent.

This vent beam runs over top of the bathroom on the curb side, again you can see the nails under the front board.

The very back beam is arched

The way the roof is payed out is arch,flat,flat,arch,arch,flat,arch,arch,flat
With the arch being 1 1/2” in the center and the flats being 3/4”
This is one of the factory sealed crimps I mentioned earlier.

The is the curb side rear skin where it meets the roof skin right around the window. I couldn’t get it to release so it just got rolled with the roof.
I am going to replace the roof but would like to use as much old skin as possible. Is there a way to free it from the crimp and still be able to re-attach to a new piece?
Also, for what it is worth. We will be replacing ALL of the panels on the interior. As well as the floor and all of the sills and supports on the trailer. |
|
|
|
Post by vikx on May 10, 2023 12:41:09 GMT -8
Remember, the panels go on before the roof rafters and crossboards. Also add backers for light fixtures, thru the body attachments and table/shelf additions.
One solution is to run the roof past the window top with a Pittsburg seam at each end. This allows short side pieces to fit beside the window and the lower front/rear metal to slip up and into the Pittsburgs at the window. The side pieces are easily adjustable to accommodate fit.
<a data-flickr-embed="true" href="https://www.flickr.com/photos/53634851@N03/49793900833/in/dateposted-public/" title="001 1959 Cardinal (3)"><img src="https://live.staticflickr.com/65535/49793900833_2561c3a4b2_n.jpg" width="320" height="240" alt="001 1959 Cardinal (3)"/></a><script async src="//embedr.flickr.com/assets/client-code.js" charset="utf-8"></script>
|
|
|
|
Post by blackguitar91 on May 10, 2023 14:28:31 GMT -8
Yep! I will likely repair all of the frame work and roof support that I can while it is all still together.
Then remove the rebuilt roof frame, ceiling panels, cabinet, take down the rebuilt walls and then work on the floor and trailer.
Thank you for the reminder for the backers! That completely slipped my mind.
That’s a good point, I wonder if the front skin had already been removed at some point and they cut the factory crimp. When we took it off it came off in 3 pieces, one fully below the front window and two different sized pieces on either size of the window.
For the flooring does it have to be marine plywood? I have seen so many different answers I can’t keep it all straight!!
I will definitely dig through the site and finish the two books (from members of the site) before I make any final decisions on my own.
|
|


