tincanalley
Active Member

Posts: 122
Likes: 102
1958 Jewel
Currently Offline
|
Post by tincanalley on Sept 16, 2022 19:28:01 GMT -8
|
|
tincanalley
Active Member
Posts: 122
Likes: 102
1958 Jewel
Currently Offline
|
Post by tincanalley on Sept 16, 2022 19:37:57 GMT -8
Probably should be posting links…instead of the bbc code pics.
just making sure it works.
<a data-flickr-embed="true" href="https://www.flickr.com/photos/80750816@N05/52363122781/in/dateposted-public/" title="3871589A-9F69-41C8-83CF-FD2B63768EDD"><img src="https://live.staticflickr.com/65535/52363122781_89e8fc2f4c_k.jpg" width="2048" height="1536" alt="3871589A-9F69-41C8-83CF-FD2B63768EDD"></a><script async src="//embedr.flickr.com/assets/client-code.js" charset="utf-8"></script>
|
|
WhitneyK
Active Member
Posts: 492 
Likes: 169
'67 Shasta Compact
Currently Offline
|
Post by WhitneyK on Sept 17, 2022 4:29:18 GMT -8
Only area of concern is some splitting on the flat inside flange. I don’t think this justifies building new wells. Looking for opinions from the community on this one. Just use what I’ve got per above or fab new? What say you all? I used putty tape to seal mine to the floor when re-installing. Personally, I would just use a little extra putty tape in the area of the split / crack and re-use the originals. The crack came from movement more than likely. With a new floor and mounted securely it should be fine. Just my opinion of course, didn't say it was a good one... Whitney |
|
tincanalley
Active Member
Posts: 122
Likes: 102
1958 Jewel
Currently Offline
|
Post by tincanalley on Sept 17, 2022 6:00:14 GMT -8
Thanks WhitneyK. I was kind of leaning that way, just looking for some validation!
|
|
PT
Active Member
Posts: 460
Likes: 260
1964 Aloha & 1962 Holiday House
Currently Offline
|
Post by PT on Sept 17, 2022 9:26:08 GMT -8
Nice work - I'd also re-use the originals. Like Whitney mentioned putty tape or similar is really important. Any microscopic gap to the outside will let dust/dirt in while towing. If you boondock on dirt roads and there are gaps it can get really dirty around the wheel wells.
|
|
tincanalley
Active Member
Posts: 122
Likes: 102
1958 Jewel
Currently Offline
|
Post by tincanalley on Sept 17, 2022 14:29:38 GMT -8
Just finished using my por15 can on them, going to undercoat with 3m undercoating. That should definitely seal it up. I’ll post a pic after they dry.
|
|
tincanalley
Active Member
Posts: 122
Likes: 102
1958 Jewel
Currently Offline
|
Post by tincanalley on Sept 17, 2022 18:58:23 GMT -8
|
|
tincanalley
Active Member
Posts: 122
Likes: 102
1958 Jewel
Currently Offline
|
Post by tincanalley on Sept 20, 2022 20:56:20 GMT -8
|
|
tincanalley
Active Member
Posts: 122
Likes: 102
1958 Jewel
Currently Offline
|
Post by tincanalley on Oct 14, 2022 18:04:34 GMT -8
|
|
newin62
Active Member
Posts: 167
Likes: 141
1962 Shasta Airflyte
Currently Offline
|
Post by newin62 on Oct 15, 2022 3:18:43 GMT -8
Good choice. Dried Douglas fir is very strong and very stable. Except for the frame, your little Jewel was built like a tank compared to my Shasta. I really like how closely the original roof rafters were spaced and the way they were laminated with plywood to create a slight crown in the middle. I think I'll do the same on mine to hopefully prevent the "Shasta Sag" from coming back.
|
|
tincanalley
Active Member
Posts: 122
Likes: 102
1958 Jewel
Currently Offline
|
Post by tincanalley on Oct 15, 2022 3:46:23 GMT -8
Yes…seems to have been well built. 1 1/2 x 1 1/2 framing everywhere. And now that I’ve beefed up the frame should be solid. Here’s the crown detail on the roof joists. Just a sistered curved 1/2” ply. Also interesting from the factory the roof joists didn’t go all the way to the edge with curbing between, but rather butted against continuous curbing along the whole wall radius.  79A57460-10E3-42CE-AA77-A818D603117C 79A57460-10E3-42CE-AA77-A818D603117C by asmay22, on Flickr |
|
tincanalley
Active Member
Posts: 122
Likes: 102
1958 Jewel
Currently Offline
|
Post by tincanalley on Nov 6, 2022 22:20:20 GMT -8
|
|
tincanalley
Active Member
Posts: 122
Likes: 102
1958 Jewel
Currently Offline
|
Post by tincanalley on Nov 6, 2022 22:32:39 GMT -8
Here’s my bending jig… 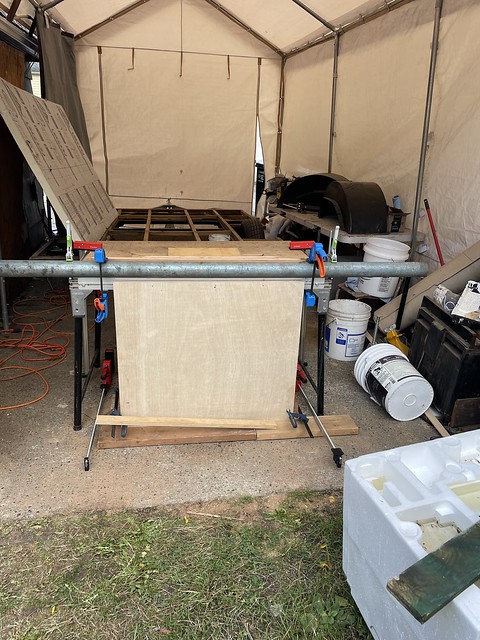 393D6551-FF43-469C-AF2C-653B6F44AB2C 393D6551-FF43-469C-AF2C-653B6F44AB2C by asmay22, on Flickr and here’s the prototype bend around the old framing (I’ll be rebuilding that).  DAED02AB-6D86-4FBD-943A-E6089D0DCBFE DAED02AB-6D86-4FBD-943A-E6089D0DCBFE by asmay22, on Flickr still a bit of bend back when the clamp is released. Not bad on the curve though only one tiny split can’t really see itI sanded out and could ca glue. Was kind of a pain to bend around the pipe freeform with a torch on the pipe and steaming the wood. The small piece at least shows it can be done. Now, for the wardrobe and above the dinette are the real challenges doing a 75” long radius along the pipe. I can build the steam box no problem…just not sure if I should persevere or bail and do straight corners or maybe solid wood curved corners that stand slightly proud with 1/8 inch dado slot forth paneling. hmmmmm…. Other side of the small kitchen upper cabinet. 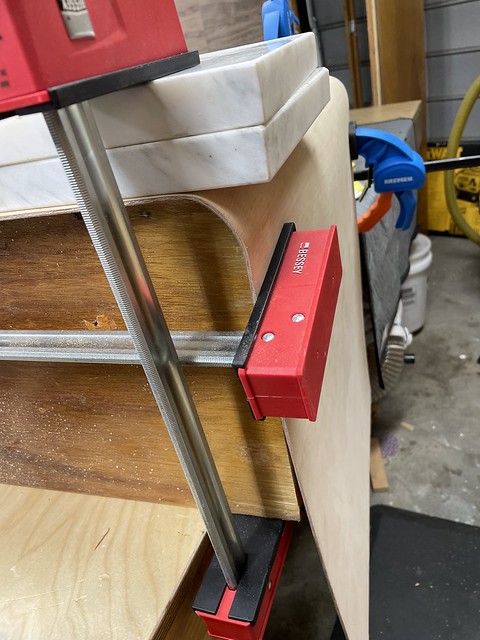 47D8033A-7960-445C-B357-852CB15A118D 47D8033A-7960-445C-B357-852CB15A118D by asmay22, on Flickr |
|
|
|
Post by Teachndad on Nov 7, 2022 6:54:32 GMT -8
Very nice work!👊 Your restoration thread has a lot of valuable ideas to share.
Keep it coming.
Rod
|
|
WhitneyK
Active Member
Posts: 492
Likes: 169
'67 Shasta Compact
Currently Offline
|
Post by WhitneyK on Nov 8, 2022 20:14:03 GMT -8
I'm impressed!
If you have the patience, it appears you have the skill!
I vote to persevere (pun intended since it election day)
|
|


/Campers/67%20Shasta?preview=2019-02-03+18.01.00.jpg)