kimberwarden
Junior Member

Posts: 91 
Likes: 32
17' 64 Oasis
Currently Offline
|
Post by kimberwarden on Dec 28, 2015 16:16:18 GMT -8
It seems that no matter what I do, I can't make my new j-rail look nice. I have a very tight radius I need to fit. I tried mobiltec's method of bending by starting at the middle of the curve, but the curve is so tight that the trim kinked anyway. I tried using a hammer and dolly to smooth out the kinks, but the hammer scuffed up the metal and didn't get it smoothed flat enough. Then I tried annealing a new piece of trim with a propane torch. That helped a lot, but I definitely didn't get the "bends like butter" results that other people report, and the process left the trim a mottled appearance. You can see it in the right edge of the rail in the photo below. (The gouge on the left side is from the shaft of my hex driver bit. When the metal bends, the "j" part of the rail gets distorted and gets in the way of the screw hole.) Even when I get a curve I'm reasonably happy with, something always seems to happen to ding, gouge, or otherwise mar the metal even though I'm trying to be so careful. I was hoping for an end result of highly polished aluminum, so any small irregularities are going to be obvious when sunlight is reflected. At this point, I'd settle for anything that looked halfway decent, either painted or not. Is there some other technique I should be using to produce a smoothly bent j-rail? Or a way to remove surface dings, etc. after shaping? I'm at my wit's end. 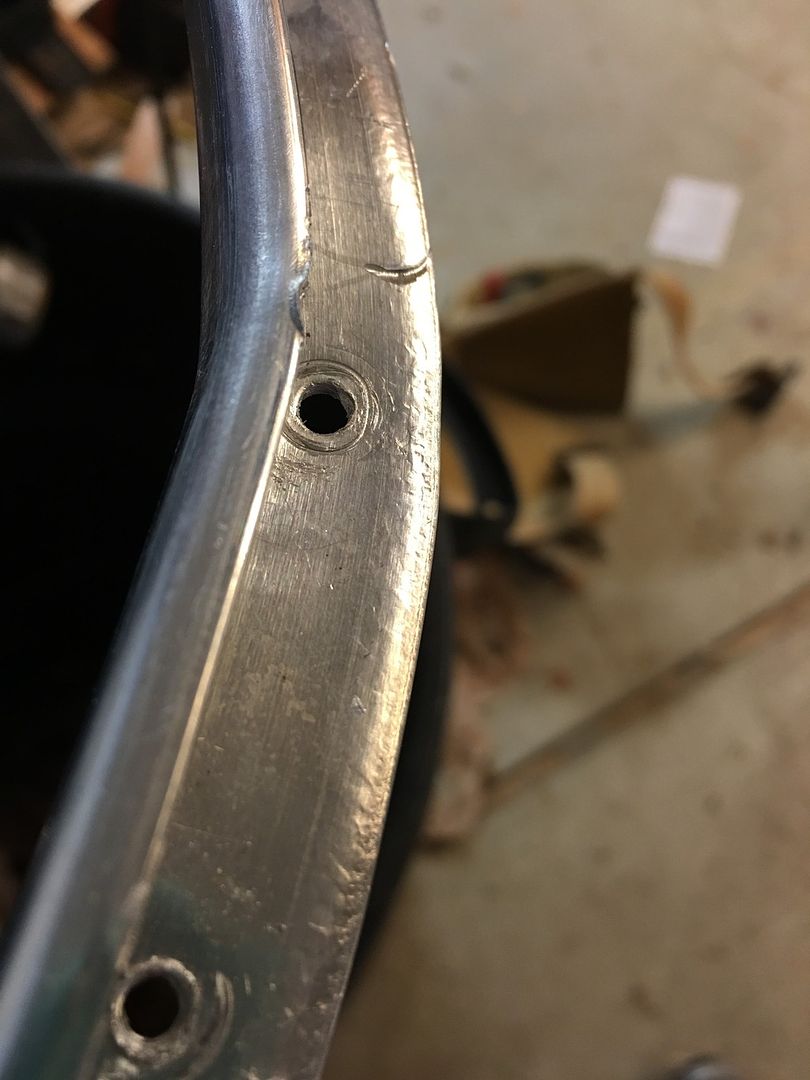 |
|
|
|
Post by danrhodes on Dec 28, 2015 17:29:40 GMT -8
Not a metal smith, but I'd use a 3-4" steel pipe in a vice as the curve and very small hammer. The j rail shape is not simple to bend, so I'd take my time and just go over and over the curve area until right. Of course, I think your photo looks great and my old one is a pretzel buried in my garage, so I may not be a good person to ask
|
|
Ten
3K Member

Posts: 3,432
Likes: 1,467
70 Shasta 16SC + 1964 Airflyte
Currently Offline
|
Post by Ten on Dec 28, 2015 20:20:57 GMT -8
The only words I have is "Patience Patience Patience".
|
|
|
|
Post by vikx on Dec 28, 2015 20:42:47 GMT -8
I've had the same trouble, it either bends too much and kinks or doesn't follow the curve. Screwing it to a post on the lean-to has helped a little. Anchor with a couple of screws, heat, bend and anchor. If you get it close, the rest of the bending can be done on the trailer. Very tedious process and did I mention IRRITATING??
If you don't already have them, get some 2" jawed sheet metal pliers or vise grips. They allow you to bend the J rail out a bit so you can drive the screws without the divot. Also, sanding with 220 puts a nice "scruff" on the metal. Finer sand paper and extra fine steel wool will smooth the sanding marks. Lots of elbow grease.
Keep us posted.
|
|
kimberwarden
Junior Member
Posts: 91
Likes: 32
17' 64 Oasis
Currently Offline
|
Post by kimberwarden on Dec 28, 2015 21:53:21 GMT -8
I'll give sanding a try, and I'll get the recommended tools. I'd never done any metal work at all before this trailer, and I find it incredibly difficult. Working with wood is so easy. Make a mistake? Sand it or fill it or glue it! Make a mistake on metal, start over again.
Question about heating the metal...am I supposed to let it cool before working with it, or am I supposed to work with it while it's still hot?
Thanks for the advice and encouragement. Any more tips are greatly appreciated.
|
|
|
|
Post by vikx on Dec 29, 2015 0:53:48 GMT -8
I'm FAR from an expert on metal. Luckily, my other half is a patient and clever person...
When heating, I tried to work with the metal when hot but it was very floppy. Needless to say, nothing worked out perfectly.
What I do know is that the metal can be straightened and made to look nice.
Lastly, we don't polish our J rail or edge trim. It ends up as a mill finish look. I can't imagine getting a polish on the inside of a J...
|
|
Hamlet
2K Member

Posts: 2,819 
Likes: 925
Currently Offline
|
Post by Hamlet on Dec 29, 2015 12:25:32 GMT -8
WHen we did Hamlet, we were having the same trouble, and with no guidance (a bunch of years back), little knowledge and not a lot of tools, I ran into the bathroom, brought out my hairdryer (my hubby thought I was nuts) and just started heating the aluminum. It became malleable without ever getting too hot to handle. Annealing will work, but the crazing or changing of the color is going to happen any time you hit aluminum with that much heat. Good luck!
|
|
mobiltec
5K Member
I make mistakes so you don't have to...
Posts: 9,822
Likes: 3,749
1954 Jewel In Progress...
Currently Offline
|
Post by mobiltec on Dec 29, 2015 20:34:59 GMT -8
This is a good thread. I haven't had the chance to work with really tight bends yet. I did do the undercurve of a Rainbow and the outer curve of a Holiday House and they were tough. I'm watching to see what you come up with... I also understand how easy it is to hit the edge of the drip rail with the screw. Little dings like that really make me cringe... Good luck and let us know how this works out for ya.
|
|
Tuneafish
New Member
Posts: 13
Likes: 9
1957 Rainbow, 1955 Starfire
Currently Offline
|
Post by Tuneafish on Dec 29, 2015 23:10:48 GMT -8
Speaking of tight curves on a Rainbow, we have some recent experience with that! My first advise is to realize that this is not fine art, no mater how much we want it to be. Once you've had it on the road a few times, the small digs on the J-rail will be the least of your worries! The tool that allowed me to have the best control over the J-rail bending was a shrinker-stretcher (from HF). The downside with this is that if leaves some significant tool marks on the metal (from the tool jaws) but these can be easily sanded down (as per Vikx suggestion above- 180 -> 220 grit sand paper etc.). Once painted, they look great! See an example of this in action on our restore tread: '57 Rainbow Project. We painted our J-rail so we were not looking for a polished finish. IMHO the shrinker-stretcher is essential for an inside curve (unless you are Mobiltec!) but also makes a tight outside curve much more manageable. n.b. the STRETCHER tool is for OUTSIDE curves and SHRINKER tool is for the INSIDE curves. On the tread listed above, Mobiltec has a link to a nice video showing how these work. |
|
gary350
Full Member
We should have gone camping today it is going to snow 6" tonight.
Posts: 573
Likes: 170
1964 FAN
Currently Offline
|
Post by gary350 on Jan 1, 2016 12:45:49 GMT -8
Cut a 3/4" piece of plywood the correct radius then bend the aluminum around the wood pattern before attaching it to the trailer. It is easy and quick if you make a wood bending fixture.
Assume your trailer radius is 24" and your aluminum is 1" wide. Cut a 23" radius on a 1 foot long piece of plywood. Next cut 1/4" plywood 1 foot long with a larger 26" radius. Attach the 23" radius to the 26" radius with glue and screws. Cut 2 pieces of 3/4" plywood with a 26" and 24" radius attach this to the back side of your fixture. The banana shape pieces 3/4 + 3/4 = 1 1/2" thick catch on the front surface if the camper so you can slide it around the radius. Attach your aluminum at a starting place, put the aluminum up over the wood fixture then pull and bend it. Slice the wood fixture about 6" around the radius then bend the aluminum another 6". After you make a few bends then you need to start putting screws in the aluminum to hold it to the trailer. Keep sliding the wood bending fixture few inches each time and bending the aluminum a few inches each time. Go all the way around the radius. If you have a different radius in a different location make another wood bending fixture just of it. Swap bending fixtures and keep on bending a few inches each time.
What your doing is building a wooden fixture like an EMT conduit bender. The wood pieces on the back side hold it in the correct location along the trailers edge where you need to bend the aluminum.
|
|
Deleted
Posts: 0
Currently Offline
|
Post by Deleted on Jan 24, 2016 20:23:00 GMT -8
I just want to say that great job sanding that j rail to make it look even that good! It takes lots and lots of patience to do that as already stated, and I think it looks about as good as it will get. I think it looks great. Apparently it seems like the metal on the rails are not the kind that polish real brilliantly.
|
|


