|
|
Post by bigbill on Dec 30, 2015 20:32:59 GMT -8
Is that a Bronco or a Scout? I was wondering the same thing. It could be a Scout. I have a Blazer so I don't know. LOL... I hate it when people say "Love your Bronco" LOL... Either way it's a nice looking truck he's got there. Yep I know what you mean. I think that is one of the last scouts made but not sure. I had a 74 Scout II new but that appears to be a later model, hopefully he will tell us what it is. I agree it is very nice, looks new. |
|
66shasta
New Member
Posts: 21 
Likes: 3
Currently Offline
|
Post by 66shasta on Jan 1, 2016 16:15:44 GMT -8
Thanks, guys. At least, thanks to SOME of you guys...but not those cussing my Scout calling one of those four-letter "F" words. lol
It's titled as a 1980 Scout II, but I built it from parts ranging from the 70's on up to the 90's. It has a '97 Trans Am LT1 fuel injected 350 engine, overdrive transmission, four wheel disc brakes, etc, etc. Not exactly stock. 325hp or so, and I can get 19 mpg in town if I try hard enough. Been driving it daily since '98 or so when I "finished" it (they are never really finished). We restore Scouts and IH pickups/Travelalls etc for a living.
I hope to tear into the front wall of the Shast in the next couple weeks, weather permitting. I'll be sure to post here with my findings...good OR bad.
Thanks, again!
|
|
mobiltec
5K Member
 I make mistakes so you don't have to...
Posts: 9,825
Likes: 3,752
1954 Jewel In Progress...
Currently Offline
|
Post by mobiltec on Jan 1, 2016 17:27:48 GMT -8
Thanks, guys. At least, thanks to SOME of you guys...but not those cussing my Scout calling one of those four-letter "F" words. lol It's titled as a 1980 Scout II, but I built it from parts ranging from the 70's on up to the 90's. It has a '97 Trans Am LT1 fuel injected 350 engine, overdrive transmission, four wheel disc brakes, etc, etc. Not exactly stock. 325hp or so, and I can get 19 mpg in town if I try hard enough. Been driving it daily since '98 or so when I "finished" it (they are never really finished). We restore Scouts and IH pickups/Travelalls etc for a living. I hope to tear into the front wall of the Shast in the next couple weeks, weather permitting. I'll be sure to post here with my findings...good OR bad. Thanks, again! Ya sorry about that LOL... I did wonder about it when I posted that though. |
|
66shasta
New Member
Posts: 21
Likes: 3
Currently Offline
|
Post by 66shasta on Jan 2, 2016 14:29:43 GMT -8
Alright...I had a couple hours to dig in this afternoon before the sun went down, and here are my results. I had suspected that the right front corner had been whacked against something at some point, taking the step and some structure out with it...and now I am more confused than I was before I peeled the skin back. It's not as twisted up as I thought, but I'm still not sure it wasn't hit. At the least, it has been repaired heavily in the corner...and needs the repair repaired, lol       And the left front corner isn't too far behind. The floor feels pretty solid over here, but the main vertical corner post is either super soft or else MIA.  So, let the rookie questions begin! I'll describe what I think I want to do from here, and y'all let me know why it won't work, and what to do. I wanna support the roof from inside so it doesn't drop (or drop more...maybe it's already settled?), then sneak around the right corner and skin the bottom half of it until I get to the door. This will allow me to get my feet wet in the world of trailers, without diving in head first in the deep end by tearing the whole thing apart. I can then see whats going on with it, while still having the left side (and the rear half of the right side) as a how-to guide for rebuilding. I know I will need to rebuild the floor from at least the corner through to the back of the door opening for at least 2'...so I propose to replace it from one side to the other while I am here, and play the rear 2/3 of it by ear once I get the front third buttoned up. Once I get the floor redone and solid again, I can recreate the right front corner post and come back to the doorway, repairing/replacing wood as needed. Likewise across the front, likely rebuilding the whole front wall from the bottom up to the window (not much to it). Once the bottom half the front wall is done, I can make sure of the upper half's condition and do what needs done. Then onto the right side, hopefully just skinning the lower half...and assess the back when I get to it. That should get me through lunchtime tomorrow, lol. So, where am I going about it wrong with this plan? Also, while I am here...the roof. It was replaced or repaired with a rubber membrane (that stinks when the sun hits it...), and looks like the fella got a little carried away with the silicone where it was screwed along the edges. Am I better off to remove that and work on sealing up the original roof, or deal with what I have and see what needs work with it? Heck, it may be sealed...I dunno. I know once I get all the work done on the walls, I don't want to wonder if it's rotting every time it rains. I wanna do it as practical as I can...originality up on the roof is not a real big deal at my house...if the rubber is better, I will use it and never tell anyone it's not 100% correct. THANKS for the help. I'm learning as I go, and its nice to have folks here to keep me from making stupid mistakes if I can help it! |
|
mobiltec
5K Member
I make mistakes so you don't have to...
Posts: 9,825
Likes: 3,752
1954 Jewel In Progress...
Currently Offline
|
Post by mobiltec on Jan 2, 2016 15:13:08 GMT -8
Doesn't look like it was crashed into to me. Just the normal rot which you will find under all the windows and in all four upright corners and most likely all long the corners of the ceiling. You can do the repairs in sections and I actually recommend doing it that way to my viewers and on this board. Or you can do a frame up rebuild. I would recommend doing a lot of reading on this board. It's all been said a thousand times already. You just need to sit down, do a little searching and read. Also I have over 400 videos on my website that may help you tremendously. These trailers are not designed or built like houses. Trailers are a completely different animal. They are built unibody style and if not done correctly can and do fall apart on the freeway causing all kinds of terrible things to happen to the people behind you. You have to do certain things a certain way or you lose all structural integrity in the trailer. Remember that these things move. The only time your house moves is during an earthquake and look what happens then. They crack and crumble because they are not built to move. Trailers are. The front skin is ruined. Must be replaced. All the rotted framing and paneling must be replaced. The rotted parts of the floor must be replaced. The roof skin sounds like it needs to be replaced also. You won't find any "quick fixes" on this board. Everyone here discourages that sort of thing. Good luck and I hope I haven't scared you off. With a little help from this board your trailer can go from this...... 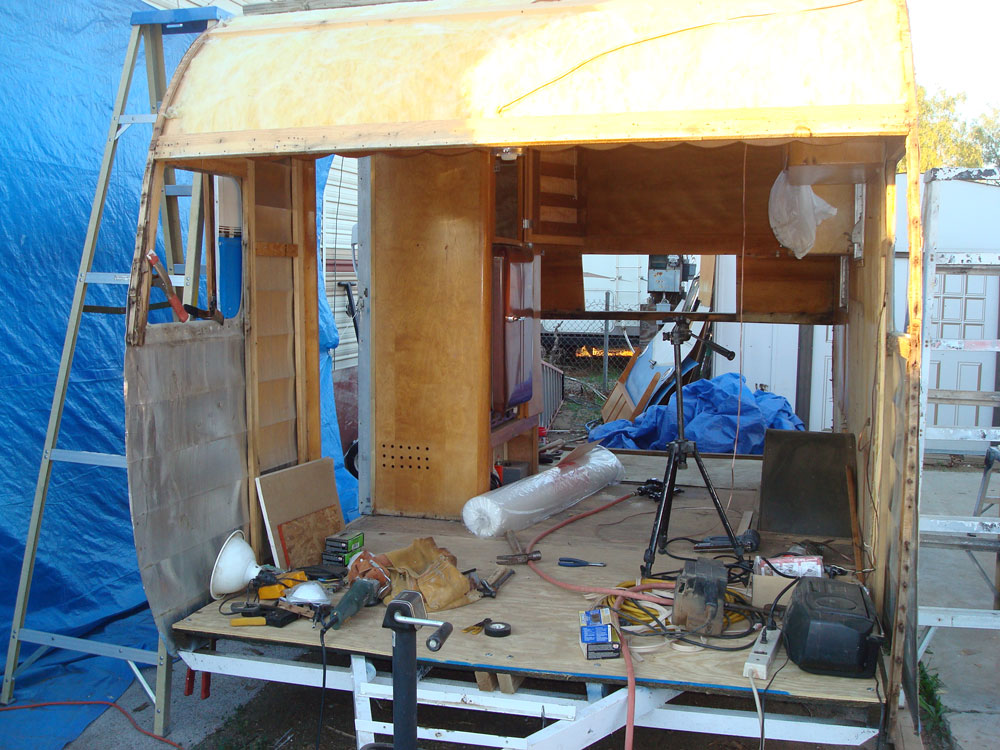 To this.... 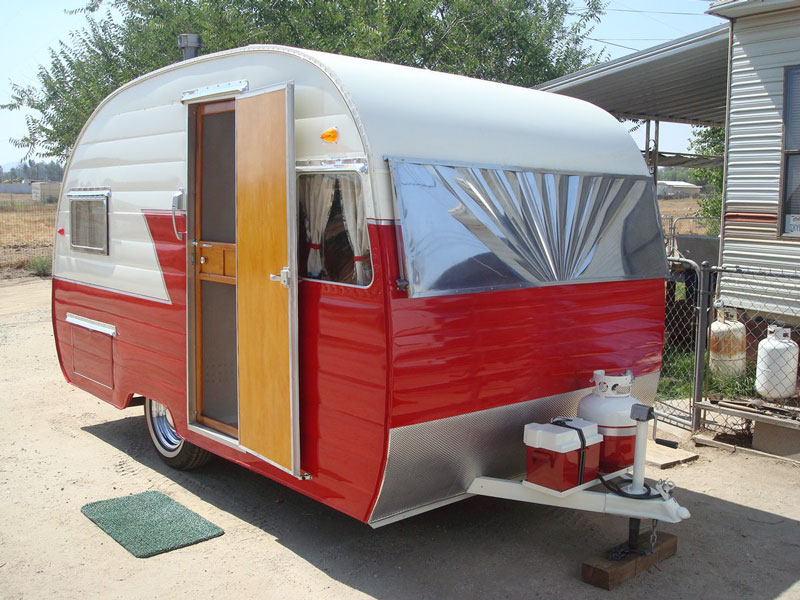 |
|
66shasta
New Member
Posts: 21
Likes: 3
Currently Offline
|
Post by 66shasta on Jan 2, 2016 15:56:13 GMT -8
It will take a lotto scare me off. I'm reading up on how to's now. I hope to not get into it too deep that I can't get out...but it looks totally doable from here. (famous last words)
|
|
nccamper
Administrator 
Posts: 7,745
Likes: 2,872
1962 Forester- 1956 Shasta
Currently Offline
|
Post by nccamper on Jan 2, 2016 16:10:30 GMT -8
It looks like normal rot to me, too. Nothing shocking. I think you have a good plan of working from bottom to top in sections. If you pull it all apart at once you won't have anything as a guide...and it will fall over. I would start by taking the windows out. If you pull too much support from under them something may drop. Then buy a good tarp and spend a couple of days reading and watching videos at cannedhamtrailers.com. There is a series on a Shasta rebuild. My guess is also that the roof skin is in rough shape but you won't know until you pull off the rubber. I'm not a big fan of the rubber roofs. The floor plywood sits between the side walls so you can work on it once the front is opened up.  |
|
66shasta
New Member
Posts: 21
Likes: 3
Currently Offline
|
Post by 66shasta on Jan 2, 2016 17:23:00 GMT -8
So, the side walls flank the floor, but the front and rear sit On the floor?
|
|
mobiltec
5K Member
I make mistakes so you don't have to...
Posts: 9,825
Likes: 3,752
1954 Jewel In Progress...
Currently Offline
|
Post by mobiltec on Jan 2, 2016 17:48:53 GMT -8
So, the side walls flank the floor, but the front and rear sit On the floor? No they actually pass over the front and rear of the floor also. The one piece frame member actually sits on the edge of the floor and the bottom of the paneling is fastened to that. From there on up the paneling spans over the walls and is fastened to them, then the framing is placed over the paneling along with the curbing on both sides. Like I said I have hundreds of videos showing all of this. And if you think it takes too much time to watch them, imagine how much time I put into making them. Check out the 57 Westerner Partial Project on my website. It has a lot of the info you need. Here is what I like to call the "Starter Board" That's where the first piece of paneling connects on the bottom... It's cut at the same angle as the bottom of the radius on the walls.     |
|
mobiltec
5K Member
I make mistakes so you don't have to...
Posts: 9,825
Likes: 3,752
1954 Jewel In Progress...
Currently Offline
|
Post by mobiltec on Jan 2, 2016 17:59:31 GMT -8
And here is how the lower rotten framing is replaced...  |
|
mobiltec
5K Member
I make mistakes so you don't have to...
Posts: 9,825
Likes: 3,752
1954 Jewel In Progress...
Currently Offline
|
Post by mobiltec on Jan 2, 2016 18:03:40 GMT -8
When the new panel is attached it looks like this. Then the new framing and curbing are installed over the panel and you are ready for wiring and insulation and vapor barrier.  |
|
|
|
Post by danrhodes on Jan 2, 2016 18:42:13 GMT -8
It will take a lotto scare me off. I'm reading up on how to's now. I hope to not get into it too deep that I can't get out...but it looks totally doable from here. (famous last words) I'm a total putz and dug myself down into a frame off rebuild of a completely worthless model of trailer. If it's doable by me, it's doable by anyone. |
|
|
|
Post by bigbill on Jan 3, 2016 9:56:05 GMT -8
Wow you turned your scout into a fantastic vehicle. I loved my 74 but it had the 304 motor and it was garbage. Mine had the deluxe interior with air and I added cruise control, also had the optional tent camper that went on the back of it. The only time it ever got hung up I high centered it on a snow bank with all four wheels off the ground. I was just telling a friend the other day I would love to have it back with a 5.3 Chevy in it. mine also had the long top and folding rear seat.
As for your trailer it doesn't look as bad as I thought it would after looking at your original pictures. You can turn it into a beauty with some time and effort.
|
|
66shasta
New Member
Posts: 21
Likes: 3
Currently Offline
|
Post by 66shasta on Jan 3, 2016 11:25:33 GMT -8
Bill...check out some of the Scouts we have built at my company. We kind of specialize in being the black sheep of the IH world, and putting 5.3, 6.0, or whatever late model GM running gear in them. Here is a 77 we built from the ground up, with a 5.3 in it:   And then there was THIS one. Brand new LS3 crate engine, with a few performance and dress-up mods. This one was 0-60 in under 5 seconds...and looked stock to the casual onlooker. Loads of fun!    We get to have a lot of fun some days at work. Of course, some days are nothing even resembling fun, too. THAT is why I think I am ready to tackle anything this Shasta can throw my way...I'm prepared! |
|
|
|
Post by danrhodes on Jan 3, 2016 12:14:39 GMT -8
Bill...check out some of the Scouts we have built at my company. After a 51 Chevy pickup, I think scouts are my favorite vehicle. My great grandfather had an awesome 4 door IH truck that he drove to every swap meet west of the Rockys. |
|


