jannica
Active Member

Posts: 185 
Likes: 26
Currently Offline
|
Post by jannica on Feb 2, 2014 10:27:36 GMT -8
I just finished putting the contact cement on the door and veneer and the fumes are outrageous! I hope I'm not going to have permanent damage to my brain cells as a result. haha ![(=])](//storage.proboards.com/3684717/images/NVMMIBL1J3sN4gcz6aYv.png) |
|
|
|
Post by bigbill on Feb 2, 2014 12:10:28 GMT -8
|
|
|
|
Post by bigbill on Feb 2, 2014 12:26:42 GMT -8
If you are getting involved with these old trailers you probably all ready have brain damage, so I guess it won't matter.  There should have been one more line that stated "that a little ventilation wouldn't hurt when using that stuff". Don't know why it didn't show up. |
|
jannica
Active Member
Posts: 185
Likes: 26
Currently Offline
|
Post by jannica on Feb 2, 2014 12:34:58 GMT -8
Ok, this is for you, mobiltec! Here are some step by step photos of my veneering endeavour today. I noticed when I inspected the cabinet door today that some bubbles/wrinkles had appeared.  I was able to smooth it out, but I’m wondering if they will reappear again later. Houston’s humid climate is probably not helping either. We'll see how it goes! Today I decided to tackle the closet door. It is much bigger, so I was a little nervous, but it came out great (so far). Door before  Veneer is cut and ready for the contact cement. I cut it a little larger than the door, just in case I didn’t get it aligned exactly right.  This is the kind of contact cement I used. I also used a small roller for this item since I had to cover a larger area. 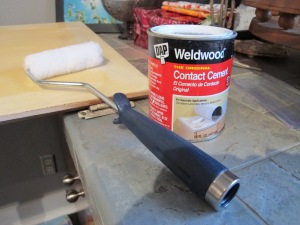 Just to save myself some time, I poured the contact cement on the door and then used the roller to spread it around. 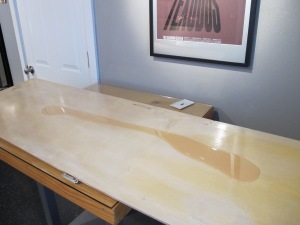  It only took one coat of contact cement for the door because of the polyurethane finish on it. I made sure to sand any rough spots first, i.e. screw holes from the handle and mirror. 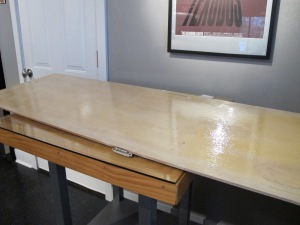 The veneer is very porous so I had to give it two coats of the contact cement. Using my dining table was probably not the best surface. haha  I had to clean off my workspace in the garage to make sure no sawdust got in the adhesive.  Instead of picking up the veneer and applying to the door, I picked up the door and turned it upside down on top of the veneer. This was easier to get it lined up.  I then flipped the door over and applied pressure using a very sophisticated tool.   I found that this light switch plate worked very well to apply pressure evenly all over the door.  This is the cabinet door. As you can see, there is a tiny bit of veneer sticking out on the edge. 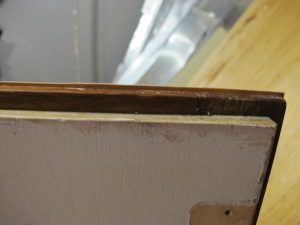 I took a razor blade and cut the veneer at the edges. Then I used a very coarse sandpaper to smooth the edges, finishing it off with a finer sandpaper. Fingers crossed that no more bubbles appear tomorrow! I will have to do the same with the edges around the door, but I’m going to wait until the cement has fully cured.  |
|
mobiltec
5K Member
 I make mistakes so you don't have to...
Posts: 9,822 
Likes: 3,749
1954 Jewel In Progress...
Currently Offline
|
Post by mobiltec on Feb 2, 2014 13:33:50 GMT -8
Thanks Jannica. Very well done. I think your doors are going to look fantastic. I'm thinking of using paper thin veneer on some things myself so thanks for the introduction.  |
|
|
|
Post by vikx on Feb 2, 2014 23:09:41 GMT -8
Thanks from me too, Jannica. The ripples appeared on my closet as well. Using a heat gun helped, but it keeps re-rippling. I think the house may be the perfect area for veneering. Once dry, it should stick and be beautiful...
|
|
jannica
Active Member
Posts: 185
Likes: 26
Currently Offline
|
Post by jannica on Feb 4, 2014 14:01:51 GMT -8
You're welcome! Glad I could help! I'm really hoping that the bubbles don't reappear when it gets hot outside. I've decided to rebuild my shelves instead of using the veneer since the twisty nails will likely cause bubbles. At least that way I won't have to worry.
|
|
jannica
Active Member
Posts: 185
Likes: 26
Currently Offline
|
Post by jannica on Feb 5, 2014 5:55:22 GMT -8
Thanks from me too, Jannica. The ripples appeared on my closet as well. Using a heat gun helped, but it keeps re-rippling. I think the house may be the perfect area for veneering. Once dry, it should stick and be beautiful... I found some instructions online about how to get rid of bubbles. Here's what it said: make a slit in the air bubble in the grain direction and apply a combination of heat and pressure using an iron. Make sure to protect the veneer by placing something between the iron and veneer. If the veneer will not laminate, it may be necessary to inject additional adhesive into the slit. |
|
|
|
Post by vikx on Feb 5, 2014 10:28:03 GMT -8
Thank you! I may try it when the weather warms. It's got more than a few ripples. Probably would be best to re-veneer the whole thing...
I've held off doing the rest of the rounded corners until I can figure out how to improve. V
|
|
jannica
Active Member
Posts: 185
Likes: 26
Currently Offline
|
Post by jannica on May 11, 2014 18:00:09 GMT -8
UPDATE: I just finished some more veneering in my Shasta. So far, it seems to be sticking really well with no bubbles! Fingers crossed that it stays that way. I made a few mistakes when cutting it with my razor blade (including cutting my index finger oops), but I'm hoping it won't be that noticeable once I get everything shellacked and get all of my knick knacks in there.  The picture below is the almost finished cabinet face. I still need to add a few strips around the edges of the box in front of the sink and also finish the drawers.  And here's the finished closet and door! I just propped the door up to see what it looks like. I will shellac it inside but will use my sprayer for the closet walls since I can't move those! I haven't replaced the camper walls or ceilings with birch yet but that's on the agenda soon.  I also decided to put veneer on this shelf instead of removing it. I'm of course going to be replacing the ceiling panel here before it's all said and done.  Here's one of the ceiling panels after I used my new paint sprayer to apply four coats of clear and three coats of amber. It's going to look so pretty!  |
|
Hamlet
2K Member

Posts: 2,820
Likes: 925
Currently Offline
|
Post by Hamlet on May 11, 2014 19:43:35 GMT -8
Beautiful!!!
|
|


![(=])](http://storage.proboards.com/3684717/images/NVMMIBL1J3sN4gcz6aYv.png)


 I was able to smooth it out, but I’m wondering if they will reappear again later. Houston’s humid climate is probably not helping either. We'll see how it goes! Today I decided to tackle the closet door. It is much bigger, so I was a little nervous, but it came out great (so far).


 The picture below is the almost finished cabinet face. I still need to add a few strips around the edges of the box in front of the sink and also finish the drawers.
