|
|
Post by Teachndad on Mar 25, 2018 7:57:40 GMT -8
Hi Friends,
Currently getting a little time to work on my Westerner floor. Working as part of a frame off build.
What is the order of build after buying the lumber all the way to installing linoleum? Looking for all the steps.
Directions like:
When to screw and glue?
When to boltto frame?
Dry fit with clamps or screws?
Etc...
I plan on supporting the floor seams from underneath, blocking the floor, painting/coating the floor joists and leaving the plywood floor exposed underneath.
Walls will go up after floor is complete.but that's a whole other topic, lol.
I will lay sheet linoleum.
Thanks,
Rod
|
|
nccamper
Administrator 
Posts: 7,745 
Likes: 2,873
1962 Forester- 1956 Shasta
Currently Offline
|
Post by nccamper on Mar 25, 2018 17:44:17 GMT -8
I remember you took it down to the frame and (I think) the wheel wells were being replaced. Is that correct?
Can you share the latest photo?
"...leaving the plywood floor exposed underneath."
No sound board (What I call it) shielding the plywood?
I've never worked on a Westerner so I hope somebody with more hands on experience jumps in.
|
|
|
|
Post by Teachndad on Mar 26, 2018 7:47:12 GMT -8
Hi NC,
The floor is a very simple design which I was going to keep. No sound board. No belly pan. Just stringers and plwood for the floor surface.
I wasn't going to replace the fenderwells. They sit on top of the floor, not sandwiched underneath like some others.
Hoping to get more pix later today.
Rod
|
|
nccamper
Administrator
Posts: 7,745
Likes: 2,873
1962 Forester- 1956 Shasta
Currently Offline
|
Post by nccamper on Mar 26, 2018 9:47:12 GMT -8
Hi NC, The floor is a very simple design which I was going to keep. No sound board. No belly pan. Just stringers and plwood for the floor surface. I wasn't going to replace the fenderwells. They sit on top of the floor, not sandwiched underneath like some others. Hoping to get more pix later today. Rod I've often wondered if the sound board acts as a shock absorber not just a water shield protecting the plywood. |
|
CorvettCrzy
Full Member

Posts: 934 
Likes: 273
'58 Corvette, '64 Franklin
Currently Offline
|
Post by CorvettCrzy on Mar 26, 2018 18:40:13 GMT -8
Our Corvette didn't have anything between the frame and plywood. Being it was/is our first "experience" it
never occurred to us to change the design. Now that I read about other tear downs I realize that most have something in between. We used the fence post paint several had recommended back then to paint the underside of the plywood, but nothing else. The original underside was coated with a similar substance.
|
|
|
|
Post by Teachndad on Mar 26, 2018 21:34:03 GMT -8
Our Corvette didn't have anything between the frame and plywood. Being it was/is our first "experience" it never occurred to us to change the design. Now that I read about other tear downs I realize that most have something in between. We used the fence post paint several had recommended back then to paint the underside of the plywood, but nothing else. The original underside was coated with a similar substance. Hi Friends, I wish I had the patience to modify. At this point, my project is becoming interminable.  Having virtually no time to continue the project, I am just going for what I see and moving off that. Thank you Corvettecrazy for sharing your thoughts.  Anyway, NC had asked for pix of the floor. Below are two pictures showing the simple design of the underside of the floor. The only pieces missing are the small pieces of plywood that were nailed and glued to the underside of the seams to support them. Those had to be removed to get the floor apart in sections. In the images, you can see small rectangles where bare wood is showing. Those indicate where the reinforcement was made to cover and support the seam.  old Westerner floor upside down 2 old Westerner floor upside down 2  Old Westerner floor upside down 1 Old Westerner floor upside down 1 Then, as a reference, I have included a photo to show where the blocking will be. Red lines indicate where the blocking will be added to support the floor. The photo is at least a year old. But, it’s the best image I have right now of what the frame looks like and it has the stringers on it (middle, curbside and streetside).  I hope this helps. If not, I am working on a draft of all the steps necessary to complete the floor. I will throw it out there for corrections to help create a working logical progression. Rod |
|
nccamper
Administrator
Posts: 7,745
Likes: 2,873
1962 Forester- 1956 Shasta
Currently Offline
|
Post by nccamper on Mar 27, 2018 6:06:01 GMT -8
I just realized that you may be reusing the skin so adding sound board may be impossible. You'd be adding to the sidewall height. I'd coat the plywood before installing it. My campers have three bolts (each side) on the outside out-rigging from the wheel forward and two from the wheel to the rear. There are also (I think) three center lag bolts from front to back. If you have a bolt where tile will go you're better off using these...  www.vintagetrailersupply.com/Elevator-Bolts-p/vts-375.htm www.vintagetrailersupply.com/Elevator-Bolts-p/vts-375.htm |
|
CorvettCrzy
Full Member
Posts: 934
Likes: 273
'58 Corvette, '64 Franklin
Currently Offline
|
Post by CorvettCrzy on Mar 27, 2018 7:07:01 GMT -8
For what it's worth - Corvette Floor after removal, as it was, I do not believe any supports had been removed. I should add that the "extra" supports and un-coated piece in the rear were added by the PO to "square off" the back end (we're guessing from a rear end collision) but that un-coated piece was added about 40+ years ago and sat through all those years outside in a MI winter next to a pond. (It was very likely treated lumber, it they had it back then) We went with it. Once it actually sees the weather I'll let you know how it holds up. Totally understand the time thing - we're on year #4! 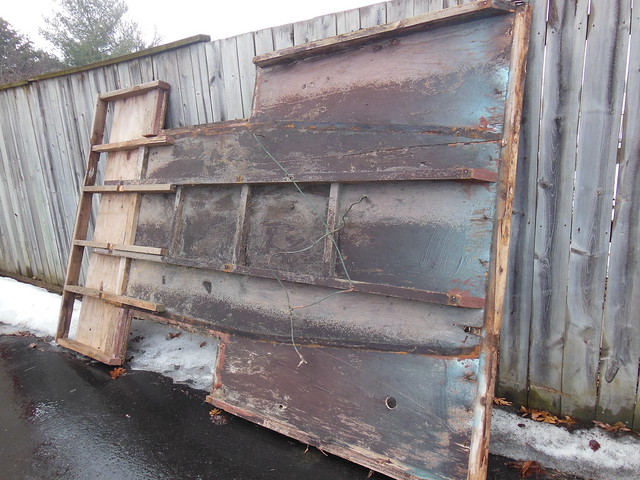 Corvette Floor Corvette Floor by Corvett crzy, on Flickr |
|
maddan
Junior Member
Posts: 71
Likes: 21
57 Westerner
Currently Offline
|
Post by maddan on Mar 27, 2018 14:19:54 GMT -8
Hi Rod,
Since we have the same build, I'll share what I did, right or wrong. I'll try to list in an assembly order, based on reviewing all my Westerner pix.
1) Prep frame before attaching any wood. I painted all metal with Black Beauty Fence Post paint. I believe you have already "prepped" your metal, meaning all rust removed, and surfaces ready for painting. I also painted the axle, as it was easier to access. Bare metal needs some rust protection.
2) Measure and cut all floor joists. Ensure new joists are the same length as old ones, meaning when reassembling the trailer, the front and rear skins will fit back in their original location, perpendicular within the side walls. I painted all floor joists, including the shorter ones attached to outriggers, with the said paint.
3) Since my original decking (floor joists and sub-floor) was NOT attached as one piece to the frame, I decided to follow the original construction. Meaning, attaching the floor joists first using carriage bolts. When snugging the carriage bolts, the heads will compress slightly into the 2x4s. Some might prefer to attach the completed deck as one piece, where the carriage bolts run through the sub-floor, then thru joists. Not sure which is best.
4) Layout new plywood sub-floor options, i.e. where is the best placement of seams. You will have 3 cut plywood sheets, with 2 seams. I used the old decking as a template. Once the sheets were cut, I painted the undersides of each with said paint; two coats. Not sure what the best practice is for untreated plywood exposed to the weather. Sure users will chime in.
5) When seam locations have been determined, I cut, then installed 2x4 blocking between the floor joists where the seams would be located. The blocking was painted as well.
6) Sub-flooring was installed using decking screws. I used a chalk line to mark the center of each floor joist running from front to rear. I probably used more screws than what was needed, but the flooring was attached securely. I also maintained a uniform pattern for screw placement, as opposed to a random placement. No glue was used to secure the sub-floor. Good that I didn't as explained next.
7) During further construction, I realized the front and rear (square) edges of the plywood sub-floor needed beveled to match the profile of the side aprons. This is also the angle at which the horizontal starter boards are attached to secure the front and rear interior panels, as well as the skins along the front and rear of the trailer. I marked the angle, removed the front and rear sub-floor sections, cut the beveled edges, painted the newly cut edges, then re-installed each piece.
8) Final prep was filling any depressions/seams on the top floor surface with a premixed floor patch. I then painted the top floor surface with a latex primer paint.
9) I next installed the wheel wells, since my floor tile would butt up against each wheel well.
10) If you're installing linoleum, I assume now would be the time to do it. Since I used VCT tiles, I waited to install flooring until later when I could layout the floor tiles for symmetry within the entry way, as well as considering where dinette benches and kitchen cabinets would be located.
Since my trailer did not have any fiber board insulation on the underside, none was installed during the rebuild. Not sure the best means of installing fiber board, if you want it.
Hope this provides a starting list for tackling your Westerner flooring. I can send pix if you need additional info; just PM/email me.
Dan
|
|


 Having virtually no time to continue the project, I am just going for what I see and moving off that. Thank you Corvettecrazy for sharing your thoughts.
