haze5736
Member

Posts: 40 
Likes: 3
1970 Fan Lee Liner 16'
Currently Offline
|
Post by haze5736 on Aug 4, 2017 15:53:26 GMT -8
My wife and I got started on the renovation of our new 1970 Fan Lee Liner. There is a ton of work ahead of us so we'll see how long the enthusiasm lasts. We're not doing a restore, just repairs and we're going for good enough in terms of cosmetics.
First order of business...remove the vent. Plenty of goop here.
<a data-flickr-embed="true" href="https://www.flickr.com/photos/153399526@N06/36331350696/in/dateposted-public/" title="IMG_1352"><img src="https://farm5.staticflickr.com/4441/36331350696_12e8ccbff7_z.jpg" width="640" height="480" alt="IMG_1352"></a><script async src="//embedr.flickr.com/assets/client-code.js" charset="utf-8"></script>
<a data-flickr-embed="true" href="https://www.flickr.com/photos/153399526@N06/35540488924/in/dateposted-public/" title="IMG_1355"><img src="https://farm5.staticflickr.com/4380/35540488924_ed8836a3e1_z.jpg" width="640" height="480" alt="IMG_1355"></a><script async src="//embedr.flickr.com/assets/client-code.js" charset="utf-8"></script>
It wasn't as bad as I thought it would be using a heat gun and scraper. Yay! One goop free area on the roof.
<a data-flickr-embed="true" href="https://www.flickr.com/photos/153399526@N06/35540488664/in/dateposted-public/" title="IMG_1368"><img src="https://farm5.staticflickr.com/4438/35540488664_dd16952090_z.jpg" width="640" height="480" alt="IMG_1368"></a><script async src="//embedr.flickr.com/assets/client-code.js" charset="utf-8"></script>
Basketball hoop post bumper removed. The PO was so proud of that thing.
<a data-flickr-embed="true" href="https://www.flickr.com/photos/153399526@N06/35540488684/in/dateposted-public/" title="IMG_1370"><img src="https://farm5.staticflickr.com/4427/35540488684_be253bf129_z.jpg" width="640" height="480" alt="IMG_1370"></a><script async src="//embedr.flickr.com/assets/client-code.js" charset="utf-8"></script>
I have not seen framing this thick in pictures I've seen of other campers. I wonder if the entire roof is that thick? The vent hatch didn't appear to be any higher than the rest of the roof. There is fiber board between the framing and interior paneling as well as between the framing and exterior skin. Maybe that's why it was not sweltering in there yesterday on a 88 degree day in the direct sun. Maybe there is a good amount of insulation up there. We'll soon find out. Does anyone know if I should approach things any different?
<a data-flickr-embed="true" href="https://www.flickr.com/photos/153399526@N06/35540488724/in/dateposted-public/" title="IMG_1372"><img src="https://farm5.staticflickr.com/4337/35540488724_bf2735b502_z.jpg" width="640" height="480" alt="IMG_1372"></a><script async src="//embedr.flickr.com/assets/client-code.js" charset="utf-8"></script>
|
|
Ten
3K Member

Posts: 3,432
Likes: 1,468
70 Shasta 16SC + 1964 Airflyte
Currently Offline
|
Post by Ten on Aug 4, 2017 16:58:02 GMT -8
There were a few makes that were notably heavier built than most, and I believe Fans were one of those. Where most have 1 X 2 or 1 X 3 framing, I know Tag Alongs and Frolics were 2 X 2, and more. The heavier build was not as popular, for all the obvious reasons, but they sure held up.
|
|
nccamper
Administrator 
Posts: 7,879
Likes: 2,967
1962 Forester- 1956 Shasta
Currently Offline
|
Post by nccamper on Aug 4, 2017 17:45:48 GMT -8
Welcome! My Forester weighs 1000 pounds more than other camper the same size because of the framing. I'd lift the skin and search for rot along the bottom where the skin wraps under. Places like that must be repairs to keep the camper safe. 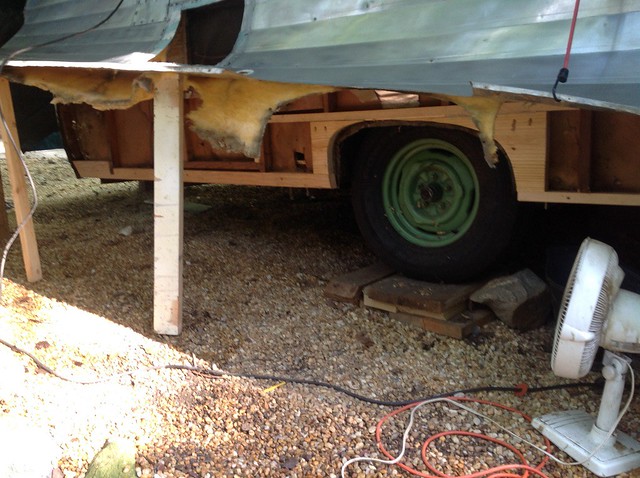 Forester-lifting lower skin for repair Forester-lifting lower skin for repair by
|
|
mrmarty51
Leading Member

Posts: 1,787
Likes: 423
1972 HOMEMADE
Currently Offline
|
Post by mrmarty51 on Aug 4, 2017 19:26:33 GMT -8
Surprising the wood around the top vent is that nice.
You can probably lighten it up by using foam board for insulation. If You do decide to do a skin off restoration.
|
|
|
|
Post by vikx on Aug 4, 2017 20:53:39 GMT -8
From the vent, it looks pretty good! At least those rafters... I'm hoping that your Fan is early enough to have escaped the MDF cabinets. If it does have MDF inside, it might be better to rebuild with plywood. 1970 was the go to year for MDF, but some manufacturers held off for a few years.
Fans were very well made, so you might get lucky.
|
|
haze5736
Member
Posts: 40
Likes: 3
1970 Fan Lee Liner 16'
Currently Offline
|
Post by haze5736 on Aug 5, 2017 0:06:27 GMT -8
Surprising the wood around the top vent is that nice. You can probably lighten it up by using foam board for insulation. If You do decide to do a skin off restoration. Do you rest the foam boards in or do you fasten them somehow? Is there a risk of having squeaks from foam board rubbing when the camper moves when walking around inside? |
|
mrmarty51
Leading Member
Posts: 1,787
Likes: 423
1972 HOMEMADE
Currently Offline
|
Post by mrmarty51 on Aug 5, 2017 7:52:39 GMT -8
Surprising the wood around the top vent is that nice. You can probably lighten it up by using foam board for insulation. If You do decide to do a skin off restoration. Do you rest the foam boards in or do you fasten them somehow? Is there a risk of having squeaks from foam board rubbing when the camper moves when walking around inside? On the flat portions I just laid them in and pressed them in. On the curved portions I used Loctite 300 foam board adhesive then used scraps of wood, with screws to the stringers to hold them down until the glue set. Also on the curved portions I used 3/4" foam board so that it would bend around the curves easier then after that glue holding them down set, added another 3/4" foam board on top of that. The structure is 2X2 which is actually 1-1/2X1-1/2". No squeaks from walking around. |
|
|
|
Post by danrhodes on Aug 5, 2017 11:20:19 GMT -8
You can also use foil bubble insulation on the curves. It's in the same area of your home store as the foam sheets and makes things easier.
|
|
haze5736
Member
Posts: 40
Likes: 3
1970 Fan Lee Liner 16'
Currently Offline
|
Post by haze5736 on Aug 7, 2017 12:37:38 GMT -8
More progress this weekend. We have some rotted boards to replace.
<a data-flickr-embed="true" href="https://www.flickr.com/photos/153399526@N06/36294471271/in/album-72157684512133084/" title="IMG_1385"><img src="https://farm5.staticflickr.com/4368/36294471271_d0021c77ca_z.jpg" width="640" height="480" alt="IMG_1385"></a><script async src="//embedr.flickr.com/assets/client-code.js" charset="utf-8"></script>
<a data-flickr-embed="true" href="https://www.flickr.com/photos/153399526@N06/36294471331/in/album-72157684512133084/" title="IMG_1386"><img src="https://farm5.staticflickr.com/4399/36294471331_7ca36457e9_z.jpg" width="480" height="640" alt="IMG_1386"></a><script async src="//embedr.flickr.com/assets/client-code.js" charset="utf-8"></script>
<a data-flickr-embed="true" href="https://www.flickr.com/photos/153399526@N06/36263003702/in/album-72157684512133084/" title="IMG_1376"><img src="https://farm5.staticflickr.com/4381/36263003702_7382cd58d6_z.jpg" width="640" height="480" alt="IMG_1376"></a><script async src="//embedr.flickr.com/assets/client-code.js" charset="utf-8"></script>
<a data-flickr-embed="true" href="https://www.flickr.com/photos/153399526@N06/36263003392/in/album-72157684512133084/" title="IMG_1382"><img src="https://farm5.staticflickr.com/4436/36263003392_991d7f8dbc_z.jpg" width="640" height="480" alt="IMG_1382"></a><script async src="//embedr.flickr.com/assets/client-code.js" charset="utf-8"></script>
Not sure what to do here. On both front sides, the skins do not meet in the corner. If you look closely at the picture it appears that both side skins were not cut around the contour of the wood. On the front skin you can see the jagged cut from following the wood. Is my thinking here correct? Is it possible that they shorted the side skins? Or did something happen to cause things to separate? Should I try to get the corners to come together or just put it back the same way? If I put it back the same way is there something I should do to protect the wood or just make sure the j channel is sealed properly?
<a data-flickr-embed="true" href="https://www.flickr.com/photos/153399526@N06/36263003612/in/album-72157684512133084/" title="IMG_1387"><img src="https://farm5.staticflickr.com/4432/36263003612_48a6eb61dd_z.jpg" width="640" height="480" alt="IMG_1387"></a><script async src="//embedr.flickr.com/assets/client-code.js" charset="utf-8"></script>
<a data-flickr-embed="true" href="https://www.flickr.com/photos/153399526@N06/36294471411/in/album-72157684512133084/" title="IMG_1388"><img src="https://farm5.staticflickr.com/4348/36294471411_f70658c61d_z.jpg" width="640" height="480" alt="IMG_1388"></a><script async src="//embedr.flickr.com/assets/client-code.js" charset="utf-8"></script>
One more thing. You can see in this picture the curbing is not built up between the framing. Instead the framing is notched out the thickness of the curbing and the curbing installed over the framing. Should I piece the curbing in between the framing? That would be 1 5/8" since I have 2x framing. Or is it best to put it back the same way? Also, at the top of the photo you can see how the curbing is floating in order to make the curve. There is a pretty good space in there. It doesn't appear to have pulled out, there are at least 8 sturdy staples holding it down near there. They did end up with 1 5/8 inch spacing but it is weird to have something floating like that.
<a data-flickr-embed="true" href="https://www.flickr.com/photos/153399526@N06/36263003452/in/album-72157684512133084/" title="IMG_1384"><img src="https://farm5.staticflickr.com/4369/36263003452_3061e8e918_z.jpg" width="640" height="480" alt="IMG_1384"></a><script async src="//embedr.flickr.com/assets/client-code.js" charset="utf-8"></script>
|
|
mrmarty51
Leading Member
Posts: 1,787
Likes: 423
1972 HOMEMADE
Currently Offline
|
Post by mrmarty51 on Aug 7, 2017 14:53:35 GMT -8
A lot of respect for doing it right.
|
|
|
|
Post by vikx on Aug 7, 2017 21:13:03 GMT -8
No, there should not be wood showing. You'll have to take it down and repair the wood and edging (nothing should float!) and other boards that need it. Build the trailer and then decide what to do about the skins. You could buy new front/rear that will fold over the siding but the siding does seem to be cut short.
It's not good, but repairable. Don't get too much invested in this 70s project but it's a great learning task. The next one will go a lot easier.
Last thought I KNOW you don't want to hear: if the roofing is all the criss cross diamond pattern, it is thinner than most siding and prone to rot/cancer. Even tho you cleaned the vent extremely well, I noticed that it might be a bad roof. Not for sure, just sayin'.
Mobiltec's videos will help a lot figuring out some of this and we are always here to help.
|
|
haze5736
Member
Posts: 40
Likes: 3
1970 Fan Lee Liner 16'
Currently Offline
|
Post by haze5736 on Aug 8, 2017 1:52:03 GMT -8
Don't get too much invested in this 70s project but it's a great learning task. I'm not sure what this means. Is there something wrong with 70s campers? I'm not in this as an investment. The plan is to use the camper because we could not find anything modern in a small size that would accommodate me at 6'3" with sleeping quarters. I also prefer the look of vintage campers over modern. Modern campers always look cheap and sometimes tacky to me. We had a brand new pop up a couple of years ago and it felt cheap. I know I'll be into this camper for far more than I'll ever get back if that's what you mean. I'm OK with that because I plan to enjoy it for many years. I'm in the same boat with my two 20 plus year old cars. They are not worth half of what I have in them but I love driving them because they are so comfortable for me. |
|
mrmarty51
Leading Member
Posts: 1,787
Likes: 423
1972 HOMEMADE
Currently Offline
|
Post by mrmarty51 on Aug 8, 2017 10:33:42 GMT -8
YES, what vikx said about the roofing.
The original siding and roofing on My camper was a lot thinner than the new siding/roofing that I got from Hemett. It was shot full of holes. Most of what could not be seen until I got it all removed then looked at it with some light on the opposite side. I am in amazement that it did not show anymore signs of leakage than it had.
Of course though, when I took the roofing and siding to the recyclers, it was worth about 1% of what the new stuff cost. LOL
|
|
|
|
Post by vikx on Aug 8, 2017 20:58:53 GMT -8
Haze, the 70s campers do not hold value as well as an older 50s/60s would. That's exactly what I meant. If it is worth repairing and keeping, then it is a good project for you. As said, there may be a lot of MDF in the cabinets which should be changed out, for weight loss if nothing else.
Everyone and any trailer is welcome here and we want to help rebuild it the right way. So hang with us, you'll get lots of info.
|
|
haze5736
Member
Posts: 40
Likes: 3
1970 Fan Lee Liner 16'
Currently Offline
|
Post by haze5736 on Aug 10, 2017 17:17:36 GMT -8
My wife found an old ad for Fan campers. It looks like ours is the 1600 Fantasy Model.
<a data-flickr-embed="true" href="https://www.flickr.com/photos/153399526@N06/36354106621/in/album-72157684512133084/" title="20748389_10209456688200486_1971777725244708919_o"><img src="https://farm5.staticflickr.com/4345/36354106621_d5a87fbabe_z.jpg" width="356" height="640" alt="20748389_10209456688200486_1971777725244708919_o"></a><script async src="//embedr.flickr.com/assets/client-code.js" charset="utf-8"></script>
We finally got the entire front left corner exposed. As expected, more rot than we thought. I'm not worried, but also not sure how to tackle this as it is not constructed the same as most of the older campers on this board and Mobiltec's videos. I have seen a couple of Mobiltec videos where he mentions some different construction methods but nothing showing how to repair.
Exposed.
<a data-flickr-embed="true" href="https://www.flickr.com/photos/153399526@N06/36491376665/in/datetaken-public/" title="IMG_1407"><img src="https://farm5.staticflickr.com/4434/36491376665_8ebf11a72d_z.jpg" width="640" height="480" alt="IMG_1407"></a><script async src="//embedr.flickr.com/assets/client-code.js" charset="utf-8"></script>
Entire lower corner is bad.
<a data-flickr-embed="true" href="https://www.flickr.com/photos/153399526@N06/36491379765/in/datetaken-public/" title="IMG_1410"><img src="https://farm5.staticflickr.com/4396/36491379765_e739fb9f1a_z.jpg" width="640" height="480" alt="IMG_1410"></a><script async src="//embedr.flickr.com/assets/client-code.js" charset="utf-8"></script>
As you can see in this picture there is not a skirt board where the side walls are attached to the outside. Instead the floor is built on top of the frame and the side walls are built on top of the floor. So in this corner I need to replace the front, side and floor framing. I'm not sure how to accomplish that. In order to do the floor I would have to take off, at least part of, the side wall. But to take the side wall off I would have to support the roof/ceiling which means my support would be resting on the floor that I must tear out. Has anyone done this? If so, how?
<a data-flickr-embed="true" href="https://www.flickr.com/photos/153399526@N06/36094556780/in/datetaken-public/" title="IMG_1413"><img src="https://farm5.staticflickr.com/4342/36094556780_a45bcf83ff_z.jpg" width="640" height="480" alt="IMG_1413"></a><script async src="//embedr.flickr.com/assets/client-code.js" charset="utf-8"></script>
|
|


