kwaggs
Junior Member

Posts: 77
Likes: 10
Currently Offline
|
Post by kwaggs on Apr 6, 2017 15:37:10 GMT -8
|
|
|
|
Post by vikx on Apr 6, 2017 22:27:02 GMT -8
Don't cut the skin!
A little more study is in order. The first "layer" mark you see is for the ceiling panel/rafter. The ceiling/front/rear panels go on BEFORE the rafters and cross boards are attached. That's about 7/8" total.
Measure everything else very closely. Something may be off because you're so off on the one edge. Measure again.
We can help, but need more info and photos. What does the outside look like? Basically, panel, then place your rafters and crossboards. If everything seems even, THEN is the time to cut the skin. Remember, you can always cut to fit, but adding is not do-able.
|
|
kwaggs
Junior Member
Posts: 77
Likes: 10
Currently Offline
|
Post by kwaggs on Apr 7, 2017 2:24:23 GMT -8
Sorry the pictures I posted are not currently how the camper sits. The roof panel is on the insulation is on the problem is that outside wall skin. When I first picked the camper up and started tear down and removed the roof skin and the lower front skin there was a gap in the front corner between the skin and inside paneling that they filled with steel wool. They, the previous owner OR Shasta stuffed steel wool into a 1" gap in the front corner because the aluminum didn't sit tight against the inside structure framing. I'll take a picture of how it sits today with everything in place and you can see how far the side skin still hangs to far over the front of the camper.
|
|
nccamper
Administrator 
Posts: 7,745 
Likes: 2,872
1962 Forester- 1956 Shasta
Currently Offline
|
Post by nccamper on Apr 7, 2017 4:46:44 GMT -8
When I first picked the camper up and started tear down and removed the roof skin and the lower front skin there was a gap in the front corner between the skin and inside paneling that they filled with steel wool. They, the previous owner OR Shasta stuffed steel wool into a 1" gap in the front corner because the aluminum didn't sit tight against the inside structure framing. Do you have photos of the "gap in the front corner" before dismantling it? Were the walls rebuilt before you owned the camper? I agree with vikx, proceed slowly before cutting the skin. I usually rehang the skin while rebuilding the walls to double check how it lines up. On the upside, too much skin is much better than too little. |
|
Deleted
Posts: 0
Currently Offline
|
Post by Deleted on Apr 7, 2017 17:44:08 GMT -8
|
|
mrmarty51
Leading Member

Posts: 1,787
Likes: 423
1972 HOMEMADE
Currently Offline
|
Post by mrmarty51 on Apr 7, 2017 17:53:40 GMT -8
third photo in this group. As vikx put it. The next thing to go on will be the paneling. After the paneling will be the insulation then the 1-1/2 X 1-1/2 {2X2}cross stringers then the front/back roofing and the top. It should all come out even after those items are applied. If not then some trimming will be required. |
|
nccamper
Administrator
Posts: 7,745
Likes: 2,872
1962 Forester- 1956 Shasta
Currently Offline
|
Post by nccamper on Apr 8, 2017 5:39:51 GMT -8
This may seem like a silly question, but did you use the skin as a template to rebuild the walls or the old wall framing as a template which may have been half rotted? Getting the new wall framing to match old skin (for me) requires repeatedly rehanging the aluminum as a guide. Some people rebuild the walls using the skin flat on the ground as a guide. I guess there are a lot of ways to do it.
To keep the shape from looking odd you may have to shim the framing. The main problem with the shim idea is how the window will fit.
|
|
Deleted
Posts: 0
Currently Offline
|
Post by Deleted on Apr 8, 2017 13:52:30 GMT -8
|
|
nccamper
Administrator
Posts: 7,745
Likes: 2,872
1962 Forester- 1956 Shasta
Currently Offline
|
Post by nccamper on Apr 8, 2017 14:20:15 GMT -8
Wow! Did they just beef up the edge board/curving to meet the skin? That's an option but you will be recreating a cavity. Is it mainly below the window?   (google photo won't let me link the photo to the thread) Judging by one of your shots it looks like you had to arch the front framing to recreate the odd cavity? If yes, another option is to beef up the edge board to the skin then add a layer of plywood to the framing in that corner and use a belt sander to even it out. A lot of work at this point in your project but if you just trim the skin it may create a new problem: the front skin will need to buckle/ bend to meet the new arch without the cavity. Hopefully that makes sense. If you trim the skin will the arch look natural or goofy? |
|
|
|
Post by vikx on Apr 8, 2017 20:45:43 GMT -8
@kwaggs27:
Your old account can be reactivated if you wish. You had two accounts here, so the older was disabled. I sent you a message yesterday. PM me for more information.
|
|
nccamper
Administrator
Posts: 7,745
Likes: 2,872
1962 Forester- 1956 Shasta
Currently Offline
|
Post by nccamper on Apr 9, 2017 5:02:05 GMT -8
I copied the photo to photobucket so it could be linked.  I'll add some clarification to the above post I made yesterday. I think this type of factory screw-up is best addressed by re-framing the wall to the skin (not copying the existing wall) during the rebuild. My guess is the mistake the factory made was in framing of the wall too short. They realized that trimming the wall to meet the mistake would require bending the front panel around this mistake which would buckle the skin. I think adjusting the front framing and building up the edge board/curving is the best solution at this point since the mistake in the wall panel can't be undone. Others may disagree. |
|
Deleted
Posts: 0
Currently Offline
|
Post by Deleted on Apr 9, 2017 5:15:14 GMT -8
I have brand new aluminum skin from Hemet Valley that is waiting to be installed. I have brand new front and rear panels and one long panel for the roof. If I trim the side aluminum panel to meet the wall the new front skin should bend over the edge fine without buckling, I think. goo.gl/photos/c4HCeFsvUwryG8gg8I'm concerned my drip edge trim won't fit correctly in the front below the window on that side if I cut the side aluminum back. |
|
nccamper
Administrator
Posts: 7,745
Likes: 2,872
1962 Forester- 1956 Shasta
Currently Offline
|
Post by nccamper on Apr 9, 2017 5:48:32 GMT -8
The jrail will bend easily enough but from earlier photos it looks like, if you trim back the side aluminum 1"+, the front panel below the window will need to arch to meet it.
I wonder if a 1"+ adjustment to the skin spread over a 3' span (based on the photo I attached above) will cause the front panel to buckle? And will the long front window bend enough to compensate for the front corner (side wall) shifting back 1" or more?
It may work out fine but the time to consider these things is now.
|
|
kwaggs
Junior Member
Posts: 77
Likes: 10
Currently Offline
|
Post by kwaggs on Apr 9, 2017 17:03:15 GMT -8
With the side skin 1 1/4" father forward then the curb side panel, wouldn't it be twisting the front window in the first place? Trimming it back would actually put the plane of the window back parallel with itself? Could that be why that front corner of the camper was so damaged when I picked it up? Interesting. 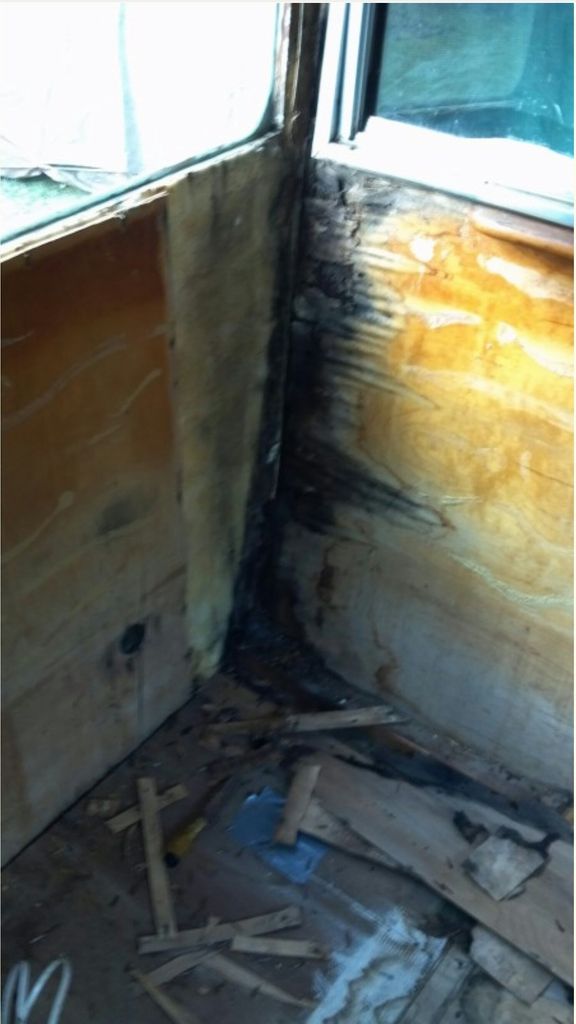 |
|
nccamper
Administrator
Posts: 7,745
Likes: 2,872
1962 Forester- 1956 Shasta
Currently Offline
|
Post by nccamper on Apr 9, 2017 18:28:54 GMT -8
It’s hard to say without seeing firsthand, but I wonder if the factory realized the wall was off and patched to bring the window framing out to the skin height. If they did, the window was straight when you got it. If they didn’t, the window bowed 1 1/4" in the corner to make this arch work. Also, if the skin was out that far I assume they made the edge board/curving wider to meet the skin? Without doing that, the jrail would have been screwed to nothing and flapping in the breeze. ![]()  With that said, the window will flex a little. I’ve seen a half inch bow work but never 1 1/4”. So as I understand it, you have two choices: beef up the new framing to the level of the old skin or trim the new skin to match the new framing. Others may disagree, but if your new framing is perfectly straight and the correct thickness for the window I might trim the skin…assuming the new arch it creates looks natural. If you bowed the framing to make the arch above (1 1/4" over a 3' span) then I would fix the framing. Is your new front window framing straight from side to side? No bow in it to compensating for the short side wall that may have needed to be larger? I wouldn't worry about the jrail. If you're trimming and not adding it won't fall short. It's also very bendable. |
|


