rvafan
Junior Member

Posts: 91 
Likes: 36
Currently Offline
|
Post by rvafan on Jun 6, 2016 5:21:34 GMT -8
|
|
rvafan
Junior Member
Posts: 91
Likes: 36
Currently Offline
|
Post by rvafan on Oct 10, 2016 6:01:35 GMT -8
Still working on this project, several set backs and now the roof is leaking again... seeking guidance
|
|
msgoehring
Full Member
Just call me Margaret the shellac, buff, sand an shine queen.
Posts: 860 
Likes: 303
1957 Westerner Deluxe
Currently Offline
|
Post by msgoehring on Oct 10, 2016 20:37:00 GMT -8
Hi rvafan, I've read your thread earlier when you first posted and thought about telling you this information then, but thought maybe mobiltec or vikx would pop in and help you out. Since they haven't and you're having trouble, I guess I'll be the bad news carrier. You are probably going to continue to have trouble with your restoration because it isn't being done properly. When restoring or repairing a vintage trailer, you must start from the OUTSIDE and work your way in. You must leave the cabinets, closets and other interior items in place because they provide the structural integrity of the trailer. In order to safely and properly repair rot or water damage in a trailer you need to start with removing the skins and shoring up the frame while it is still supported by the interior. You also need to check the boards that hold the body to the frame which are called skirt board (this one is the bottom board of the trailer body) and the sill board (which is attached to the frame to nail or screw the body to) as these are likely to be rotted also. Since it's too late for that, my best suggestion right now is to go look at the videos mobiltec does where he goes step by step through the correct methods of replacing walls roof etc. His website is www.cannedhamtrailers.com , and I recommend you watch this video first so you better understand why these things have to be repaired from the outside in: www.youtube.com/watch?v=hDdpZgSD1JM . Depending on where the roof is leaking you're probably going to have to remove it and correctly frame it up and inspect the metal for pinholes or separating seams. There are ways to temporarily fix the seam problems, but if you have pinholes you'll have to replace the roof, there is no sealant available that works on trailers no matter what they say. The best water barrier is sound metal and correct installation. Another resource you could look into is an awesome repair manual that vikx put out. You can get it here vintagetrailerrepairmanual.weebly.com My husband doesn't do computers so this manual has become very important to him as we work to do a frame off restoration of our 57 Westerner Deluxe travel trailer. I know you don't want to hear any of this, but you really do need to start over in some areas and the roof is one. The next one would be the skirt and sill boards and the frame to make sure you have a good base for your walls. I hope you'll continue with your trailer and don't be afraid to jump in with all the questions that you come up with. |
|
bullseye17
Active Member
Posts: 143
Likes: 45
Currently Offline
|
Post by bullseye17 on Oct 11, 2016 5:25:53 GMT -8
I guess an important question would also be: What is your goal with this trailer? Restoration? Rebuild? What is your budget? I think budget is an important thing to talk about that probably doesn't get discussed enough on here. It's very expensive to do some things, and not so expensive to do other things, depending on what you're going for, what condition the trailer is in, etc.
For example, I started in a similar place as you, and am in the final stages of a complete ground-up rebuild. I ended up spending 4-5 times what I originally budgeted! One of the most valuable things I did was to research, plan and always be thinking 10-20 steps ahead - and even more importantly, listen to the smart folks on this forum. The experience and knowledge available here is invaluable.
Let us know how we can help - it's a major learning experience working with, restoring and rebuilding these trailers and it's worth slowing down, doing your research and understanding the whole process before diving in so far that you are in over your head, and end up doing things that cannot be undone.
Good Luck.
|
|
Deleted
Posts: 0
Currently Offline
|
Post by Deleted on Oct 11, 2016 5:53:36 GMT -8
Man I am so sorry you sre having such a hard time. You probably just wanted to do a couple things, clean it up and start camping. Well since this is something that is a good deal of effort it may be important to also in addition to the other comments think about how much you like this trailer. If its not just everything you have dreamed it may be hard to get the motivation to continue. We all need drive. Just a thought. Also if you got it for free it may be easier to pass from a financial stand point if you are too overwhelmed. But of course hopefully you love it enough to bring it back to glory! And everyone here is so helpful.
|
|
rvafan
Junior Member
Posts: 91
Likes: 36
Currently Offline
|
Post by rvafan on Oct 30, 2016 19:19:18 GMT -8
Found some more water damage in the parts that I had repaired. The leaking was in the roof so I pulled off the roof.... . I am Starting fresh, taking your advise and starting from scratch. I pulled all of the skin off and I will be removing the walls this week. Thanks for the advice and I will keep you updated
|
|
msgoehring
Full Member
Just call me Margaret the shellac, buff, sand an shine queen.
Posts: 860
Likes: 303
1957 Westerner Deluxe
Currently Offline
|
Post by msgoehring on Oct 31, 2016 0:17:42 GMT -8
Found some more water damage in the parts that I had repaired. The leaking was in the roof so I pulled off the roof.... . I am Starting fresh, taking your advise and starting from scratch. I pulled all of the skin off and I will be removing the walls this week. Thanks for the advice and I will keep you updated I'm glad to hear you aren't giving up on the trailer, it's a cutie for the era. I think once you start rebuilding her, you'll find that you feel much better about how the trailer will end up. You will know for a fact that every rotted piece of wood, every bad frame piece and everything that could cause trouble down the road has been taken care of correctly because you did it yourself. My trailer is still sitting in pieces all over my garage and family room (since the weather turned all the stuff I was doing outside has overtaken my family room). We are at the point where we are trying to decide what to do about the wood finish. We've narrowed it down to sticking with shellac, but now we have to buy tints so we can get the color as close to what was there as possible. I'm also working on tearing down each and every window to replace all the gaskets and seals since they've dried up over the years. And while doing that I have to polish all the aluminum so they look good going back in in the spring. These vintage trailers are truly a labor of love, and it seems one issue leads to another. But when you're done, you get lots of pleasure saying that you did that yourself. And other than routine maintenance the trailer should last for another 40 to 50 years. |
|
rvafan
Junior Member
Posts: 91
Likes: 36
Currently Offline
|
Post by rvafan on Nov 6, 2016 4:59:38 GMT -8
I was reading today about the pressure treated wood. I was not aware it off gassing and wood reacting to the aluminum siding and the different types of nails, man was I looking for trouble with my quick fixes. Thanks for all the treads about restoration. I am still tearing down the trailer and will be repurposing the wood that I bought from my "quick fix". I am in for the long haul.
While pulling my trailer apart I found the aluminum skin covering the framing with nothing between.
Can anyone explain why some people wrap the exterior with wood and then attach aluminum skin?
I have also seen them wrapped in tyvek after framing or both exterior wood and wrap. What is the reasoning for that?
|
|
|
|
Post by vikx on Nov 7, 2016 21:23:39 GMT -8
Many people like to have an extra barrier against moisture is the reason for Tyvek. It actually isn't a vapor barrier, since it breathes. Maybe someone who use it will chime in.
|
|
mrmarty51
Leading Member

Posts: 1,787
Likes: 423
1972 HOMEMADE
Currently Offline
|
Post by mrmarty51 on Nov 7, 2016 23:12:25 GMT -8
Tyvek breathes only one way, allowing humidity and moisture pass out through the exterior walls and stopping it from seeping inwards.
I purchased the book from vikx and just finished reading it. That is probably theee best $25.00 investment that I have ever made. As msgoehring said, well worth the money.
I was a mechanic for over 31 years for the Mt. DOT, now retired, I have people ask Me how to fix this or that, My very first question right back at them is, "Do You have the Book ?" usually they`ll say no and so I tell them that for every piece of equipment that I have, I have purchased the book for that piece of machinery, rather I know how to fix it or not, I still have the book. and no, do not ask, I do not do mechanic work on the side. LOL I tell them, that is what the people up town are for. LOL
I too had sort of started out like You are doing, thinking a piece here, a piece there and it`ll be as good as new. NOT. I started dismantling by removing the roof, then the sides and then down to the frame. i am so happy that I went down that far. In order to get a solid structure, a person must start at the ground level and make sure that thefoundation is solid before replacing any of the rest of what is bad.
Good luck on Your build and the people in this forum really are very kind to those of us that knows nothing about the re~making of Our campers but wants to do it ourselves.
I am thankful for every word of advice that I am offered in My thread.
|
|
|
|
Post by vikx on Nov 8, 2016 22:42:55 GMT -8
Thanks Martin. We are a family here. The Good, the Bad and the Ugly get repaired. Mostly takes longer than we thought.
|
|
rvafan
Junior Member
Posts: 91
Likes: 36
Currently Offline
|
Post by rvafan on Nov 9, 2016 14:04:45 GMT -8
|
|
rvafan
Junior Member
Posts: 91
Likes: 36
Currently Offline
|
Post by rvafan on Nov 15, 2016 15:54:40 GMT -8
I now own the ebook and I have only read it 20 times and use it like reference material.... I am starting to gather supplies for the rebuild. The original builder used aluminum as the base between the trailer and the first layer of decking for the subfloor. The book recommends using Coroplast but I have been unable to find large sheets of Coroplast. (Only smaller sizes) I have found other people use paints and paint on plastics on the flooring below the sub floor.(the part that will be exposed to the road in parts not covered by the trailer frame. Does any one else have any ideas for my first lay on top of the trailer decking?
|
|
msgoehring
Full Member
Just call me Margaret the shellac, buff, sand an shine queen.
Posts: 860
Likes: 303
1957 Westerner Deluxe
Currently Offline
|
Post by msgoehring on Nov 15, 2016 16:22:56 GMT -8
rvafan, you said there was aluminum before the first layer of decking. Was there any insulation and what thickness was the aluminum? Was the aluminum thick like the skin, or really thin like aluminum foil? Do you want to put insulation in the floor?
I think it would also really help if you showed pictures of what you're talking about. That way people can give you more knowledgeable answers.
|
|
rvafan
Junior Member
Posts: 91
Likes: 36
Currently Offline
|
Post by rvafan on Nov 18, 2016 14:55:05 GMT -8
It is thick and busted up in different places. It did have a thin layer of insulation. After talking with VK, I am going with Masonite. Two days of work later and I am moving forward again. 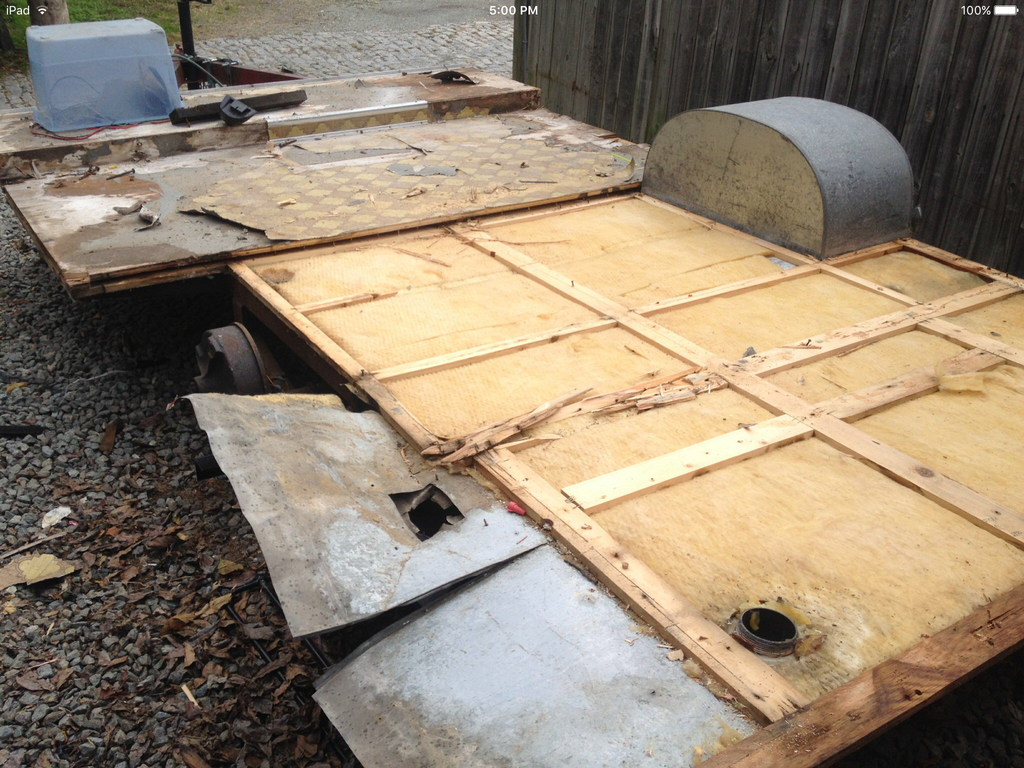 |
|


