|
|
Post by vulcancowboy on Oct 29, 2013 13:40:15 GMT -8
I just finished applying the fence post paint from TSC. What a messy job! Looking back, I wish I would have used my tractor w/frontend loader to pick the camper up so the bottom would have been vertical, rather than lying on my back and painting over my head. However, I am pleased with the results so far. Hopefully, I will not need to apply a 2nd coat.
|
|
kirkadie
1K Member

Posts: 1,156 
Likes: 556
'69 Serro Scotty Hilander
Currently Offline
|
Post by kirkadie on Oct 29, 2013 18:48:51 GMT -8
I've heard some scary stories about hitch-up tail-down manouvers where frames bend and a-frames break... some side rolls stories on the old shasta site also ended unpleasantly.
May I suggest using cinder blocks or similar 'gettin' it jacked up higher off the ground, but not putting strain that was never designed (40-50 years ago)into the frames even when they were young and strong. You'll still be on you back but nothing gets bent or broken (except a back as old as mine, 's why I did it on the lawn).
Those old tail fins and outrigger angle irons probably would be happiest remaining parallel to the ground, just saying, down the road, for someone who never suspected what all likes to go wrong with our ancient patients.
VC, you're right about the mess, but you really missed the point of the task... neighbor kid needs money for gas, you use the Tom Saywer-paint-the-fence technique, he thanks you for the experience, you tell em when he's 21 he can use the trailer for a night, by then you both forget, and the frame has long since been done.
No muss, no fuss, and all you gotta do is wash the brush, unless you're really good and your 'apprentice' does that too.
We've been using this 'help your elders' method for years and since we have a pretty consistant turn over of new families down the block, I don't see that ending soon.
Sometimes it's not how the job gets done but who you can snooker into helping, just saying.
|
|
maddan
Junior Member

Posts: 71
Likes: 21
57 Westerner
Currently Offline
|
Post by maddan on Oct 30, 2013 5:29:03 GMT -8
I'm curious. Did they really use 2x4s for joists? With 3/4"-thick walls? My '76 used 2x2 for everything except the rafters. Re: the 2x4 joists, my trailer has 2x4's which are used to attach the flooring deck to the frame, and 1x2s or 1x4s for the wall supports. The thickness of the walls are 3/4". The original design of the trailer had a middle 2x4 floor joist running front to rear, as well as 2x4s on each side to support the flooring. I added two additional 2x4s in the center front to rear, along with blocking under all the flooring seams. The entire decking now feels rock solid. Also, since I had removed the shell, the application of the undercoat paint was a breeze. I can envision a messier painting experience if the entire trailer had been intact. |
|
|
|
Post by vulcancowboy on Oct 30, 2013 5:46:58 GMT -8
I've heard some scary stories about hitch-up tail-down manouvers where frames bend and a-frames break... some side rolls stories on the old shasta site also ended unpleasantly. May I suggest using cinder blocks or similar 'gettin' it jacked up higher off the ground, but not putting strain that was never designed (40-50 years ago)into the frames even when they were young and strong. You'll still be on you back but nothing gets bent or broken (except a back as old as mine, 's why I did it on the lawn). Those old tail fins and outrigger angle irons probably would be happiest remaining parallel to the ground, just saying, down the road, for someone who never suspected what all likes to go wrong with our ancient patients. VC, you're right about the mess, but you really missed the point of the task... neighbor kid needs money for gas, you use the Tom Saywer-paint-the-fence technique, he thanks you for the experience, you tell em when he's 21 he can use the trailer for a night, by then you both forget, and the frame has long since been done. No muss, no fuss, and all you gotta do is wash the brush, unless you're really good and your 'apprentice' does that too. We've been using this 'help your elders' method for years and since we have a pretty consistant turn over of new families down the block, I don't see that ending soon. Sometimes it's not how the job gets done but who you can snooker into helping, just saying. I did put it up on ramps which gave me another 8" or 10". Actually, the hardest part was the cleanup.....of me! Actually used a scotchbrite pad and paint thinner on some of the spots on my arms & neck. Guess it is a kind of redneck exfoliation! |
|
kirkadie
1K Member
Posts: 1,156
Likes: 556
'69 Serro Scotty Hilander
Currently Offline
|
Post by kirkadie on Oct 30, 2013 17:38:08 GMT -8
VC, OUCH!
Maybe one of those paper painter suits and a wood shop faceshield?
|
|
jbar2bc
New Member
Posts: 1
Currently Offline
|
Post by jbar2bc on Nov 23, 2013 16:46:56 GMT -8
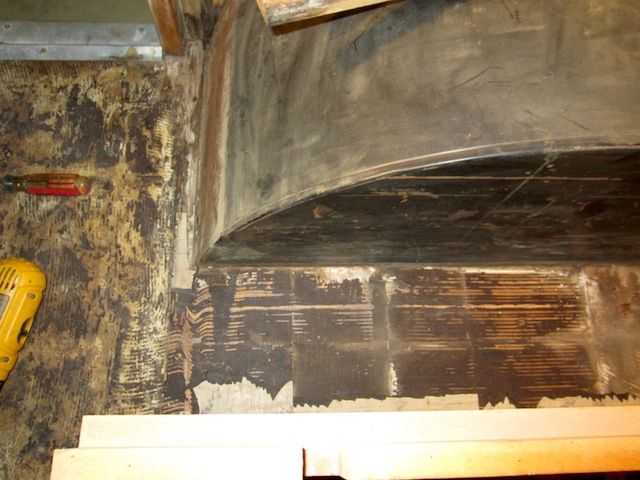
Today I started working on the under side of my 61 Shasta compact and I'm wondering just how much rust, crud, tar, etc I need to remove before moving on to paint (or under coating stuff) ? Should I prime the wood and the metal before undercoating? Thanks for your input!
Jill
|
|
kirkadie
1K Member
Posts: 1,156
Likes: 556
'69 Serro Scotty Hilander
Currently Offline
|
Post by kirkadie on Nov 24, 2013 5:31:12 GMT -8
Hey Jill,
You probably should grind off any loose, flaky stuff so you get a good solid coating over everything.
I only used the fence post paint under the body of my Scotty, and after grinding rust off the bumper and hitch a-frame I sprayed (rattle can) rustoleum primer and top coat on them.
Since the fence paint is meant to soak into the wood grain, I applied it to bare wood; no primer, but I suspect you could go either way as the stuff sticks to everything.
If you're doing it in a garage, put a tarp down first, cause it'll drip for the first few minutes till it sets up. I did mine in the summer and it took a few days to really harden.
|
|
newmexicogal
Junior Member
Posts: 77 
Likes: 25
Currently Offline
|
Post by newmexicogal on Dec 14, 2013 12:09:55 GMT -8
 Has anyone used this magical fence post goo INSIDE their trailer? I'm specifically thinking about the seam (rather large gap,actually) around my Compact's wheel wells. I'm definitely planning to give her a good coating underneath when she emerges from the garage next spring but I'm wondering, would this help with moisture penetration also? thanks! |
|
kirkadie
1K Member
Posts: 1,156
Likes: 556
'69 Serro Scotty Hilander
Currently Offline
|
Post by kirkadie on Dec 14, 2013 17:48:32 GMT -8
The Scotty had butyl tape shoved in like caulking everywhere there was an open seam or just plain bad craftsmanship and it seemed to do the job because there was no rot in those areas.
I think the only reason maybe NOT to do what you are thinking is that it might smell on some really hot and humid day with the rig all closed up, but I don't know.
Since the Scotty walls are solid plywood sheets, I slopped the fence paint up between them and the wheel wells, and technically that'll be inside, so I'll give you a definative answer next July.
|
|
|
|
Post by shastastic on Apr 30, 2014 7:50:13 GMT -8
Yep in fact I had to shave a few down to match exact dimensions. They were 1 3/4" exactly. I could have gone further as there are now a few humps in the floor Several of the contact points had shims as well. Not sure why, I just mimicked everything I replaced as close to the original as possible. My thinking is if it held up in Maine for almost 60 years, it ought to do just fine with what I wont be putting it through. I am learning that you can go absolutely crazy with this stuff. I have backed off my bomb proofing, and come to my senses. I've taken the .."I'd just like to get done with a pretty camper and go fishing ...like soon approach. " The other thing, anyone who has opened up one of these canned ham's should have noticed, was the utter and absolute lack of precision that they were built with. As long as you get certain critical measurements correct, "it won't matter" ...to quote my mentor.."Godfather" 1960 Airflyte.....He has 2 years and 50+ trips on his. Tried, tested, and proven. Overkill on certain things, relax on others. Damn it I just want to get 'er done.
|
|


