gary350
Full Member
 We should have gone camping today it is going to snow 6" tonight.
Posts: 573 
Likes: 170
1964 FAN
Currently Offline
|
Post by gary350 on Oct 2, 2015 10:30:53 GMT -8
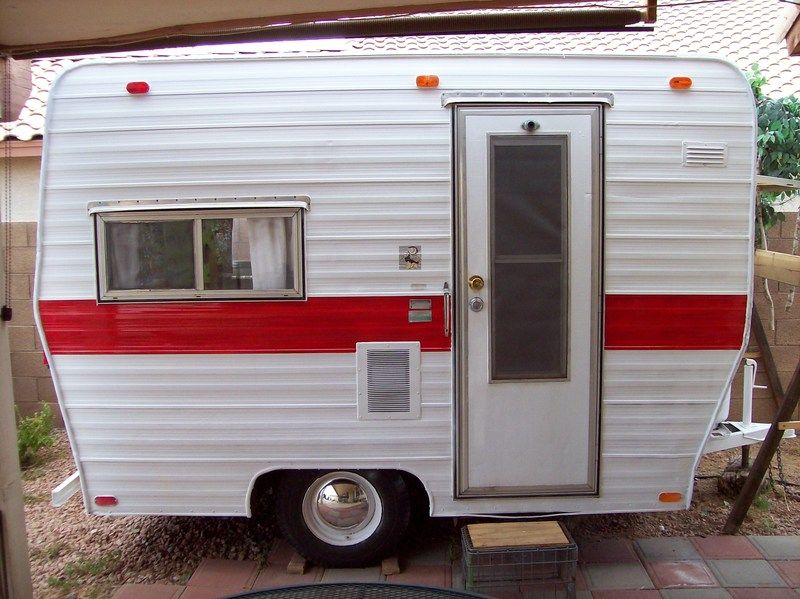
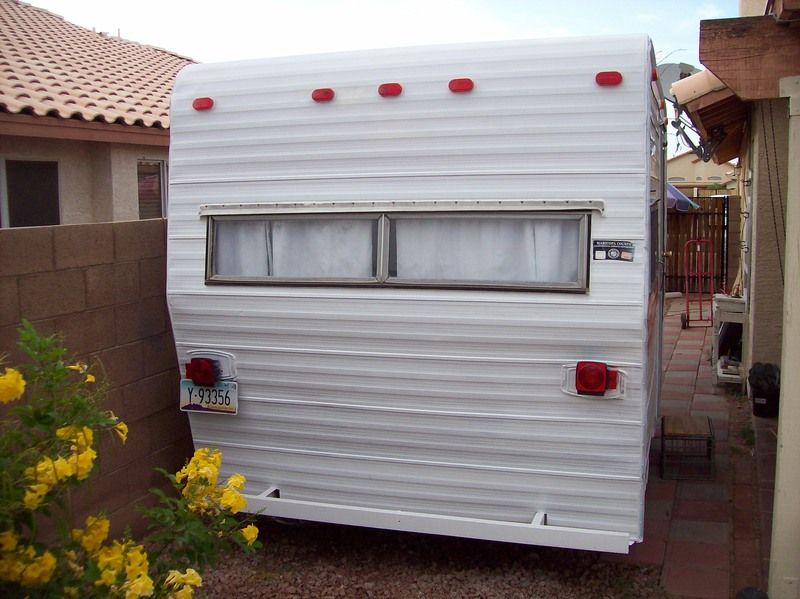
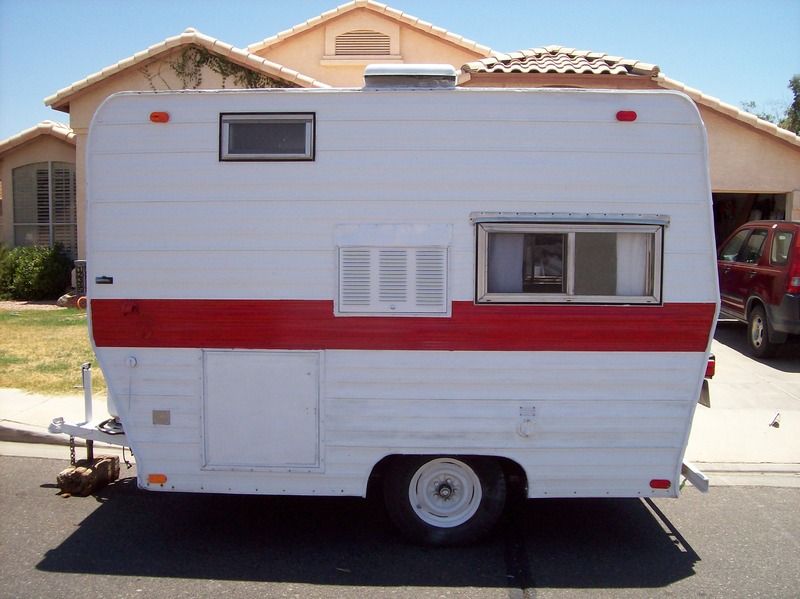
When I bought this Caveman trailer 2013 it was in very bad condition. Kitchen table was missing, 3 cabinet doors were gone, no refrigerator, and the whole inside was in the process of being gutted. Every thing that has been ripped out was in a pile on the floor. The trailer had been backed onto things that bent the corners in several places the front corners were all bent too like they had hit something. The propane tank mount was bent up in a wad like someone had used a pry bar to try and rip it from the trailer frame. Roof had been leaking pretty bad and the walls were rotted out in several places.
I decided to fix the roof first before replacing water damage wood inside. The inside was like a big puzzle I spent a lot of time trying to find the original location of each piece of wood laying in the pile. Little by little I got the kitchen cabinets back together. Then I reassembled the bed area, the storage cabinet area that use to have a refrigerator and the cabinet that houses the propane furnace.
I had to replace the wall behind the kitchen and the wall in the real by the big window.
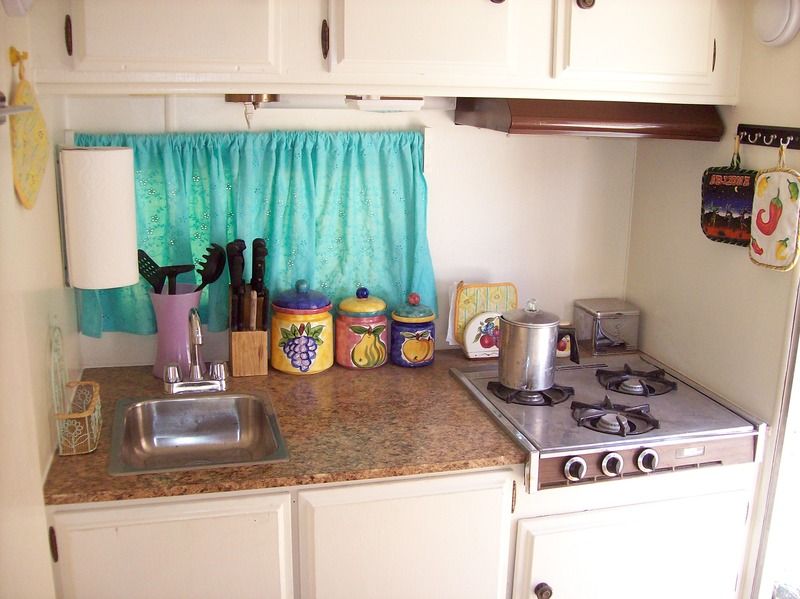
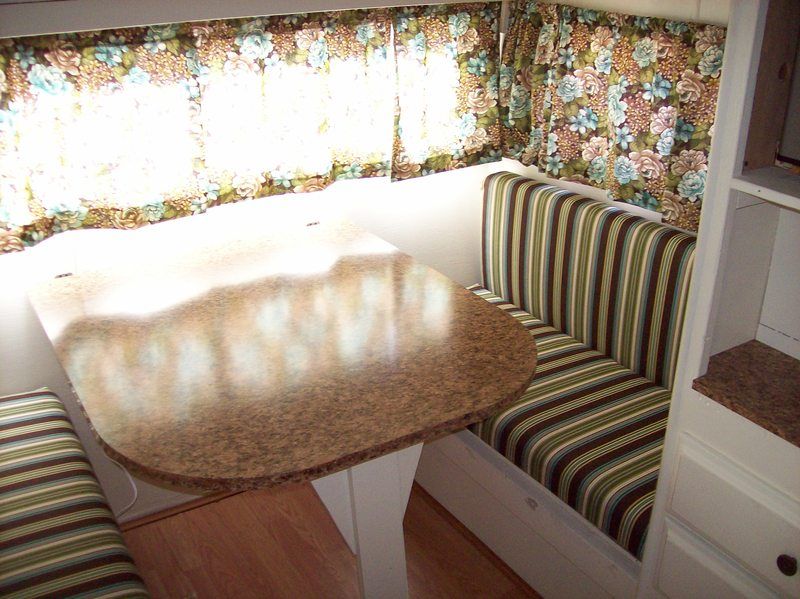
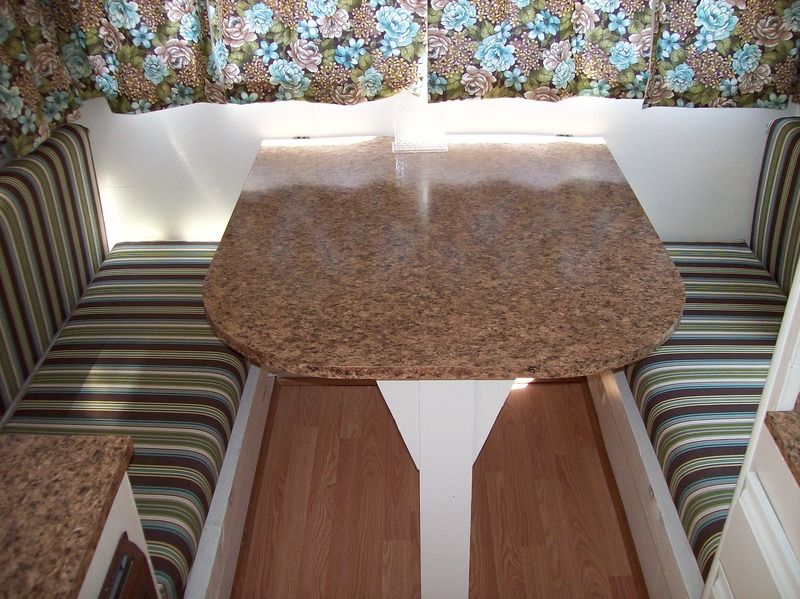
The kitchen counter top was made of particle board had been wet and was all curled up like a 4 foot wide potato chip. I used 3/4" plywood to make a new kitchen counter top and a table. I found pictures of a Caveman and a Bell online that were very helpful. This trailer was sold under 2 different names, bell and caveman, it had 8 different floor plans. I bought a 4x8 sheet of counter top Masonite laminate and used contact cement and a small router to glue it to the kitchen counter top, kitchen table, and a few other places.
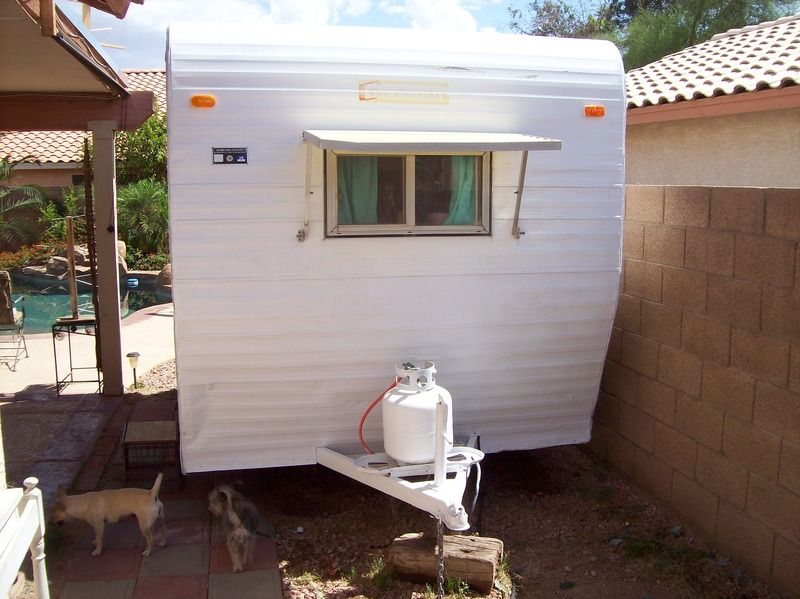
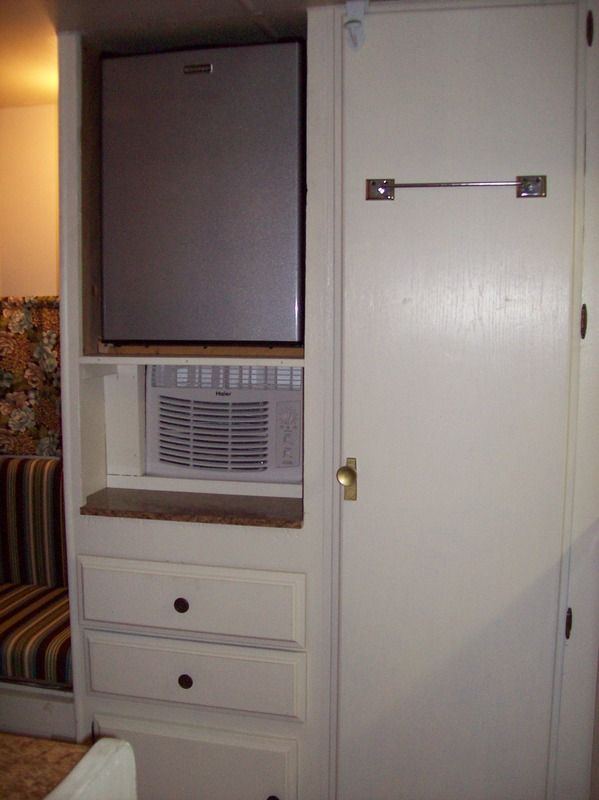
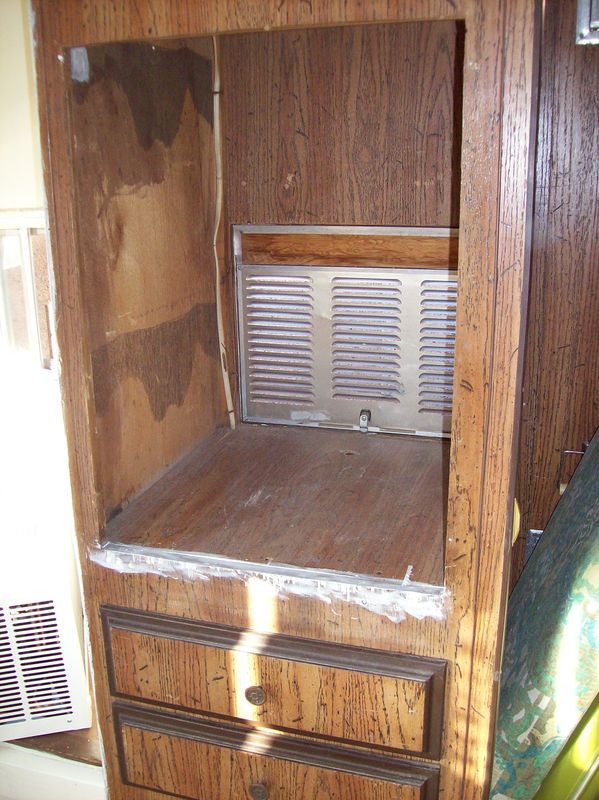
I bought a 120 volt air condition and a 28" tall refrigerator and mounted them in the cabinet area.
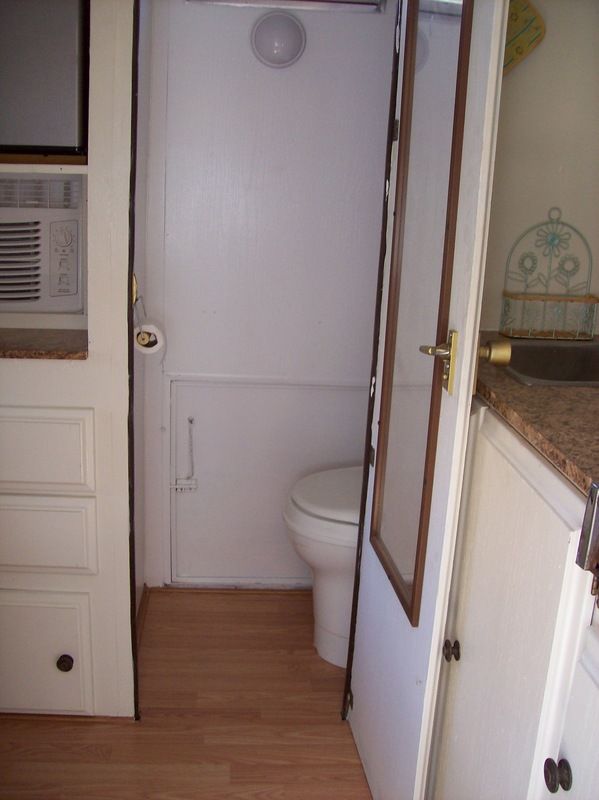
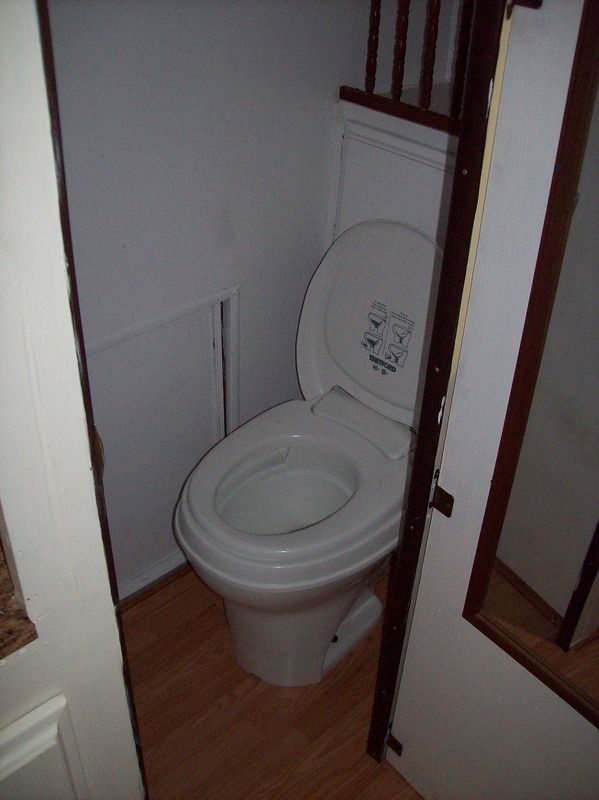
The original port a potty was missing not a big deal we don't want it anyway. I rebuilt the bathroom and had it ready for the new floor, electrical wiring, light, storage, and a real camper toilet.
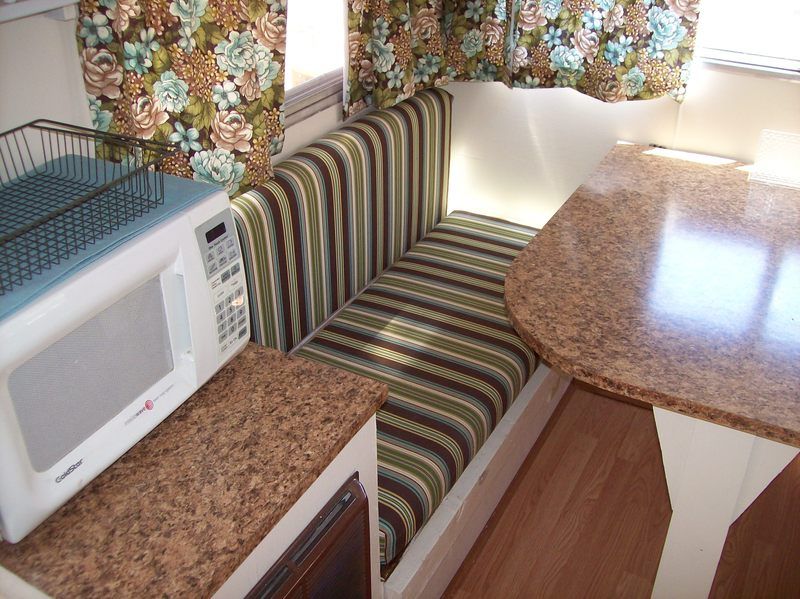
I rebuilt the seating area for the kitchen table, wired the whole trailer with new #14 wire and electrical outlets under the seats, behind the shelves for the AC unit and the refrigerator, lights, and 4 outlets in the kitchen. The 2 circuit electrical box is 240 VAC with 2 120 VAC circuits in the trailer.
The bunk bed area needed a lot of work I almost decided to trash it out but we decided we wanted it for storage we need a place to keep 14 quilts, blankets, sheets, pillows, for winter camping.
I painted the whole inside of the trailer, installed the kitchen counter top, installed the sink 2 feet to the left of where it use to be, plumbing and lights. Next I installed the laminate wood floor and toilet.
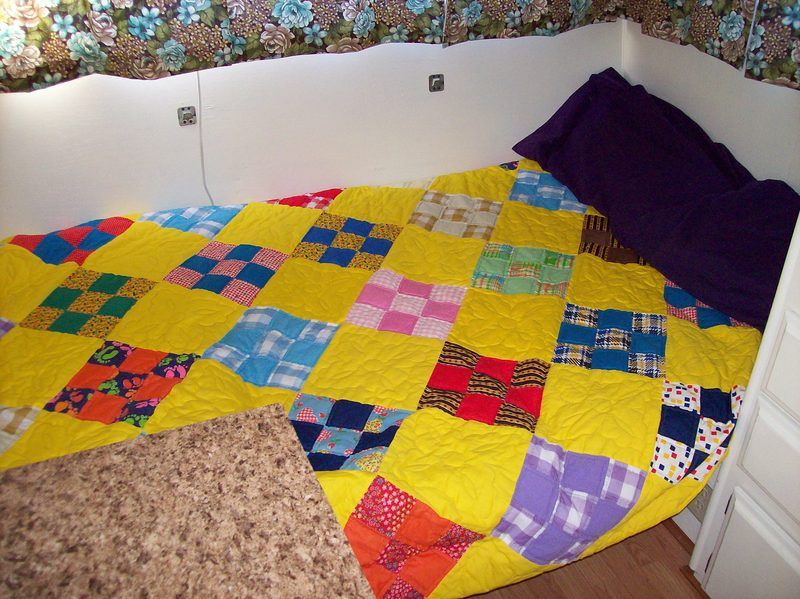
Foam for the pillows was $280 at one place and about $300 an another place so I decided to make pillows with 1/2" carpet pad. 8 sheet of carpet pad glued together with Elmer's wood glue worked excellent. Wife found a deal at Mill End Fabric 70% off sale for the upholstery material and made the pillow covers on her sewing machine. The foam pillows cost us $34 dollars to make and the upholstery material was $76. We saved about $400 on foam and upholstery material.
Next I installed the kitchen table that I had built. Wife made new curtains. I repaired the bent and damaged places on the trailer outside and replaced the caulking. Next I spray painted the whole trailer with Rustoleum white paint and a Red stripe. I connected the propane tank and tested the stove and furnace. Toilet and kitchen sink flush to a 5 gallon bucket under the trailer. Trailer sewer pipe is hooked up like a mobile home no storage tank.
The little camper pulls easy behind my 2002 Honda CRV 4 cylinder. Everything works great. Don't need heat in 20 degree weather with all these blankets but we brought the electric space heater just in case.
We had a lot of fun with this project but the full size bed is just too small for use. If I had known the bed was going to be so terrible to sleep in I would have left out the propane furnace and the lower part of the cabinets to make room for a queen size bed.
I advertised the camper trailer on Ebay and Craigslist and had it sold in 7 days. A young girl about 27 bought it to go camping. She had been looking at vintage campers for about 6 months but had not found anything as nice as our camper. We let the girl have every thing in the trailer except our quilts, blankets, sheets, and pillows. We had it stocked with pots, pans, silver ware, microwave, toaster oven, crock pot, coffee maker, hot pads, towels, electric heater, and a spare tire with a jack.


|
|
kirkadie
1K Member

Posts: 1,156
Likes: 556
'69 Serro Scotty Hilander
Currently Offline
|
Post by kirkadie on Oct 2, 2015 12:30:42 GMT -8
Wow, nice job Gary.
Bet you can't just do one!
|
|
RJ
Active Member
Posts: 416
Likes: 144
Currently Offline
|
Post by RJ on Oct 2, 2015 12:33:46 GMT -8
Nicely done sir.
|
|
|
|
Post by danrhodes on Oct 2, 2015 12:36:57 GMT -8
That looks amazing. Do you have any before photos of the interior?
|
|
Ten
3K Member

Posts: 3,432
Likes: 1,467
70 Shasta 16SC + 1964 Airflyte
Currently Offline
|
Post by Ten on Oct 2, 2015 18:31:05 GMT -8
I have only heard of "Caveman" brand trailers a couple times. Beautiful job! What time is breakfast??
|
|
nccamper
Administrator 
Posts: 7,744
Likes: 2,871
1962 Forester- 1956 Shasta
Currently Offline
|
Post by nccamper on Oct 2, 2015 18:40:06 GMT -8
They sell fast these days, don't they? You'll be back with another camper. It's a hard habit to break.  |
|
mtucson
Junior Member
Posts: 61
Likes: 14
Currently Offline
|
Post by mtucson on Oct 2, 2015 18:59:21 GMT -8
Is that new Formica? If so, did you fabricate the edging yourself?
|
|
|
|
Post by danrhodes on Oct 2, 2015 20:02:30 GMT -8
Interesting question about the bed. Anyone figure a good way to fit a queen in the back of a small trailer? I assume that cutting notches out of the tall cabinet wouldn't be good for the overall structure of the trailer...
|
|
|
|
Post by Teachndad on Oct 2, 2015 21:35:54 GMT -8
That ain't no man cave. It's just too nice. Wow - (eyes bulge) For such a lil thing, it's got all the creature comforts of home. I am amazed that it has a potty. Was the potty cabinet original? Also, I am jonesing for the laminate floor. Do you have a picture of the floor at the doorway. Also, that step up made from the metal milk crate is nice. Is that a scrap of the laminate on top? You have done well!  Now go get another. Cheers, Rod |
|
gary350
Full Member
We should have gone camping today it is going to snow 6" tonight.
Posts: 573
Likes: 170
1964 FAN
Currently Offline
|
Post by gary350 on Oct 4, 2015 6:39:44 GMT -8
I was already in the process of putting the cabinets back together when I realized I had taken no pictures. Here are the only 2 photos I can find.
Back wall panel board had been replaced and it has the first coat of paint. The seats have been assembled and I have the new wiring installed and a 2x4 board along the front to hold the table top for the bed. Later I had to remove the 2x4 and lower it 1/4" because the table is 3/4" thick plywood and the seats are 1/2" plywood.
The photo shows the cabinet area assembled again but I had to take it apart and make some changed so it was 1" lower there was not enough room for the Air Conditioner unit and the Refrigerator too. The top of that cabinet had a door missing and the bottom of the cabinet was missing so it worked out perfect to cut out the top part to make room for the largest refrigerator that would fit in the space that was available.
The toilet room was original. There is a door on the side of the trailer to remove the potty every day to be dumped and cleaned. You can see that door in the finished photo but the original potty was not there. I installed a real camper toilet shown in the picture. I don't like the idea of dumping a toilet every day no way was I going to have another removable potty toilet.
Floor was solid every place I walked except in the back corner where I replaced the wall and front behind the sink where I replaced the wall. Floor was a little soft but no big deal no one walks there so no need to do any repairs to the floor. I started to pull up the vinyl floor but it appeared to be a big job it was glued down good. At first we wanted more vinyl over the old vinyl but later decided on the laminate floor. Laminate floor is probably 10 lbs heaver than vinyl.
Someone asked how I attached the laminate at the door. I spent about a week thinking and coming up with different ideas. I finally decided to drill 5 evenly spaces holes 1/2" from the edge of the laminate, I counter sunk the holes for flat head screws. I used 1" long Philips head screws to hold the laminate down at the door. I used brass screws, after it was finished it was hardly noticeable. I was worried it would look terrible but it looked good.
I used all the wood pieces to put the cabinets back together the original way just so I could see how it was suppose to be. I decided the original counter top was trash it would not lay flat and the particle board was all buffed up from being wet and the location of the sink was right next to the stove. If you use the stove the counter space was on the other side of the sink that is not good. Sink water was too close to hot skillets not good either might splash water in hot oil and get burned. I built a new counter top with the sink all the way to the left with counter top space in the middle that can be used for both the sink and stove. Much better design than before.
I had to take the kitchen cabinets apart again to remove the none working hot water heater and the water storage tank that we are not going to use. The sink drain line connects to a 3" T under the trailer. Sewer drain is made just like a mobile home. Sink water drains out the 3" pipe with the toilet under the trailer. I put a 5 gallon bucket under the trailer to catch water.
We wanted hot water for the sink so I decided to buy a roll of copper tubing and put it under the stove burners of the propane stove. While you cook breakfast you can fill the sink with hot water. About 5 minutes after you start cooking you have water hot enough to wash dishes.
 |
|
|
|
Post by vintagebruce on Oct 4, 2015 7:18:53 GMT -8
I have seen photos of Caveman campers before, but yours is the first nicely rebuilt one I have seen. Congratulations on your project! You just might have the nicest 1973 Caveman on the road today!  |
|
|
|
Post by Teachndad on Oct 4, 2015 9:09:28 GMT -8
Hi Gary,
Great idea on using the carpet foam. Did you use the cheap foam which is usually blue on a side, or did you use what I remember as a kid, the more dimpled variety? How is the support of the foam when you sit on it and did you ever lay down and convert the table to a bed and sleep on it? I was curious also as to how it would be to sleep on.
Does the A/C unit vent to the side of the trailer through a vent or does it stick out?
Thanks,
Rod
|
|
gary350
Full Member
We should have gone camping today it is going to snow 6" tonight.
Posts: 573
Likes: 170
1964 FAN
Currently Offline
|
Post by gary350 on Oct 4, 2015 18:58:40 GMT -8
I experimented a little with the foam at the carpet store, cheap is too soft you sink all the way to the bottom. The 1/2" puke pad works good. We always called it puke pad it looks like someone chewed up several different colors of foam then puked it up. 4" of puke pad makes a good mattress and good seats too. I don't remember it being blue on one side. I cut the foam to size and put it in 4 stacks. Then I put the wood glue on each layer in streams about 2" apart. I stacked the layers and let it dry until the next day. Wife took measurements of the foam blocks and made all 4 covers, they fit perfect.
The old 3 way refrigerator use to be in the place where I put the AC unit. The trailer had a large 24"x 15" vent in the side. The vent was on a hinge that could be opened. The AC unit was right up against the vent. The vent door needed to be open for good air circulation for the AC unit to work. The AC unit did not stick out the side of the trailer. Leave the vent cover closed while driving down the highway.
AC unit is behind the vent in the photo. Open the vent to use the AC unit.
|
|
|
|
Post by Teachndad on Oct 6, 2015 20:10:20 GMT -8
Gary,
Thanks for the description on how you placed the A/C unit. I wanted to know if it was vented to the back. Lucky for you.
I do know what puke padding looks like. Great descriptor. That clarifies.
That's a lot in a little package.
Rod
|
|
mommao
New Member
Posts: 4 
Currently Offline
|
Post by mommao on Oct 7, 2015 5:30:15 GMT -8
Great job! Do you by chance have any pictures of the exterior drain/ bucket system?
|
|


