tnbuckeye
Member
 Scared stiff and excited to be starting on my vintage trailer journey...
Posts: 28 
Likes: 3
Currently Offline
|
Post by tnbuckeye on Apr 25, 2015 10:08:48 GMT -8
I got this trailer off of craigslist for $150, and I sometimes still feel like I got robbed!  My wife and I have a wedding photography business in Nashville, and she had a great idea that an old camper would make a great photo booth. The only problem is that neither of us have ANY experience doing anything like this, so to say that I am a bit overwhelmed is an understatement.  I have experience with some home rehab, so I am familiar with my tools, but redoing a travel trailer looks quite a bit different to me. I have purchased a video series on restoring vintage travel trailers, but it still leaves some holes in the process. I have also looked at some videos on YouTube, but I thought that I would reach out to you in this forum to see if you had some additional wisdom that I could glean.  We are wanting to restore the trailer enough to make it functional for a photo booth - we have no intention to use this as a camper either now or in the future. There just isn’t room on the interior for the cabinetry and a group of inebriated wedding guests wanting to get a group picture!        As a result, we no longer need any of the cabinetry or fixtures. So, I won't need the propane lines, exterior access panels and may not need all of the windows. We just need an open interior space for people to have their picture taken. I am trying to decide whether to replace the aluminum or sand and repaint. I have had someone else who saw pictures of it say that the siding appears to be in good shape, and for the most part it is, but the bottom edges and corners have taken a beating, so they would need some work, and after many coats of spray paint, the skin feels very gritty - like a coarse sand paper. I just wonder if it would not be easier AND FASTER to just replace the aluminum altogether. I don't know the cost of that yet, so I am asking you travel trailer veterans what your thoughts are on this. There is a lot to do, obviously: the metal frame needs sanding/painting, exterior aluminum, finish interior demo, completely replace flooring, wall frame work, replace insulation & wiring for exterior/interior lighting, etc. My 13 yr-old son and I have already done some interior demo work. When we pulled the paneling off of the ceiling, the horizontal frame pieces (under the roof) came with it, as if they were not attached at all to the roof metal and had broken off of the wall frame, so the frame will have to be mended/rebuilt. There is extensive water damage throughout, since the skylight was busted. In my inexperienced assessment, I feel like I need to take everything down to the trailer frame and wall frame and rebuild from beginning. But, since I have no experience in this, you may know of ways that I can avoid this. We have an event that could use this at the end of May - 4 weeks. While I think it is nearly impossible to have the trailer finished by then, maybe you can suggest some temporary solutions that would allow me to use this for that event, then continue my rehab after the event. Any ideas? There is probably a ton of additional information that I could provide, but I will leave it at this for now. Feel free to ask my any & all questions and toss your advice my way.  Thank you, in advance, for any help and advice that you can provide. I am excited to complete this project, but I am equally excited for this to be a project that my son and I can work on together. I just hope that he still respects and loves me when we are done! My hope is that after we get this project done, that we can do a real restore on a larger vintage camper that our family can use on the weekends. But after this project, he may never want to go camping - ever!  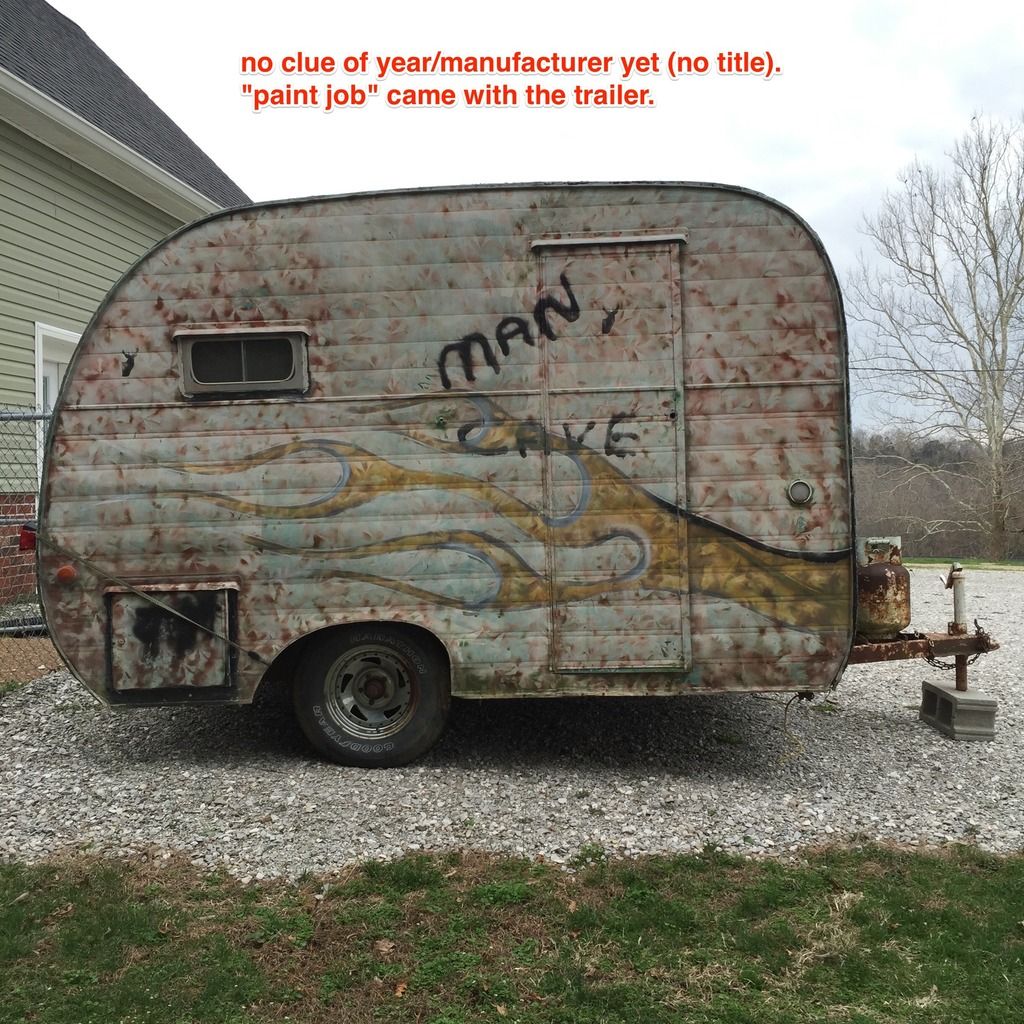 Man Cave? 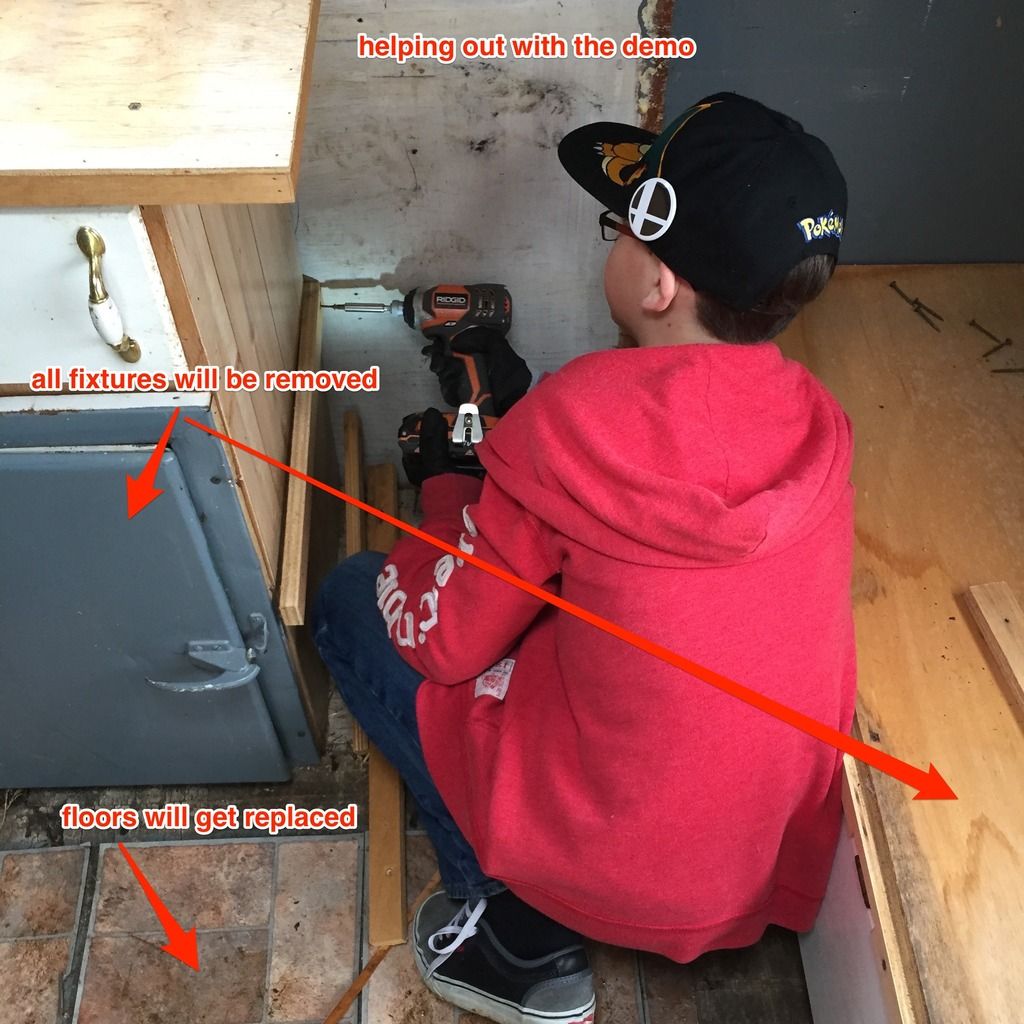 Proud dad moment 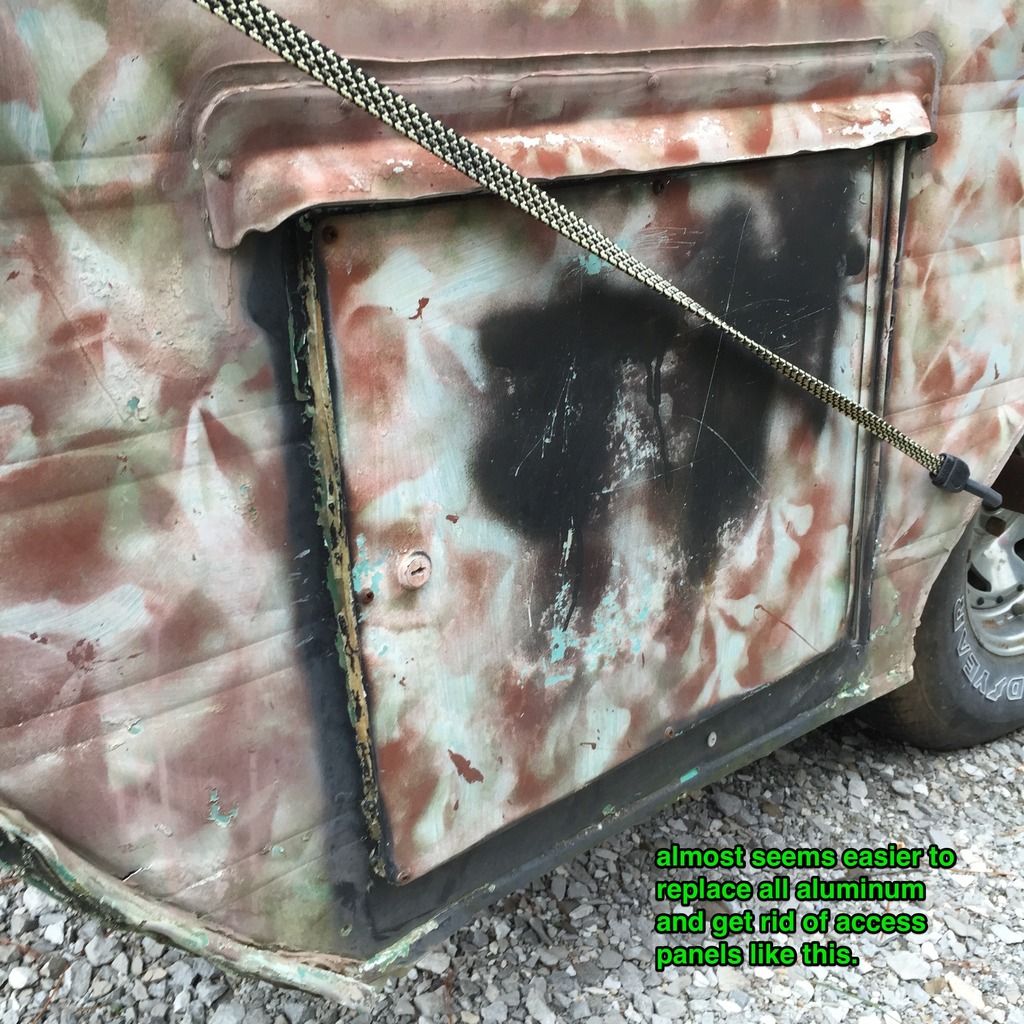 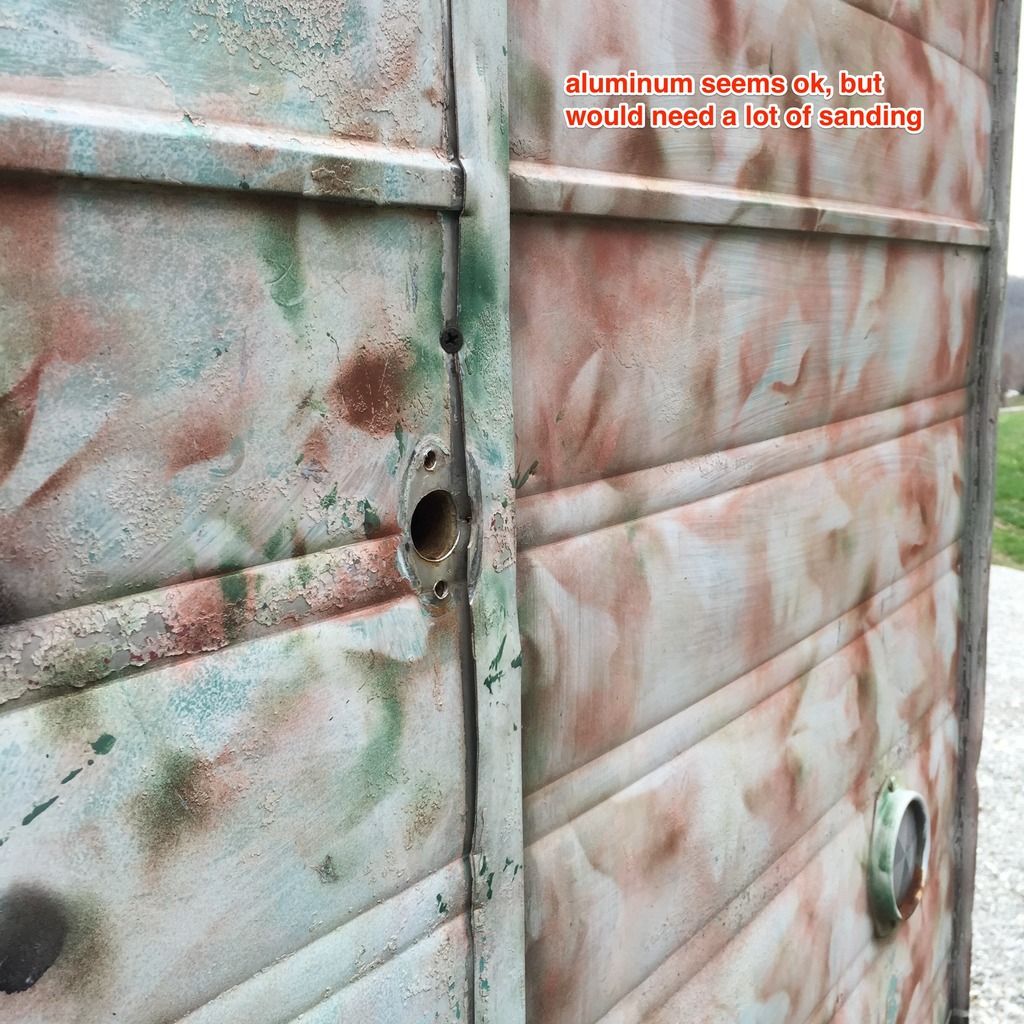 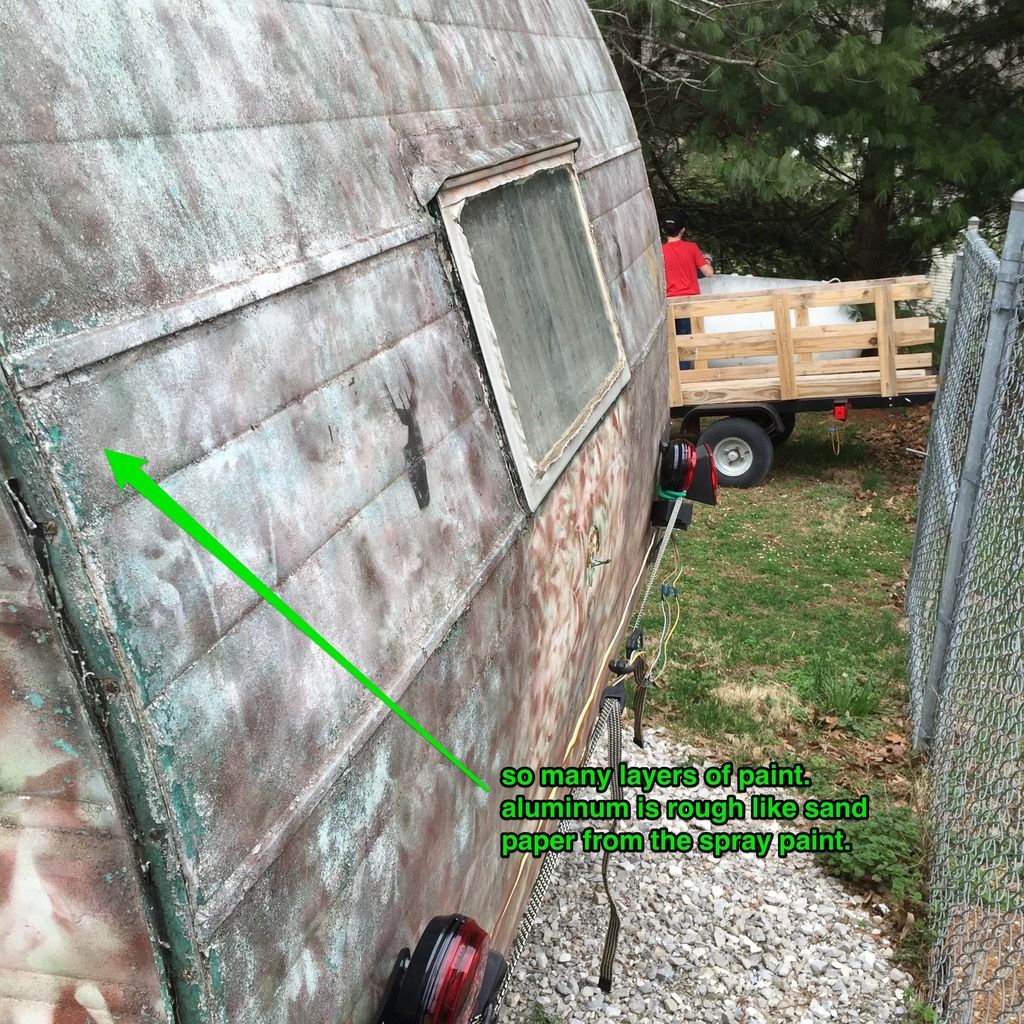 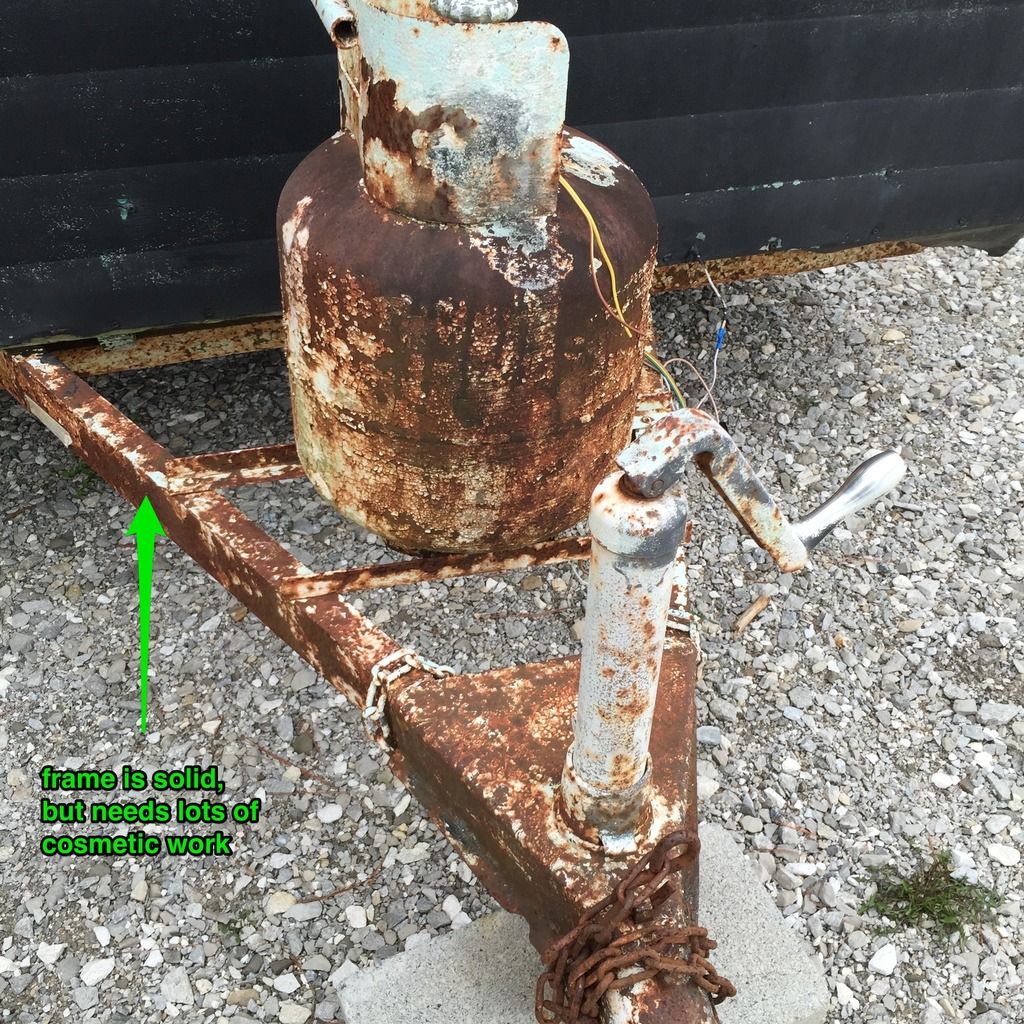 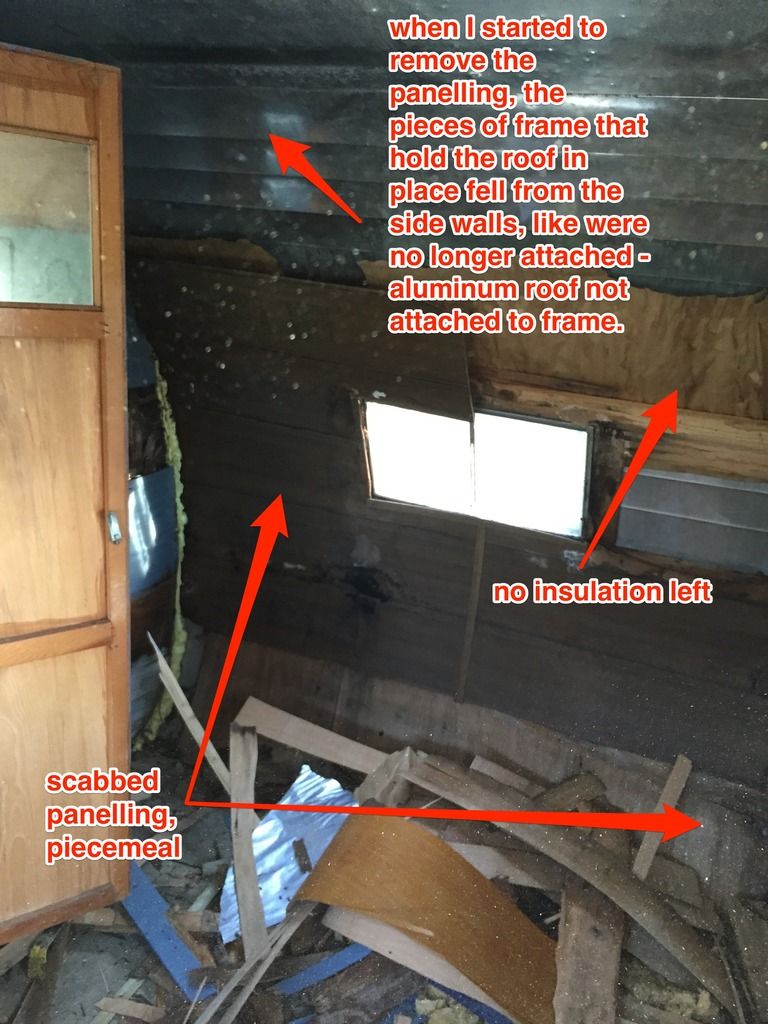 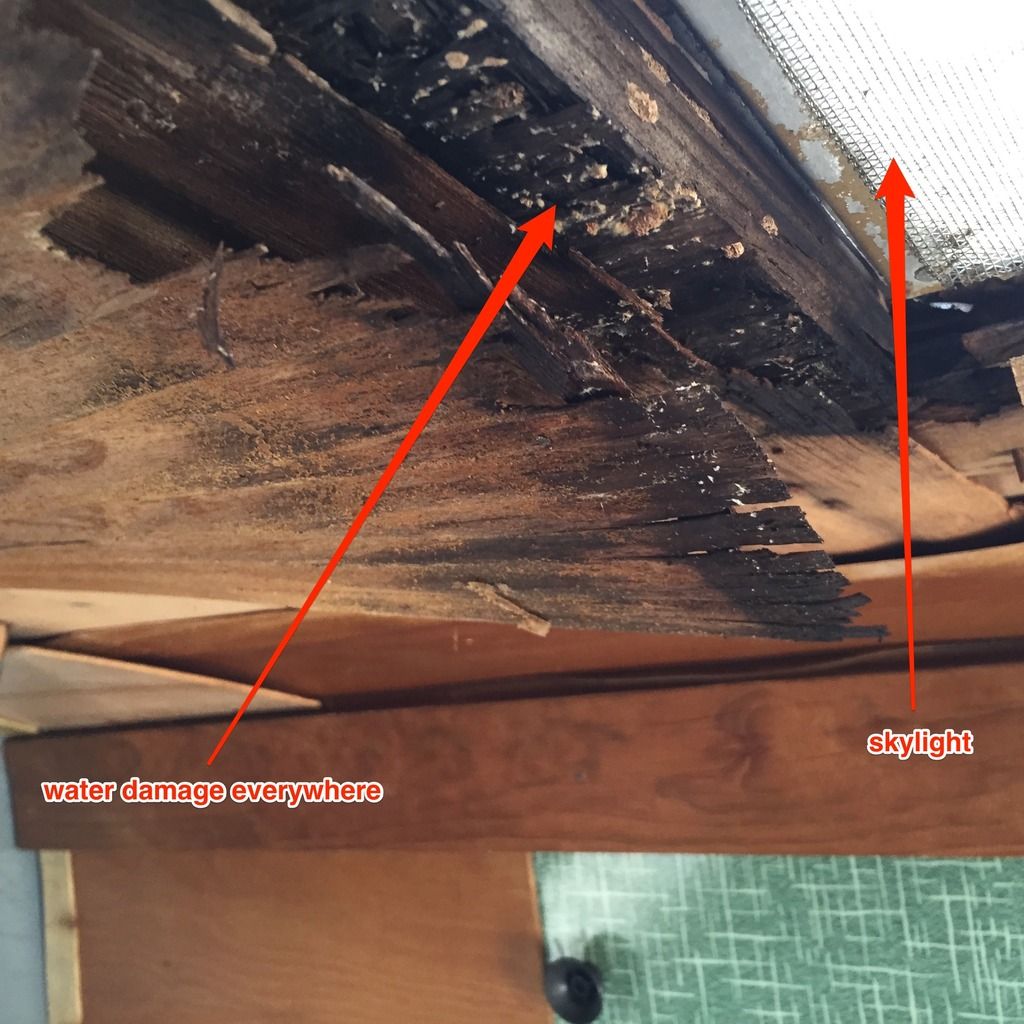 |
|
|
|
Post by vintagebruce on Apr 25, 2015 16:46:15 GMT -8
STOP WHAT YOU ARE DOING!! Whew, catch your breath. The cabinetry and certain horizontals hold the frame/box together and keep it from simply sagging in one of four directions and breaking free of the anchor points in the bottom sill to the frame. If you remove everything all together inside and in the process have bits and pieces of the framing falling off, you will end up with a demolished trailer for sure. Mobiltec as well as a number of Members have very informative videos and/or blogs/photo albums that demonstrate how to go about removing interior cabinetry and supporting pieces, while bracing and stabilizing the "box" in the process. Also as you demolish, it should be done in sections with existing framing and skins, etc. to be used again or as patterns. Good luck with what you want to do with your camper. Many vintage campers have been converted to commercial uses, but it is a planned step by step process if you expect a successful outcome. IMHO your camper was a real bargain, even with what you are finding.
|
|
mobiltec
5K Member
 I make mistakes so you don't have to...
Posts: 9,822
Likes: 3,749
1954 Jewel In Progress...
Currently Offline
|
Post by mobiltec on Apr 25, 2015 17:23:27 GMT -8
Looks kinda like a Corvette. Are the walls solid?
You began this rehab all wrong I'm sorry to say. These things come apart opposite the way they were put together. You must first remove the metal skin. Then the framing and then you can get to the paneling to replace that if the walls are in good shape and I doubt they are. The metal corners were capped and that means leaking for sure. Not sure where you are now but quit removing cabinets. They are half the structural integrity of the trailer. The way the trailer was built is the other half of the equation. The framing is just there to provide a 3/4 inch space between the metal skin and the wood paneling. It really plays very little part in holding the trailer together.
Bruce is right. Take a deep breath and start reading up on how this is done. These trailers are built from the inside out so you must start from the outside and work in.
|
|
tnbuckeye
Member
Scared stiff and excited to be starting on my vintage trailer journey...
Posts: 28
Likes: 3
Currently Offline
|
Post by tnbuckeye on Apr 25, 2015 18:59:55 GMT -8
Ok, so thank you both - vintagebruce & mobiltec for the information. I will heed your warnings and take a breath.  The amount of demo that you see in the pictures is all that we have done so far. While I have taken some of the paneling off of the walls/ceiling, I have stopped. The cabinet that you saw my son working on was put in by someone and came out easily without messing with the frame at all. I have not removed the closet yet and will stop for now. mobiltec, the side walls seem ok right now without doing much of anything to them so far. Regarding the horizontal studs (ceiling), the only thing that was holding several of them up was the paneling. They were not connected to the side frame. Not sure why. Age? There are still several horizontal studs, and I will leave them alone for now. So, is it safe to summarize that the plan should be to remove the windows, corner trim, then siding to get to the frame? I will search out more tutorials. vintagebruce, I am glad that you think that my investment wasn't foolish. I will just try not to be a fool and destroy the camper in my effort to fix it. Can you guys point me in the right direction to some tutorials that will really help me out? Thanks. |
|
mobiltec
5K Member
I make mistakes so you don't have to...
Posts: 9,822
Likes: 3,749
1954 Jewel In Progress...
Currently Offline
|
Post by mobiltec on Apr 25, 2015 19:46:12 GMT -8
As I said, those roof rafters don't really do a lot for the structural integrity of the trailer. It's the paneling that holds the walls together and that's why if you tear it out from the inside you ruin the structural integrity. It has to overlap both walls and attach to them from the outside of the paneling. Then the rafters are placed OVER the back side of the panels usually at 16 inch centers to accomodate the seams and offer a place to nail the field of the panels to to hold the panels up. The wall frame would just fall apart if not for the metal skin and the interior paneling being attached. LOL. So it's not like a house at all.
The big cabinet is the most important one in the trailer. Although all of them do something for structural integrity. If there is one over the dinette it helps to hold the walls together and apart at the same time.
I asked if the walls were solid but what I meant was are they made from solid plywood or fiber board. I wasn't asking if they are in good shape. If those are solid walls as in no studs... solid fiber board of plywood, it very well could be a Corvette trailer. That's how they were made. So is there any air space in your walls or are they solid?
If you go look at some of my videos you will see how these things are made and how they are restored or rebuilt. You can catch all my vids on my website listed down below in my sig line. They are free to watch and free of advertising.
|
|
tnbuckeye
Member
Scared stiff and excited to be starting on my vintage trailer journey...
Posts: 28
Likes: 3
Currently Offline
|
Post by tnbuckeye on Apr 25, 2015 19:46:29 GMT -8
So, mobiltec, your comment about the Corvette and solid walls went completely over my head. I had no idea that there was (is) a Corvette travel trailer. Solid walls? I thought you were asking if they were in good (solid) shape. After searching for a Corvette travel trailer, I think you are right. It does look like a Corvette, and I have not checked the walls to see if they are solid yet, but I will tomorrow. Thanks for the tips and help. |
|
mobiltec
5K Member
I make mistakes so you don't have to...
Posts: 9,822
Likes: 3,749
1954 Jewel In Progress...
Currently Offline
|
Post by mobiltec on Apr 25, 2015 19:50:02 GMT -8
No problem Tn... We are here to help. Lot's of knowledge on this board so you are in good hands. We've already made all the mistakes in advance so you don't have to...  |
|
tnbuckeye
Member
Scared stiff and excited to be starting on my vintage trailer journey...
Posts: 28
Likes: 3
Currently Offline
|
Post by tnbuckeye on Apr 25, 2015 20:04:46 GMT -8
mobiltec, what is your opinion on the aluminum? Replace it? How expensive is it to replace? Wouldn't that be easier than all the sanding and metalwork? Since I got the trailer cheaply, I don't mind putting money into the siding, expecially since I am not replacing interior stoves, iceboxes, etc. Your thoughts?
|
|
mobiltec
5K Member
I make mistakes so you don't have to...
Posts: 9,822
Likes: 3,749
1954 Jewel In Progress...
Currently Offline
|
Post by mobiltec on Apr 25, 2015 20:07:39 GMT -8
I have been replacing metal more and repairing it less lately for exactly those reasons. LOL. Steve Loomis at Hemet Valley RV and Siding makes all of my aluminum and he ships. Shipping is expensive because of the size but the metal is fantastic. There are links on my website also.
|
|
|
|
Post by vikx on Apr 25, 2015 22:36:45 GMT -8
|
|
SusieQ
Global Moderator 
Posts: 4,781 
Likes: 1,197
'62 Shasta Compact
Currently Offline
|
Post by SusieQ on Apr 25, 2015 23:26:55 GMT -8
Wow! You have a great little trailer there! Glad you came here before you did any more demo. You are correct about them not being built like a house. You definitely weren't robbed. I'd be glad to take it off your hands for what you paid  It is an amazing find. I think the photo booth is a neat idea but you might want to consider a larger trailer. Normally I would say that the larger trailers are more plentiful and usually cheaper but you got a steal of s deal. You'll find all the info you need here. Unfortunately, anyone can post a video or sell how-to books on the internet now and they don't always contain good information. Good luck. It's not as hard as you think. |
|
tnbuckeye
Member
Scared stiff and excited to be starting on my vintage trailer journey...
Posts: 28
Likes: 3
Currently Offline
|
Post by tnbuckeye on Apr 26, 2015 0:43:02 GMT -8
I am looking at your pictures, and I am having a hard time keeping my jaw from falling on my lap! How you and @mobiletec described the construction kind of made sense, but now that I see the pictures, the way these things are constructed is NOTHING like I imagined. I am trying to do this in my driveway. I have no garage. But now that I see this, I am going to have to find some interior space to lay all of this out and deconstruct and rebuild effectively. Otherwise I will have no place to put parts and pieces during construction. This was a real eye-opener. Thanks. |
|
tnbuckeye
Member
Scared stiff and excited to be starting on my vintage trailer journey...
Posts: 28
Likes: 3
Currently Offline
|
Post by tnbuckeye on Apr 26, 2015 0:45:45 GMT -8
Wow! You have a great little trailer there! Glad you came here before you did any more demo. You are correct about them not being built like a house. You definitely weren't robbed. I'd be glad to take it off your hands for what you paid It is an amazing find. I think the photo booth is a neat idea but you might want to consider a larger trailer. Normally I would say that the larger trailers are more plentiful and usually cheaper but you got a steal of s deal. You'll find all the info you need here. Unfortunately, anyone can post a video or sell how-to books on the internet now and they don't always contain good information. Good luck. It's not as hard as you think. Thanks for the encouragement and boost of confidence, SusieQ. I think I'm going to need it.  |
|
txoil
Active Member
Posts: 459
Likes: 149
1960 Shasta Deluxe 19
Currently Offline
|
Post by txoil on Apr 26, 2015 5:56:08 GMT -8
First of all, take a breath, and realize you are NOT ALONE! Many people have been in your shoes, and they have had a successful outcome. As Mobiltec noted, these trailers are NOT built like a home or fixed building, and you CANNOT approach resto in that fashion. If I were in your place, I would, before spending any money, determine just what the desired outcome is to be. It seems you wish to have just a stationary photo prop...no traveling or camping, just a location to take photos. If this is the case, then you can rebuild it as such, and not have to worry about correctness or structural integrity. If this is true then I would think you can cut solid plywood walls, replace with new skin and then finish out to your liking. If, however, there is even a slight chance you will want to move, camp or even sell it in the future, then I would say to demo the proper way, skins off first and replace framing, interior birch and then skins, and fit it out to meet your needs. perhaps with lots of storage space for photo accessories. If you go this way, then there is a chance you may be able to sell it and recover some of your investment in the future. In any case do not panic. There are many seasoned vets of the trailer wars here to help, and lots of advice available as well-- several blogs to learn how others have done their own trailers--and always, plenty of helpful voices. Whichever way you choose to go with your project, I hope it turns out great!
|
|
tnbuckeye
Member
Scared stiff and excited to be starting on my vintage trailer journey...
Posts: 28
Likes: 3
Currently Offline
|
Post by tnbuckeye on Apr 26, 2015 11:29:08 GMT -8
Thanks, txoil. Although our intentions for the travel trailer are only as a photo booth, it will still need to travel. We plan on taking this on location - renting it out. So, it will need to function as a travel trailer and be mobile, although the interior will be mostly empty. As a result, I am beginning to think that I have no real option other than to do a complete rebuild. I will lean on this forum and the collective experience to guide us through the proper steps to take. |
|


 I have experience with some home rehab, so I am familiar with my tools, but redoing a travel trailer looks quite a bit different to me. I have purchased a video series on restoring vintage travel trailers, but it still leaves some holes in the process. I have also looked at some videos on YouTube, but I thought that I would reach out to you in this forum to see if you had some additional wisdom that I could glean.


 As a result, we no longer need any of the cabinetry or fixtures. So, I won't need the propane lines, exterior access panels and may not need all of the windows. We just need an open interior space for people to have their picture taken.


 The amount of demo that you see in the pictures is all that we have done so far. While I have taken some of the paneling off of the walls/ceiling, I have stopped. The cabinet that you saw my son working on was put in by someone and came out easily without messing with the frame at all. I have not removed the closet yet and will stop for now.


 It is an amazing find. I think the photo booth is a neat idea but you might want to consider a larger trailer. Normally I would say that the larger trailers are more plentiful and usually cheaper but you got a steal of s deal.
