|
|
Post by Teachndad on Mar 30, 2015 22:29:26 GMT -8
Hi, I finally got a chance to use my Harbor Freight pocket jig today on my trailer Andy. Pix are below. I have some questions. After drilling the pocket holes, I started to wonder if I had drilled too many pockets in one piece of wood. See image below. I still need to do the other side, so this will be a learning opportunity. Afterward, I wondered how the "cascade" of pocket holes should be created. If you are working from the top down, is there a rule of thumb? In the image below, I had four pieces of new wood for completing the radius. I started at the top and worked my way down. The final result was that I was drilling pockets in the largest board and not in the succeeding boards as the pockets “cascaded” downward. I started to wonder if it impacts overall strength doing it this way? The wood is poplar. I have a few questions between the images. I clamped every time I screwed into the pocket holes. It would have help to have a clamp that was longer in depth beyond a few inches. I plan on stapling a small sheet of aluminum over every but joint just for reinforcement, later. 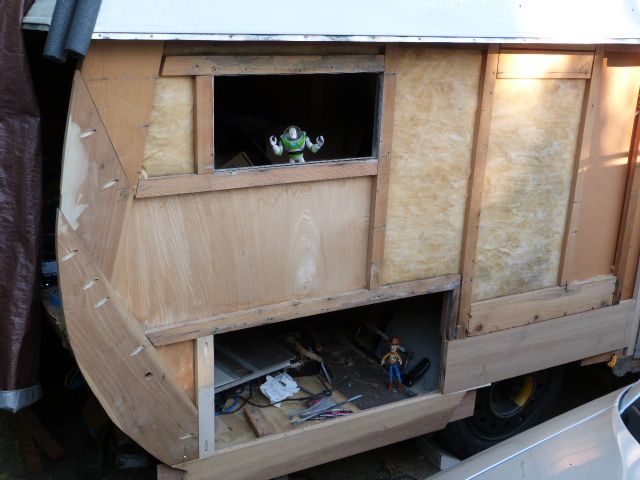 Closer up. White portion on the rhombus shaped piece is from sanding. The wood was warped and needed a little sanding to be flush with the board below. 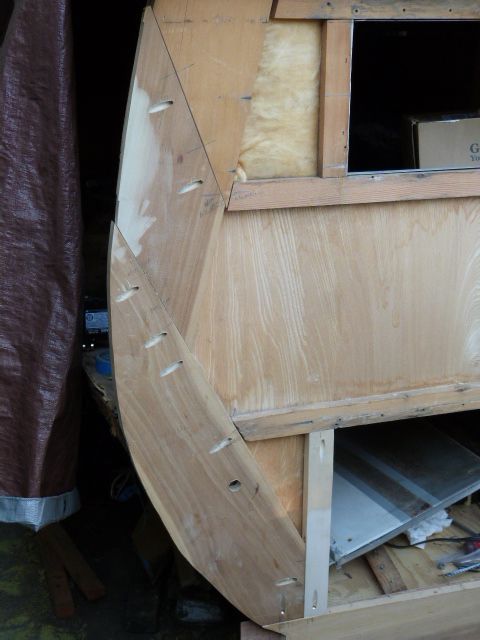 Below is a close up. Each hole is numbered for easy reference. #3 was a mistake Should holes, 6, 7, and 8 be drilled into the pieces around them as I did or from the opposite board? How's the spacing on all the holes? Are they too far or not far enough? 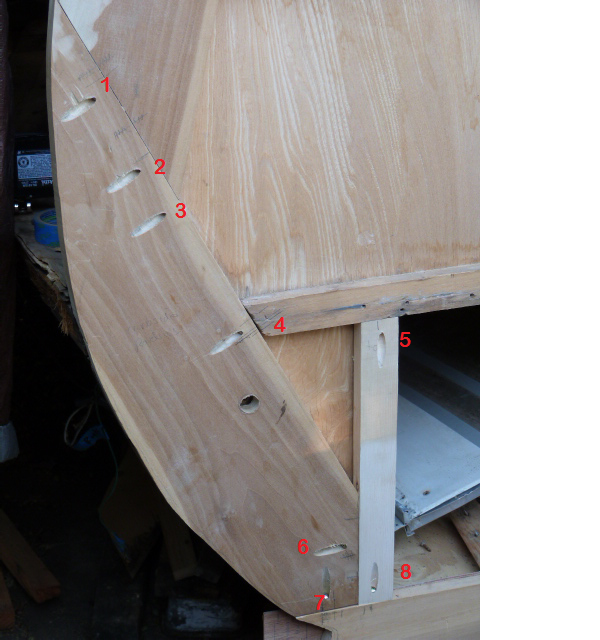 Any thoughts? BTW, the storage door frame fits better than it did originally. (pats self on back  Thanks Rod |
|
|
|
Post by Ross on Mar 31, 2015 2:25:11 GMT -8
I have always used the Kreg Jig for pocket holes. Your spacing looks good to me. I wouldn't increase the amount of holes on the bottom piece, however, the piece above the "numbered board, I would have put 3 screws in it.
Sometimes on the longer edges, like up towards the window, I would use 2 biscuits and titebond wood glue to help add strength to those joints. Then use the pocket hole screws on either side of the biscuits.
Again, looks good to me!
|
|
RinTin
Full Member

Posts: 760 
Likes: 292
Currently Offline
|
Post by RinTin on Mar 31, 2015 5:39:51 GMT -8
Hi Rod, Looks good enough to me. In cabinet face frame construction you typically have at least two screws or dowels at each joint, even in narrow boards. This keeps the ends from twisting and provides that much more holding power.
What you have should be fine. I would probably have put three screws into each of your longer joints and two screws at the top of the vertical baggage compartment board. On wider boards, you want fasteners fairly close to the end of each joint and one in the middle to help prevent the board from bowing or warping. Where you sanded, either that board or the one joining it is likely warped. You to stabilize those boards.
Hope to see more of your two helpers.
|
|
mobiltec
5K Member
 I make mistakes so you don't have to...
Posts: 9,822
Likes: 3,749
1954 Jewel In Progress...
Currently Offline
|
Post by mobiltec on Apr 1, 2015 19:43:43 GMT -8
Looks OK to me...
|
|
|
|
Post by Teachndad on Apr 2, 2015 6:15:05 GMT -8
I have always used the Kreg Jig for pocket holes. Your spacing looks good to me. I wouldn't increase the amount of holes on the bottom piece, however, the piece above the "numbered board, I would have put 3 screws in it. Sometimes on the longer edges, like up towards the window, I would use 2 biscuits and titebond wood glue to help add strength to those joints. Then use the pocket hole screws on either side of the biscuits. Again, looks good to me! Thanks everyone, Good stuff here.  Ross, What's a biscuit? Rod |
|
|
|
Post by Ross on Apr 2, 2015 8:57:29 GMT -8
Hey Rod, Biscuit joints add additional strength to an edge or butt joint. Some people call them plate joints or a variation of a spline joint. Here's a great article on biscuit joints: How To Make A Biscuit Joint There are a few video's, too. Biscuit joints are not always needed, but I am a custom furniture / cabinet maker and use this means of joining 2 pieces of material together, a lot, as well as pocket hole screws. |
|
|
|
Post by danrhodes on Oct 16, 2015 9:12:33 GMT -8
This may be even more rookie than this thread was intended, but how do you know the correct depth to set your kreg bit? Half of the screw in each side of the joint? How long of a screw is generally used for 3/4" thick material?
|
|
kirkadie
1K Member

Posts: 1,156
Likes: 556
'69 Serro Scotty Hilander
Currently Offline
|
Post by kirkadie on Oct 16, 2015 10:38:03 GMT -8
The kreg joiner has a depth guage built in to it's base. You set the drill depth with a stop collar that comes on the drill bit to accommodate different thicknesses of the wood you are joining. 1 1/4" kreg screws are used in 3/4" material, and they have two different kinds of screws, one for soft woods which has a coarse thread, and another for hard woods which is a finer thread.
Not sure what comes with the harbor freight knock-off. Kreg also makes several kinds of deep throated clamps, one looks similar to welding clamps with discs on either jaw. They are pricey but worth the money.
I use titebond wood glue along with the screws.
|
|
|
|
Post by Teachndad on Oct 16, 2015 15:57:19 GMT -8
Not sure what comes with the harbor freight knock-off. Hi Everyone, There are two drill angles on the Harbor Freight knock off. The directions tell you which one to use depending on the thickness of the wood. I don't remember which was which, since it's been so long since I used the pocket joiner. As for the depth, you can adjust the collar with a hex key. It's always good to practice on some scrap wood first. It's pretty easy to get the hang of it. I was happy with the HF model. There is a general use video on their site on it's general use, and I think I found some videos on youtube on how to use it. The HF joiner was well made, IMHO, and I think Larry uses one. Maybe that's an endorsement enough. If you go after the HF model, use the 20% off coupon. Cheers, Rod |
|
|
|
Post by danrhodes on Oct 16, 2015 19:06:57 GMT -8
mobiltec with the harbor freight jig, how deep do you set the drill collar for 3/4" material?
|
|
mobiltec
5K Member
I make mistakes so you don't have to...
Posts: 9,822
Likes: 3,749
1954 Jewel In Progress...
Currently Offline
|
Post by mobiltec on Oct 16, 2015 19:35:54 GMT -8
mobiltec with the harbor freight jig, how deep do you set the drill collar for 3/4" material? You always set the drill tip to almost go through the wood to the metal but stop just short of it. You don't want to actually go through to the metal. That will dull the tip. And you use the guide holes in the jig that are closest to the material you are drilling for 3/4 inch material. The outer guides are for much thicker wood. |
|
|
|
Post by danrhodes on Oct 16, 2015 21:00:17 GMT -8
The kreg Jr uses these drill depths, so I'll start from here
Each jig position has its recommended drilling depth. To drill in 3/4" (19mm) material for example, set the Depth Collar 3-1/2" (89mm) from the Step of the drill bit (see figure 1A) using a
folding rule or tape measure. This will place the tip of the bit approximately 1/8" (3mm) from the edge of the workpiece. Adjust the depth collar to 3-5/16" (84mm) from the step of the bit
for 1/2" (13mm) material and 4-1/4" (108mm) from the step of the bit for 1-1/2" (38mm) material. To set the depth, simply slide the Depth Collar onto the loose drill bit shank (the bit should
not be chucked into the drill). Measure and position the Depth Collar the desired distance from the Step of the drill. Tighten the setscrew with the Allen wrench provided. Now chuck the
KJD bit/collar into your drill
|
|
joek
Member
Posts: 42
Likes: 16
Currently Offline
|
Post by joek on Nov 17, 2015 5:39:53 GMT -8
I'd like to add some advice. When screwing into members, it is best to avoid screwing into end grain when you can. Screws will easily strip out the wood when going into end grain. When the wood shrinks, its gets tighter around the fastener but can also cause it to split. Screws 1, 2 and 4 would have been better going the opposite direction. Notice how 5-8 are pulling the end grain towards the long grain. These will all work fine either way, but when you have the choice the other way is typically better, imo.
|
|
|
|
Post by danrhodes on Nov 17, 2015 6:07:43 GMT -8
I'd like to add some advice. When screwing into members, it is best to avoid screwing into end grain when you can. Screws will easily strip out the wood when going into end grain. When the wood shrinks, its gets tighter around the fastener but can also cause it to split. Screws 1, 2 and 4 would have been better going the opposite direction. Notice how 5-8 are pulling the end grain towards the long grain. These will all work fine either way, but when you have the choice the other way is typically better, imo. I have read this several places, but it seems counter intuitive to drill a large pocket hole in the narrow 1x2. Do you usually use 2 screws per board as recommended by RinTin or one per stud? |
|
joek
Member
Posts: 42
Likes: 16
Currently Offline
|
Post by joek on Nov 17, 2015 21:38:40 GMT -8
I'd like to add some advice. When screwing into members, it is best to avoid screwing into end grain when you can. Screws will easily strip out the wood when going into end grain. When the wood shrinks, its gets tighter around the fastener but can also cause it to split. Screws 1, 2 and 4 would have been better going the opposite direction. Notice how 5-8 are pulling the end grain towards the long grain. These will all work fine either way, but when you have the choice the other way is typically better, imo. I have read this several places, but it seems counter intuitive to drill a large pocket hole in the narrow 1x2. Do you usually use 2 screws per board as recommended by RinTin or one per stud? Yes, I use 2 screws on a 1x2. My Kreg Jig, which is at least 15 years old and has bored thousands of holes, has the sleeves spaced for doing 2 holes in 1-1/2" wide piece of wood. I have also done 2 screws in 1-1/4" wide. Try it on some scraps. I think you'll find the joint to be surprisingly strong.
In this particular application, these joints are seeing very little stress once the interior skin is nailed on. The screws act as more a joint locator really until the interior skin is on, at which point the job of the 1x2 is to keep the interior skin flat, and give you something to attach the exterior skin to. Don't get me wrong, a strong joint is great. But a weak joint is very unlikely to fail once it's all put together.
|
|


