|
|
Post by calebwcampbell on Mar 12, 2015 17:35:54 GMT -8
I have read quite a lot of great info on here about how to build the curbing/edgeboard, what material to use, what glue, to kerf or not to kerf. My question (and it may be a silly one) is: what is the purpose of the curbing?
|
|
goshawks
Active Member
 working on the trotwood when not camping
Posts: 182 
Likes: 56
Currently Offline
|
Post by goshawks on Mar 12, 2015 21:24:48 GMT -8
It's the outer frame edge of a trailer, usually 1 1/2" to 2" deep . It allows for insulation, possibly wiring and the roof supports run perpendicular to it and it is the frame work for your roof metal.
|
|
|
|
Post by vikx on Mar 12, 2015 21:48:50 GMT -8
The edge wood is laminated in a canned ham to form the curve. Some have used one bys to replicate the shape as well. Mobil uses the term curbing; a few of us started rebuilding vintage trailers before they were popular. Nobody knew any terms, so we used other building nomenclature to describe what we were doing... 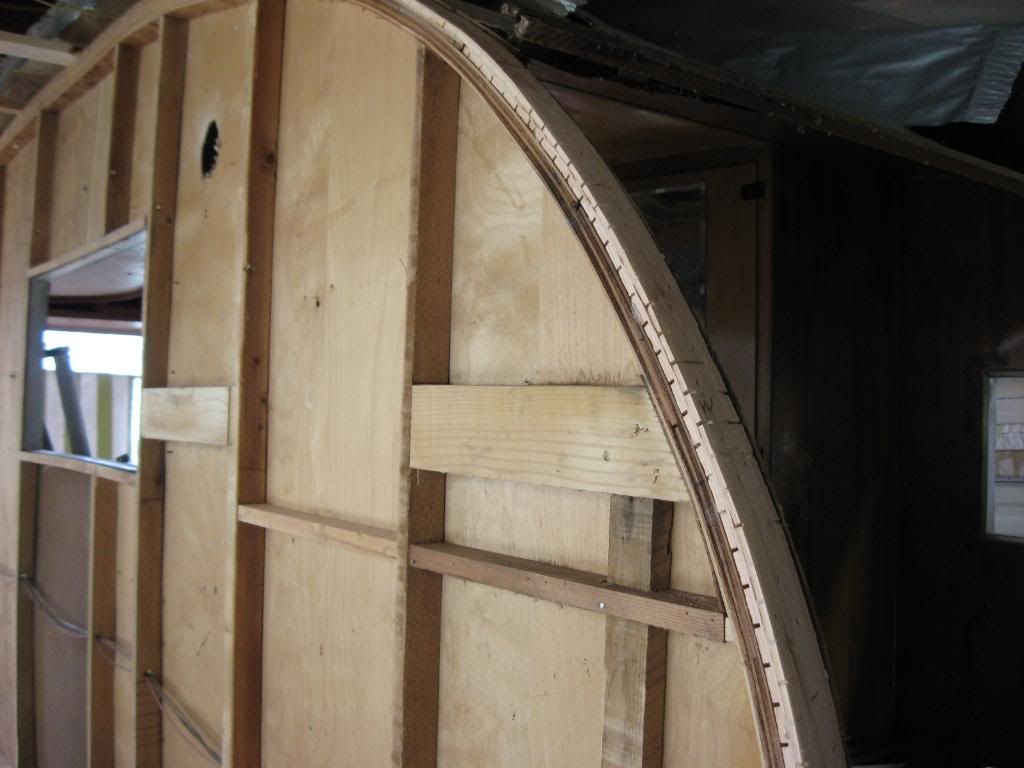 |
|
|
|
Post by calebwcampbell on Mar 13, 2015 8:07:54 GMT -8
So it is mostly there just to create a little space between the framing and the skin?
|
|
mobiltec
5K Member
 I make mistakes so you don't have to...
Posts: 9,843
Likes: 3,761
1954 Jewel In Progress...
Currently Offline
|
Post by mobiltec on Mar 13, 2015 11:47:50 GMT -8
Curbing is there as a frame to build up the edges over the walls thus matching up the space of the frame work. You need something to attach the side metal and folded over metal roof and the front and rear metal. If your framing or rafters are 3/4 inches thick, then your curbing matches that height at 3/4 inch total. In this case you would use 3 layers of 1/4 inch thick plywood to build it up to match the height of the framing material just like in the photo below. On my Aljoa and other trailers like the Forester or the Deville, the frame work is 1 1/4 inch thick so I use two layers of 3/8 inch and two layers of 1/4 inch to build it up to a total of 1 1/4 inch thick. Here you can see it placed between the front wall framing. This continues all the way around the trailer.  |
|
|
|
Post by vikx on Mar 13, 2015 20:37:39 GMT -8
My picture above shows the shape of the trailer with the inner edging. Mobil's photo below mine shows the panels on top to the inner edge with the rafters going all the way to the edge of the wall. There are fill strips of edging or curbing between the rafters. Here's another view: 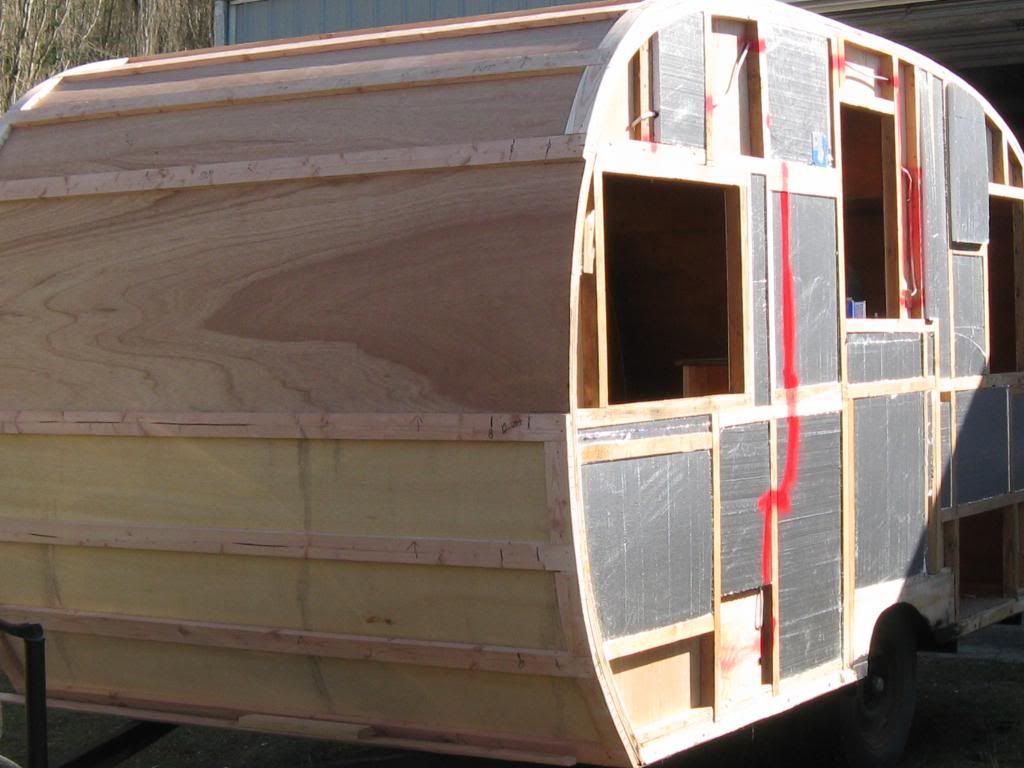 This shows a trailer with most of the fillers in place. At the front window, you see just the curving 1/8 wall panel before the rafters (or crossboards) and fillers. And more: 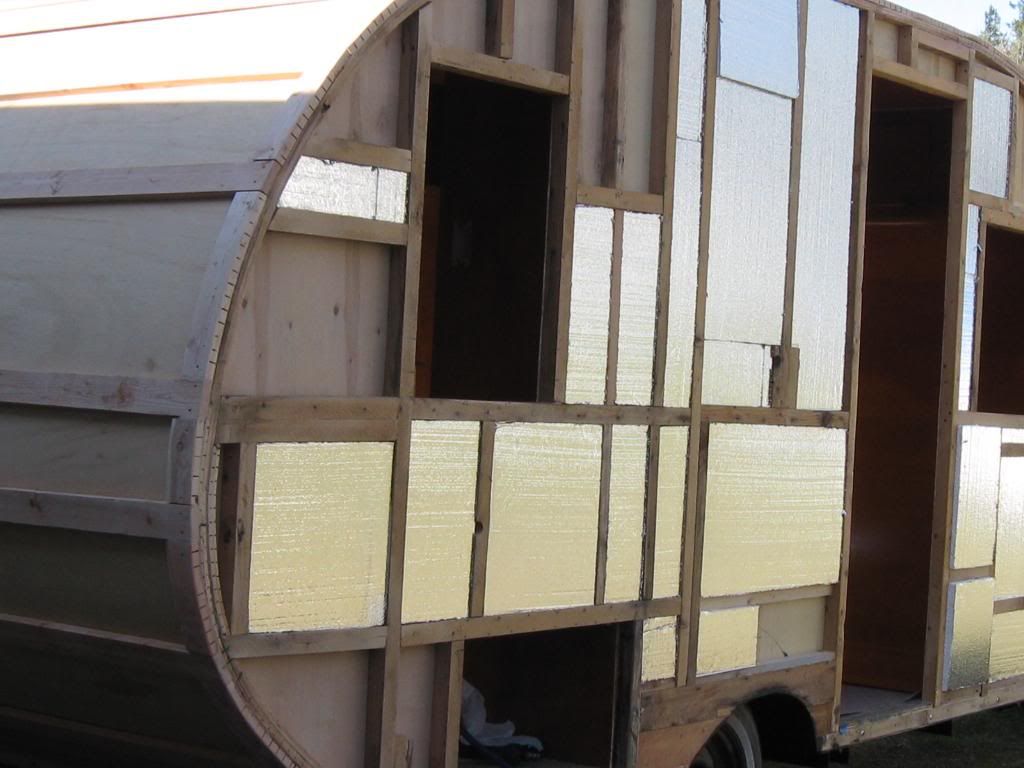 You can see the inner edging, with the panel, then crossboards in place. |
|
|
|
Post by calebwcampbell on Mar 14, 2015 7:49:23 GMT -8
Very cool. Thanks guys. And thank you for showing several kinds. When I get my roof lifted off I should be able to figure out which kind I need to build.  ? |
|
mobiltec
5K Member
I make mistakes so you don't have to...
Posts: 9,843
Likes: 3,761
1954 Jewel In Progress...
Currently Offline
|
Post by mobiltec on Mar 14, 2015 18:15:29 GMT -8
Very cool. Thanks guys. And thank you for showing several kinds. When I get my roof lifted off I should be able to figure out which kind I need to build. ? Just duplicate what you see when you lift the roof... |
|
lilwayne
New Member
Posts: 16
Likes: 1
Currently Offline
|
Post by lilwayne on Feb 1, 2021 23:47:12 GMT -8
new answers lead to more questions..... I am confused because although this makes sense to me, it looks completely different from rabbit corner roof edges as mentioned by mobiltec "helps a viewer" (christina's trailer)instructs about.
I am trying to wrap my mind around how how does the "routered-off" roof edges mobiltec talks about fit into this? Or is it a completely different type of construction (please say yes)?
In your picture above I can clearly see that the rafter boards extend to the entire frame (sit on top of frame), while mobiltec rafter boards they are nested down onto an edge of some sort.
I am failing in the vocabulary to rightly explain or ask here and for that I do apologize.
|
|
|
|
Post by vikx on Feb 2, 2021 17:07:27 GMT -8
I use a 40 grit belt sander to carve the edge boards. Not sure what Mobil does with a router...
|
|
|
|
Post by wisconsinjoe on Feb 27, 2021 9:00:44 GMT -8
Here's another way to do it. I built my rafters and curbing as units to create as much solid "curbing" as possible. I wanted to avoid, as much as possible, breaks or joints in the area that would receive the all important screws to hold the J-channel that seals the camper from water leaks.  20201010_111707 20201010_111707 by Joe Mirenna, on Flickr  20201011_154847 20201011_154847 by Joe Mirenna, on Flickr I built the curbing with 2x2s on the straight runs, and on the curved sections, two layers of 3/4" plywood glued together, leaving spaces in the inside layer to accommodate the rafters, which in turn sit on the load bearing side walls. There were a total of 7 sections built in the shop, then fit onto the side walls over the ceiling skin. |
|
DayDreamer
Member
Posts: 48
Likes: 9
1955 Aljoa & 1960 Oasis
Currently Offline
|
Post by DayDreamer on Jul 10, 2021 17:07:01 GMT -8
I’ve had someone suggest using wiggle board for the curbing/edge board. Has anyone used that type of board and if so better than plywood? Also, My curbing/edge board is continuous not between frame boards. Can I use a solid piece of wood on the straight part and then layered plywood for just the curves as long as the curved sections end on a frame board? www.amerhart.com/product/wiggle-wood-bending-board-8x4-ft-7-inch-minimum-radius |
|
|
|
Post by vikx on Jul 10, 2021 20:00:27 GMT -8
Wiggle wood will work but isn't really necessary. I layer my edge boards and glue and tack as I go. You can use solid board in flat areas and then curve the layers for the front and rear. Since your edge is solid, be SURE the rafters and crossboards are anchored firmly into the wall framing as well as the edge wood. Everything should be super sturdy when building a trailer.
|
|
DayDreamer
Member
Posts: 48
Likes: 9
1955 Aljoa & 1960 Oasis
Currently Offline
|
Post by DayDreamer on Jul 11, 2021 6:49:00 GMT -8
Thx vikx, I think I will stick to plywood. My trailer is a 1955 Aljoa and the edge/curbing boards total 1 5/8”W x 1 1/4”H and then built up layers of 3/4”W x 1 3/4”H. So if a section of the top layered boards, which the skin attaches to, are rotten can I remove just that part and replace that section by attaching first layer to the edge board underneath, and if a section top narrower widths and the bottom wider widths, that the roof frame boards are attached to are rotten I replace it I would cut back to a frame board so I have an anchor for the first layer?
I hope I explained that clearly. 🤪This is my first restoration so I want to make sure I’ve got it right.
|
|
|
|
Post by vikx on Jul 11, 2021 20:07:15 GMT -8
Daydreamer, if part of the edge boards are rotten, it makes sense that the rest will be very old and perhaps very dry. Take the skins off the trailer, float or remove the roof and then you will see what needs to be done. I would not try to "piece meal" the trailer. I learned the hard way many years ago that is not the way to go...
|
|


 ?
?
