SusieQ
Global Moderator 
Posts: 4,781 
Likes: 1,197
'62 Shasta Compact
Currently Offline
|
Post by SusieQ on Oct 27, 2014 6:16:08 GMT -8
Here's a short tutorial on marking tiles to cut-to-fit. First, find the center of your room/area and draw perpendicular lines by measuring the center of the side walls and drawing a straight line and the front back walls and drawing a straight line. Now you can place your tiles wherever you want them by drawing a parallel line to either of your pre-drawn lines. (If you butt them up against the wall instead, it's probably not exactly square and your tiles will make a slanted line as you put them down.) I wanted mine centered so I put a row down the middle and cut the tiles on the side to fit. 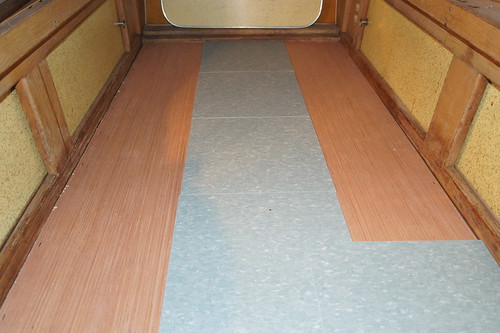 Here's how I measured to fit. I laid my tiles down and made sure they were turned in the direction that I wanted them. (Look, Larry, I have socks on.  ) 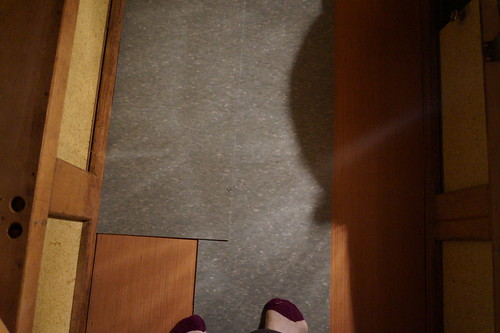 Then I picked up the center tile, put the tile to be cut down upside down, laid the center tile back down in place right side up, drew a pencil line. I also marked with an arrow my cut edge so I would know that was the edge I wanted to place against the wall. And I numbered my tiles and wrote the number on the floor. When the glue is put down, it dries clear before you place the tiles down and you can see your pencil marks. 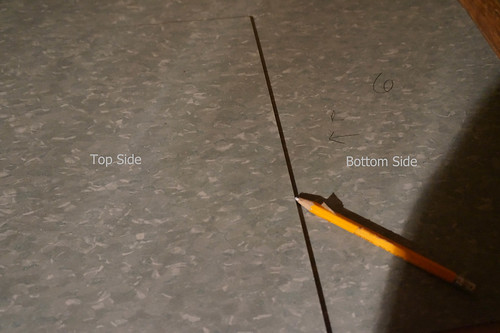 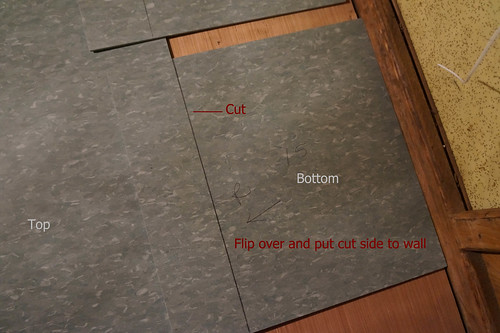 One more note and I hope I don't confuse you. If you have more than one cut, mark one side at a time or you will end up with a cut side on the wrong end. I avoided butting cut edges together because I cut mine with a small battery powered circular saw and I scored some. It worked well but not always perfect cuts. After they were all cut, I had them laid out and then picked them up in the order that was going to put them down. 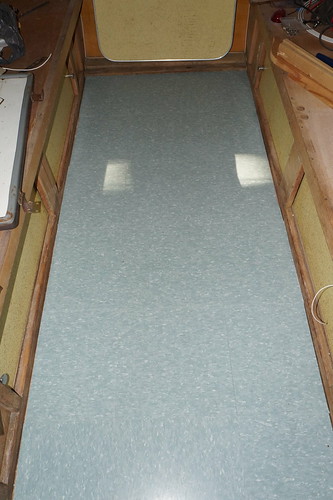 Follow the directions on your VCT glue. |
|
nccamper
Administrator 
Posts: 7,745 
Likes: 2,872
1962 Forester- 1956 Shasta
Currently Offline
|
Post by nccamper on Oct 27, 2014 9:28:33 GMT -8
You make it look easy.
|
|
SusieQ
Global Moderator
Posts: 4,781
Likes: 1,197
'62 Shasta Compact
Currently Offline
|
Post by SusieQ on Oct 27, 2014 10:01:45 GMT -8
It really was easy. Probably the easiest thing I've done so far. This and my curbing were a breeze. And I really liked doing it. I just thought I'd post this for those who've never cut pieces to fit next to a wall. I remember the first time I did it and didn't know what I was doing. You'll loose your mind if you try to measure each piece.
|
|
pirateslife
Active Member

Posts: 426
Likes: 137
1969 Shasta Compact
Currently Offline
|
Post by pirateslife on Oct 27, 2014 20:10:43 GMT -8
Susie, looks great.
BTW...GREAT JOB!!!
|
|
|
|
Post by vikx on Oct 27, 2014 21:49:08 GMT -8
Thank you for posting this SusieQ! It will help many of us.
|
|


 )
)


