John Palmer
Senior Member
 Hi, From a vintage trailer guy located in Santa Ana, CA. It's good to see lots of activity here.
Posts: 1,629 
Likes: 576
Currently Offline
|
Post by John Palmer on Sept 11, 2014 20:23:08 GMT -8
Ok thanks for all the extra tips, that will help. It sounds like in order to add bracing rafters I'm going to have to remove some of the ceiling birch. Not a happy prospect. Anyone have suggestions about replacing it? Current resources in the south east? Yes, what John said about the roof. There is no way to replace or add rafters without getting under the skin from the outside. Finding 1/8" birch in the Southeast will be a problem. 1/4" is easy to find but may require kerfing (making shallow cuts across it so it will bend) and it will throw off the fit of the existing skin a bit. SusieQ, I don't think using two different thickness panels "will throw off the existing skin (panel) a bit", as long as we agree to replace the ceiling panels from the outside. They would still mount to the wall edge "at the exact same height".
If they are replaced using "the inside method", YES they will show the different thickness, unless you were able to figure out how to shim for the thinner material.
Thanks for pointing out another valid reason, to take the time to do the repair from the outside.
I use 1/4" Birch paneling for the ceiling curves "without kerfing", or "wetting/steaming". It's not difficult when working from the outside. I try to position my pieces so the seams are on the flat areas if possible. Make sure to keep an eye on the wall width "very frequently" as you put the panels on. It's easy to let it get "too wide". I leave the panels at least three inches wide, and use a router to cut them when they are firmly mounted to the walls. The first panel I install is at the top, then work my way down the front and rear. At the paneling seams I use 1 by 4 Poplar. I back it up with a scrap eight foot 2 by 4 "over the poplar". I screw the poplar down to the wall edge, and use a c-clamp to hold the 2 by 4 to the wall edge. By working from the center down on each end, you can pull the panels down with ratchet straps and motorcycle tie downs. The reason for the 2 by 4's are to prevent the panels from bowing up until they take a set, and you get the cabinets and closet screwed to the roof rafters. It's also easier to put at least three or four coats of shellac on the panels before they are mounted, I've never had any problem with the shellac cracking during the curve bending.
|
|
soup
1K Member
"I hate cold Soup"
Posts: 1,237
Likes: 204
Currently Offline
|
Post by soup on Sept 12, 2014 0:00:35 GMT -8
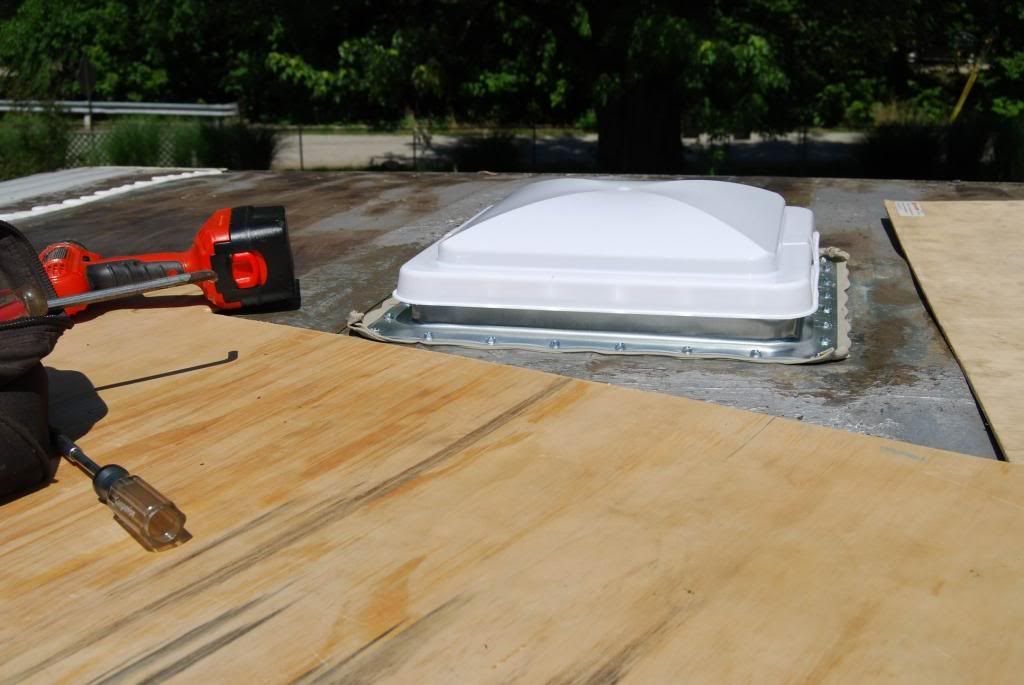
A thousand words..... (Couple different roof vents but you'll get the idea!) Good Luck! So easy even I could do it.


|
|
SusieQ
Global Moderator 
Posts: 4,781 
Likes: 1,197
'62 Shasta Compact
Currently Offline
|
Post by SusieQ on Sept 12, 2014 3:07:39 GMT -8
Yes, what John said about the roof. There is no way to replace or add rafters without getting under the skin from the outside. Finding 1/8" birch in the Southeast will be a problem. 1/4" is easy to find but may require kerfing (making shallow cuts across it so it will bend) and it will throw off the fit of the existing skin a bit. SusieQ, I don't think using two different thickness panels "will throw off the existing skin (panel) a bit", as long as we agree to replace the ceiling panels from the outside. They would still mount to the wall edge "at the exact same height".
If they are replaced using "the inside method", YES they will show the different thickness, unless you were able to figure out how to shim for the thinner material.
Thanks for pointing out another valid reason, to take the time to do the repair from the outside.
I use 1/4" Birch paneling for the ceiling curves "without kerfing", or "wetting/steaming". It's not difficult when working from the outside. I try to position my pieces so the seams are on the flat areas if possible. Make sure to keep an eye on the wall width "very frequently" as you put the panels on. It's easy to let it get "too wide". I leave the panels at least three inches wide, and use a router to cut them when they are firmly mounted to the walls. The first panel I install is at the top, then work my way down the front and rear. At the paneling seams I use 1 by 4 Poplar. I back it up with a scrap eight foot 2 by 4 "over the poplar". I screw the poplar down to the wall edge, and use a c-clamp to hold the 2 by 4 to the wall edge. By working from the center down on each end, you can pull the panels down with ratchet straps and motorcycle tie downs. The reason for the 2 by 4's are to prevent the panels from bowing up until they take a set, and you get the cabinets and closet screwed to the roof rafters. It's also easier to put at least three or four coats of shellac on the panels before they are mounted, I've never had any problem with the shellac cracking during the curve bending.
John, I'm just speaking from experience. The 1/4" does make the ceiling 1/8" thicker and when you go to reattach the old roof, you can tell. Adding extra rafters can also make a "a bit" a of difference in a roof that has settled in for 50 years. It's doable, I did it. But Shasta also wasn't very consistent with the size of the edge that is folded down on the roof skin so that 1/8" can cut it close in spots. And true, if it is used just on the flat part of the ceiling, there will be no problem with the curves or need for kerfing. I replaced my entire ceiling, front to back. My 1/4" birch would not bend around the curves without cracking. Another member encountered the same problem, but the kerfing worked for both of us. |
|
annbclay
Active Member

Posts: 108
Likes: 12
1961 Shasta Compact
Currently Offline
|
Post by annbclay on Sept 12, 2014 18:46:41 GMT -8
PEEL THE ROOF BACK?  Oh my god, oh my god, I can't breathe! I think that is way out of my league. I DO appreciate the info though, now I know what not to attempt! Or at least to wait until I have a garage to work in for the next year. Thanks for the photos Soup, I will approach it that way and see what I've got. If it requires turning my roof into a banana peel I think I'll have to look for a pro. Which means I'll be selling my house and all my earthly possessions to continue to maintain my lovely little Shasta! Let's see... new car to tow her, re tooled the brakes, installed a hitch & brake controller, etc. Hmm about time for that 3rd job eh?! I have to to say everyone is really great with sharing info on this forum and giving timely responses! I have learned so much already. Thank you all. |
|
John Palmer
Senior Member
Hi, From a vintage trailer guy located in Santa Ana, CA. It's good to see lots of activity here.
Posts: 1,629
Likes: 576
Currently Offline
|
Post by John Palmer on Sept 13, 2014 7:52:00 GMT -8
Ann, It's funny to me how some of these threads play out.
It reminds me of having shop meetings with my mechanic's. One common meeting topic was why can we always find the time "to do it over", but never take the time "to just do it right"?
|
|
pirateslife
Active Member
Posts: 426
Likes: 137
1969 Shasta Compact
Currently Offline
|
Post by pirateslife on Sept 13, 2014 16:32:29 GMT -8
Ann, if you pull the vent, you can cut some 3/4" x 1-1/2" strips that will fit around the inside between ceiling and roof metal. it sounds like this is what you are saying you dont have. if you dont this will give you something to secure the vent too very easily. and no it wouldnt be the "wrong way" of doing it if it solves your problem. they always more than one way to skin a possum
|
|
annbclay
Active Member
Posts: 108
Likes: 12
1961 Shasta Compact
Currently Offline
|
Post by annbclay on Sept 13, 2014 18:29:34 GMT -8
... we always find the time "to do it over", but never take the time "to just do it right"? I agree John, I prefer to do it right the first time. I wish the person who installed the vent had. I need to pull the vent to see what the situation is. I will do that from above. If it needs new rafters I'll have to take it to a pro or find a garage to work in. I do think removing the j channel and awning channel might be more than in can do well. I'm really afraid of removing the roof alone. If I had someone experienced to show me I'd feel differently. But I learned how to build a pottery kiln alone so who knows... |
|
annbclay
Active Member
Posts: 108
Likes: 12
1961 Shasta Compact
Currently Offline
|
Post by annbclay on Sept 13, 2014 18:35:20 GMT -8
Ann, if you pull the vent, you can cut some 3/4" x 1-1/2" strips that will fit around the inside between ceiling and roof metal. it sounds like this is what you are saying you dont have. if you dont this will give you something to secure the vent too very easily. and no it wouldnt be the "wrong way" of doing it if it solves your problem. they always more than one way to skin a possum That was my original thought, I was thinking I could do it from the inside, now I know I'll need to go in from the roof. I'm sure adding rafters would be much stronger but unless I have rotten framing inside I'm hoping the square framing will suffice. At least until I can afford a pro to do some repairs to the skin at the same time they reinforce the rafters. |
|


 Oh my god, oh my god, I can't breathe! I think that is way out of my league. I DO appreciate the info though, now I know what not to attempt! Or at least to wait until I have a garage to work in for the next year.