


I Was Bad - the Tearing down of a 1955 Fireball
Mar 25, 2016 6:03:28 GMT -8
vintagebruce, mobiltec, and 2 more like this
Post by Teachndad on Mar 25, 2016 6:03:28 GMT -8
Hi Friends,
This thread was originally posted in 2016. Long time members may remember this thread. I moved it from its hybernation in the Talk About Anything subforum that has limited access to new members so everyone could read it.
Here goes:
I was bad.
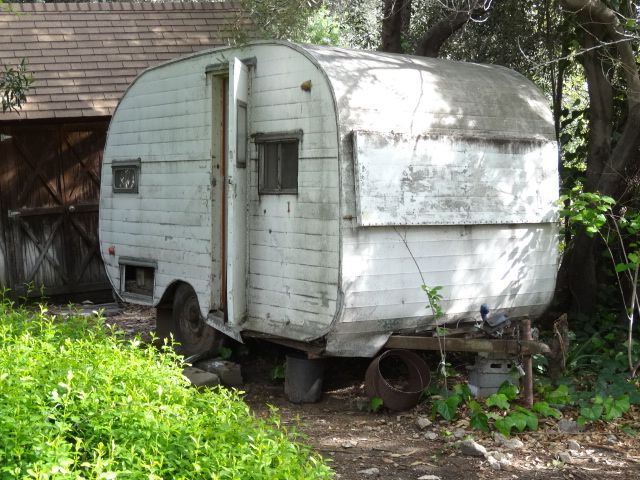
I finished tearing down a 1955 Starfire for parts to financially support the restoration on my Westerner. I bought it for $60.
It pained me.
The Starfire sat for 40 years in this one spot. At least that's my guess. The registration tags on the plate were dated 1975 and the registration I found in the trailer matched that. I was going to move it, but build bracing for it, as briefly discussed in the blocking thread vintagetrailertalk.freeforums.net/thread/5335/blocking-framing-support-camper-trip?page=1&scrollTo=60347 , but the floor was very sketchy and in the end, I decided to ask to tear it down where it sat.
Critters of all sizes found their way into the Starfire. They left plenty of calling cards...
Before:
After:

![]()
Floor near the door was shot and squishy when you stepped on it.

The trailer had been raised up on cinder blocks and a log as well as this stack of lumber. The tires had few cracks and one of them still held air.

![]()

I initially chased after this because of the door window. My Westerner, Andy was missing one when I bought it. Sadly after removal, the hammer slipped off the top of my ladder and crashed down on to the glass and broke it. What are the odds? Always place the valuable stuff away from the demo!

![]()
The front window configuration was interesting. Two wing windows and one solid in the middle. That was a new one for me. The road guard was homemade.


The trailer was listing towards the streetside for probably a variety of reasons. At some point, someone had added small tiles to the counter top of the kitchen cabinet. This turned out to be very heavy. My theory is that the list occured through settling and the weight of the counter top and gravity joined forces(no pun intended) to form a bulge in the streetside wall. This caused the storage door area to separate from the skirt boards. Then critters could get in. The trailer also sat in a nest of sprinklers.

![]()
![]()
In the images below, you can see the listing and a sample of the tile counter top.

![]()
![]()
Note, despite all the years it sat, the water damage around the roof vent was very minor compared to some others inclulding my Westerner.

I cut out the roof vent which had all the parts. I found the knobs inside the stove area.


Doors and upper cabinetry removed.

The dinettes were gone. Before viewing the Starfire, I had hoped for some dinette cushions. My Westerner has none.
![]()

Below is a very short video showing how little of the body was attached to the floor. the only thing holding up the up the body at this point was the wardrobe. It might have been a good idea to add a "deadman" or roof support at this point. I did keep checking the structure to make sure it wouldn't collapse on me.
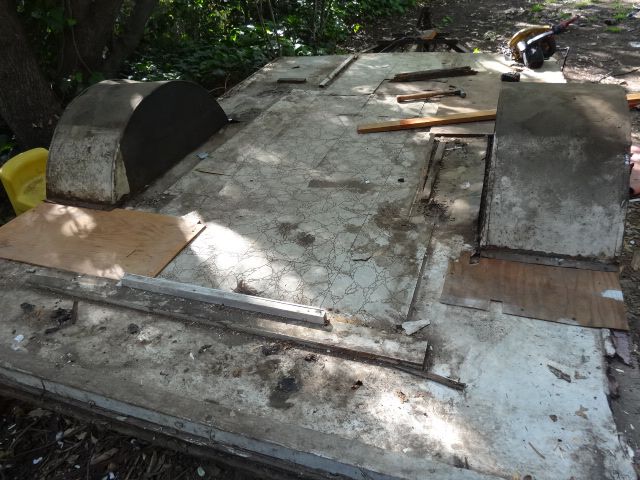
Kitchen removed. The only place the floor was attached was where the sink used to be. The rest was completely unattached.


At this point, rather than cut it up, I elected to just twist it down and let Larry Leverage be my friend.


All gone.
Initially, I considered hauling the cut up walls on the trailer frame itself, but the floor was so dilapidated that I couldn't get a safe purchase to tie it all down. I ended up putting into my minivan.

My job was not yet done. The floor needed repairs to make the trailer road worthy, otherwise, I thought the floor would fall apart on the way home, not to mention littering the freeway with debris.

I don't know much about working with wood, but I came up with an idea. I cut a 2 x 3 and wedged it under the floor up against what was left of the sill board. Drilled new holes in the outriggers and screwed into place. Then the wheelwells all needed repair to their supports. The small piece of wood up against the wheel well was a recycled shelf support from a cabinet. I screwed that down into the 2 x 3 and then I could screw in from the top. The plywood piece on top was from the trailer. I was able to screw that down farther up into the area of the floor and that gave me a solid floor once again. I used a combination of 1 1/4", 2" screws and 3" screws depending on the need.


Here is the top view of the sheet of plywood. The farthest away screws were drilled into one of the floor joists which were not rotted away. You can barely make out the gold screw heads where I screwed into the floor. I used 3" deck screws.

More patching had to be done. You can still see the fecal matter near the rear edge of the floor. I was wearing a respirator throughout the tear down. I also almost went through an entire box of elastic gloves.
I think the spirit of this little girl was still trying to throw everything at me to stop me from moving her. The dropping hammer on the door window was the harbinger of things to come. The floor issues came second and then finally, her last battle came with the tongue jack and coupler. Combined time to loosen and free up these two very essential parts took about 1.5 hours.
The tongue jack was frozen solid with rust and I only wanted to cut it as a last resort. This particular jack had a bolted collar. Once I figured out how to free the bolts, the next step was to raise the jack post. It was frozen into the coupler with a very aggressive rust monster. Larry Leverage would be my friend again. I placed a cinder block under the bottom of the jack for a solid base. Took a small sledge hammer and started pounding on the top of the coupler. Eventurally, the post started to slide upward. But first, I would ask for my super friends, Sargaent PB Blaster and his best buddy, DublyouDee - 40. They came to the rescue after many flying attacks from all sides. The darn slider under the coupler was frozen as well.
So, what's the 2 x 3 doing there in the photo, below?

After all the work on the jack, I got it to free up finally, but... then the shaft wouldn't come out of the hole. So, I cut a piece of wood to fit under the frozen part of the jack and I would eventually wrap it with a bungi cord to keep it in place. That got me home.
Voila'! The Starfire frame is finally attached and moved.

Before moving, the frame on to the open road, I did check the bearings for grease. The grease was somewhat runny, so I wiped out what I could get to from the outer bearings and forced in some new grease into the outer bearings and added a little grease to the grease cap. It all would mix once I drove. I also lowered the PSI in the tires to @15 lbs.
Cheers,
Rod
P.S. If you want to see all the gory details in the mega album, you can go here: s1078.photobucket.com/user/Vintage-Trailer-Dad/library/1955%20Starfire%20Travel%20trailer%20step%20by%20step
![]()
This thread was originally posted in 2016. Long time members may remember this thread. I moved it from its hybernation in the Talk About Anything subforum that has limited access to new members so everyone could read it.
Here goes:
I was bad.
I finished tearing down a 1955 Starfire for parts to financially support the restoration on my Westerner. I bought it for $60.
It pained me.

The Starfire sat for 40 years in this one spot. At least that's my guess. The registration tags on the plate were dated 1975 and the registration I found in the trailer matched that. I was going to move it, but build bracing for it, as briefly discussed in the blocking thread vintagetrailertalk.freeforums.net/thread/5335/blocking-framing-support-camper-trip?page=1&scrollTo=60347 , but the floor was very sketchy and in the end, I decided to ask to tear it down where it sat.
Critters of all sizes found their way into the Starfire. They left plenty of calling cards...
Before:
After:
Floor near the door was shot and squishy when you stepped on it.
The trailer had been raised up on cinder blocks and a log as well as this stack of lumber. The tires had few cracks and one of them still held air.
I initially chased after this because of the door window. My Westerner, Andy was missing one when I bought it. Sadly after removal, the hammer slipped off the top of my ladder and crashed down on to the glass and broke it. What are the odds? Always place the valuable stuff away from the demo!
The front window configuration was interesting. Two wing windows and one solid in the middle. That was a new one for me. The road guard was homemade.
The trailer was listing towards the streetside for probably a variety of reasons. At some point, someone had added small tiles to the counter top of the kitchen cabinet. This turned out to be very heavy. My theory is that the list occured through settling and the weight of the counter top and gravity joined forces(no pun intended) to form a bulge in the streetside wall. This caused the storage door area to separate from the skirt boards. Then critters could get in. The trailer also sat in a nest of sprinklers.
In the images below, you can see the listing and a sample of the tile counter top.
Note, despite all the years it sat, the water damage around the roof vent was very minor compared to some others inclulding my Westerner.
I cut out the roof vent which had all the parts. I found the knobs inside the stove area.
Doors and upper cabinetry removed.
The dinettes were gone. Before viewing the Starfire, I had hoped for some dinette cushions. My Westerner has none.
Below is a very short video showing how little of the body was attached to the floor. the only thing holding up the up the body at this point was the wardrobe. It might have been a good idea to add a "deadman" or roof support at this point. I did keep checking the structure to make sure it wouldn't collapse on me.
Kitchen removed. The only place the floor was attached was where the sink used to be. The rest was completely unattached.
At this point, rather than cut it up, I elected to just twist it down and let Larry Leverage be my friend.
All gone.
Initially, I considered hauling the cut up walls on the trailer frame itself, but the floor was so dilapidated that I couldn't get a safe purchase to tie it all down. I ended up putting into my minivan.
My job was not yet done. The floor needed repairs to make the trailer road worthy, otherwise, I thought the floor would fall apart on the way home, not to mention littering the freeway with debris.
I don't know much about working with wood, but I came up with an idea. I cut a 2 x 3 and wedged it under the floor up against what was left of the sill board. Drilled new holes in the outriggers and screwed into place. Then the wheelwells all needed repair to their supports. The small piece of wood up against the wheel well was a recycled shelf support from a cabinet. I screwed that down into the 2 x 3 and then I could screw in from the top. The plywood piece on top was from the trailer. I was able to screw that down farther up into the area of the floor and that gave me a solid floor once again. I used a combination of 1 1/4", 2" screws and 3" screws depending on the need.
Here is the top view of the sheet of plywood. The farthest away screws were drilled into one of the floor joists which were not rotted away. You can barely make out the gold screw heads where I screwed into the floor. I used 3" deck screws.
More patching had to be done. You can still see the fecal matter near the rear edge of the floor. I was wearing a respirator throughout the tear down. I also almost went through an entire box of elastic gloves.
I think the spirit of this little girl was still trying to throw everything at me to stop me from moving her. The dropping hammer on the door window was the harbinger of things to come. The floor issues came second and then finally, her last battle came with the tongue jack and coupler. Combined time to loosen and free up these two very essential parts took about 1.5 hours.
The tongue jack was frozen solid with rust and I only wanted to cut it as a last resort. This particular jack had a bolted collar. Once I figured out how to free the bolts, the next step was to raise the jack post. It was frozen into the coupler with a very aggressive rust monster. Larry Leverage would be my friend again. I placed a cinder block under the bottom of the jack for a solid base. Took a small sledge hammer and started pounding on the top of the coupler. Eventurally, the post started to slide upward. But first, I would ask for my super friends, Sargaent PB Blaster and his best buddy, DublyouDee - 40. They came to the rescue after many flying attacks from all sides. The darn slider under the coupler was frozen as well.
So, what's the 2 x 3 doing there in the photo, below?
After all the work on the jack, I got it to free up finally, but... then the shaft wouldn't come out of the hole. So, I cut a piece of wood to fit under the frozen part of the jack and I would eventually wrap it with a bungi cord to keep it in place. That got me home.
Voila'! The Starfire frame is finally attached and moved.
Before moving, the frame on to the open road, I did check the bearings for grease. The grease was somewhat runny, so I wiped out what I could get to from the outer bearings and forced in some new grease into the outer bearings and added a little grease to the grease cap. It all would mix once I drove. I also lowered the PSI in the tires to @15 lbs.
Cheers,
Rod
P.S. If you want to see all the gory details in the mega album, you can go here: s1078.photobucket.com/user/Vintage-Trailer-Dad/library/1955%20Starfire%20Travel%20trailer%20step%20by%20step


 (Is that what those were?)