Starflyte68
New Member
Posts: 21
Likes: 8
1968 Shasta Starflyte
Currently Offline
|
Post by Starflyte68 on Oct 19, 2022 8:24:56 GMT -8
What a journey this summer has been for me! The 68 Starflyte I bought was not in much worse shape than I expected, but the time it takes to do each thing has been 10 times what I anticipated! Well, structural work is all done, siding is cleaned an ready for paint, and I just have the roof to prep now. I will be replacing the roof-top AC with a vent. The old AC mount was much longer than 14 inches, so there will be a bunch of old screw holes that need filling (photo below). What is the best practice on this? My thought is that since it is out of sight, I could use a small sheet of aluminum with matched holes on top, screwed down through the old holes with a layer of putty tape between. Maybe some gutter seal too. Alternatively, maybe I should put back the plate that the AC sat on and mount the vent through it? A second question... I've seen suggestions that roof top items are best sealed with only putty tape and optional gutter seal, other suggestions add some additional bit of lap sealant. What is the current thought on this? Thanks everyone! I wouldn't have done a very good job without this forum. 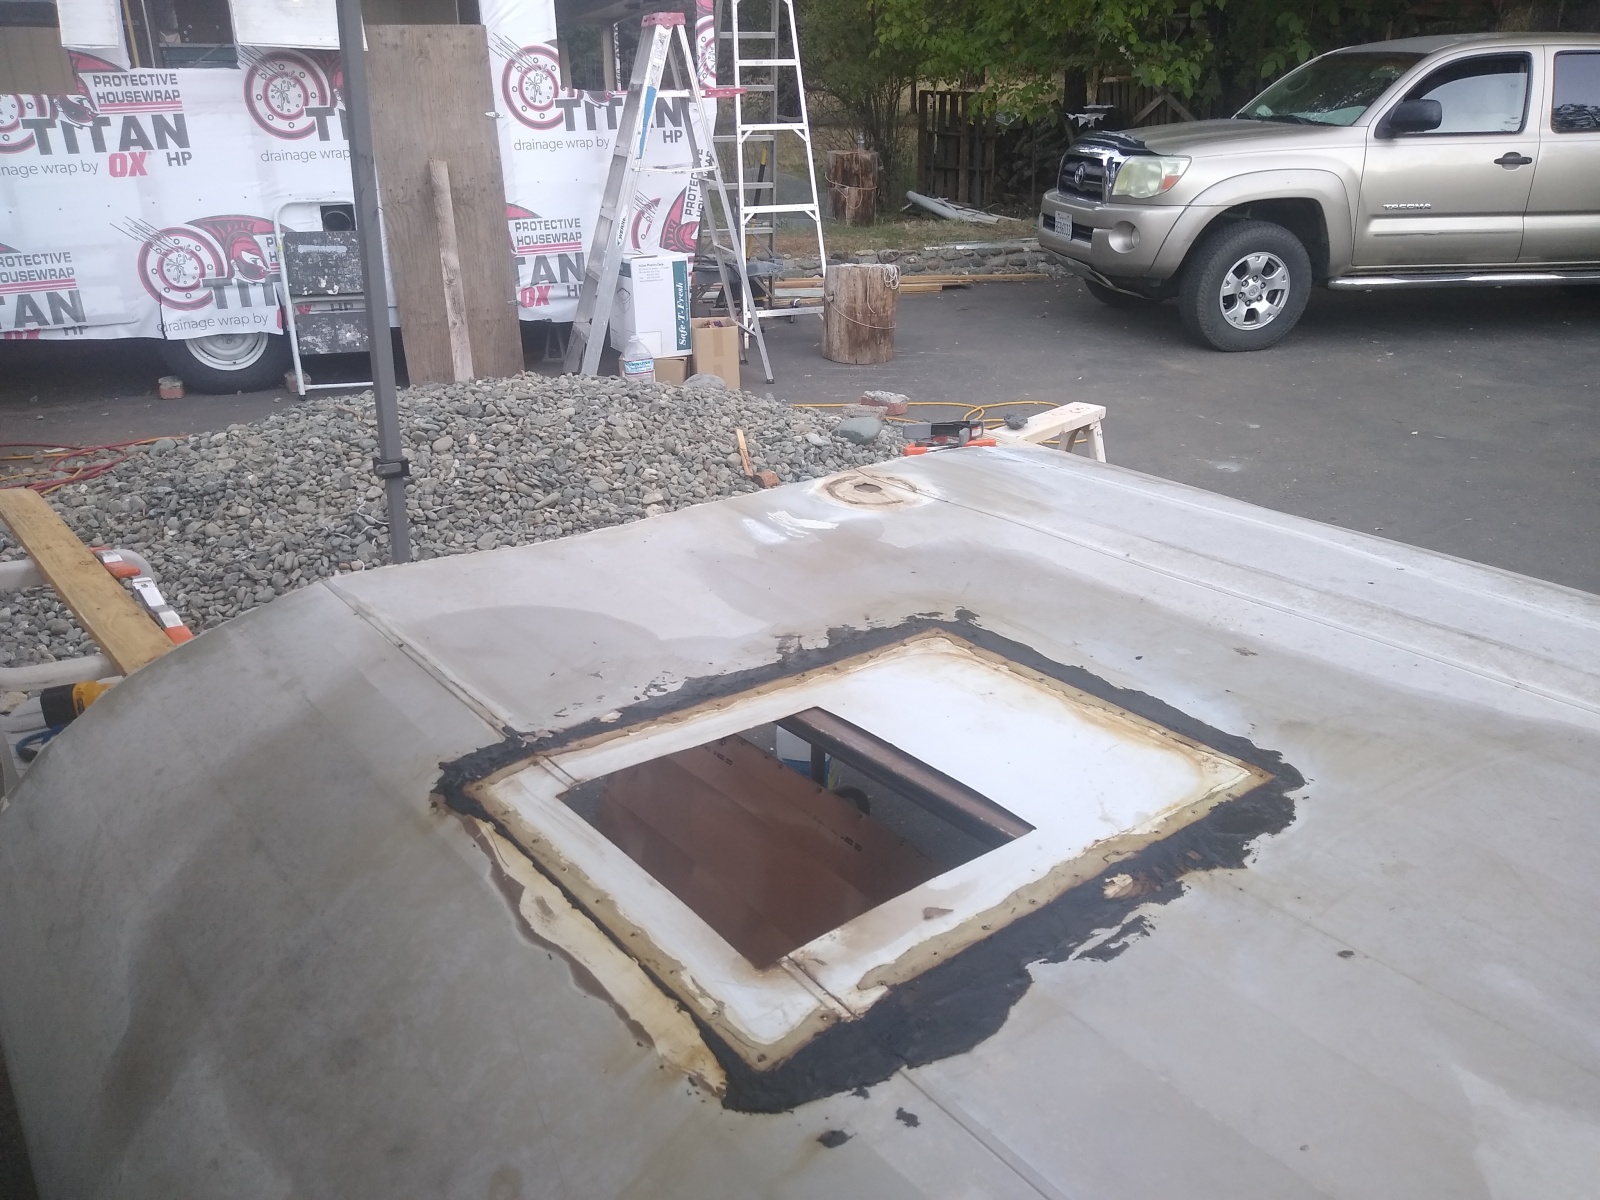 |
|
|
|
Post by vikx on Oct 19, 2022 12:40:38 GMT -8
If the original plate is OK, I would re-use it. Not sure why there are so many screw holes. If you putty it over the screw holes, that should seal them, especially when the screws are secure. There are many steps to a roof patch. I'm concerned about the tar which doesn't look removable. First place the patch with putty and screws. The product you will be using next is Proflex clear brushable sealant. www.geocelusa.com/product/pro-flex-rv-multi-purpose-brushable-repair-coating/Please don't substitute products. When the patch is mounted, paint a layer over the edges/screw heads. It is thick and gooey so disposable brushes work well. Do 3 layers, covering everything that is old or apt to leak. Proflex sticks to almost anything and is self leveling, so it will seal. Here is an example of 3 layers on an "iffy" roof seam: <a data-flickr-embed="true" href="https://www.flickr.com/photos/53634851@N03/52440016866/in/dateposted-public/" title="005 l Roof Seams (2)"><img src="https://live.staticflickr.com/65535/52440016866_aafcf73f7c_n.jpg" width="320" height="240" alt="005 l Roof Seams (2)"></a><script async src="//embedr.flickr.com/assets/client-code.js" charset="utf-8"></script> Here is a patch I did for a refer roof hole: <a data-flickr-embed="true" href="https://www.flickr.com/photos/53634851@N03/52440479070/in/dateposted-public/" title="005 3 Roof goes on (4)"><img src="https://live.staticflickr.com/65535/52440479070_092b6d28c7_n.jpg" width="320" height="240" alt="005 3 Roof goes on (4)"></a><script async src="//embedr.flickr.com/assets/client-code.js" charset="utf-8"></script> I ended up covering the whole patch since it wasn't very big. Double putty in the dips. Oddly enough, when I tried using the pattern to match the roof, the metal rippled, hence the cross patterns. NOTE: OSI gutter seal is great for small holes and a light seal along edge trim. It's not for big patches. I use Dicor self leveling sealant on the roof vent flange because it is removeable for later repairs. Dicor has to be touched up and it sticks to itself. <a data-flickr-embed="true" href="https://www.flickr.com/photos/53634851@N03/35577486721/in/album-72157711234756182/" title="Dicor on a roof vent"><img src="https://live.staticflickr.com/4254/35577486721_cf276fc328_n.jpg" width="320" height="213" alt="Dicor on a roof vent"></a><script async src="//embedr.flickr.com/assets/client-code.js" charset="utf-8"></script> |
|
Starflyte68
New Member
Posts: 21
Likes: 8
1968 Shasta Starflyte
Currently Offline
|
Post by Starflyte68 on Oct 20, 2022 19:15:55 GMT -8
Thank you Vikx! With a good soaking of mineral spirits, the tar is coming up fairly well. The old putty is what is really trying my patience. I've got a few spots that a PO recently(?) repaired that have a soft gray putty that is still quite flexible (though not terribly sticky). Most of the trailer seams have an old brown putty that I could almost swear must be bondo as it is so hard and immobile. A good multi-day soak with mineral spirits penetrates only a couple micrometers, so is almost useless. I think I'm not going much faster than about 1 ft of seam per hour. At least on the roof I'm willing to use a sharp chisel since I'm not so worried about scratches showing.
Sorry to grump - overall I'm really enjoying that I'll have a trailer I can take pride in. I'm just at a particularly tedious point in my restoration effort and with a change in weather hanging over my head. If I were not already so overloaded with side projects and hobbies, I might consider doing more trailers in the future!
|
|
|
|
Post by vikx on Oct 20, 2022 20:33:43 GMT -8
Roofs are a pain in the .... I've spent hours on some that weren't worth doing. Hang in there and keep picking. If you use Proflex, you don't have to have the roof spotlessly clean. It covers a multitude of sins.
By the way, gasoline melts tar (and other things) amazingly well. BE CAREFUL.
|
|
chriss
Active Member

Posts: 241 
Likes: 97
Currently Offline
|
Post by chriss on Oct 23, 2022 6:55:39 GMT -8
You could fill the screw holes with "dummy screws" with gutter sealant or equiv in the holes. I feel a sheet over the existing roof is a good place to trap moisture.
I sealed a roof vent with putty tape only, no goop, no gutter seal almost 10 years ago. I did shim up the framing about 3/8" to drain water. No leaks to date.
|
|


