


Post by wisconsinjoe on Oct 25, 2021 6:58:55 GMT -8
If you are doing a complete frame-off or scratch build, you know you are close to the finish line when you get to the J-rail. This important step squishes putty tape between the J-rail trim and the body to cover the seams of overlapping aluminum and the fasteners used to hold it down. Done correctly it will seal out water and last for many years, if not decades especially if you keep the trailer covered from the effects of brutal hot sunlight.
It’s crucial to pre-bend the J-rail to match the curves and straight runs of the body sides. This was done using curved bending jigs, mapp gas for heat, and probably an assistant. The one cool trick is to mark up the heated (bending) areas with a black sharpie, which will begin to fade as the aluminum reaches its optimal bending temperature.
However, even with an assistant to help keep it in a flat plane by screwing it to the bending jig, the J-rail will undoubtedly end up a bit out of flat. It will become painfully evident when you start assembly around those curves. Never fear. There is an easy fix for that later.
 20211014_163030 by Joe Mirenna, on Flickr
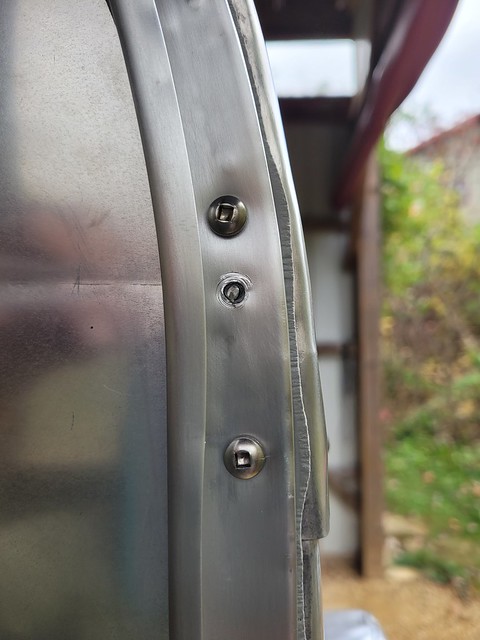
Assistant and I began at a pre-marked spot on the rail that transitioned from a straight run to curved. Each hole was pre-drilled through the aluminum skin only after first whacking a starter dimple with a sharp punch. We used a 9/64 bit to accommodate one inch #10 stainless steel square drive screws. However, for this first step we used ¾ inch #8 phillips head regular steel screws that would be replaced for the final assembly. The reason is that the stainless steel heads are relatively soft and easily boogered up at the square drive hole.
Although the bends didn’t perfectly match the curves, it was easy to push them in place and tack down with screws to perfectly follow the profile. You’ll notice that the J-rail sits properly a little below the roof plane to cover the fasteners (nails or staples) as well as the seam of the overlapping aluminum skins. Once it is tacked in place, go back and drive those steel screws in every hole.
Next, place a line of masking tape along the flat edge that will serve as a guide for the putty tape as well as alignment for reassembly of the rail that will need to be removed to apply the putty tape. Since you will be butting up to an adjacent section of J-rail to make it all away around your profile, keep the first one attached. However, unscrew as much section as needed to slip the next piece underneath so you can determine exactly where you want to make the joint.
 20211014_172043 by Joe Mirenna, on Flickr
 20211014_165242 by Joe Mirenna, on Flickr
Repeat the process for the next section, carefully marking (on applied masking tape) the cut offs for both the joining sections and the end sections at the bottom of the camper runs. This same process is used for the awning rail (which is applied first) on the curb side.
You will notice that in some of the curved sections the rail doesn’t lay flat against the body. You may even notice the trim metal distorting as the powerful screw fails to drive it flat. You will need to form the metal by hammering it down. The trick for me was to cut an angle on a scrap stick of hardwood, about 1-¼” square. That allowed me to apply hammer pressure flat all the way to the inside of the “J”. If you keep it flat you can hammer and slide it along the stubborn section without leaving many impact marks. It also may help to hit a flat board directly on top of the “J,” but that may close the gap too much. Be careful, and if it does overly flatten, you can pull it back open with pliers, or even better, sheet metal flattening pliers that press about a 3 inch section back into a flat plane. Don’t worry about a bit of unevenness or some hammer marks. It’s going to happen.
 20211014_162935 by Joe Mirenna, on Flickr
 20211014_164014 by Joe Mirenna, on Flickr
Once I was satisfied that everything was flat enough against the body so that one layer of putty tape would fill the gaps, I went around and lightly hammered any metal edges that bent slightly out, including those places where the overlapping sides are crossed. The heavy 40 mil skin with a layer of putty tape makes a significant step. Hammering along that profile will assure a good putty seal.
Before removing the J-rail, and after applying the masking tape guide, make sure to mark a starting place for reattachment. I chose a place in the middle so the awkward trim piece could be relatively balanced. Mark it both on the body masking as well as the rail. Once removed, I marked the back with a sharpie to make realignment foolproof.
 20211014_172300 by Joe Mirenna, on Flickr
 20211015_104958 by Joe Mirenna, on Flickr
 20211015_105154 by Joe Mirenna, on Flickr
Next it’s time to clean up the metal trim. It still had pencil and sharpie marks (from the heat bending process). I propped the gangly piece on several portable stands that could hold it with clamps as I cut and cleaned the ends with a hacksaw and file. Then I sanded by hand with 220 grit sandpaper until all the marks were gone. Don’t fret over the many little bumps and gouges that show up from the hammer forming. Now rub with a coarse grit of steel wool followed by a fine grit. I used #1 and #00. It should quickly turn into a nice mill finish that hides much of the surface flaws.
 20211014_174324 by Joe Mirenna, on Flickr
 20211014_174315 by Joe Mirenna, on Flickr
Using the masking tape as a guide, press a continuous line of putty tape along the profile. If you have to piece together, just overlap a bit and smoosh down level with the fresh tape. I added a short extra layer at those skin overlaps. It really helps to have an assistant to roll out the tape.
A bit about putty tape. I don’t know why this is so confusing. Apparently there are different kinds of “butyl” tape. There are different colors (white, black, and gray) and different colored paper backings (brown and white) and different paper textures (smooth and wrinkled). I was sure I got the right thing and posted it on VTT. Then Vikx noticed that I got “pure” butyl which apparently is not correct because it is stickier to handle and melts too much in the heat and drips out of seams. I was advised to get “RV Butyl” tape which is gray with wrinkled white paper backing. Found it on Ebay and it works great. Ended up buying eight 30 foot rolls and we used up almost all of it in this project. (Mobile Home Solutions, rod@mobilehomesolutions.com, 518-366-4663)
 20211015_102536 by Joe Mirenna, on Flickr
Anyway, press that tape over the seams and rub the paper backing to get good adhesion. Then pull off the paper backing and align your first piece of J-rail (or window, door, seam, etc - all the same process). You should easily locate your starting screws from the marks left on the masking tape. Tack in all along the run until the trim is properly aligned, but don’t drive in your finished stainless steel screws until you get them all started. Before driving in to squish out the sealing putty, make sure you remove the masking tape. Finally drive in all the screws until you see a significant squeeze out.
 20211015_102609 by Joe Mirenna, on Flickr
 20211015_105740 by Joe Mirenna, on Flickr
 20211014_164114 by Joe Mirenna, on Flickr
 20211015_112850 by Joe Mirenna, on Flickr
There is some controversy about drivers. Many use a regular drill driver, but I prefer an impact driver. The latter has a bit of a learning curve because without some resistance from the screw, the impact driver whirls too quickly. It is easy to slip out of the screw head and in a worst case scenario, ram the driver bit into your nice new siding. Or, in another common instance, you can pop the head off the screw. Yep, I did that twice. Nothing you can do about it because drilling out that broken screw will be difficult. Rather, just leave it alone because the putty probably sealed it enough. Drill another pilot hole close to the destroyed one. Put a dab of gutter seal on the hole or just let the putty ooze out around it. It will become one of several mistakes you made that only you will ever notice. But, the great thing about the impact driver is that its hammering action will not deform the screw head, especially those expensive but soft stainless steel ones. I like the square drive ones from McFeely’s. A regular drill driver will undoubtedly mess up a bunch of screw heads. Trick is to practice using the impact driver on scrap material. Make sure you practice with skin scrap material and putty tape and go so far as to break off a few heads to learn the subtle feel. Also, learn to pulse the tool when starting so it doesn’t spin out of control.
 20211015_113044 by Joe Mirenna, on Flickr
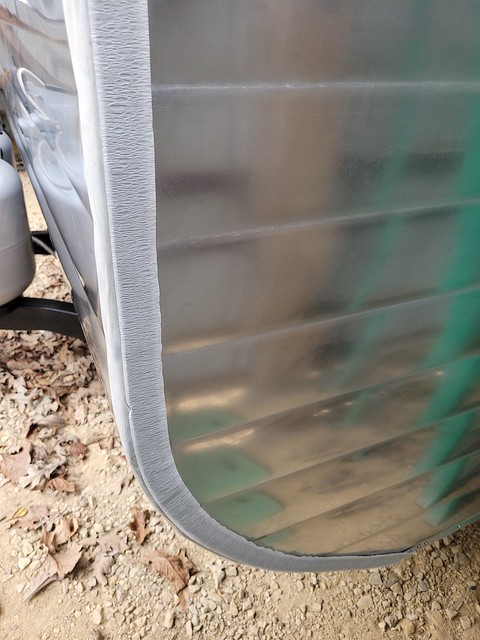
Finally one of the most satisfying tasks is to trim off the squeeze-out putty. With a utility knife simply run along the edge of the trim to make a clean cut. If you are doing this over a pre-painted skin, make sure the knife blade is dull to avoid cutting through the paint layer. Run the knife on the underside of the “J” as well, but realize that it is difficult to get all the way under to the flat side. Just cut it even, leaving a bit of a thicker line of putty. If you used the correct tape, it should stay there nicely.
 20211015_113424 by Joe Mirenna, on Flickr
 20211015_113928 by Joe Mirenna, on Flickr
Pat yourself on the back and start planning your first camping trip because you probably have a relatively short punch list until completion.
 20211018_181942 by Joe Mirenna, on Flickr
It’s crucial to pre-bend the J-rail to match the curves and straight runs of the body sides. This was done using curved bending jigs, mapp gas for heat, and probably an assistant. The one cool trick is to mark up the heated (bending) areas with a black sharpie, which will begin to fade as the aluminum reaches its optimal bending temperature.
However, even with an assistant to help keep it in a flat plane by screwing it to the bending jig, the J-rail will undoubtedly end up a bit out of flat. It will become painfully evident when you start assembly around those curves. Never fear. There is an easy fix for that later.
20211014_163030 by Joe Mirenna, on FlickrAssistant and I began at a pre-marked spot on the rail that transitioned from a straight run to curved. Each hole was pre-drilled through the aluminum skin only after first whacking a starter dimple with a sharp punch. We used a 9/64 bit to accommodate one inch #10 stainless steel square drive screws. However, for this first step we used ¾ inch #8 phillips head regular steel screws that would be replaced for the final assembly. The reason is that the stainless steel heads are relatively soft and easily boogered up at the square drive hole.
Although the bends didn’t perfectly match the curves, it was easy to push them in place and tack down with screws to perfectly follow the profile. You’ll notice that the J-rail sits properly a little below the roof plane to cover the fasteners (nails or staples) as well as the seam of the overlapping aluminum skins. Once it is tacked in place, go back and drive those steel screws in every hole.
Next, place a line of masking tape along the flat edge that will serve as a guide for the putty tape as well as alignment for reassembly of the rail that will need to be removed to apply the putty tape. Since you will be butting up to an adjacent section of J-rail to make it all away around your profile, keep the first one attached. However, unscrew as much section as needed to slip the next piece underneath so you can determine exactly where you want to make the joint.
20211014_172043 by Joe Mirenna, on Flickr20211014_165242 by Joe Mirenna, on Flickr Repeat the process for the next section, carefully marking (on applied masking tape) the cut offs for both the joining sections and the end sections at the bottom of the camper runs. This same process is used for the awning rail (which is applied first) on the curb side.
You will notice that in some of the curved sections the rail doesn’t lay flat against the body. You may even notice the trim metal distorting as the powerful screw fails to drive it flat. You will need to form the metal by hammering it down. The trick for me was to cut an angle on a scrap stick of hardwood, about 1-¼” square. That allowed me to apply hammer pressure flat all the way to the inside of the “J”. If you keep it flat you can hammer and slide it along the stubborn section without leaving many impact marks. It also may help to hit a flat board directly on top of the “J,” but that may close the gap too much. Be careful, and if it does overly flatten, you can pull it back open with pliers, or even better, sheet metal flattening pliers that press about a 3 inch section back into a flat plane. Don’t worry about a bit of unevenness or some hammer marks. It’s going to happen.
20211014_162935 by Joe Mirenna, on Flickr20211014_164014 by Joe Mirenna, on FlickrOnce I was satisfied that everything was flat enough against the body so that one layer of putty tape would fill the gaps, I went around and lightly hammered any metal edges that bent slightly out, including those places where the overlapping sides are crossed. The heavy 40 mil skin with a layer of putty tape makes a significant step. Hammering along that profile will assure a good putty seal.
Before removing the J-rail, and after applying the masking tape guide, make sure to mark a starting place for reattachment. I chose a place in the middle so the awkward trim piece could be relatively balanced. Mark it both on the body masking as well as the rail. Once removed, I marked the back with a sharpie to make realignment foolproof.
20211014_172300 by Joe Mirenna, on Flickr20211015_104958 by Joe Mirenna, on Flickr20211015_105154 by Joe Mirenna, on FlickrNext it’s time to clean up the metal trim. It still had pencil and sharpie marks (from the heat bending process). I propped the gangly piece on several portable stands that could hold it with clamps as I cut and cleaned the ends with a hacksaw and file. Then I sanded by hand with 220 grit sandpaper until all the marks were gone. Don’t fret over the many little bumps and gouges that show up from the hammer forming. Now rub with a coarse grit of steel wool followed by a fine grit. I used #1 and #00. It should quickly turn into a nice mill finish that hides much of the surface flaws.
20211014_174324 by Joe Mirenna, on Flickr20211014_174315 by Joe Mirenna, on FlickrUsing the masking tape as a guide, press a continuous line of putty tape along the profile. If you have to piece together, just overlap a bit and smoosh down level with the fresh tape. I added a short extra layer at those skin overlaps. It really helps to have an assistant to roll out the tape.
A bit about putty tape. I don’t know why this is so confusing. Apparently there are different kinds of “butyl” tape. There are different colors (white, black, and gray) and different colored paper backings (brown and white) and different paper textures (smooth and wrinkled). I was sure I got the right thing and posted it on VTT. Then Vikx noticed that I got “pure” butyl which apparently is not correct because it is stickier to handle and melts too much in the heat and drips out of seams. I was advised to get “RV Butyl” tape which is gray with wrinkled white paper backing. Found it on Ebay and it works great. Ended up buying eight 30 foot rolls and we used up almost all of it in this project. (Mobile Home Solutions, rod@mobilehomesolutions.com, 518-366-4663)
20211015_102536 by Joe Mirenna, on FlickrAnyway, press that tape over the seams and rub the paper backing to get good adhesion. Then pull off the paper backing and align your first piece of J-rail (or window, door, seam, etc - all the same process). You should easily locate your starting screws from the marks left on the masking tape. Tack in all along the run until the trim is properly aligned, but don’t drive in your finished stainless steel screws until you get them all started. Before driving in to squish out the sealing putty, make sure you remove the masking tape. Finally drive in all the screws until you see a significant squeeze out.
20211015_102609 by Joe Mirenna, on Flickr20211015_105740 by Joe Mirenna, on Flickr20211014_164114 by Joe Mirenna, on Flickr20211015_112850 by Joe Mirenna, on FlickrThere is some controversy about drivers. Many use a regular drill driver, but I prefer an impact driver. The latter has a bit of a learning curve because without some resistance from the screw, the impact driver whirls too quickly. It is easy to slip out of the screw head and in a worst case scenario, ram the driver bit into your nice new siding. Or, in another common instance, you can pop the head off the screw. Yep, I did that twice. Nothing you can do about it because drilling out that broken screw will be difficult. Rather, just leave it alone because the putty probably sealed it enough. Drill another pilot hole close to the destroyed one. Put a dab of gutter seal on the hole or just let the putty ooze out around it. It will become one of several mistakes you made that only you will ever notice. But, the great thing about the impact driver is that its hammering action will not deform the screw head, especially those expensive but soft stainless steel ones. I like the square drive ones from McFeely’s. A regular drill driver will undoubtedly mess up a bunch of screw heads. Trick is to practice using the impact driver on scrap material. Make sure you practice with skin scrap material and putty tape and go so far as to break off a few heads to learn the subtle feel. Also, learn to pulse the tool when starting so it doesn’t spin out of control.
20211015_113044 by Joe Mirenna, on FlickrFinally one of the most satisfying tasks is to trim off the squeeze-out putty. With a utility knife simply run along the edge of the trim to make a clean cut. If you are doing this over a pre-painted skin, make sure the knife blade is dull to avoid cutting through the paint layer. Run the knife on the underside of the “J” as well, but realize that it is difficult to get all the way under to the flat side. Just cut it even, leaving a bit of a thicker line of putty. If you used the correct tape, it should stay there nicely.
20211015_113424 by Joe Mirenna, on Flickr20211015_113928 by Joe Mirenna, on FlickrPat yourself on the back and start planning your first camping trip because you probably have a relatively short punch list until completion.
20211018_181942 by Joe Mirenna, on Flickr


