


Scratch Build Update - Getting Closer
Jul 22, 2021 21:35:03 GMT -8
kirkadie, nccamper, and 1 more like this
Post by wisconsinjoe on Jul 22, 2021 21:35:03 GMT -8
Had a bit of a slowdown this spring with work around the property and a medical procedure that had me sitting on the deck, bandaged foot elevated and a cold refreshing beverage within easy reach for days on end. But then, back on the horse. Thank God these campers are built from the inside out, meaning I got to do the precise finish work that I enjoy the most.
But the big challenge for me was the electrical. Now I am pretty good when it comes to household wiring, having done all that myself for both the house and workshop. But campers are another thing entirely with three systems: AC shore power, tow power, and 12 volt DC. It seems all I did for over a month was internet research, shopping locally and on Amazon, and communicating with great mentors, especially our friend here, vikx. Don’t know how to give thanks enough.
I tackled the shore power first because that was going to be the easiest. A small 30 amp box with two circuits (15 amp for the charger/converter and 3-way refrigerator and a 20 amp for 4 outlets spread throughout the camper).
 20210701_150756 by Joe Mirenna, on Flickr
 20210629_142625 by Joe Mirenna, on Flickr
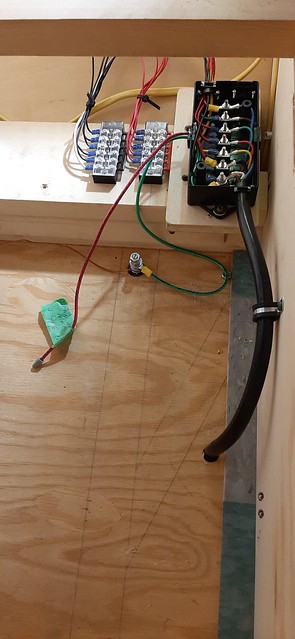
Then, I wired up the tow system. I temporarily attached my running and tail lights and ran wires to each, including a ground wire so I didn’t have to rely on the aluminum skin like it was done in the old days. I happened to have a large spool of nice two wire 14 gauge stranded wire that got good use. I took vikx’s advice and powered it up with a portable 12 volt charger and tow vehicle side coupler to test everything. The advice I did not take however, was keeping the junction box under the camper. I found it easy to poke the tow cable up through the floor to a junction box that I can fit in my wire closet under the street-side dinette seat.
 20210701_150639 by Joe Mirenna, on Flickr
And while I was at it, I drilled through the plywood floor to the metal frame that I had marked off way at the beginning of the project. There I drilled and tapped into the frame where I screwed in a heavy long bolt (after grinding off paint). Then I removed the bolt, cut off the head and ground in a screwdriver slot so I could reinstall and lock in with a double nut and dielectric compound paste. Now I had a post to serve as a frame ground that will not get rusted from being on the outside of the trailer. That ground post holds everything needing grounding: The battery array, the shore power service, the tow wiring, and the charger converter.
One thing that helped me was using termination blocks. I had run separate wires to several of my running lights because they were too difficult to daisy chain along one wire path. As I said above, I had a whole large spool of good 14 gauge wire just laying around the garage. The termination blocks allowed me to send all the hots and grounds to their separate blocks, and then send off one wire each to the tow wire junction box.
Then, the daunting part came: the 12 volt DC. I started with two AGM batteries wired parallel and set in a shallow plywood tray and secured in with a heavy nylon trucker’s strap. The charger/converter got plugged into a shore power AC outlet and connected directly to the battery. Some call for a breaker between them, but the tech from the Iota converter said it wasn’t really necessary. However, I did put a 20 amp self-healing breaker between the battery (and tow hot charge wire) and the 12 volt fuse block. Then, it was easy to send all my ground wires to the termination block (part of the fuse block) and each of my circuits to its own fuse. I added a cut off switch between the battery hot and fuse block, and also added a switch to my DC fridge hot wire because I didn’t want to have the fridge slowly discharge my battery by demanding phantom power. Finally, I swallowed hard and switched her on...and wow, everything worked. So, if you haven’t yet bought vikx’s book, the illustrations on the electrical systems alone are worth the price.
 20210721_142523 by Joe Mirenna, on Flickr
 20210721_142422 by Joe Mirenna, on Flickr
 20210721_142437 by Joe Mirenna, on Flickr
 20210721_143139 by Joe Mirenna, on Flickr
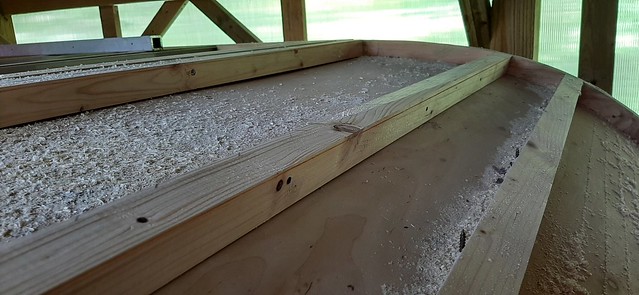
I had to route much of my wiring within the street-side wall, but some of it went either back inside under the bed framing or up and over the ceiling. Once everything was tested, I began the tedious work of fitting 1.5” foam insulation in all of the cavities. A friend had a bunch of poly iso scraps from a housing insulation project. It is kind of nasty stuff with fiberglass embedded in the tar paper-like covering. I learned the hard way to use gloves, long sleeves, and eye protection. Thanks to John Palmer for the great advice to use a knife blade in a jigsaw for dust free foam cutting.
 20210721_160151 by Joe Mirenna, on Flickr
I also tackled a dreaded project. There is a section of the curving roof above the dinette that did not bend as well as hoped. In retrospect, I should have added more kerfing even at the shallow part of the bend. What happened was in that spot, the bend created a bit of an arch, powerful enough to bend the rafters out of straight. I used a very fine Japanese chalk line that I just read about in a Fine Homebuilding magazine, and snapped a line from one wall to the other opposite. Sure enough, I was bent about a quarter inch out of straight. That was going to cause problems when I apply the aluminum roof because a flat sheet of metal can’t bend in two directions. But, that nice thin line and my buddy’s hand held planer cleaned up that problem pretty easily.
 20210622_115518 by Joe Mirenna, on Flickr
 20210622_133505 by Joe Mirenna, on Flickr
 20210622_115534 by Joe Mirenna, on Flickr
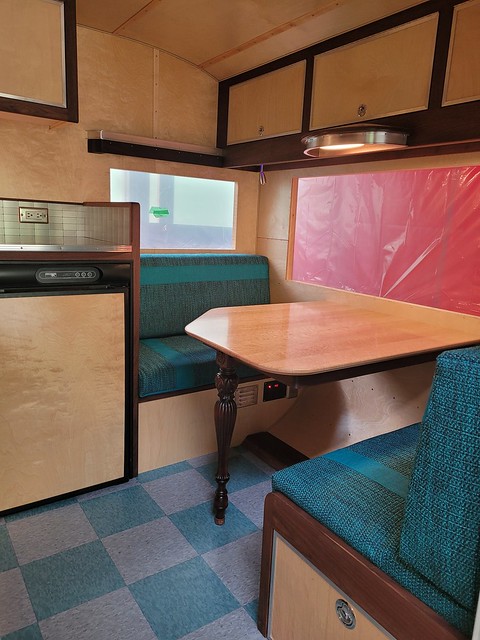
Once work was completed in the wire box under the dinette seat, I installed the birdseye maple dinette table, which had been sitting and waiting in the shop for some time now. Wanting a bit of whimsy in this project, I used an old furniture leg to hold it up. This table is not designed to drop down to form another bed. We actually don’t want other people (even grandkids) to share our small intimate space. And once the table was in, my wife Kathi brought down the cushions she had just completed upholstering.
 20210721_155357 by Joe Mirenna, on Flickr
 20210721_155223 by Joe Mirenna, on Flickr
Earlier I got the kitchen countertop installed. We went around and around deciding on a top material. Finally, we chose stainless steel, which was surprisingly affordably cut to size by a local sheet metal fabricating business. It was attached with contact adhesive and clamped overnight. We were worried that it would act like a mirror and reflect annoyingly the undercabinet task lights. So I just went over it with a random orbit sander with a coarse grit until it made a soft dull sheen. It got finished with aluminum edging and stick on stainless steel (look) aluminum backsplash tiles topped with walnut trim.
 20210525_084347 by Joe Mirenna, on Flickr
 20210525_093531 by Joe Mirenna, on Flickr
 20210721_155315 by Joe Mirenna, on Flickr
You might notice that the camper does not have a sink, or any water for that matter. We found that we actually like the “camping” part of camping. So, for us, it is easier to do dishes outside on the picnic table where there is plenty of room for a wash basin, drying rack, and a 7 gallon water tank that we haul in the tow vehicle. We find it somewhat satisfying to drive out of the campground past the line of campers waiting to empty their black water tanks.
So now, aside from just a little trim to install after the windows and door are permanently put in place, the interior is virtually done. All the lights and fan work. I have screens in some of the windows to keep insects out, and frankly, because it sits under a deluxe shed, I can just use the camper as is as my personal “poutin’ shanty.” But no, the aluminum skins are coming up fast, and undoubtedly a whole new level of anxiety.
But the big challenge for me was the electrical. Now I am pretty good when it comes to household wiring, having done all that myself for both the house and workshop. But campers are another thing entirely with three systems: AC shore power, tow power, and 12 volt DC. It seems all I did for over a month was internet research, shopping locally and on Amazon, and communicating with great mentors, especially our friend here, vikx. Don’t know how to give thanks enough.
I tackled the shore power first because that was going to be the easiest. A small 30 amp box with two circuits (15 amp for the charger/converter and 3-way refrigerator and a 20 amp for 4 outlets spread throughout the camper).
20210701_150756 by Joe Mirenna, on Flickr20210629_142625 by Joe Mirenna, on FlickrThen, I wired up the tow system. I temporarily attached my running and tail lights and ran wires to each, including a ground wire so I didn’t have to rely on the aluminum skin like it was done in the old days. I happened to have a large spool of nice two wire 14 gauge stranded wire that got good use. I took vikx’s advice and powered it up with a portable 12 volt charger and tow vehicle side coupler to test everything. The advice I did not take however, was keeping the junction box under the camper. I found it easy to poke the tow cable up through the floor to a junction box that I can fit in my wire closet under the street-side dinette seat.
20210701_150639 by Joe Mirenna, on Flickr And while I was at it, I drilled through the plywood floor to the metal frame that I had marked off way at the beginning of the project. There I drilled and tapped into the frame where I screwed in a heavy long bolt (after grinding off paint). Then I removed the bolt, cut off the head and ground in a screwdriver slot so I could reinstall and lock in with a double nut and dielectric compound paste. Now I had a post to serve as a frame ground that will not get rusted from being on the outside of the trailer. That ground post holds everything needing grounding: The battery array, the shore power service, the tow wiring, and the charger converter.
One thing that helped me was using termination blocks. I had run separate wires to several of my running lights because they were too difficult to daisy chain along one wire path. As I said above, I had a whole large spool of good 14 gauge wire just laying around the garage. The termination blocks allowed me to send all the hots and grounds to their separate blocks, and then send off one wire each to the tow wire junction box.
Then, the daunting part came: the 12 volt DC. I started with two AGM batteries wired parallel and set in a shallow plywood tray and secured in with a heavy nylon trucker’s strap. The charger/converter got plugged into a shore power AC outlet and connected directly to the battery. Some call for a breaker between them, but the tech from the Iota converter said it wasn’t really necessary. However, I did put a 20 amp self-healing breaker between the battery (and tow hot charge wire) and the 12 volt fuse block. Then, it was easy to send all my ground wires to the termination block (part of the fuse block) and each of my circuits to its own fuse. I added a cut off switch between the battery hot and fuse block, and also added a switch to my DC fridge hot wire because I didn’t want to have the fridge slowly discharge my battery by demanding phantom power. Finally, I swallowed hard and switched her on...and wow, everything worked. So, if you haven’t yet bought vikx’s book, the illustrations on the electrical systems alone are worth the price.
20210721_142523 by Joe Mirenna, on Flickr20210721_142422 by Joe Mirenna, on Flickr20210721_142437 by Joe Mirenna, on Flickr20210721_143139 by Joe Mirenna, on FlickrI had to route much of my wiring within the street-side wall, but some of it went either back inside under the bed framing or up and over the ceiling. Once everything was tested, I began the tedious work of fitting 1.5” foam insulation in all of the cavities. A friend had a bunch of poly iso scraps from a housing insulation project. It is kind of nasty stuff with fiberglass embedded in the tar paper-like covering. I learned the hard way to use gloves, long sleeves, and eye protection. Thanks to John Palmer for the great advice to use a knife blade in a jigsaw for dust free foam cutting.
20210721_160151 by Joe Mirenna, on FlickrI also tackled a dreaded project. There is a section of the curving roof above the dinette that did not bend as well as hoped. In retrospect, I should have added more kerfing even at the shallow part of the bend. What happened was in that spot, the bend created a bit of an arch, powerful enough to bend the rafters out of straight. I used a very fine Japanese chalk line that I just read about in a Fine Homebuilding magazine, and snapped a line from one wall to the other opposite. Sure enough, I was bent about a quarter inch out of straight. That was going to cause problems when I apply the aluminum roof because a flat sheet of metal can’t bend in two directions. But, that nice thin line and my buddy’s hand held planer cleaned up that problem pretty easily.
20210622_115518 by Joe Mirenna, on Flickr20210622_133505 by Joe Mirenna, on Flickr20210622_115534 by Joe Mirenna, on FlickrOnce work was completed in the wire box under the dinette seat, I installed the birdseye maple dinette table, which had been sitting and waiting in the shop for some time now. Wanting a bit of whimsy in this project, I used an old furniture leg to hold it up. This table is not designed to drop down to form another bed. We actually don’t want other people (even grandkids) to share our small intimate space. And once the table was in, my wife Kathi brought down the cushions she had just completed upholstering.
20210721_155357 by Joe Mirenna, on Flickr20210721_155223 by Joe Mirenna, on FlickrEarlier I got the kitchen countertop installed. We went around and around deciding on a top material. Finally, we chose stainless steel, which was surprisingly affordably cut to size by a local sheet metal fabricating business. It was attached with contact adhesive and clamped overnight. We were worried that it would act like a mirror and reflect annoyingly the undercabinet task lights. So I just went over it with a random orbit sander with a coarse grit until it made a soft dull sheen. It got finished with aluminum edging and stick on stainless steel (look) aluminum backsplash tiles topped with walnut trim.
20210525_084347 by Joe Mirenna, on Flickr20210525_093531 by Joe Mirenna, on Flickr20210721_155315 by Joe Mirenna, on FlickrYou might notice that the camper does not have a sink, or any water for that matter. We found that we actually like the “camping” part of camping. So, for us, it is easier to do dishes outside on the picnic table where there is plenty of room for a wash basin, drying rack, and a 7 gallon water tank that we haul in the tow vehicle. We find it somewhat satisfying to drive out of the campground past the line of campers waiting to empty their black water tanks.
So now, aside from just a little trim to install after the windows and door are permanently put in place, the interior is virtually done. All the lights and fan work. I have screens in some of the windows to keep insects out, and frankly, because it sits under a deluxe shed, I can just use the camper as is as my personal “poutin’ shanty.” But no, the aluminum skins are coming up fast, and undoubtedly a whole new level of anxiety.


/Campers/67%20Shasta?preview=2019-02-03+18.01.00.jpg)