|
|
Post by Teachndad on Jan 26, 2021 21:23:58 GMT -8
|
|
|
|
Post by Teachndad on Dec 18, 2021 6:20:17 GMT -8
Hi Friends, It’s done.  Some background. My 55’ Rod and Reel came to me sans a fridge. Pix on the web of another twin trailer to mine indicated the presence of a small Marvel Fridge (Model MR – 1014). I bought a used one about 3 years ago and while it ran and as stated in my first post, the casing on some of the wiring was dried and cracked especially around what I called the junction. Wiring leading to the fan, and thermostat were still supple. With the covers in place, the fridge looks like this.  The cooling fan, compressor, and thermostat all have wires that meet in a square shaped junction as pictured above. I am showing that photo again for convenience. I will now refer to this as the hub. Note the yellow arrow. 
Here it is a little closer.
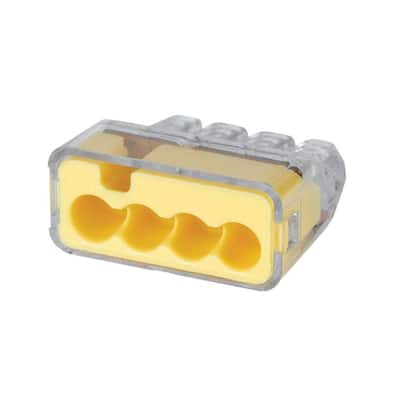
 The hub was made of solid hard rubber and over the years its now almost like a hard plastic.  I decided to cut out the hub and any connecting wires. Not knowing how the wires came together within the hub, I tediously used an Exacto knife to trim away the black hard rubber that made up the hub to find the wires you see below. It took me well over an hour to cut out the rubber of the junction. I felt like an archaeologist. Upon the end of my excavation, I ended up with this maze of wires. Wires merge and others pass one another with no contact. What do I do with all of this? I was initially perplexed. Note: The wire cable leading to the 2 o'clock position goes to the compressor.  Eventually, the answer came to me and I just started to follow the wiring. A remnant of white casing remained after my excavation. That would be my key. I traced forward and backward to identify the white wires and where they connected. I labeled wire ends. I realized that there were three intersections for all the wires. I would then focus on these three intersections and connect those wires using push in connectors which look like this: Eventually, the answer came to me and I just started to follow the wiring. A remnant of white casing remained after my excavation. That would be my key. I traced forward and backward to identify the white wires and where they connected. I labeled wire ends. I realized that there were three intersections for all the wires. I would then focus on these three intersections and connect those wires using push in connectors which look like this:
I connected a new appliance cable including a ground wire to bring in power. The ground wire was attached to an existing screw in the framing of the fridge. In order to duplicate the hub, I used a three push in connectors each like a tiny hub themselves.
I double and quadruple checked my pathways to make sure I duplicated the pathway through the original hub. Over two days I tracked the wires over and over. I did find three mistakes in the process.
The moment came to plug it in. I inserted the plug and I was rewarded with the sounds of a @66-year-old fridge coming to life! Here is the video to capture the moment. youtu.be/2mUwhpBLhrY The fridge begins cooling within 10 minutes. To test the thermostat, I opened the door after it stopped in order to test to see if it would restart. It restarted. Wahoooo!
I still need to clean up a few things on the wiring.
Cheers,
Rod
|
|
WhitneyK
Active Member

Posts: 492 
Likes: 169
'67 Shasta Compact
Currently Offline
|
Post by WhitneyK on Dec 18, 2021 7:34:22 GMT -8
Good "work around" Rod.
Referring to you video; Have you tested the fan by plugging it in directly to 110V? Motor may be shot?
I would think, if it's like "regular" refrigerators, that the fan comes on with the compressor and not thermostatically controlled.
Just a thought, didn't say it was a good one...
Whitney
|
|
|
|
Post by Teachndad on Dec 18, 2021 7:40:31 GMT -8
Hi Whit,
Thanks for the suggestion to check the fan motor directly. I plugged it in and it's definitely not working. Next step is to be a contortionist and unscrew the legs of the fan from the mounting plate, check contacts and then start to look for a new motor if all else fails.
Thanks
Rod
|
|
|
|
Post by vikx on Dec 18, 2021 13:01:01 GMT -8
I added a new drain tube from the ice tray down. The outlet has a barbed hose fitting with a screened cap to prevent bugs.
|
|
|
|
Post by Teachndad on Dec 25, 2021 11:43:27 GMT -8
Vik, Thanks. What tubing did you use for the new drain tube? Just a section of rubber hose from the hardware store? Was the barbed end 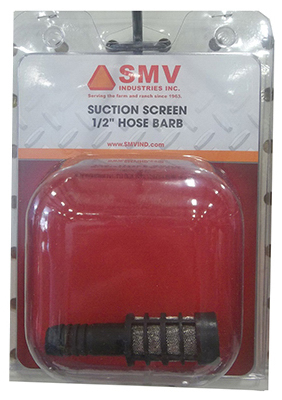 similar to this one. This was found on a website for one of the hardware store chains. Thanks, Rod |
|
|
|
Post by vikx on Jan 8, 2022 11:37:51 GMT -8
Rod, my hose was clear vinyl tubing, 1/2". I wanted to see if the tube was clean or not.
The end I use is a hack and a bit complicated to explain:
1. Buy a hose nozzle with threads on the nose portion. What you are looking for is the screw on plastic protector on the threads.
2. You will need a type of screen to block bugs. I use screened washers for washing machines or cut a piece of metal screen to fit inside the rubber threaded protector.
3. Buy a barb to fit your hose size. The end of the barb should have a male 3/4 hose threads.
4.Screw your screened fitting on and Voila! no bugs in the drain tube...
<a data-flickr-embed="true" href="https://www.flickr.com/photos/53634851@N03/51808218868/in/dateposted-public/" title="Hanson Marvel Fridge (7)"><img src="https://live.staticflickr.com/65535/51808218868_3e827eb062.jpg" width="500" height="375" alt="Hanson Marvel Fridge (7)"></a><script async src="//embedr.flickr.com/assets/client-code.js" charset="utf-8"></script>
You can also make a drain cap by drilling a hole in a solid hose cap for the screen.
|
|
|
|
Post by Teachndad on Jan 8, 2022 17:57:12 GMT -8
Thank you, Vik. That's very clear with the picture and the description.
Cheers,
Rod
|
|
|
|
Post by Teachndad on Jan 29, 2022 21:12:21 GMT -8
The saga continues … I had ordered a fan based on a recommendation on an antique appliance forum. I would later find another forum with better information. Upon unboxing, the motor looked poorly made with what looked like bad orange peel with the paint, lousy looking welds for the cast iron motor body and the screw holes in the mounting supports were poorly drilled. I was worried about durability. Does what is on the outside reflect what is on the inside?  I emailed my concerns. During the next week, I was forwarded to a corporate rep who was willing to work with me. They offered. H e had agreed with my concerns. But communication was really poor on his end. I got a lot of excuses mixed with no responses. I wouldn’t get a response for days and finally I said I wanted to return it. He apologized via text due to all the hassles. Finally, he said, just keep it and we will refund your money acknowledging I had been through a lot already. Well, I figured I would try to install it anyway. I went to the hardware store today and got hex head screws to replace the flat blade screws for the original mount. This would make mounting or removal easier. I added a plug on the end of the wiring. This all takes a while. Come to get it set into the mounting holes on the fridge base and I can’t find a way to insert the motor into it’s placement area. I finally realize that the fan motor casing is almost ¾” longer than the original motor casing. Even if I could fit it in, the fan blades would hit the cooling vanes on the condenser. I just shook my head (”You have got to be kidding!”), packed stuff away and left my shed and went home. I didn’t even curse. I just kept on shaking my head.
For reference, below is and image of the limited space in the compressor compartment. I have to screw down the motor stand blindly and that wire you see traversing the across the top of the picture is in the way. This image was taken by placing my hand into the compartment and turning it 90 degrees. My eye is not behind this. Short of damaging the connections between the compressor and the condenser to insert the motor on it’s stand, there is no way to use this motor. I will try to find a motor that has the same shaft length. If that doesn’t work, I have a fancy ice box and a new paper weight. Rod |
|
|
|
Post by Teachndad on Feb 11, 2022 15:04:16 GMT -8
Hi Friends, Well, I have an update. I found a second vintage appliance forum monitortop.freeforums.net/board/13/vintage-refrigators and finally found someone who actually had experience restoring vintage appliances. Turns out my concerns for a 16 watt motor for this small fridge were valid. I will quote his response below. "Hi Rod. I can say for certain that a modern 16W rated output motor is going to be massively overpowered for that. That is a smaller size Tecumseh compressor similar to what we see in the smaller soft drink coolers. They can be used with a 4W condenser fan motor.
Based on the amp rating of the original motor being 0.31A being just slightly more than the 0.26A rated for the modern 4W motor, and slightly less than a modern 6W motor's 0.4A rating. It seems likely that your original motor was marked based on input wattage versus shaft wattage as with modern ones.
But as said, using the same compressor and what appears to be same condenser on the vintage soft drink coolers, I expect a 4W motor would be plenty."
Now to order one. It should be easier to find the right size when looking for a modern 4 watt unit as they tend to be a little smaller. I will update once the newer smaller capacity unit is installed and tested. Cheers, Rod |
|
|
|
Post by Teachndad on Feb 19, 2022 22:28:17 GMT -8
Hi Friends, So, I ordered the recommended 4 watt motor from the David, the guy on the Monitortop forum. It fit perfectly and is running magnificently. The fan motor turns on and off with the compressor. Touche’. Here is the motor I ordered. It’s a Dayton 4 watt model 4YFJ2. www.zoro.com/dayton-unit-bearing-motor-1185hp-1550-rpm-115v-4yfj2/i/G1405607/ The motor has to be CWLE or Clockwise from the Lead end. Meaning that if you look at the motor from the rear where the wire leads enter the motor housing, then this becomes the lead end, so you want a motor that turns clockwise when looking at the motor from the rear. Should anyone have to do the same repair here is what this all entailed: The condenser and compressor sit on steel base about a square foot in size. It’s screwed to the steel frame of the fridge below the cooling compartment. There are 4 mounting screws and they all need to be removed to allow a little wiggle room for your hand to work around. This allows some adjusting of the position of the base for access. The original screws are flat blade round heads which are very difficult to remove. I used a socket with a flat blade socket head attached to it. One of the screws had to be removed with a set of channel locks. It got stuck. Re-attachment
The fridge must be out of the cabinet for you to do the following. Otherwise access to the rear is impossible. Before I installed the motor, I assembled the original fan blade to the motor and then attached the original motor stand to the new motor using the enclosed 4 hex screws. This became the condenser fan motor assembly. I was still able to navigate around the wire and insert the entire assembly in the gap between the condenser and the compressor. You have to turn this assembly on its side and practice hand gymnastics. In the process, I replaced the mounting screws for the motor stand to the base with hex head bolts so they could more easily be loosened or tightened using a small quarter inch drive socket with an extension. I added a compression washer to each bolt and some grease to the threads to allow for an easier removal in the future if needed a repair. The first two bolts have to be done almost blindly. These are the two to the left when you face the fridge. The second set (to the right) near the right sidewall of the fridge are a pain. It’s easiest and still a pain to reach from the rear of the fridge around the compressor and elevate and twist the socket with extension and finally feel around blindly until you have the hex head within the socket. That’s the "docking" procedure. I had to stretch the motor stand leg a little to line up with the bolt holes in the base. Then tighten. I fully tightened all bolts once I had bolts in all four holes not before. Finally, re-attach the base for the condenser and the compressor to the fridge frame using new hex head mounting bolts. I also added a ground wire here. The new bolt sizes mimic the originals. Cheers, Rod |
|


/Campers/67%20Shasta?preview=2019-02-03+18.01.00.jpg)


