|
|
Post by Teachndad on Aug 20, 2023 13:04:01 GMT -8
Hi Alex, I used a product available at NAPA Autoparts. It's simply called Aluminum Brightener It comes in a 32 oz. spray bottle and a gallon bottle. The spray bottle is a great deal at only $7.99.
I follow the steps to cleaning the windows that Larry does in his window video series 18a - 18e. You can find the links for his window series 18a - 18e here at www.cannedhamtrailers.com/57shasta.htm. I follow his steps as he works them up to a shine after cleaning. He uses a buffer to bring it to a mirror shine. Watch the series. Make sure to wear rubber gloves. Depending on your sensitivity to smells, you might consider a respirator.
I don't have access to a buffer nor do I know how to use one, so I polish with Mother's Mag and aluminum polish or sometimes, I use a tube of Simichrome polish. Member NC camper likes this product.
I hope that helps.
Rod |
|
|
|
Post by Teachndad on Aug 20, 2023 13:22:13 GMT -8
Well, this seems like as good enough time to share what I was working on. Here's the jalousie window I just about finished restoring. I cleaned it up, hand polished, replaced 18 rivets as well as replaced 4 glass holders. Let's not forget replacing the glass retainer disks. 
Just polished frame no glass.  The window still needs a missing glass pane, the pile seal for the sides, and the top and bottom seal. The seals can go in today and the glass goes in tomorrow after I visit the glass shop. Here is the before picture:  After  Cheers, Rod |
|
turbodaddy
1K Member

Posts: 1,086 
Likes: 462
17' 1965 Fan "Sunseeker"
Currently Offline
|
Post by turbodaddy on Aug 20, 2023 19:35:19 GMT -8
Rod, your pics of window frames prompted this post.
I did most of the restoration of our trailer in 2014. There is only one way to park the camper in our driveway and the street-side is facing the south which has made the red (soy based) paint fade and become chalky. The other side looks almost new. Today, I began prepping for a fresh coat of paint and the first thing I did was to remove the squished putty around all of the trim and windows. I was happy to see that most of it was still soft after almost 10 years. Until then it had never occurred to me to go all over the camper to tighten the trim and window screws.
Lesson learned is that obviously the putty compresses over time and therefor the screws need to be tightened.
There were some that did not seat well. Toothpicks and epoxy will be inserted into those loose places to give the screws something to grab on to.
Also worth mentioning is that the Eternabond tape I used to cover screw holes in the roof made by a previous owner is still intact. That saved me a lot of money. I may have to remove and replace it sometime but it sure beats having to replace the entire roof.
|
|
alexrepair
Member

Posts: 34
Likes: 29
1970 Scotsman Model 1500
Currently Offline
|
Post by alexrepair on Aug 31, 2023 23:47:30 GMT -8
First time I stretched the roof skin back, I figure out that the hole for top for roof ventilation didn't fit correctly. It should be 3/8 toward the front. So I stapled the front wrongly/lose. I need somehow to staple correctly at the front. For that I take out all staples and did this: I screwed a 2 by 6 at the appropriate level to two planks. Used three straps to tie the front of the skin to it's place above front windows, stapled, and stretched on back. Now the opening on top for the fan/vent is inline to the right place. Time to place aluminum side pieces. Here is a temporary wooden holder. It holds this long pieses and easyli can be lifted at the right level with angle wooden sticks I kept from the time I did roof rafters from 2X4 wood. Time for the second piece: Have fun to everybody who is restoring trailer right now! How many of you are doing it right now? And have the same project you are involving in. Oh we just switched to month of September 2023? Sorry if I am asking for too much. Alex Whatever you do, work at it with all your heart, as working for the Lord, not for human masters Colossians 3:23-24 NIV
|
|
|
|
Post by Teachndad on Sept 1, 2023 7:09:38 GMT -8
Hi Alex,
I enjoy watching your resourcefulness.
Did the trailer have any insulation in the walls as originally built? If it didn't, and since you added the insulation to the outside of the walls, that would add width to the trailer as originally designed.
Did you build the trailer narrower than original to compensate for the added insulation on the sides?
I might be over thinking this.😁
Cheers,
Rod
|
|
alexrepair
Member
Posts: 34
Likes: 29
1970 Scotsman Model 1500
Currently Offline
|
Post by alexrepair on Sept 1, 2023 20:28:14 GMT -8
Hi Rod,
I made walls 1/2 plywood. Original was 3/8. So the roof, front and back I made 6 millimeter shorter to compensate the difference.
Insulation didn't go straight to the ends corner about an inch, so it makes aluminum sides a little curve at ends.
So far everything is good fit at corners.
|
|
|
|
Post by Teachndad on Sept 12, 2023 5:00:18 GMT -8
|
|
tpcm5000
Junior Member
Posts: 87
Likes: 46
Yellowstone 1966
Currently Offline
|
Post by tpcm5000 on Sept 24, 2023 9:27:22 GMT -8
Chipping away at the Yellowstone. Have not posted updates in a while but had a good before an after pic to share. Flooring is in, we like it. A bit of anxiety making the pattern and doing the cuts, but we got close enough (a bit of trim here and there to hide any mistakes)  . Before:  Untitled Untitled by Tom Myers, on Flickr After:  Untitled Untitled by Tom Myers, on Flickr |
|
|
|
Post by vikx on Sept 24, 2023 12:47:48 GMT -8
Flooring looks great Tom!
|
|
alexrepair
Member
Posts: 34
Likes: 29
1970 Scotsman Model 1500
Currently Offline
|
Post by alexrepair on Sept 25, 2023 22:36:18 GMT -8
Today we started with installation of this 6000 BTU heat pump mini split. After long research this brand is the best fit in our application. First with a small inverter generator and later with all solar. It has only 28 inch wide indoor unit The back right side would be a good place. Something like that I know the clearance on top isn't much enough, but if later we decide to install the second top bed, there will be enough for it to bend back. Mini split will run on low fan setting, therefore this shouldn't be the issue. Now we are working on making the rack for outside unit. We will upload pictures of it lately.
|
|
alexrepair
Member
Posts: 34
Likes: 29
1970 Scotsman Model 1500
Currently Offline
|
Post by alexrepair on Sept 26, 2023 23:26:17 GMT -8
Frame for mini split outside unit and tinted windows: |
|
|
|
Post by Teachndad on Oct 5, 2023 20:33:06 GMT -8
Hi Friends, Not very exciting, but it was progress today with some movement in my carport. I have had my curbside wall leaning up against a house wall due to space constraints where I was working on it. We flipped the curb side wall around 180 degrees. Then, we leaned the street side wall up against the curb side wall. The walls are now "stacked" and oriented in the same direction. I need to replace all the skirt boards as well as most of the rear wing boards on the streetside. I wish I had taken a picture of the interior side of the streetside wall to show most of the edging of the paneling is rotted.  Below shows the space left from removing the old wing boards. I began this repair @8 years ago. 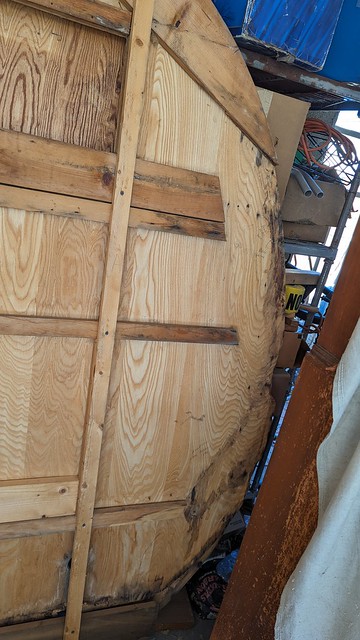 Today, before I flipped the curbside wall, I made a template of the rear wing using 2 scraps of ¼” plywood. I use what I have, LOL. Later, I will connect the two halves of the template to form the complete template and trim the curve line. I plan to use the template to form the rear wing of the street side wall.  The traced rear wing edge on the template is legible when the image is magnified. Click twice on the image to magnify.  Finally, I started planning how to rebuild the wall. It was interesting to note that when the streetside wall was still on the trailer, it had a bulge under the galley window as seen below. 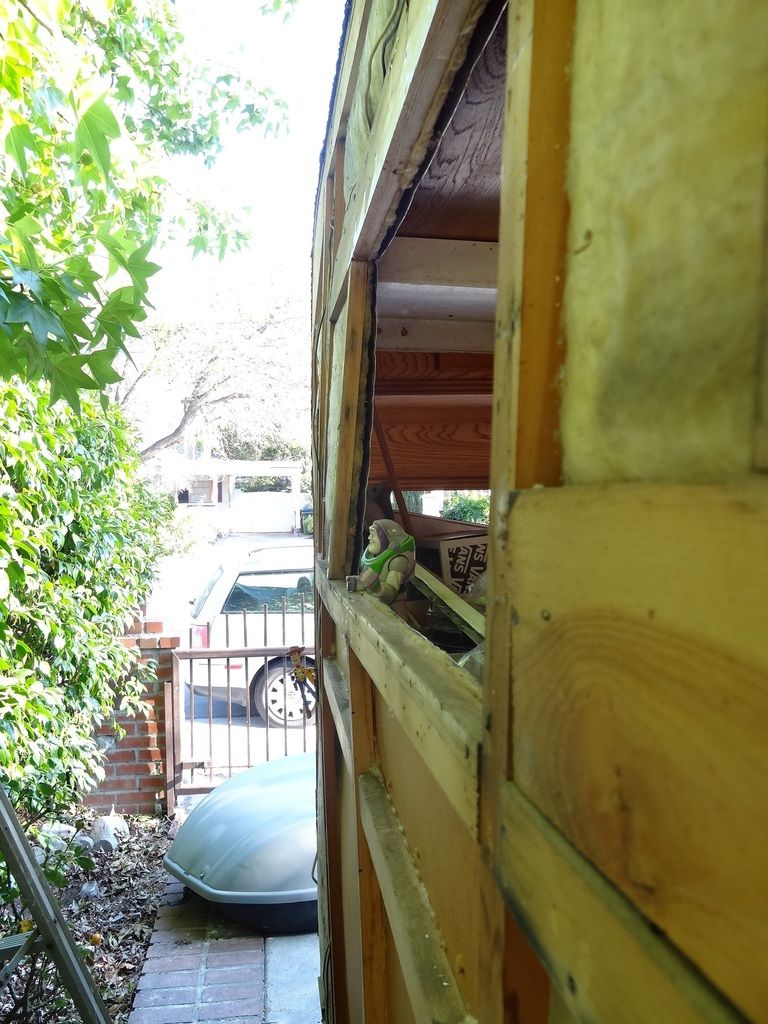 No wonder, because two of the horizontal blocking below the window was unattached to another frame member.  I will be adding replacing some older wood with wider pieces of lumber in some areas for a better grab for the staples at the wall skin mid seam. Observationally, on both my trailer walls, the majority of the boards at the top edge were fine and showed little if any rot. However, the bottom skirtboards on both walls were rotted or disintergrating from water damage and rot. This trailer had evidence of water intrusion from what I perceived to be from a leaking roof vent opening, not the tops of the walls where I would have expected. The original floor Marmoleum was heavily cracked and water staining was present at the base of the cabinets. Cheers, Rod |
|
tpcm5000
Junior Member
Posts: 87
Likes: 46
Yellowstone 1966
Currently Offline
|
Post by tpcm5000 on Feb 27, 2024 13:49:01 GMT -8
Not much to report but got new hubcaps from VTS. In a rush I painted the old ones with por 15, solid but the black was not a good choice and did not even try to remove the por 15 and repaint. I like the chrome anyway.  hubcap 2 hubcap 2 by Tom Myers, on Flickr  hubcap 1 hubcap 1 by Tom Myers, on Flickr |
|
|
|
Post by Teachndad on Mar 2, 2024 8:39:27 GMT -8
Hi Friends, An upcoming 1000 mile camping and mountain biking trip into Southern Utah necessitated a regreasing of the bearings on my 1955 Rod and Reel. It was a good thing I went in. Inner bearing seal was coated with dried grease 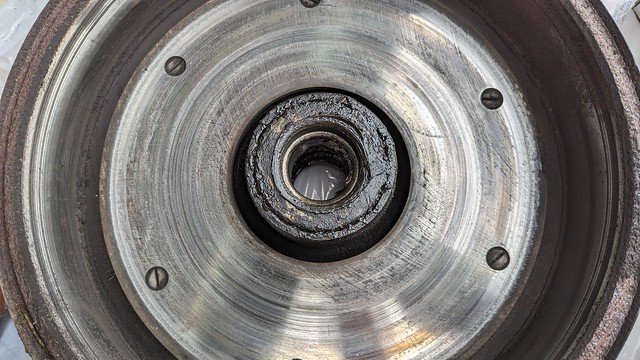
The original felt lined grease seal was present.
 
 Cleaning and regreasing station. Cleaning and regreasing station. The curbside seal came off with my finger. When I pulled off the hub, the grease seal was already halfway off and I hadn’t even pulled the hub against the castle nut. The seal was caked similarly to the streetside seal. However, the color of the grease was darker on this side. Bearings and races looked good. Cheers, Rod |
|


 .
.


 I will be adding replacing some older wood with wider pieces of lumber in some areas for a better grab for the staples at the wall skin mid seam.