matt146
New Member
Posts: 9
Likes: 3
Currently Offline
|
Post by matt146 on Aug 16, 2018 15:32:21 GMT -8
Hi Everyone, I'm a new member and this is my first post. We just bought a 1968 Shasta Compact and I'm digging into the back wall, where there was obvious rot. I already pulled out the rotten section of flooring under the rear bench (the rot was confined to the corners). The previous owner had pulled the paneling off the back wall and attempted some repairs, as you can see. They put in some new 1x2s but it looks like they didn't replace all of the rotten structure, and in fact, the rear corner boards seem to be completely missing. The skin has definitely sagged in the rear some, it is crumpled where it touches the rear bumper supports so it's about 1/2 inch lower than it should be. The 1x2 skirt boards along the bottom of the siding along the back and under the cargo door were rotten, and I've pulled them off. I have new pressure treated 1x2 to replace them, but I can't even put the continuous piece along the bottom back edge because the bumper supports will interfere until I get the sagging fixed. I can pull the bottom edge of the siding back to put this new wood in. The big thing is I want to restore the framework to how it was originally built (or better). Hopefully when I do this the back of the body won't sag any longer. Does anyone have information and photos of what the structure of this model on the back wall should look like? This video shows new corner pieces cut out of what looks like 1x6 or 1x8 lumber: www.youtube.com/watch?v=hJ5i8tm1vEI&t=0s&list=PLOTcQcNU-b0_OcJgQQkkzwdoXj-EHpOvg&index=2The previous owner had an A/C unit in the back window, which probably compounded the sagging problem. Thanks in advance, everyone! I know that's a long-winded introduction. Matt |
|
nccamper
Administrator 
Posts: 7,745 
Likes: 2,872
1962 Forester- 1956 Shasta
Currently Offline
|
Post by nccamper on Aug 17, 2018 4:19:44 GMT -8
Welcome! You’re working from the outside in? “I'm digging into the back wall, where there was obvious rot.” Working from the inside reduced the strength of the corners/walls.
" I have new pressure treated 1x2 to replace them..." As a rule I don't use pressure treated lumber. Aside from the chems off gassing the new chemicals used now can cause decay. That's why new building codes require special flashing and screws.
I added framing.
"The skin has definitely sagged in the rear..." This is the first thing I'd focus on correcting.
|
|
matt146
New Member
Posts: 9
Likes: 3
Currently Offline
|
Post by matt146 on Aug 18, 2018 14:12:19 GMT -8
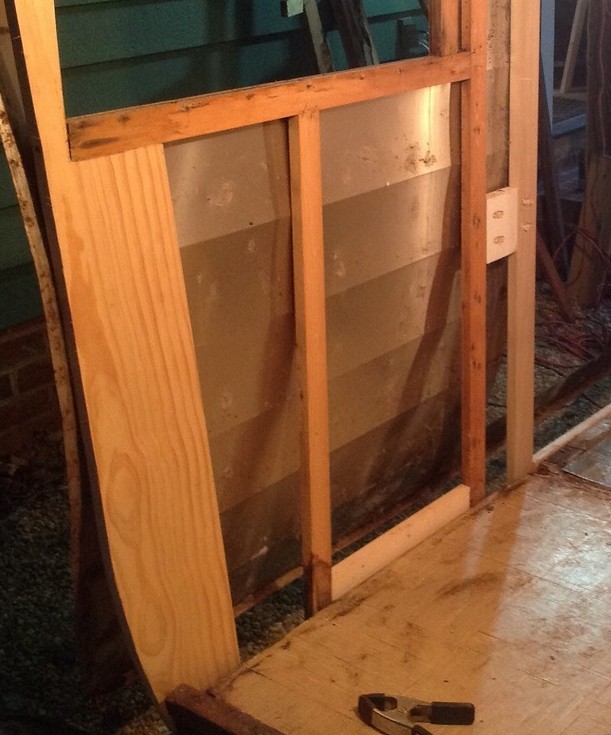
Thanks for the feedback. Here's a photo of the inside back wall: 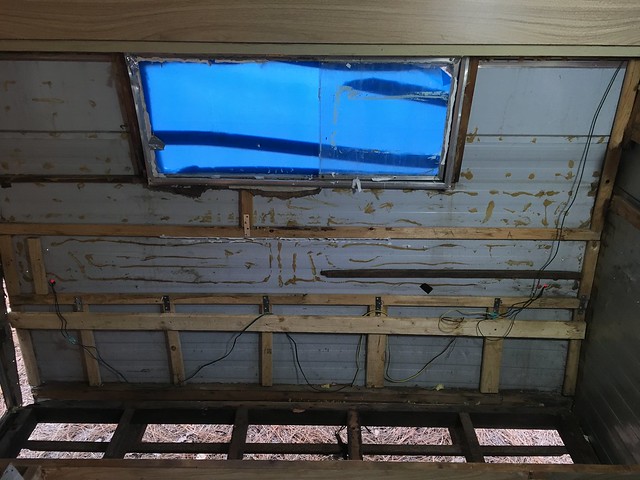
I'm working from the inside because all of the paneling from the rear wall (and the rearmost pieces on the side walls) had already been removed by the previous owner. Also, per your suggestion, I won't use treated lumber. Any ideas on a wood preservative to apply to the new 1x2 skirt board and the underside of the new plywood flooring? A few other questions: Should either skirt board attached to the bottom edge of the rear siding be screwed or bolted into the board at the rear of the frame? There were two skirt boards, a 1x2 at the bottom edge of the siding that was completely rotted (I took it off and will replace it), and a larger board above it, that is in good condition. When I make the new corner boards, I don't have the old ones for a pattern, unfortunately, since the PO removed them. Is the side profile of the rear of this camper just two straight lines with a rounded corner transition? I figure I can pull off one of the J-rails (I'll need to at least pull out the screws that attach them to the new corner board) and use the edge of the siding to trace out the shape on the board. From your 63 Shasta photo, it looks like you used 1x6, so that's what I bought. The outlines of the old rotten wood on the inside of the side siding look like 1x4, but the larger board should be stronger and I can cut to fit where needed. So if I get the new corner boards made and installed along the sides (the J-rails screwed into them) and a 1x2 screwed into these along the back wall to form an 'L', how do I raise the body back to where it should be? I'm having trouble seeing where the sag even is, since the siding seems to line up on the corners, and the bottoms of the skirt boards line up with the bottom of the floor joists and metal frame members. Lastly, it looks like the 1x2s in mine were factory joined with 1" wide x 1/2" tall staples. Air staplers for this size are expensive (~250) and not common. Any ideas on other attachment methods or tools? Thanks, more photos to come, let me know if any particular details will help! |
|
nccamper
Administrator
Posts: 7,745
Likes: 2,872
1962 Forester- 1956 Shasta
Currently Offline
|
Post by nccamper on Aug 18, 2018 15:59:44 GMT -8
The problem you’ll have working from the inside is it’s impossible to restore the overlapping layers recreating the original strength. I bought one with the same kind of hack-job demo done by a previous owner. It makes recreating the framing difficult.
This is another one I had to rebuild the framing so the panels would have something to nail into before the framing was redone.
Any ideas on a wood preservative to apply to the new 1x2 skirt board and the underside of the new plywood flooring?
Most people don’t apply a sealer or paint. Most of the time it’s water leaking down the walls that causes rot. With that said, I have painted the skirt wood when I paint the frame.
Should either skirt board attached to the bottom edge of the rear siding be screwed or bolted into the board at the rear of the frame?
The bottom board is often rotted. That’s the framing piece that should be solid and securely screwed into the framing. I also bolt it in a few places. When that fails, it’s bad…
When I make the new corner boards, I don't have the old ones for a pattern,…
Use the skin as your guide. Leave 3/4 inch for the curving (plywood layered over the panel) and you’ll be fine.
So if I get the new corner boards made and installed along the sides (the J-rails screwed into them)
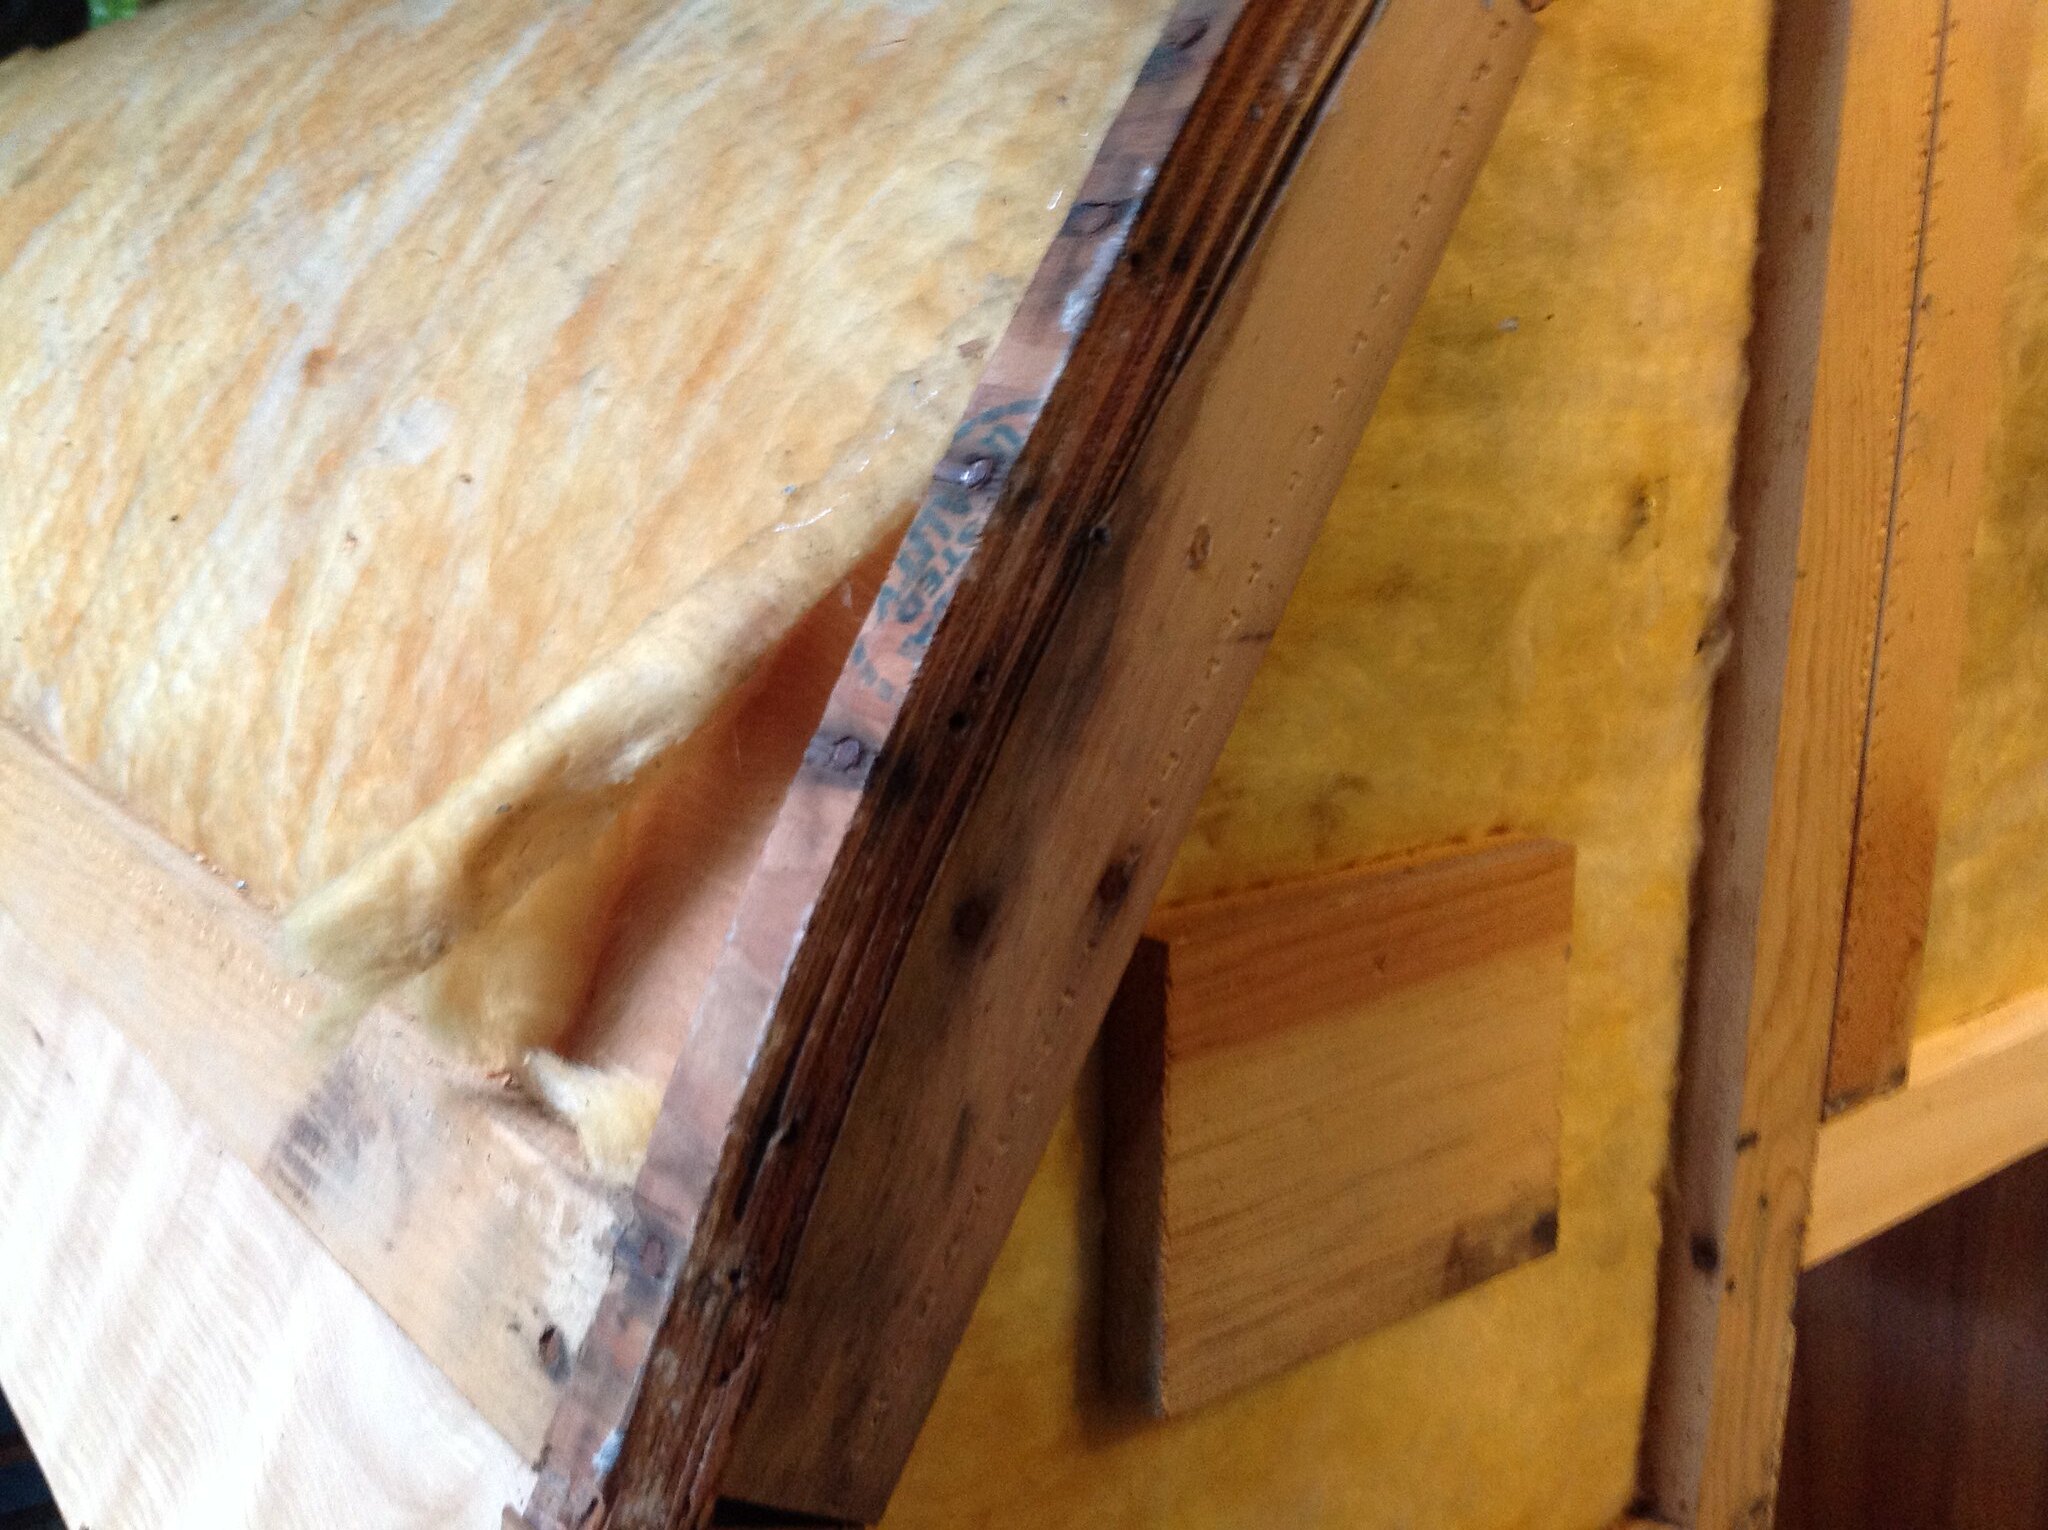
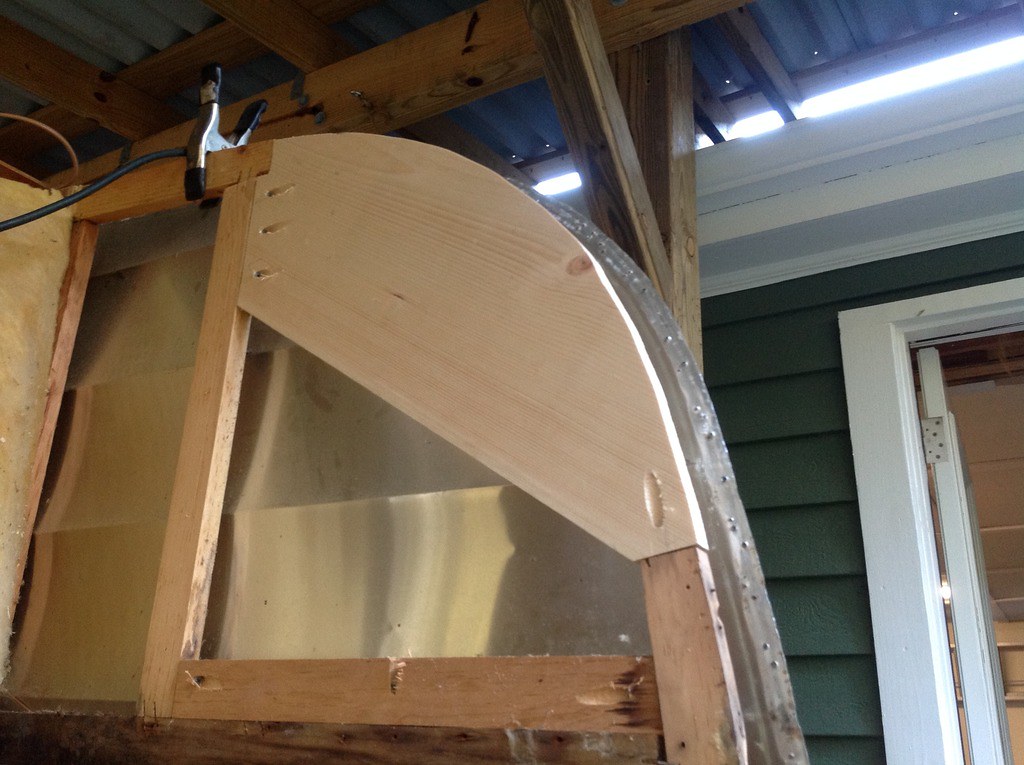
The jrail doesn’t screw into the boards, it screws into the curving (also called curbing or edge wood). Sorry about the photo. It’s the best one I have handy. See the curving to the left?
how do I raise the body back to where it should be? I'm having trouble seeing where the sag even is, since the siding seems to line up on the corners, and the bottoms of the skirt boards line up with the bottom of the floor joists and metal frame members.
IMO, this needs addressed first. If you tie a string at the front corner and pull it back tight at the rear corner, you’ll see where the sag starts. Hopefully that makes sense. Give us photos for more exact suggestions on this issue.
Lastly, it looks like the 1x2s in mine were factory joined with 1" wide x 1/2" tall staples. Air staplers for this size are expensive (~250) and not common. Any ideas on other attachment methods or tools?
|
|
matt146
New Member
Posts: 9
Likes: 3
Currently Offline
|
Post by matt146 on Aug 20, 2018 14:37:40 GMT -8
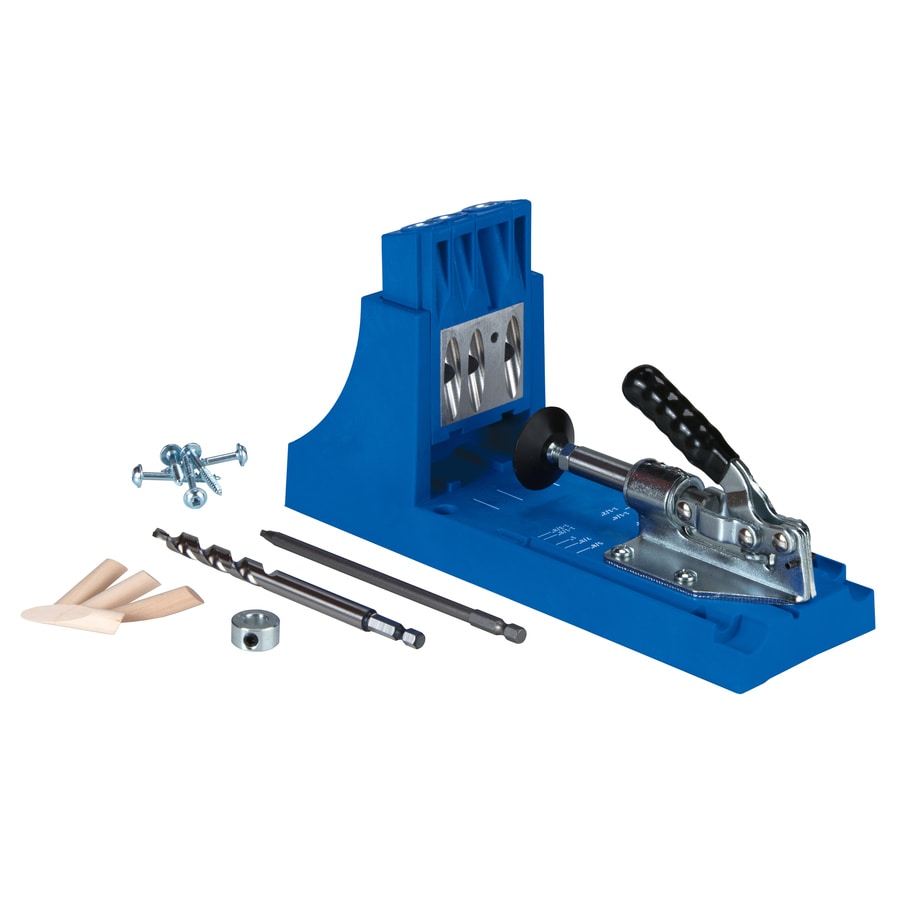
Thanks again for the help. I put some notes on that photo: 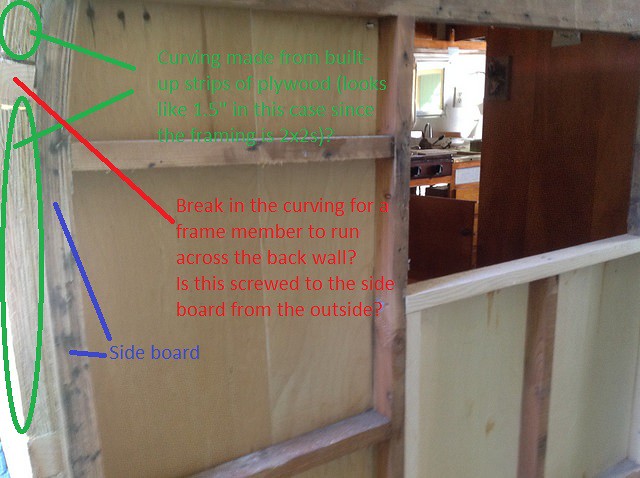 Example Corner w notes Example Corner w notesDo I understand correctly what's going on here? If so, is the curving needed on a more "square" camper like ours? What does it do as opposed to cutting the back edge of the corner board to match to the side siding edge and lining it up? It sounds like having the horizontal boards on the back wall go all the way across and tie into the back of the side boards like your photo shows makes it stronger than tying them into the sides of the side boards using a pocket drill. Like many new vintage camper owners, this is more involved than I thought it would be when we bought it. I do want to do a good job and make it strong, attractive, and not prone to coming apart. I don't mind taking the rear J-rails and window off and lifting up the rear skin to get proper access to the rear structure, but I'd rather not have to take the side skins off. I did buy a two-hole pocket drilling jig and will use it for joining framing boards instead of stapling. It looks like a much stronger method to attach framing together. Thanks, Matt |
|
matt146
New Member
Posts: 9
Likes: 3
Currently Offline
|
Post by matt146 on Aug 20, 2018 17:51:08 GMT -8
I just read this thread, and I think it helps me answer my own question and understand what the curbing is for: vintagetrailertalk.freeforums.net/thread/10061/idea-build-curbing-framing-crazyIt sounds like you run the paneling over the curved corner board, then put the curbing and horizontal boards over the paneling. I missed that in the photo you posted but now that I realize this I think I see the edge of the paneling between the corner board and the curbing. If you did it like I described (without the curbing and attached the paneling on the inside without it overlapping the side walls), the paneling wouldn't be running all the way across the camper and tying the everything together as a structural element. Is that the concept here? Thanks, Matt |
|
nccamper
Administrator
Posts: 7,745
Likes: 2,872
1962 Forester- 1956 Shasta
Currently Offline
|
Post by nccamper on Aug 21, 2018 3:32:39 GMT -8
"If you did it like I described (without the curbing and attached the paneling on the inside without it overlapping the side walls), the paneling wouldn't be running all the way across the camper and tying the everything together as a structural element. Is that the concept here?"
Yes, that's the concept.
The layered system in the marked photo you have above and the one I added below are the same, just heavier on the Forester. The design is strong and also leaves room for insulation. The Forester boards (in blue) are actually made like a boat…all layered plywood. Unbelievably strong. Overkill. Question in red type: yes, these 2x2 framing pieces go across completely and screw into the side boards. This is a modification. The original framing stopped at the curving as you can see in the photo below. It's then toe-nailed into the side board. The framing on my Shasta campers is half as heavy as what’s on the Forester. Both campers are the same size but the Forester weighs 700+ pounds more.
|
|
charliemyers
Active Member

Posts: 181
Likes: 58
Currently Offline
|
Post by charliemyers on Aug 21, 2018 4:50:51 GMT -8
If you did it like I described (without the curbing and attached the paneling on the inside without it overlapping the side walls), the paneling wouldn't be running all the way across the camper and tying the everything together as a structural element. Is that the concept here? YES!!! It really is awesome to see someone come to understand this concept. I'm sorry if that sounded a bit over enthusiastic, but this is a concept that SO many people just do not understand, and they'll argue til they're blue in the face that there's nothing wrong with replacing those panels from the inside. Unfortunately repairing from the inside is what you see in about 95% of the posts on Facebook. I'll admit that when I bought my first vintage canned ham, my wife and I both were prepared to gut & repair/fix from the inside. After all, that's how everyone was doing it so it had to be right. But in my research I ran into mobiltec's YouTube videos condemning the "inside" approach and showing the right way to rebuild these campers. After that I spent nearly a full year studying these things before arriving at the conclusion that you just came to (obviously you're much sharper than I am!). But if I did anything right at all it was NOT removing a single screw from my camper until I worked that all out. |
|
matt146
New Member
Posts: 9
Likes: 3
Currently Offline
|
Post by matt146 on Aug 21, 2018 17:17:19 GMT -8
Thanks both of you for helping me think through these concepts. I feel like now I can get started and lift off the back skin. I'll keep you posted!
Matt
|
|
theresa
1K Member
 from Northern Maine ~ Proud new owner of Lola, a 1960 Shasta Airflyte and Pearl, a 1962 Mobile Scout
Posts: 1,055 
Likes: 347
Currently Offline
|
Post by theresa on Aug 22, 2018 6:04:26 GMT -8
Let's all raise our hands to the sky and yell Hallelujah! Though the concept of working from the outside in is explained on a daily basis both in here and on other forums and Facebook groups, few rarely get it, and lots blatantly dismiss it by saying "I know others who've done it successfully", or "my husband's a carpenter, he can do it" or "I don't have the space" or "It's not bad, I just need a quick fix", or "To each their own".... or a number of other proclamations to get out of doing it the right way.
|
|
matt146
New Member
Posts: 9
Likes: 3
Currently Offline
|
Post by matt146 on Aug 23, 2018 15:12:37 GMT -8
Hey Everyone, I have another question (probably not my last!): Does the paneling on the back wall go all the way down to the bottom of the skirt board on the rear wall and get sandwiched between the skirt board and the back of the frame? If not, does it stop at the top of the skirt board or flooring?
Thanks,
Matt
|
|
nccamper
Administrator
Posts: 7,745
Likes: 2,872
1962 Forester- 1956 Shasta
Currently Offline
|
Post by nccamper on Aug 23, 2018 17:53:20 GMT -8
It goes between the framing and sill.
Sort of a wall sandwich.
|
|
|
|
Post by Teachndad on Aug 25, 2018 5:49:54 GMT -8
Hi Friends,
I have to applaud NCCamper's efforts to answer all the questions in this thread. Amazing!
If he hasn't heard it enough, THANK YOU for taking the time and effort to help out. Your patience in tutelage is exemplary. I really liked how much time and effort went in to post #3 as an example.
Awesome!
Cheers,
Rod
|
|
matt146
New Member
Posts: 9
Likes: 3
Currently Offline
|
Post by matt146 on Aug 25, 2018 18:46:40 GMT -8
So, today I pulled the rear skin off, built and installed new corner boards, and installed new rear wall paneling. Next I want to build the framing for the back wall the way it was originally (before the PO modified it). What do you think about this? 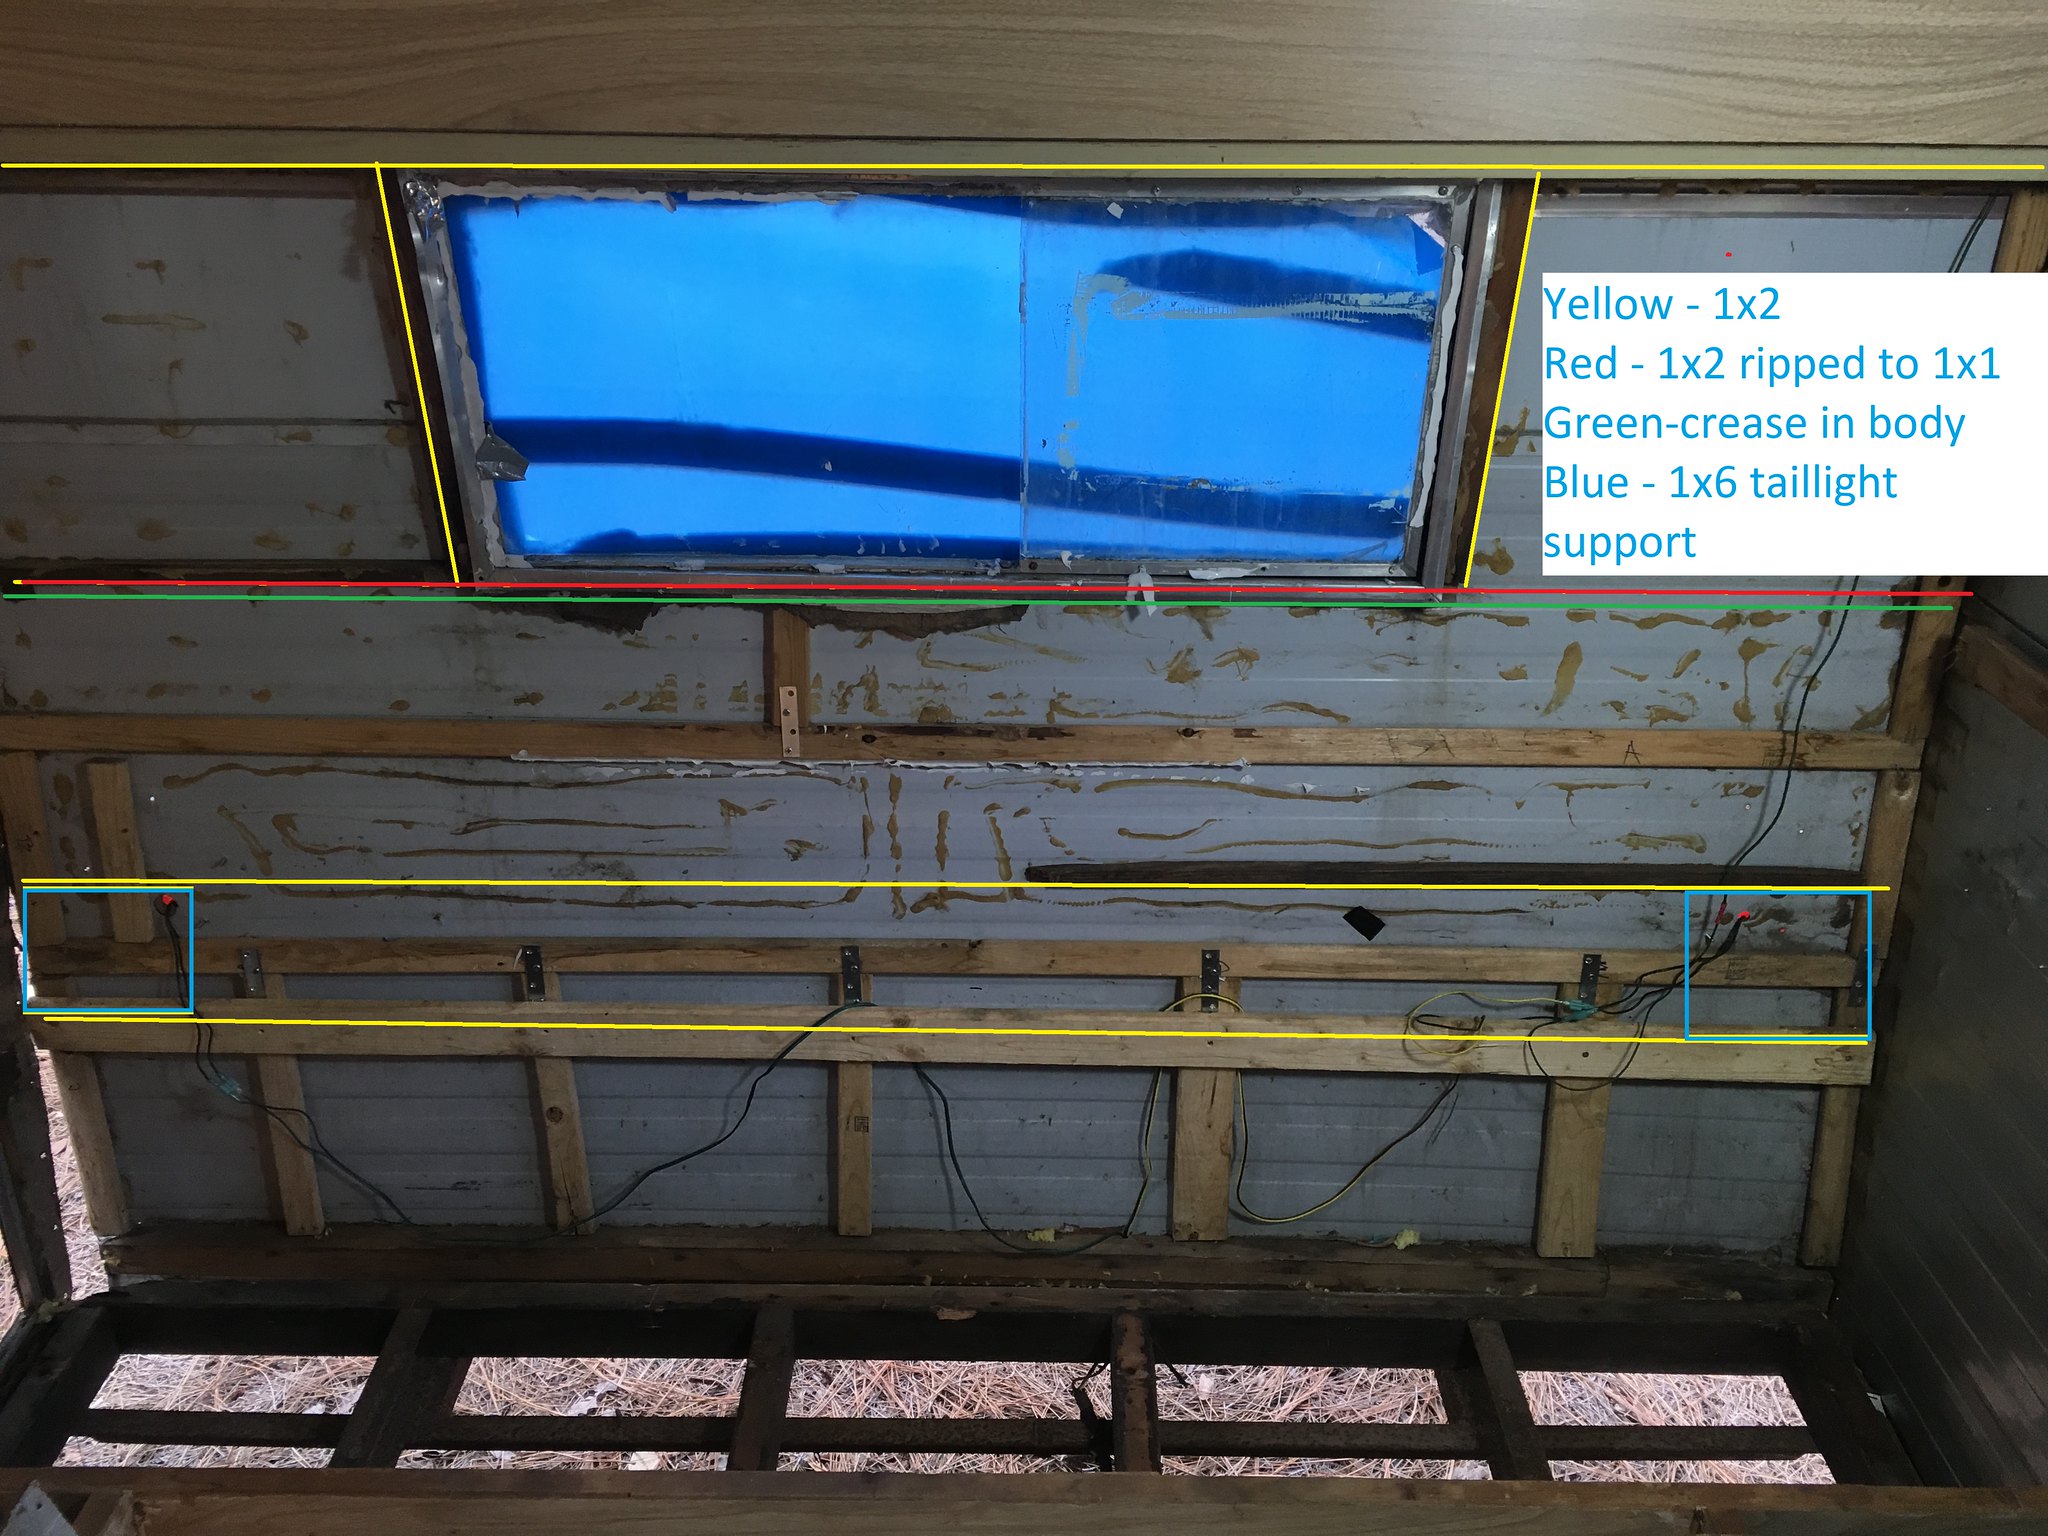
This is based on the remnants of the original structure that I could still see and a video of a Compact that showed the rebuilt rear wall. The horizontal 1x2s will be tied to the edge of the new corner boards and curbing strips will fill in the rest of the corner board edge space. The lowest 1x2 will be at about the level of the bench/bed with a board or aluminum L angle to support the back of the bench. Thanks to NCCamper and everyone else who's helped me out! Matt ![]() |
|
nccamper
Administrator
Posts: 7,745
Likes: 2,872
1962 Forester- 1956 Shasta
Currently Offline
|
Post by nccamper on Aug 26, 2018 17:52:36 GMT -8
Why cut the framing under the window to a 1x1? It has always been 1x2" on my shastas.
I always beef up the bed framing with a few support from frame to floor. We usually leave the bed fixed with a real mattress. --
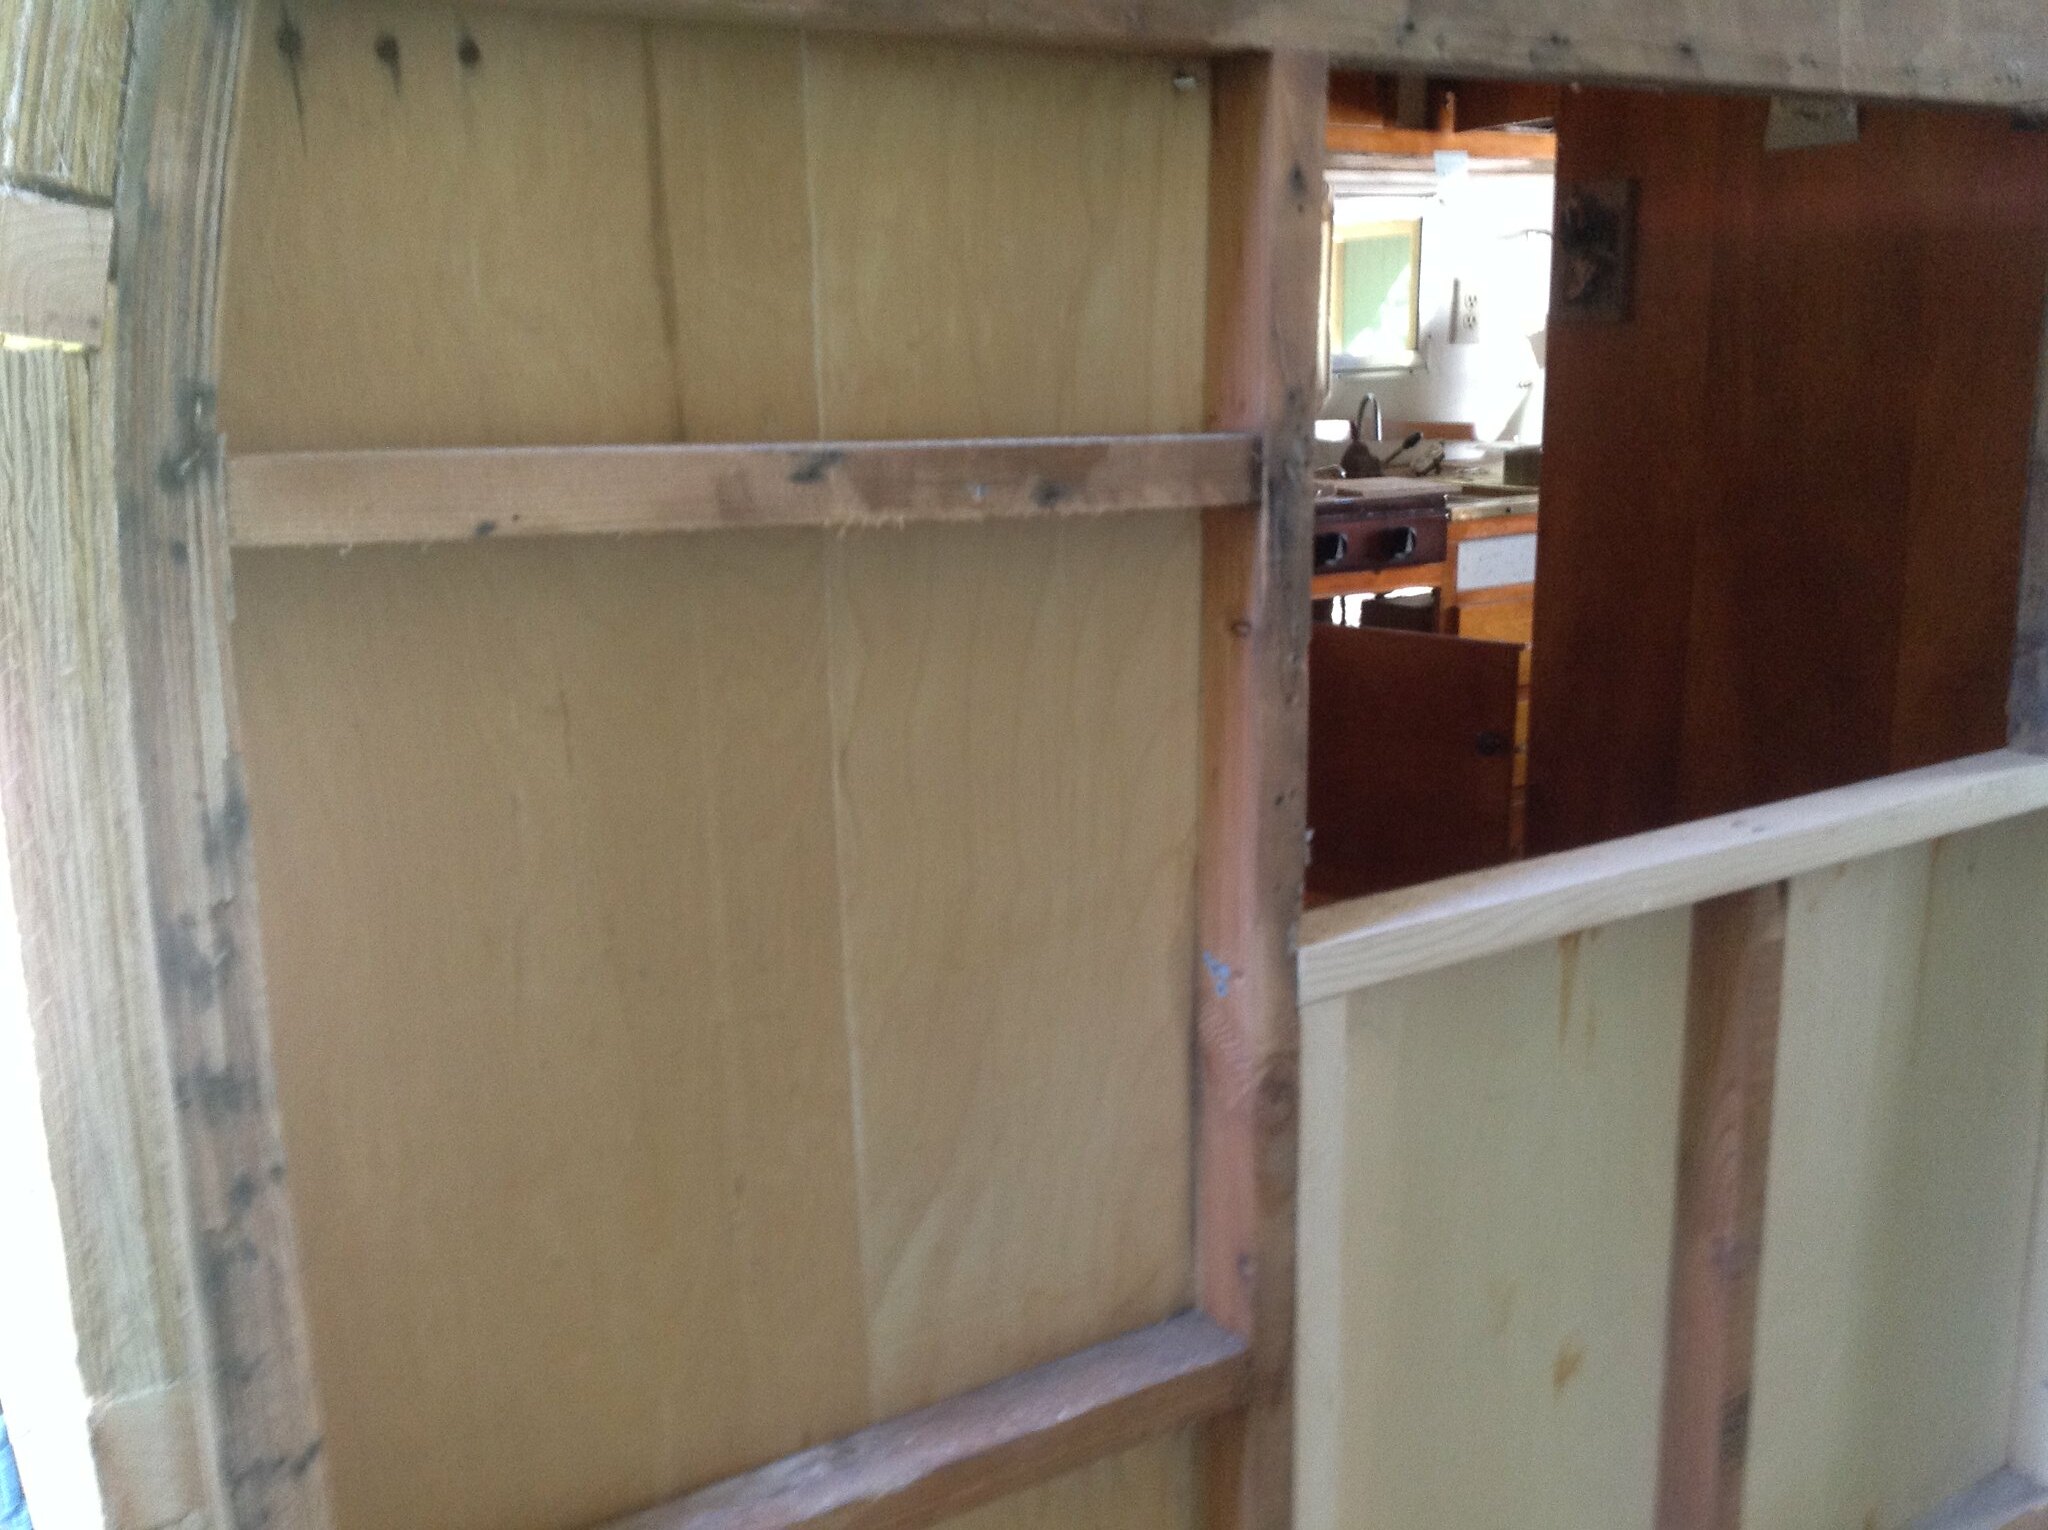
In an earlier post you asked about the panel being sandwiched between wood frame and outer wall framing. This is fairly easy if doing one section at a time. Once the panel slides in place everything gets screwed together. I did a section today.
 Untitled Untitled
|
|