Dad Rambles
Active Member

Posts: 246 
Likes: 140
62 Shasta Airflyte
Currently Offline
|
Post by Dad Rambles on Aug 20, 2017 17:28:53 GMT -8
I saw that post too... What I don't understand about every person who guts the interior of a trailer, is why none of them ever notice that the trailer does not end at the inside walls. Don't any of them ever stop and think about the parts under the floor, the sag at the front, the soft spots, the panels splitting at the back corners? Their mind set is "If you can't see it, it does not exist". Last week a guy on Facebook posted a photo of the back corner of his trailer. He said "This piece has bulged out, how do I pull the two sides back together to seal it"... meanwhile you could see through the gapping hole that the inner framing had collapsed into a jumbled pile of rotted wood and was bulging out at that point. Seriously... "Just close the gap and it doesn't exist"... I think it's reflective of the way people live now. They don't want to deal with realities, and they want easy answers. So many people have dropped by our shop to see the trailer and asked "Isn't it done yet?" ... Some have watched me work, one piece at a time, slow relax mode... they just shake their heads and say "I couldn't do that"... I guess we have lost something in the character department, that our grandparents understood. I guess should change my name to Noah... and name the trailer "The Ark"..lol Ha. ha.. Yeah, I saw that post last week too. I did like I do many times, typed up a LONG post about how the issue they are looking at is not the REAL issue. Then i deleted it and went on about my day. I figured WHY? At the end of they day they are just going to cover up the issue anyways by forcing things back together and painting the heck out of it. I think we take for granted that most people don't look at things from a "why is it built that way" point of view, and thus "why / how should I take it apart". They cut first, and then worry about putting it back together later. Such is the mentality of "well, it's demo day". Let's rip the entire inside out (because it looks like crap), not thinking at all about what repercussions that has on the future steps or what is the right way to do it. Having said all that I don't have any claim to know what I'm doing, BUT I do give it more thought than most, and I like to think I can figure out just about anything. Not only how to do it, but how is the logical way to do it. I do believe you are on to something. People just want a trailer, the don't want to repair it (which is half the fun for me), for which there are very few easy answers. @dadrhodes I do the same thing. Usually when I see a comment from someone on here, I keep trucking...I figure 1 prophet spewing the truth is enough. lol. |
|
Dad Rambles
Active Member
Posts: 246
Likes: 140
62 Shasta Airflyte
Currently Offline
|
Post by Dad Rambles on Aug 18, 2017 20:13:14 GMT -8
Because I had to share with those that would appreciate it... This was posted on one of the Facebook groups earlier. I know this horse had been beaten, but I swear... Facebook is killing me. I can't watch. This is after the ceiling had been "ripped out".  |
|
Dad Rambles
Active Member
Posts: 246
Likes: 140
62 Shasta Airflyte
Currently Offline
|
Post by Dad Rambles on Jun 29, 2017 9:37:19 GMT -8
Sorry, y'all I didn't meant to abandon this thread. I've been checking back periodically to read the responses. I've been tied up trying to finish my mom/dad's teardrop before a 2 week camping trip next month.
AND>>> I don't think we've gone more than 2 days in the last month without some sort of rain, so painting hasn't exactly been doable. I'm hoping I can figure out an indoor place to take it (close to home) to paint it... just haven't come up with that yet.
I'm leaning now to removing it. When I originally mentioned before/after, I hadn't considered taping it, I was just going to paint it with the camper scheme if I put it on first.
Anyways, as always, thanks for all the input!
|
|
Dad Rambles
Active Member
Posts: 246
Likes: 140
62 Shasta Airflyte
Currently Offline
|
Post by Dad Rambles on Jun 16, 2017 4:06:09 GMT -8
So, I know this sound like a dumb question, but I am having the toughest time deciding on this. I have seen it done both ways. The rail put on and then painted, and the rail put on after paint (either polished or mill finished). '62 Shasta
I just can't decide which is better. I have a few screws reinstalled in my top (awning) rail (prior to painting), but am now debating on if I want it painted or not.
The main things are this:
Rail up before paint:
1. Trimming the putty tape, it is going to look right where the putty tape is painted along the outside edge? Is that going to flake off later and look like crap?
2. What If i remove the rail to retape later on? I'm thinking the paint is going to crack and not go back together correctly.?
Rail up after paint:
1. My rail is in good shape, but not perfect. I don't know that I can get it looking as good as I want to.
Maybe I am just worrying about this/ being too anal about it. I tend to do that... especially about the trim and others details that notice on trailers.
Thoughts from the group? Good/bad experiences from either approach?
|
|
Dad Rambles
Active Member
Posts: 246
Likes: 140
62 Shasta Airflyte
Currently Offline
|
Post by Dad Rambles on Jun 11, 2017 18:43:36 GMT -8
I haven't posted much on my timeline here lately. Here a video I did yesterday of the polishing process I used on the stripe on the shasta. I am pretty happy with the results. order="0" allowfullscreen></iframe> Really nice shine. One thing worth mentioning...if the wheel spatters any polish the paint won't stick so it needs cleaned above and below, then cleaned again. I do the Z stripe by hand because it's easier for me to control where the polish lands. Although your way looks much faster and the shine speaks for itself. Your camper is going to look great. Thank you. I'm hoping the hard work pays off and the paint job turns out like I have envisioned. I think it will.... I will be sure to get it real clean. I still don't know if I'm going to go over it the final time with, acetone, denatured alcohol, or prep sol? |
|
Dad Rambles
Active Member
Posts: 246
Likes: 140
62 Shasta Airflyte
Currently Offline
|
Post by Dad Rambles on Jun 11, 2017 5:07:48 GMT -8
...I can't imagine how folks like nccamper strip whole trailers. With that said, after buying all new skin for the Forester I may never strip a camper again. For $2000 you save 100+ hours of work, $200 of stripper/materials and turning the backyard into a Chem-Bath. I told my wife the exact same thing yesterday, when I came inside soaking wet from the work we were doing. She said.. "the next one"  As if she thinks there won't EVENTUALLY be a next one  I saw your camping photos in the other post. That REALLY turned out looking great. Awesome work! |
|
Dad Rambles
Active Member
Posts: 246
Likes: 140
62 Shasta Airflyte
Currently Offline
|
Post by Dad Rambles on Jun 11, 2017 5:00:44 GMT -8
I haven't posted much on my timeline here lately. Here a video I did yesterday of the polishing process I used on the stripe on the shasta. I am pretty happy with the results.
<iframe width="560" height="315" src="https://www.youtube.com/embed/1Ht5JOPjiqg" frameborder="0" allowfullscreen></iframe>
|
|
Dad Rambles
Active Member
Posts: 246
Likes: 140
62 Shasta Airflyte
Currently Offline
|
Post by Dad Rambles on Jun 10, 2017 18:57:20 GMT -8
It seems like I have been at a standstill with things lately, but I'm SLOOWWWWLY creaping towards prepping the outside for paint. My dad came over today and we worked for 3-4 hours on the outside. It basically looks like we did nothing, but we did work.. I promise. 1. I figured out how to polish the Z stripe (and made a video of it that will be up tomorrow). Got this done on the first and curb side.  2. We cleaned up the putty tape and flattened out the fold over a bit along the top on both sides. 3. We cleaned up the putty tape some more, and pretty much have the edge free of any "gunk". 4. We installed the awning rail, and finished up for the day. All in all the prep work on the outside is killing me..... but it's getting done. I think another couple of days and we will have the outside to the "final wipe down" stage. I do think I'm going to finish the windows before we paint it though. I don't want to have to tarp it after we paint it... in fact, I can't. I don't have a good way to hold the tarp off so as not to scratch the paint. SO. I want to have the windows ready to pop back in once the paint dries. So, I guess once the prep work is complete, we will work on those. Not to mention we found out a few weeks ago, that the camper just got a little smaller....  |
|
Dad Rambles
Active Member
Posts: 246
Likes: 140
62 Shasta Airflyte
Currently Offline
|
Post by Dad Rambles on Jun 6, 2017 10:16:39 GMT -8
I'm glad you posted this. I guess I hadn't thought about it that much... and I was just starting mine. It was previsously replace, so I don't have the original countertop material or board.
I don't have pics now, but I will try and grab some tomorrow.
I just cut the hole out for the sink, the same size as would fit the metal ring tightly. My plan was to screw the sink to the bottom side of the plywood (3/4). The sink has 4 holes, 1 in each corner.
I didn't even think of there being a sandwich of the sink sitting in a piece and having a piece on top... hum.. maybe mine was originally that way ?
|
|
Dad Rambles
Active Member
Posts: 246
Likes: 140
62 Shasta Airflyte
Currently Offline
|
Post by Dad Rambles on May 25, 2017 11:42:08 GMT -8
Go here www.cannedhamtrailers.com/and watch all of his repair videos for the shasta and the deville, then.... Do like I did, and go outside, 2 times a day, every day for a week, and see how your trailer relates to the shasta and the deville. THEN: Watch them again! No seriously though, Mobiltec (the link above) has great videos on the restoration process. I would start with that, and then take a few photos of what you have and post them here. Here is a tutorial on how to post photos from a photo hosting service (Free), such as flickr vintagetrailertalk.freeforums.net/thread/7276/add-photos-hosted-flickr-tutorialMost importantly DO NOT just start tearing things apart (his videos will explain why this is important). Good luck and excited to see photos of your upcoming project! |
|
Dad Rambles
Active Member
Posts: 246
Likes: 140
62 Shasta Airflyte
Currently Offline
|
Post by Dad Rambles on May 21, 2017 9:13:27 GMT -8
I have been on the road for the last week or so with my day job and haven't had any time to work on things. BUT Right before I left I picked up the paint (there's a long but fruitful story behind this), and the trim (for the counter) from big orange came in the mail. I was hoping to get things ready to paint over the memorial day weekend, but that's looking slim at this point. Like they all say, the prep work for painting is here it's at... Endless!   |
|
Dad Rambles
Active Member
Posts: 246
Likes: 140
62 Shasta Airflyte
Currently Offline
|
Post by Dad Rambles on May 7, 2017 16:34:09 GMT -8
Hey danrhodes, We used Tractor Supply's soy based tractor paint, applied with foam rollers 3 years ago. Except for the fact that for some reason red paint of any manufacture seems to dull in time...it still looks great. The camper is parked with street side facing south and west, and the red paint has faded. We are on Cape Cod with lots of salty air and dampness. Usually a coat of wax brings it back pretty well. It isn't showroom quality, but fresh and clean, and we don't worry so much about scratches and dings from boondocking. Do you have any photos? I have a sprayer but am seriously considering using foam rollers just to make it easier on myself. I am a bit timid about using this trailer as my first time with the sprayer. There is a video on YouTube put out by a guy from Eastwood. I have watched it a couple times. He go s over everything, but really focuses on the technique of spraying. I really feel like I learned a lot from it. He explained how to find the right distance from the thing you are panting. And why you should paint every thing as if it's a box, ignoring seams and openings and such. |
|
Dad Rambles
Active Member
Posts: 246
Likes: 140
62 Shasta Airflyte
Currently Offline
|
Post by Dad Rambles on May 7, 2017 4:45:31 GMT -8
I had a good bit of time yesterday to work on things. Mainly focused on the rest of the outside prep for pain. I still hadn't gotten the door hung. I was trying to figure out the trim, as I had one piece I needed to fabricate (the threshold) I made it, and then put the side in place, reattached the hinge, and hung the door. 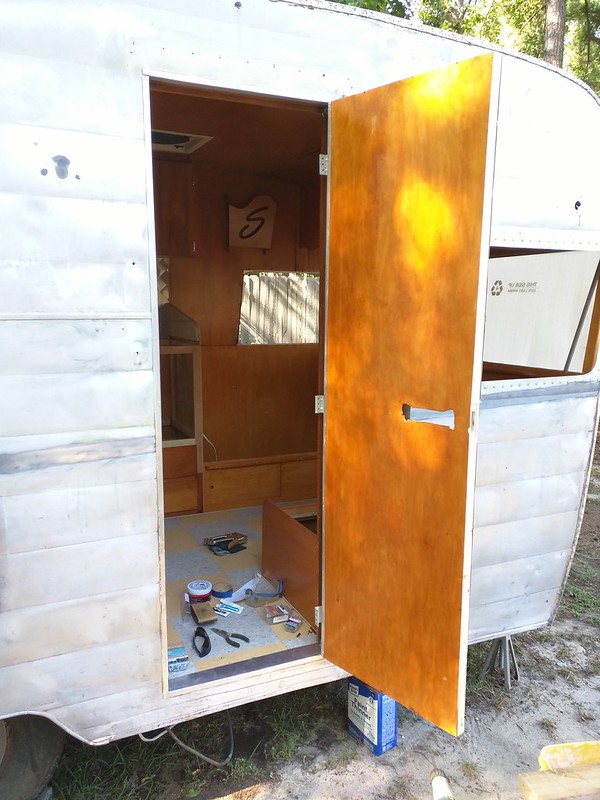 IMG_20170506_165536 IMG_20170506_165536 by gunguy05, on Flickr 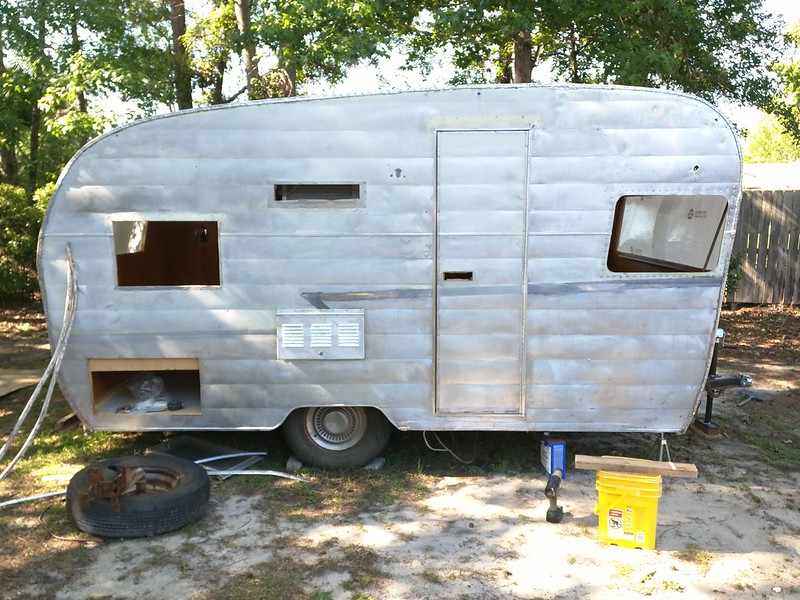 IMG_20170506_165520 IMG_20170506_165520 by gunguy05, on Flickr Next was the daunting task of cutting another big hole in the side for the AC vent. I've been putting this off thinking that I could come up with a better location for the AC. I cant, so off to cut the hole I go. 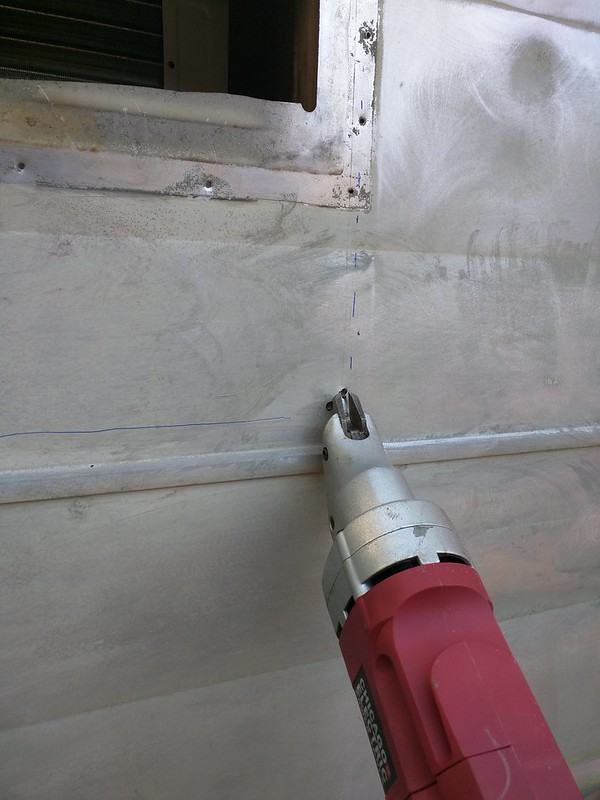 IMG_20170506_173257 IMG_20170506_173257 by gunguy05, on Flickr 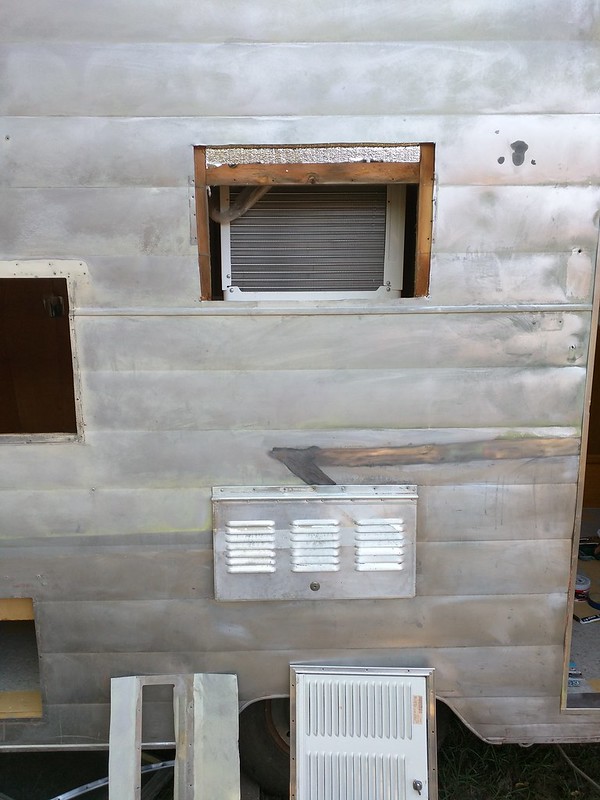 IMG_20170506_173749 IMG_20170506_173749 by gunguy05, on Flickr I don't have to cut through the entire framing members to get this to fit, since the vent is only about 5/8 thick. So, I decided to route out that area to about 5/8 leaving as much support as possible in that area since there is a lot of weight and roof support going on right there. Problem was, I left my router at my folks house, so I had to quit for the day. Going to try and get that this afternoon, route that out, and put in the vent.... At least that's my plan. |
|
Dad Rambles
Active Member
Posts: 246
Likes: 140
62 Shasta Airflyte
Currently Offline
|
Post by Dad Rambles on May 6, 2017 21:14:18 GMT -8
If you are going to do it in full sheet size sections, I would say yes. I have seen teardrops built that way, with the "cookie cutter" middles sections removed, and filled with 3/4 foam insluation. If you are talking about ripping downs and making 1x2, 1x3, and 1x4 pieces of plywood, and then piecing it together, I would say no. Too much work, and too many joints, pocket screws/glue etc. I know the originals barely had any touching joints and many didn't, they were just attached to the inside wall panels. BUT I want to make mine better than the original. Just my preference, and how I look at it as a whole. Lots of work.
|
|
Dad Rambles
Active Member
Posts: 246
Likes: 140
62 Shasta Airflyte
Currently Offline
|
Post by Dad Rambles on May 6, 2017 5:55:32 GMT -8
I can only speak of my torsion axle that I installed on my teardrop(ish) camper that I built. (Its about 2K lb loaded).
BUT I LOVE IT.
Rides like a dream. You get a fully independent flexing of each side (wheel) of the trailer in relation to the static weight of the body. Bumps are taken well, and I couldn't be happier.
As far as durability, I only have about 12K miles on my trailer/axle, so all I can say is "so far so good".
As far as ride height, the torflex (Dexter) is non adjustable, and must be ordered with the angle (ride height). 0, 12.5, 22.5 etc + or - depending on if you want a drop or rise above the mounting plate. I think I paid about 300 shipped for one of these that was 6' outside bracket measurements.
The Flexride axles (by Universal) are adjustable in that you can take the spindle arm off and adjust the ride height. (these cost a little more). I think a simlar was about 400 or so to fit my trailer.
There may be other brands, but these are the two main ones that I have seen while researching the topic.
|
|


 As if she thinks there won't EVENTUALLY be a next one
