


Post by handkey on Aug 13, 2017 15:16:39 GMT -8
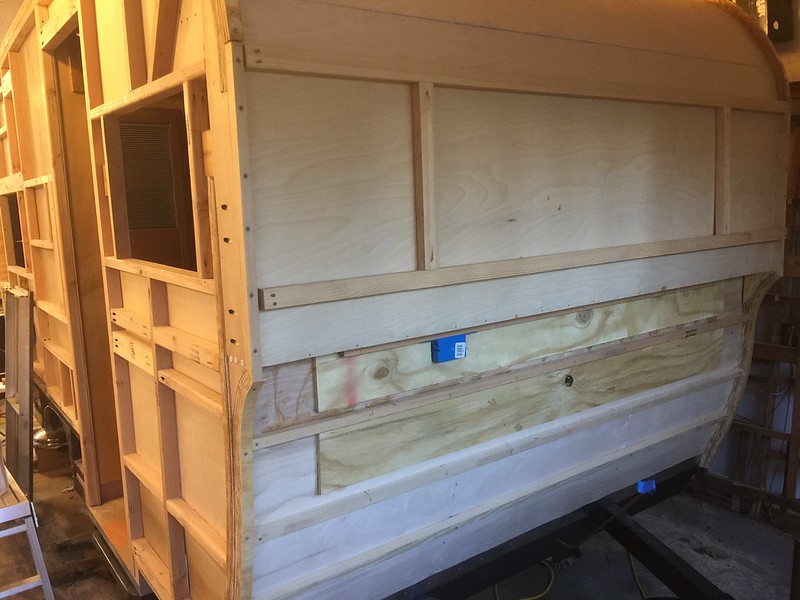
Decided to create a new thread as its been over 90 days since Ive hammered on the Vintage trailer talk keyboard. I sold this trailer while I was trying to sell my 1964 Forester model 14. I wanted to show the prospective buyers what the framing work looked like before the insulation and skin when on etc. The husband liked what he saw and the wife really liked the color scheme of the one I was still working on. So They bought it. It took my 90 days to finish. I prepped this trailer for rooftop air with oversize rafters clad in .030 aluminum c channel, 12 ga wire feed and a separate fuse box. In the end they chose a window AC unit that I hid under the Davano. It slides out and is exposed like a regular window unit should be. This in itself became an extensive modification that Im not going to get into with this thread!
Streetside view
 Campurist Model 14 Forester 1968 curb by Campurist, on Flickr
Curbside view with new owners tow vehicle
 IMG_8251 by Campurist, on Flickr
AC unit deployed
 IMG_8167 Campurist Model 14 Forester by Campurist, on Flickr
Front view with "ghost image of Forester Logo
 IMG_8172 Campurist Model 14 Forester by Campurist, on Flickr
New super sized luggage door.
 Campurist Model 14 Forester by Campurist, on Flickr
Lower curbside detail. this 68 is trimmed out like a 64 with J rail inverted and run along the bottom. It also uses the period correct heavy duty edge guard for the wheel well trim
 Campurist Model 14 Forester by Campurist, on Flickr
Topside of the curbside. I really like the texture of the door playing of the smoothness of the siding and all those screws!
 IMG_8159 Campurist Model 14 Forester by Campurist, on Flickr
Texture!
 IMG_8048 Campurist Model 14 Forester by Campurist, on Flickr
Going inside
The interior was taken back to a 1964 look with the brass screw fist nails, smooth amber birch and birch trim.
 IMG_8187 by Campurist, on Flickr
The dark vinyl wood grain was replaced with retro betty laminate and trimmed with aluminum nose facing instead of the brown rubber.
 IMG_8229 Campurist Model 14 Forester by Campurist, on Flickr
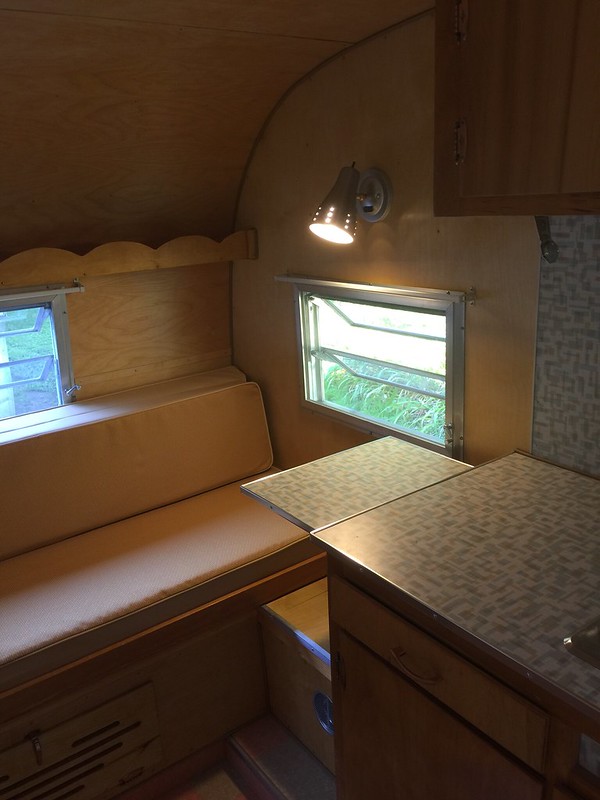
Gas light gets its fuel from all new lines and two stage regulator.
 IMG_8190 by Campurist, on Flickr
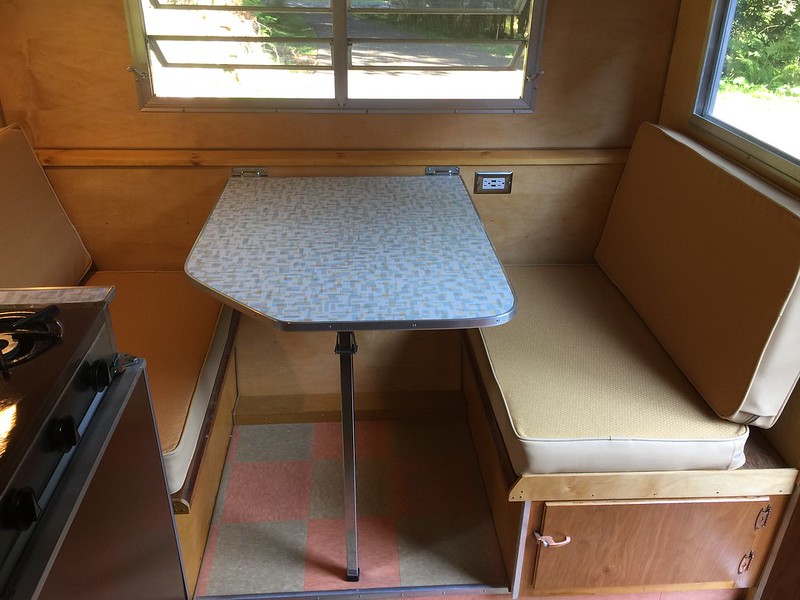
Tiles cut to original 9x9. plastic edge guards replaced with extruded aluminum corners
 IMG_8239 Campurist Model 14 Forester by Campurist, on Flickr
cushions upholstered to match 1964 style with fabric over vinyl , vinyl piping with access zippers.
 IMG_8231 Campurist Model 14 Forester by Campurist, on Flickr
Original hydro flame heater tucked around the corner with the cover of an older heater visible in the entry.
 Untitled by Campurist, on Flickr
A piano hinge allows access to a deep pantry, wine/liquor cabinet.
 IMG_8242 Campurist Model 14 Forester by Campurist, on Flickr
upper kitchen cabinets
 IMG_8225 Campurist Model 14 Forester by Campurist, on Flickr
original fusebox with added AC fuse box with on/ off switch
 IMG_8227 Campurist Model 14 Forester by Campurist, on Flickr
I modified an older stovetop to fit the space by installing the trim surround from a "newer" stove. There are certain things inside a trailer that give visual cues to the trailers age and a stove is one of them. I want to remove any hints that this camper was a 1968. I didn't make it look like 1950, but felt I could shave a few years off !
 IMG_8224 Campurist Model 14 Forester by Campurist, on Flickr
Davano area with "new" period correct writing desk deployed
 IMG_8222 Campurist Model 14 Forester by Campurist, on Flickr
Davano area you can see to the left, a vent for the AC. The Davano access door has been slotted to allow the Hidden AC unit
to inhale the from the interior.
 IMG_8211 by Campurist, on Flickr
The AC unit does not impinge on the storage space beyond the left side of the Davano
 IMG_8213 by Campurist, on Flickr
The trailer originaly had the old three blade shore power inlet. As the whole trailer got a rewire, I aded a 10Ga feed wire. and updated with a modern shore power connection,
 Untitled by Campurist, on Flickr
Updated modern shore power connection, and correct fridge vents
 IMG_8077 Campurist Model 14 Forester by Campurist, on Flickr
Jumping around a bit. .... Here we go with sealing up the front!
 IMG_7482 by Campurist, on Flickr
Sometimes i think a big flatscreen tv should go here and maybe a camera can give you a picture of whats join on outside!
 IMG_7483 by Campurist, on Flickr
heres the whole shebang before routing off the excess
 IMG_7486 by Campurist, on Flickr
Here it is after its haircut. Now the second layer of lamination can be applied !!! The ceiling? wall panels act like a stress skin in this system and become part of the trailers structural integrity.
 Untitled by Campurist, on Flickr
the corners can relax a even out a bit once the mega staples are driven! The staple size is common to the wood fence building industry.
 IMG_7488 by Campurist, on Flickr
The laminating strips are precut to size before starting
 IMG_7499 by Campurist, on Flickr
the staggered pattern appears while gluing.
 IMG_7514 by Campurist, on Flickr
you can see the mechanics of the front curve here before it gets covered
 IMG_7494 by Campurist, on Flickr
the plywood acts as a backer board for the dinette hinge
 Untitled by Campurist, on Flickr
not sure I covered the "tining" of the front and back edges somewhere else, so , yes like the original, areas that may take abuse from rocky roads or bad weather, get a layer of aluminum.
 IMG_7495 by Campurist, on Flickr
The table goes in. The screws go into the backer board.
 Untitled by Campurist, on Flickr
The "rafters" for rooftop wire are doubled and wrapped in an aluminum c channel.
 Untitled by Campurist, on Flickr
The channels were cut on and bent on the brake
 Untitled by Campurist, on Flickr
 Untitled by Campurist, on Flickr
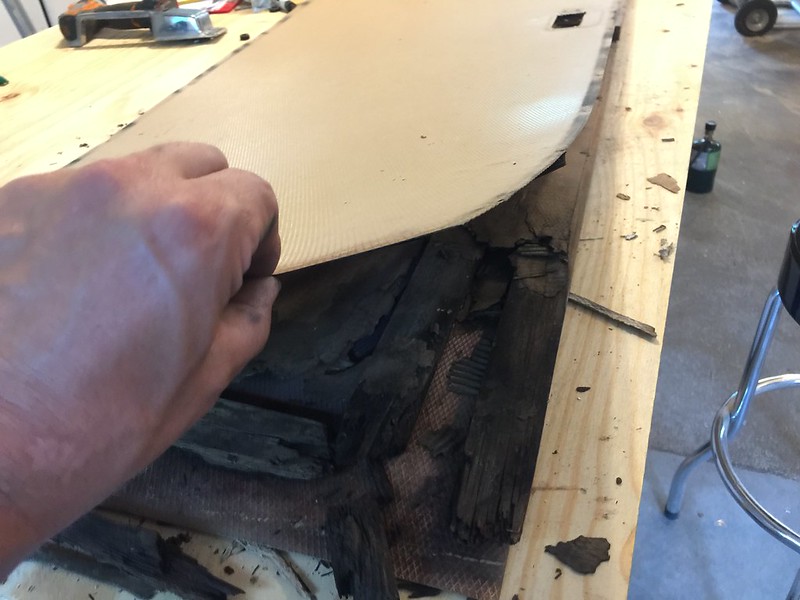
now jumping to the entry door. It was rotten.
 IMG_7970 by Campurist, on Flickr
The bottom of the frame was reduced to clumps of detached wood and wood dust.
 IMG_7973 by Campurist, on Flickr
solution: make new frame and use those same funky corrugated fasteners as the original
 IMG_7987 by Campurist, on Flickr
Then spend the best part of a day stripping the old paint of the skins. I really like these micro diamond patterned door skins,and wanted to save them.
 IMG_7981 by Campurist, on Flickr
Seemed like a logical time to attack the lockset
 IMG_7792 by Campurist, on Flickr
Im not a locksmith, but I know how to degrease, and re grease stuff and thats all this lock needed.
 IMG_7795 by Campurist, on Flickr
Lets do some wiring. sample of 120VAC wiring for the awning outlet. Main thing here is the abundant use of the nailing protector plates. I went a little nutty with these.
 Untitled by Campurist, on Flickr
DC 7 pin connector junction box. Everything is in there. including Brakes, accessory wire, and battery charge wire.
 Untitled by Campurist, on Flickr
giving yourself big loops of wire really helps when it time to fish that wire out of the little hole you cut through the siding to mount the light.
 Untitled by Campurist, on Flickr
Grounding : I attached a big ground wire to a frame bolt to establish ground inside the trailer for a distribution block
 Untitled by Campurist, on Flickr
This is why you replace the brake wires. This was deep inside the boxed frame where a mouse decided to chew on it.
 Untitled by Campurist, on Flickr
found the wire!
 IMG_8107 by Campurist, on Flickr
automotive style connectors are used on the exterior DC lighting
 IMG_8116 by Campurist, on Flickr
The pile of lights gets putty tape and a grommet
 IMG_8114 by Campurist, on Flickr
The license plate holder gets the same treatment. BTW this feature add also makes the trailer present itself as older than it is.
 IMG_8104 by Campurist, on Flickr
ok lets insulate this thing! The last one, I use foam. This one I used foil backed insulation like the original with all seams taped.
 IMG_7783 by Campurist, on Flickr
Doing condensed version of siding
 IMG_7892 by Campurist, on Flickr
I use a router to cut openings and tape off the area to avoid scratches with the router. I add bees wax to the router path to keep the bit cool and melted aluminum from forming on it.
 IMG_7893 by Campurist, on Flickr
I shoot narrow crown staples around the perimeter of the opening and pay attention not to shot them where a window or doorframe screw might land!
 IMG_7895 by Campurist, on Flickr
Getting the roof on. I pull the roof over the top with the leading edge attached to a pipe.... with duct tape, lots of duct tape. this is not a one person job!
 IMG_8091 by Campurist, on Flickr
I use pipe and clamps as a pulley to tighten the webbing material thats spans the trailer length and pulls the siding flat to the trailer. . Credit Larry from Mobiltec! Note: with .030 siding this is a chore and will not law perfectly flat. use Larry's tips to work out any "bulges" that may form while fastening.
 IMG_8094 by Campurist, on Flickr
 IMG_8093 by Campurist, on Flickr
windows and doors magically appear. Note: the trailer does not have an axil yet. Theres a seven ft garage door this thing has to squeeze under! I do not recommend others try this!!!
 IMG_8096 by Campurist, on Flickr
Windows get overhauled with with new seals, fresh grease on the crank assembly and a bit of shine, but not too much!
 IMG_8032 by Campurist, on Flickr
 IMG_8033 by Campurist, on Flickr
Ok that it for now!
Streetside view
Campurist Model 14 Forester 1968 curb by Campurist, on FlickrCurbside view with new owners tow vehicle
IMG_8251 by Campurist, on FlickrAC unit deployed
IMG_8167 Campurist Model 14 Forester by Campurist, on FlickrFront view with "ghost image of Forester Logo
IMG_8172 Campurist Model 14 Forester by Campurist, on FlickrNew super sized luggage door.
Campurist Model 14 Forester by Campurist, on FlickrLower curbside detail. this 68 is trimmed out like a 64 with J rail inverted and run along the bottom. It also uses the period correct heavy duty edge guard for the wheel well trim
Campurist Model 14 Forester by Campurist, on FlickrTopside of the curbside. I really like the texture of the door playing of the smoothness of the siding and all those screws!
IMG_8159 Campurist Model 14 Forester by Campurist, on FlickrTexture!
IMG_8048 Campurist Model 14 Forester by Campurist, on FlickrGoing inside
The interior was taken back to a 1964 look with the brass screw fist nails, smooth amber birch and birch trim.
IMG_8187 by Campurist, on FlickrThe dark vinyl wood grain was replaced with retro betty laminate and trimmed with aluminum nose facing instead of the brown rubber.
IMG_8229 Campurist Model 14 Forester by Campurist, on FlickrGas light gets its fuel from all new lines and two stage regulator.
IMG_8190 by Campurist, on FlickrTiles cut to original 9x9. plastic edge guards replaced with extruded aluminum corners
IMG_8239 Campurist Model 14 Forester by Campurist, on Flickrcushions upholstered to match 1964 style with fabric over vinyl , vinyl piping with access zippers.
IMG_8231 Campurist Model 14 Forester by Campurist, on FlickrOriginal hydro flame heater tucked around the corner with the cover of an older heater visible in the entry.
Untitled by Campurist, on FlickrA piano hinge allows access to a deep pantry, wine/liquor cabinet.
IMG_8242 Campurist Model 14 Forester by Campurist, on Flickrupper kitchen cabinets
IMG_8225 Campurist Model 14 Forester by Campurist, on Flickroriginal fusebox with added AC fuse box with on/ off switch
IMG_8227 Campurist Model 14 Forester by Campurist, on FlickrI modified an older stovetop to fit the space by installing the trim surround from a "newer" stove. There are certain things inside a trailer that give visual cues to the trailers age and a stove is one of them. I want to remove any hints that this camper was a 1968. I didn't make it look like 1950, but felt I could shave a few years off !
IMG_8224 Campurist Model 14 Forester by Campurist, on FlickrDavano area with "new" period correct writing desk deployed
IMG_8222 Campurist Model 14 Forester by Campurist, on FlickrDavano area you can see to the left, a vent for the AC. The Davano access door has been slotted to allow the Hidden AC unit
to inhale the from the interior.
IMG_8211 by Campurist, on FlickrThe AC unit does not impinge on the storage space beyond the left side of the Davano
IMG_8213 by Campurist, on FlickrThe trailer originaly had the old three blade shore power inlet. As the whole trailer got a rewire, I aded a 10Ga feed wire. and updated with a modern shore power connection,
Untitled by Campurist, on FlickrUpdated modern shore power connection, and correct fridge vents
IMG_8077 Campurist Model 14 Forester by Campurist, on FlickrJumping around a bit. .... Here we go with sealing up the front!
IMG_7482 by Campurist, on FlickrSometimes i think a big flatscreen tv should go here and maybe a camera can give you a picture of whats join on outside!
IMG_7483 by Campurist, on Flickrheres the whole shebang before routing off the excess
IMG_7486 by Campurist, on FlickrHere it is after its haircut. Now the second layer of lamination can be applied !!! The ceiling? wall panels act like a stress skin in this system and become part of the trailers structural integrity.
Untitled by Campurist, on Flickrthe corners can relax a even out a bit once the mega staples are driven! The staple size is common to the wood fence building industry.
IMG_7488 by Campurist, on Flickr The laminating strips are precut to size before starting
IMG_7499 by Campurist, on Flickrthe staggered pattern appears while gluing.
IMG_7514 by Campurist, on Flickryou can see the mechanics of the front curve here before it gets covered
IMG_7494 by Campurist, on Flickrthe plywood acts as a backer board for the dinette hinge
Untitled by Campurist, on Flickrnot sure I covered the "tining" of the front and back edges somewhere else, so , yes like the original, areas that may take abuse from rocky roads or bad weather, get a layer of aluminum.
IMG_7495 by Campurist, on FlickrThe table goes in. The screws go into the backer board.
Untitled by Campurist, on FlickrThe "rafters" for rooftop wire are doubled and wrapped in an aluminum c channel.
Untitled by Campurist, on FlickrThe channels were cut on and bent on the brake
Untitled by Campurist, on FlickrUntitled by Campurist, on Flickrnow jumping to the entry door. It was rotten.
IMG_7970 by Campurist, on FlickrThe bottom of the frame was reduced to clumps of detached wood and wood dust.
IMG_7973 by Campurist, on Flickrsolution: make new frame and use those same funky corrugated fasteners as the original
IMG_7987 by Campurist, on FlickrThen spend the best part of a day stripping the old paint of the skins. I really like these micro diamond patterned door skins,and wanted to save them.
IMG_7981 by Campurist, on FlickrSeemed like a logical time to attack the lockset
IMG_7792 by Campurist, on FlickrIm not a locksmith, but I know how to degrease, and re grease stuff and thats all this lock needed.
IMG_7795 by Campurist, on FlickrLets do some wiring. sample of 120VAC wiring for the awning outlet. Main thing here is the abundant use of the nailing protector plates. I went a little nutty with these.
Untitled by Campurist, on FlickrDC 7 pin connector junction box. Everything is in there. including Brakes, accessory wire, and battery charge wire.
Untitled by Campurist, on Flickrgiving yourself big loops of wire really helps when it time to fish that wire out of the little hole you cut through the siding to mount the light.
Untitled by Campurist, on FlickrGrounding : I attached a big ground wire to a frame bolt to establish ground inside the trailer for a distribution block
Untitled by Campurist, on FlickrThis is why you replace the brake wires. This was deep inside the boxed frame where a mouse decided to chew on it.
Untitled by Campurist, on Flickrfound the wire!
IMG_8107 by Campurist, on Flickrautomotive style connectors are used on the exterior DC lighting
IMG_8116 by Campurist, on FlickrThe pile of lights gets putty tape and a grommet
IMG_8114 by Campurist, on FlickrThe license plate holder gets the same treatment. BTW this feature add also makes the trailer present itself as older than it is.
IMG_8104 by Campurist, on Flickrok lets insulate this thing! The last one, I use foam. This one I used foil backed insulation like the original with all seams taped.
IMG_7783 by Campurist, on FlickrDoing condensed version of siding
IMG_7892 by Campurist, on FlickrI use a router to cut openings and tape off the area to avoid scratches with the router. I add bees wax to the router path to keep the bit cool and melted aluminum from forming on it.
IMG_7893 by Campurist, on FlickrI shoot narrow crown staples around the perimeter of the opening and pay attention not to shot them where a window or doorframe screw might land!
IMG_7895 by Campurist, on FlickrGetting the roof on. I pull the roof over the top with the leading edge attached to a pipe.... with duct tape, lots of duct tape. this is not a one person job!
IMG_8091 by Campurist, on FlickrI use pipe and clamps as a pulley to tighten the webbing material thats spans the trailer length and pulls the siding flat to the trailer. . Credit Larry from Mobiltec! Note: with .030 siding this is a chore and will not law perfectly flat. use Larry's tips to work out any "bulges" that may form while fastening.
IMG_8094 by Campurist, on FlickrIMG_8093 by Campurist, on Flickrwindows and doors magically appear. Note: the trailer does not have an axil yet. Theres a seven ft garage door this thing has to squeeze under! I do not recommend others try this!!!
IMG_8096 by Campurist, on FlickrWindows get overhauled with with new seals, fresh grease on the crank assembly and a bit of shine, but not too much!
IMG_8032 by Campurist, on FlickrIMG_8033 by Campurist, on FlickrOk that it for now!


