|
|
Post by Teachndad on Jun 2, 2017 23:39:18 GMT -8
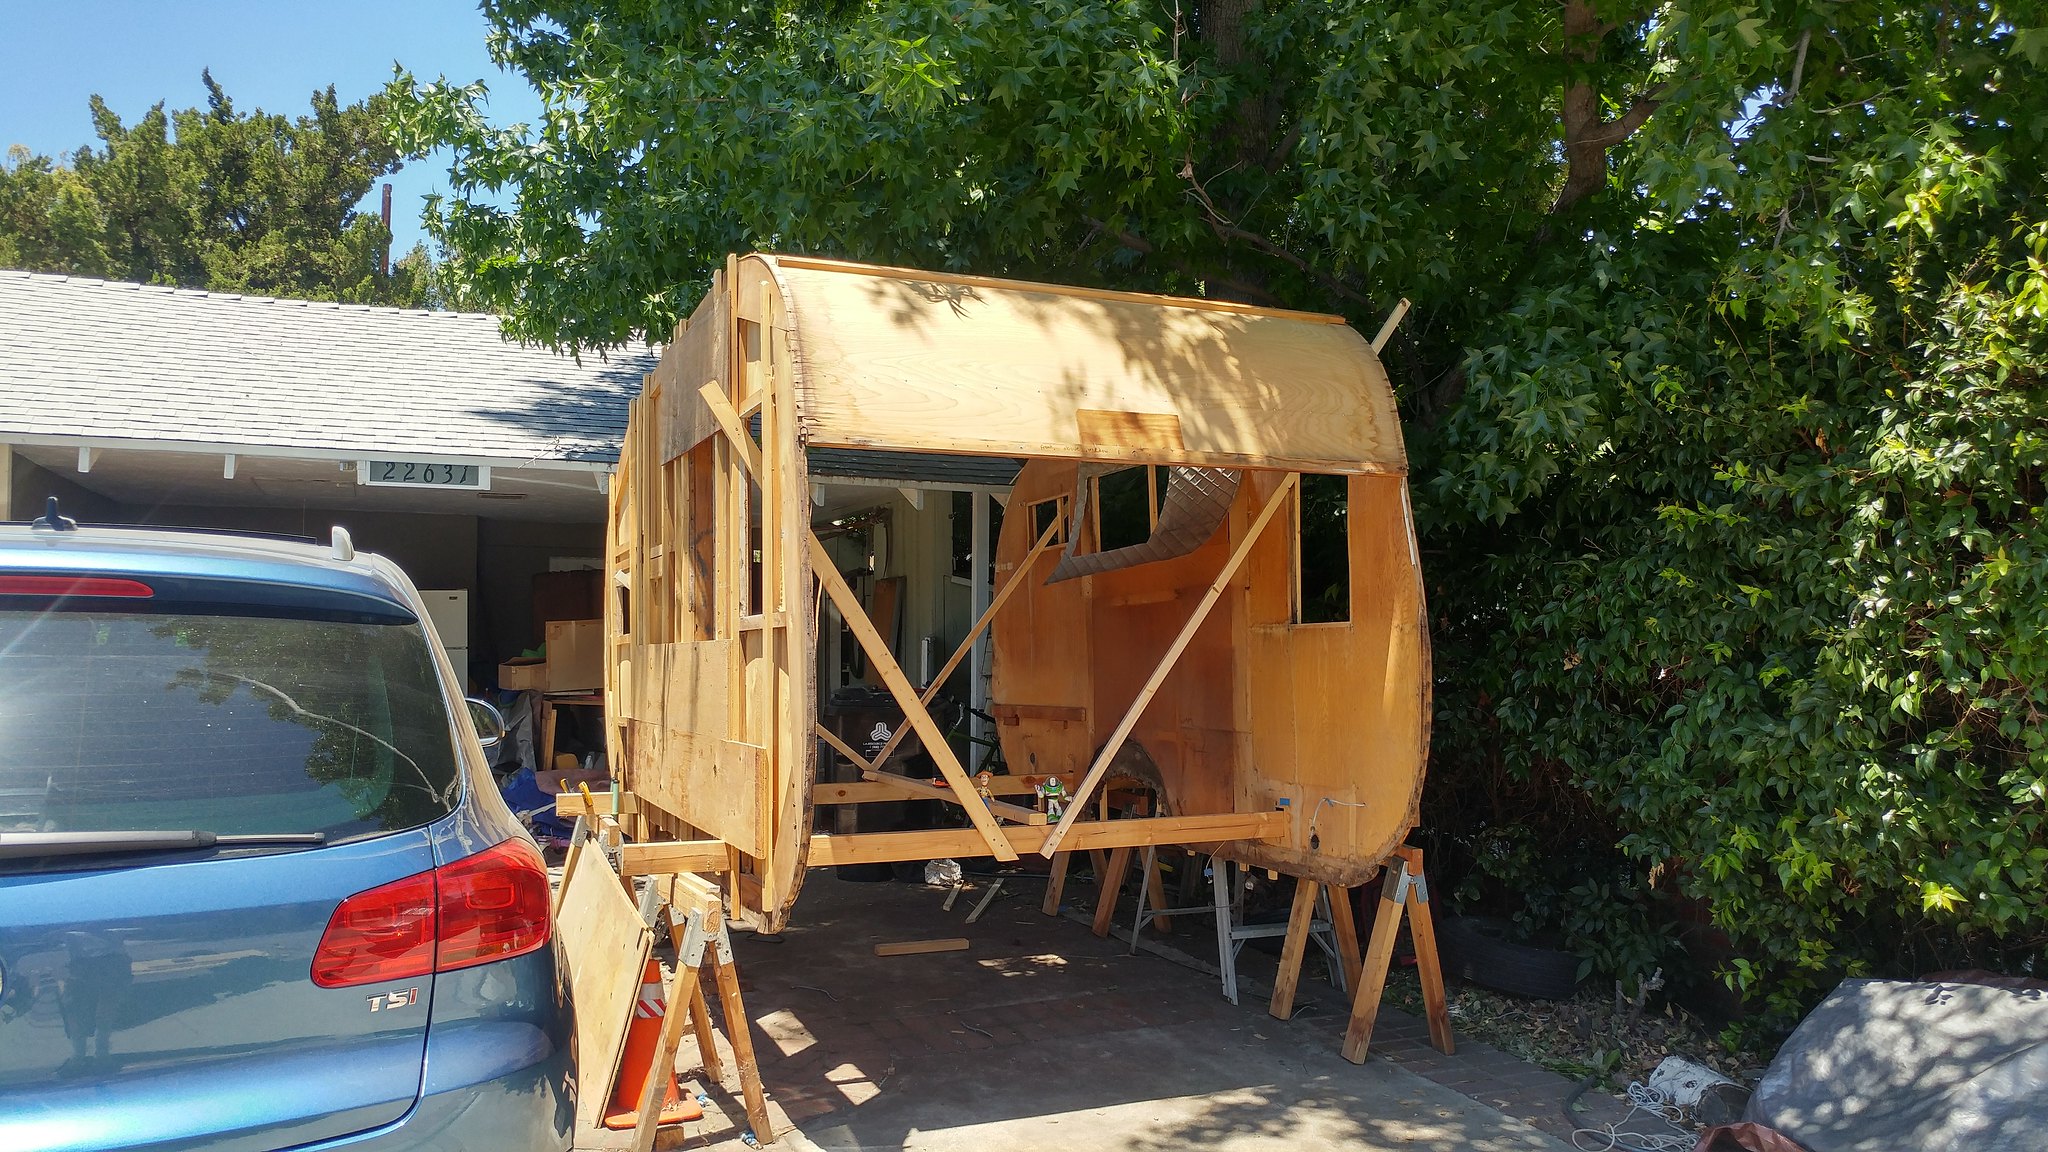
Hi Friends, After over 2 years, Andy, my '57 Westerner, has been hopelessly stalled due to life hurdles. It's been sitting on my driveway under a tarp. I now HAVE to move it. The wife is tired of snaking around the side of the trailer when she parks on the driveway and wants the driveway back. I also have to admit, it needs to be moved one way or the other. We have inherited a house that has some area to stow the frame and a place to stow the walls, skins and everything else that sits on the frame. But no place to erect it. I will deal with that later. For those with the time and a cup of coffee at hand, you can trace my long winded journal on how I got here at this link. Those of you who have been members for a while may remember that when you last saw my progress, I had planned to restore Andy by raising the body for frame repairs that included leveling out the frame and adding new steel cross members. After the frame repairs, I would then install a new floor and lower the body back down and then restore panels and the ceiling. Now that Andy is raised above the frame, I am unsure as to how to continue. Here is Andy without the tarp, more or less. He is raised up and sitting on 4 sawhorses.  Anyone have any steps to recommend? Since the body is raised, I think it changes the teardown procedure. Even if the body was attached to the frame, I would be lost. BTW, I still have the old floor which can be used for anchoring, but the center floor joist has been replaced. Cheers, Rod |
|
RinTin
Full Member

Posts: 760 
Likes: 292
Currently Offline
|
Post by RinTin on Jun 3, 2017 4:31:14 GMT -8
Rod, good to hear from you. I love that picture. You can go to my 65 Aloha thread and review what I did to give you an idea. If you recall my trailer was in the exact same predicament.
If you can lay the floor back on top of the frame that would help. Brace the walls to the sawhorse cross supports, remove the rest of the cabinets and ceiling panels, lay the walls down on top of the floor, pile everything on top of the walls, secure everything to the frame, cover with a tarp, secure the tarp and trailer it to your new home.
|
|
|
|
Post by Teachndad on Jun 3, 2017 8:28:40 GMT -8
Hi Greg! Thanks for the tips! I will go back to your Aloha thread and check out the pix. Your thread in the early days gave me the inspiration to raise the body, LOL, and now look at me - A Rin Tin wannabe  following suit. My Westerner will be better for the break down. This summer we are at home on a staycation. More time is predicted to get the ball moving again on Andy's restoration. Cheers! Rod |
|
ladywendolyn
2K Member

Posts: 2,315 
Likes: 928
1964 Golden Falcon
Currently Offline
|
Post by ladywendolyn on Jun 3, 2017 10:29:46 GMT -8
Good to hear from you. You and I started our re-habs around the same time and we are both at about the same stage. "So much ripped down that it feels overwhelming"... but committed to seeing it through. I ended up choosing to not pull the top off of the frame, so I am working around a bit at a time and usually have to get right under the trailer to replace the frame stringers one at a time. I hope to make some progress as well this summer.
|
|
|
|
Post by Teachndad on Jun 13, 2017 5:57:48 GMT -8
Rod, good to hear from you. I love that picture. You can go to my 65 Aloha thread and review what I did to give you an idea. If you recall my trailer was in the exact same predicament. If you can lay the floor back on top of the frame that would help. Brace the walls to the sawhorse cross supports, remove the rest of the cabinets and ceiling panels, lay the walls down on top of the floor, pile everything on top of the walls, secure everything to the frame, cover with a tarp, secure the tarp and trailer it to your new home. Hi Greg, I found your well detailed descriptions and pix on page 5 of your Aloha restoration thread. I noticed you did some work on edges and sills before taking the walls down. Will it make a significant difference for me to do that work later while the walls are lying on the floor of the trailer instead of while the walls are upright? I still have the original floor and can easily attach it to the frame for transport of the walls. I HOPE to start next week. Cheers, Rod |
|
RinTin
Full Member
Posts: 760
Likes: 292
Currently Offline
|
Post by RinTin on Jun 13, 2017 7:12:26 GMT -8
Hi Greg, I noticed you did some work on edges and sills before taking the walls down. Will it make a significant difference for me to do that work later while the walls are lying on the floor of the trailer instead of while the walls are upright? Cheers, Rod The only reason I did that work at that time is it was easy and convenient to do so. It won't matter at all if you do it later. Just be sure the walls are well supported to retain their shape. If needed, more temporary plywood scabs do the trick. Another thought I had is that the walls are too wide/tall to lay flat between your wheels so you'll need to build a structure to support the walls, and whatever else you will be stacking on top of the walls, above the wheels. A 1x4 framework, screwed together, cross braced and screwed to the floor should be plenty enough. |
|
|
|
Post by Teachndad on Jun 17, 2017 21:59:39 GMT -8
Thanks Greg for the extra tip on transporting the walls. I hadn't considered that. I may build a lean-to type of structure or something more rectangular prism oriented as you suggested. I only have to tow Andy to a new home 1.5 miles away. I scoped out the trailer today, formulating a plan for disassembly. The skirt boards are still attached to the bottom of the walls and the saw horses are outside the walls which I thought made things more complicated, but another close read on page 5 of your thread showed the answer by moving the saw horses into the interior of the trailer. The frame has been stored underneath the body and can be easily pulled from underneath the body of the trailer like this. That gives me full access to the interior of the trailer. I was going to place some small sand bags dead center on the 2 x 4 cross members so the remaining wall has no chance of toppling, but noticed that you kept the opposite saw horses outside the other wall to prevent toppling. Smart guy.  BTW, for those of you new to the board, RinTin's 1965 Aloha Restoration thread, which I refer to earlier in the thread is here for reference. vintagetrailertalk.freeforums.net/thread/4148/1965-aloha-project?page=1Cheers, Rod |
|
|
|
Post by Teachndad on Jun 19, 2017 8:43:02 GMT -8
Hi Friends,
Another question.
When removing the roof panels, do I keep them attached to the rafters? Then, later, remove the rafters from the panels that I think could be saved? The center or key roof panel needs full replacement. The rafters there are warped and bent downward and the plywood around the roof vent hole is destroyed with water damage.
However, the panel forward of the key panel is good and the rear curve above the window is still good about 90 percent. Some blackness on the outer edge.
Cheers,
Rod
|
|
|
|
Post by danrhodes on Jun 19, 2017 12:16:17 GMT -8
One of my biggest regrets was not using very dense hardwood for my roof framing to minimize sagging. I did not like the look of any of my original wood and it was all glued to the panels so could not be saved, but I did keep all the panels and framing as units to reproduce them later.
If you have minimal areas of black water stain on good wood, oxalic acid wood bleach will take them out with repeated applications.
Nice to see the Westerner getting some love this summer break.
|
|
RinTin
Full Member
Posts: 760
Likes: 292
Currently Offline
|
Post by RinTin on Jun 20, 2017 5:53:47 GMT -8
I would try to leave the rafters attached to the paneling. If/when you separate them it will be much easier to work with on the ground or on a table.
|
|
|
|
Post by Teachndad on Jul 13, 2017 23:45:52 GMT -8
I would try to leave the rafters attached to the paneling. If/when you separate them it will be much easier to work with on the ground or on a table. Hi Greg,
I did leave them attached.
Thanks.
Rod
|
|
|
|
Post by Teachndad on Jul 13, 2017 23:57:23 GMT -8
Hi Friends,
Below are the images to show my work on how I removed the walls. I am almost done.
Pix are below. Here is the opening image for reference.
Then, over the past 4 weeks, I have made some progress as seen below. The plan was to dismantle and follow Greg’s suggestion of steps in post 2 of this thread:
“If you can lay the floor back on top of the frame that would help. Brace the walls to the sawhorse cross supports, remove the rest of the cabinets and ceiling panels, lay the walls down on top of the floor, pile everything on top of the walls, secure everything to the frame, cover with a tarp, secure the tarp and trailer it to your new home.”
I also had to figure out how I was going to transport the walls to the new home. I figured out, the walls could e stacked one at a time on top of two long pallets I had. The top pallet needed to be extended 2.5 feet front and back to fully support the walls and clear wheels.  pallets to move walls 2 pallets to move walls 2
However, along the way, I made a last minute change. We even made a video of the dismantling, but I don't know if we will ever edit it.
Here is the body with the frame removed frome underneath.
 Front image 1 Front image 1
Rear view. Upper kitchen cabinet had been removed. Upper dinette cabinet remains.
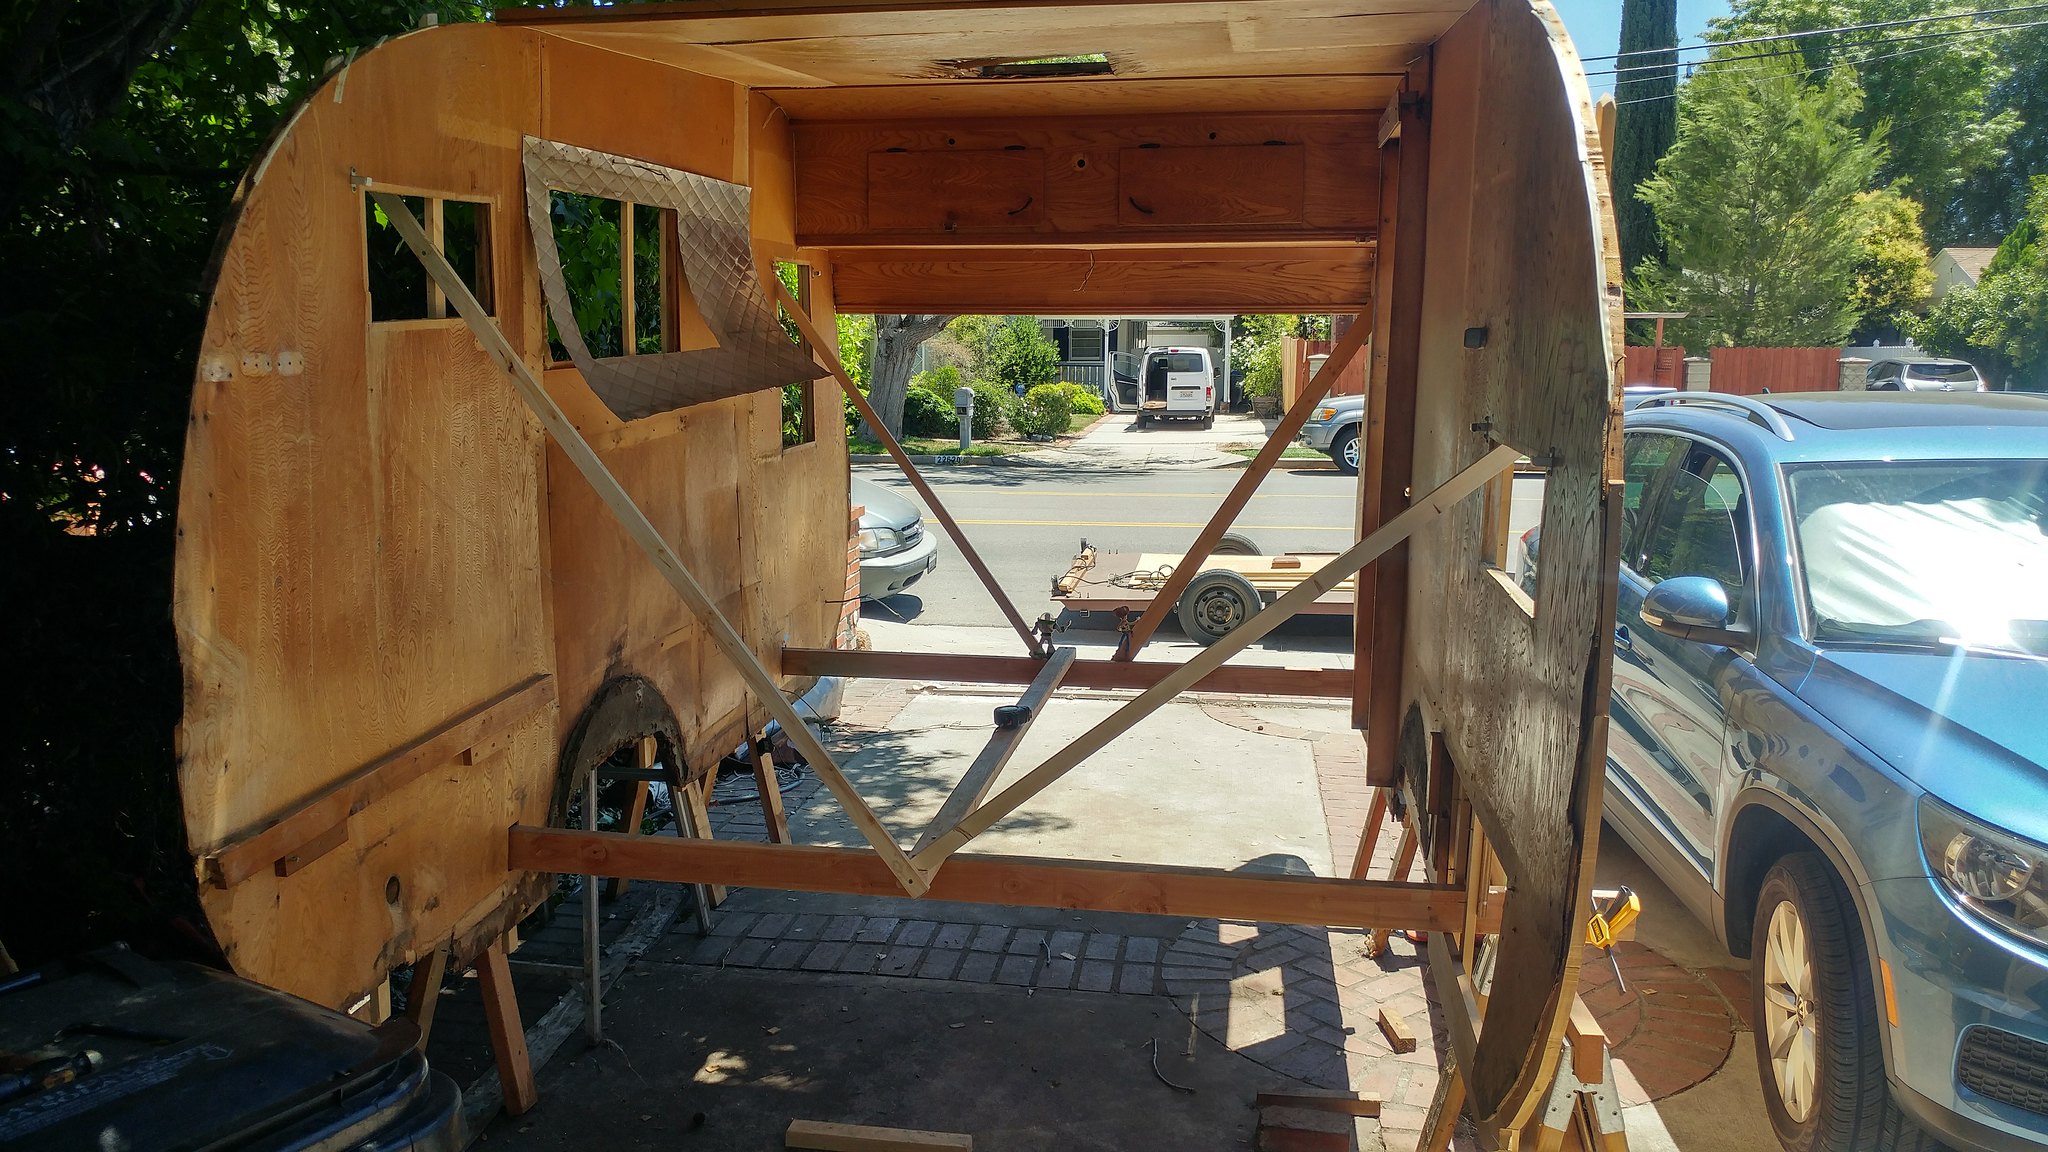 no bunk image from rear no bunk image from rear
Then, I removed the remaining roof panels and the upper dinette cabinet. The key panel with the roof vent is a gonner. Warped and water damaged. I was hoping to keep the front and rear upper radius panels. I had to be very careful removing the nails that held down the edges, which did come out easily. I love my Sharkgrip nail removal tool.
 After removal of roof panels After removal of roof panels
At this point, I realized that I never marked the frame’s position as it related to the body before I raised the body. So, I decided to lower the walls (walls assembly) back down to the frame. New readers should know that all new outriggers were welded onto the frame, and the tongue sag was reduced by a welder.
I still have the original sill boards on the front half of the walls. The front half of the floor also still has the original floor joists on the sides. I moved the frame/floor underneath and vertically matched the holes in the sill boards to the holes in the side floor joists and used those holes as a guide for dropping the walls on the outriggers of the frame.
The lifting began. I used the scissor jack from my minivan to lift the front 2 x 4 crossmember in the middle and then removed the saw horses. The rear sawhorses were still in place.
 front of walls lifted with scissor jack front of walls lifted with scissor jack
Then... upon lowering, the jack gets stuck under the 2 x 4 crossmember.
 front of walls down jack stuck front of walls down jack stuck
In order to remove the jack, I had to re-raise the front 2 x 4 crossmember and insert some scrap 1 x 3’s I had lying around. Next, I just lifted the end of the crossmember 2 x 4 by hand and my son removed one 1 x 3 one at a time moving from right to left each time until the 2 x 4 crossmember was lowered all the way down and the edge boards sat on the ends of the outriggers. We worked with the front crossmember first, and repeated the procedure with the rear one.
 front of walls before lowering front of walls before lowering
One of my mistakes was removing the screws too early that held the crossmember 2 x 4s in place. I had placement screws that screwed the walls to each crossmember 2 x 4 where the 2 x4 ran through each wall. The loss of those placement screws gave us a little side to side movement . Worsening this was that we shortened the 2 x 4’s just past the walls. I reinserted screws again and adjusted the walls a little. Below you can see the lean on the curbside wall.
We had another unintended issue. The streetside rear wall has no sill board. so badly It was rotted and fell apart when I raised the body. Since I had reinforced the walls with additional 1 x 2’s, I screwed a scrap piece of sill board to these for strength and a temporary band aide. It worked.
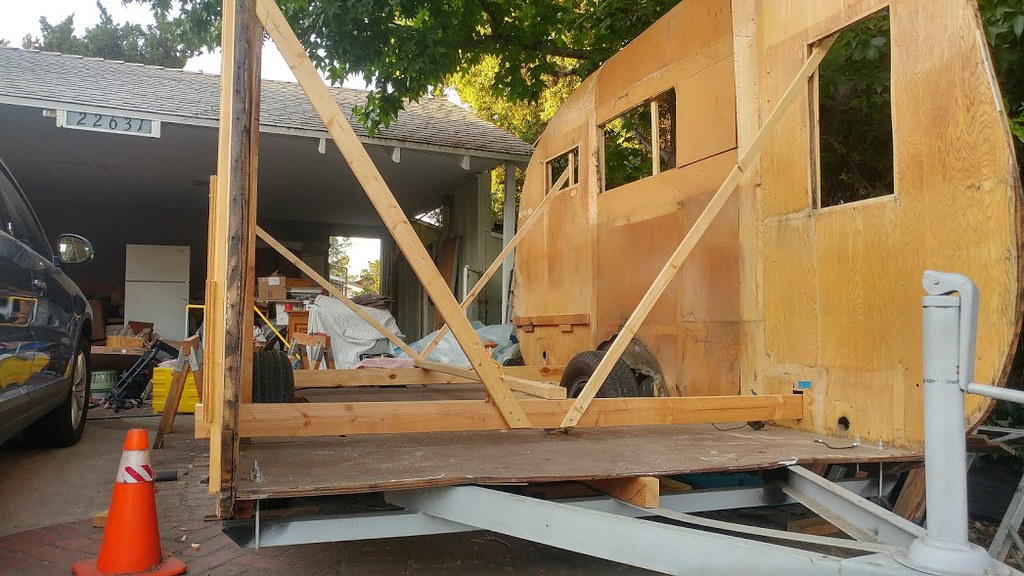 front and rear lowered to outriggers front and rear lowered to outriggers
It was exciting to see those walls back on the frame.
 walls lowered corner profile walls lowered corner profile
One outrigger was off by ¼” fore and aft. I knew this because the impression on the old wood underneath did not match the placement of the new outrigger. Perhaps the original outrigger wasn’t square or may have even been bent. Otherwise, everything was really close to the original impressions where the outriggers supported the body. I was happy.
I remember my front outrigger being very low when I purchased the trailer. The water stain lines now don’t line up on the bottom of the walls because the new front outrigger is now were it is supposed to be.
Below are some images that show how far down the original front outrigger was. These pictures below show the gap between the bottom of the floor joist and the top of the outrigger end. Once the floor was leveled, this is what I saw. This has since been corrected as part of the welding work on the frame.

Gap.

Gap with inserted piece of wood.


I digress.
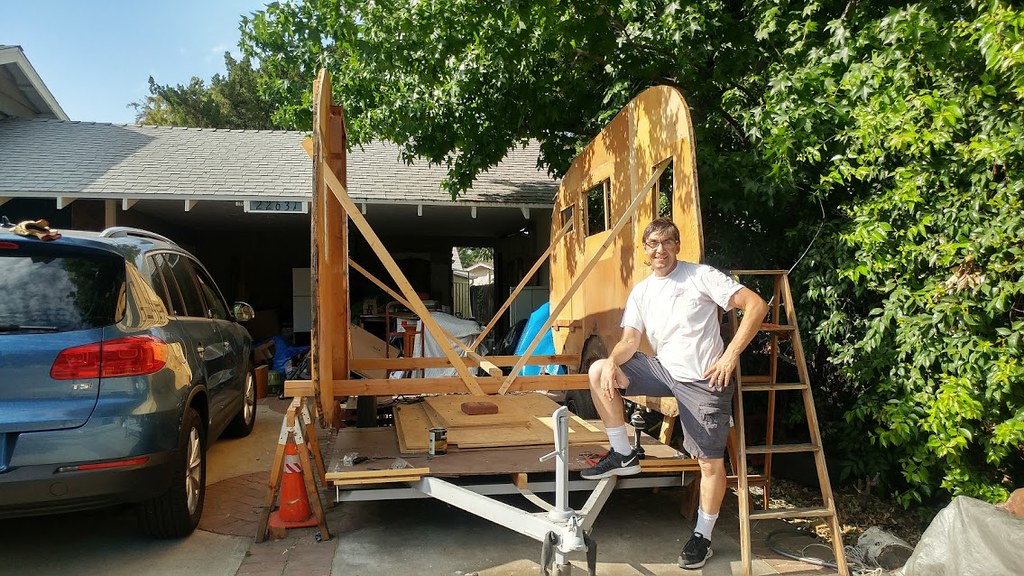
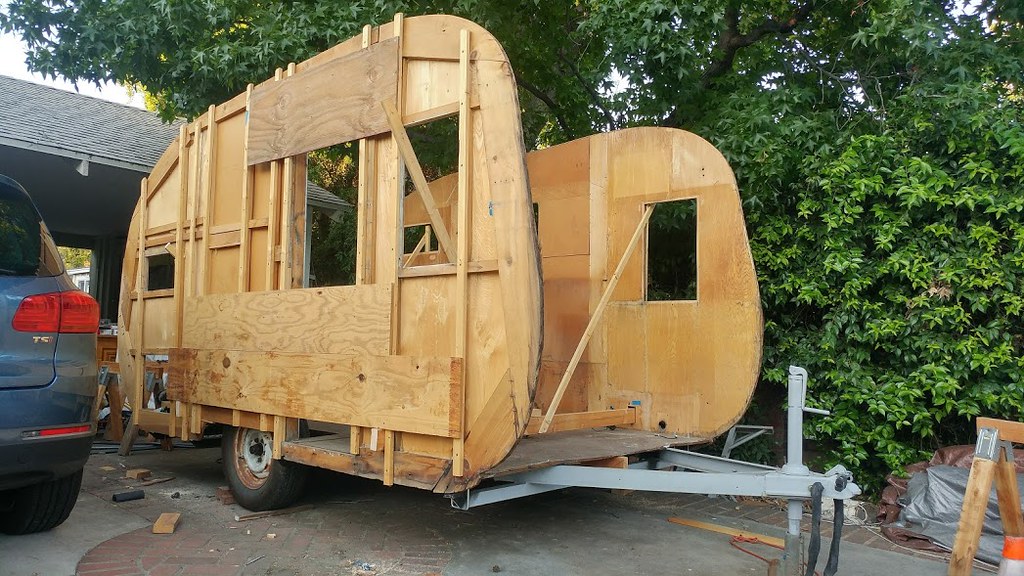
So, finally, at this point the walls look like this. you can see the doubling up of the studs in the walls and the plywood scabs we used for strengthening the wall especially the curbside(pictured).
 Walls lowered profile Walls lowered profile
 walls lowered profile close up walls lowered profile close up
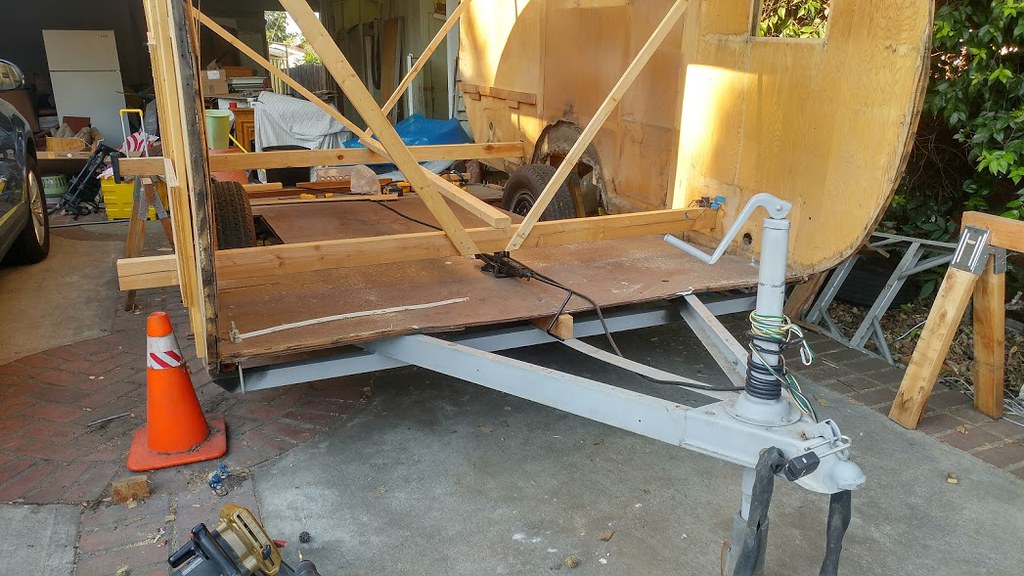
I have screwed the old sill boards back into the side floor joists every 8 inches along the side. In preparation to move the Ole Andy, the diagonal cross members are screwed to the walls and the crossmember 2 x 4’s are screwed to the walls. It’s all set for it’s 1.5 low speed journey to it’s new home.
Cheers,
Rod
|
|
RinTin
Full Member
Posts: 760
Likes: 292
Currently Offline
|
Post by RinTin on Jul 14, 2017 5:38:03 GMT -8
I would love to see looks you get towing it to it's new home. Make sure it's a calm day, you don't want to end up like the Shasta Disasta.
|
|
|
|
Post by Teachndad on Jul 15, 2017 20:31:56 GMT -8
Hi Friends, Well, today, we moved the walls with the frame and pulled it off my driveway. It was Saturday, so not too many people on the neighborhood roads. I watched the faces on the people driving in the opposite direction and many seemed to crane back to look at the funny thing passing them going in the opposite direction. I felt like I was towing a float. 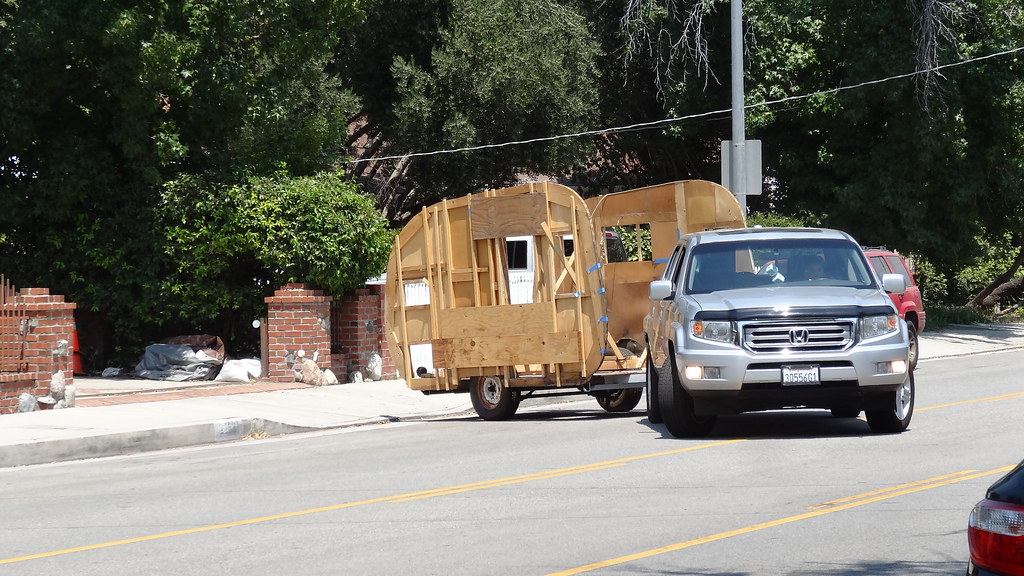  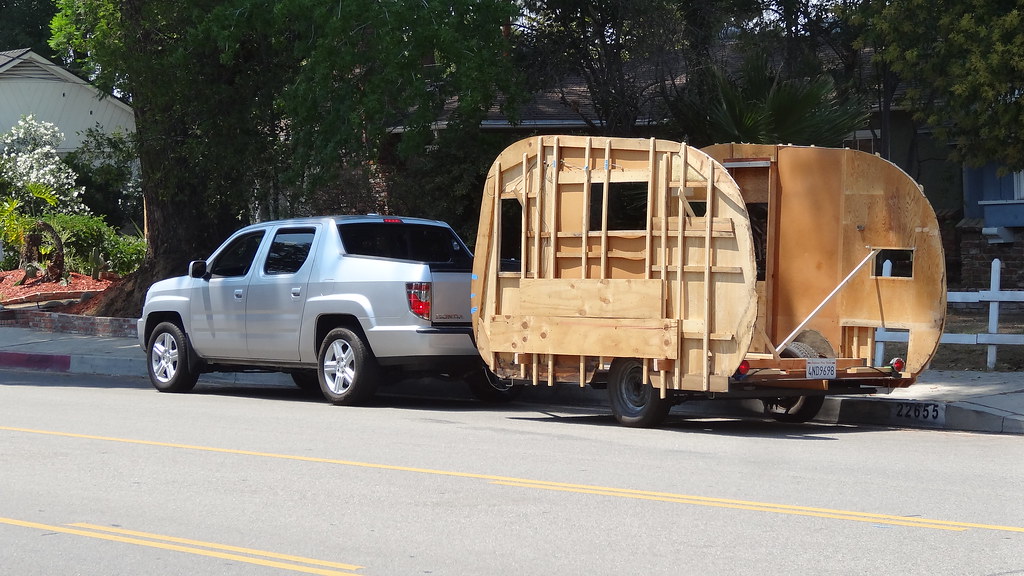 And for you video lovers, here is a drive by pass for a few seconds. Westerner going by videoCheers, Rod |
|
|
|
Post by danrhodes on Jul 16, 2017 7:03:26 GMT -8
I guess that's why even the most rotten glamper can be towed...for a while.
|
|


 following suit.


