Dad Rambles
Active Member

Posts: 246 
Likes: 140
62 Shasta Airflyte
Currently Offline
|
Post by Dad Rambles on Nov 19, 2016 8:06:14 GMT -8
Here is what i have on my 62 Shasta.  IMG_20161119_103441 IMG_20161119_103441 by gunguy05, on Flickr So I just pulled the left lower side panel and this is what I have. It's behind the sink on the inside, and where the stove was on the inside. The panels look fine inside, but then there is this. The lower 3 in or so of the outer wheel wells are rusted to the point of falling apart. The rest, top and inner, is solid. I know that needs replacing, just not sure how to do it. Also the wall panels. they are better to the left, and will actually be replaced both of the front corner panels. 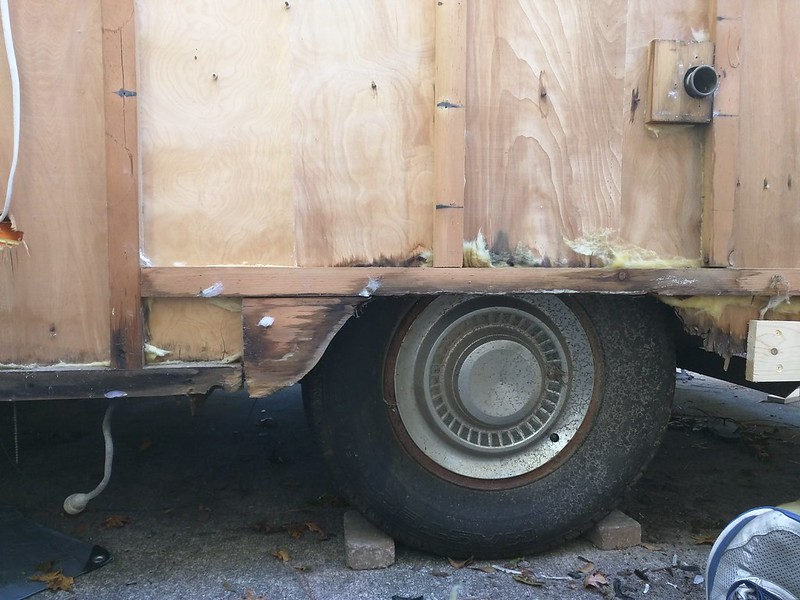 IMG_20161119_104636 IMG_20161119_104636 by gunguy05, on Flickr 1. What I'm trying to decide is how far is reasonable to take this. Do I rip the entire middle of the side off? 2. Do I just replace the lower panel behind the sink side cabinet, about 1-2ft up from the bottom, and the outer side of the wheel well? ---> I feel like this is the most probable route. Do I take the cabinet out and do it from the inside, and the outside. Do I take the entire wheel well out? OR Do I just replace the lower oustide well panel with rivets and paint (POR or similar)? This is all be independent of replacing the lower facia framing with a beefier 1x4 or 6, all that is a given. I want to do this right, but I don't want to rip the entire side off the the trailer if it's not necessary. Thoughts, similar repair situations and what you did. I'm looking for input here from others. |
|
nccamper
Administrator 
Posts: 7,745
Likes: 2,872
1962 Forester- 1956 Shasta
Currently Offline
|
Post by nccamper on Nov 19, 2016 9:52:39 GMT -8
I would not rip the entire side open unless you're building a show camper you're hoping to donate to the Vintage Camper Museum. A few inches of the wheel well can be patched. I did it on the last Shasta camper and it worked fine. If you expand the 1 1/2" piece running along the top of the wheel well and trim the wall framing up to that expanded piece it will give you access to the rotten birch and offer something to screw the wheel well patch to for a seamless repair. with that said, I think the piece running along the wheel well is too skimpy for my taste. Other purist may disagree.  |
|
Dad Rambles
Active Member
Posts: 246
Likes: 140
62 Shasta Airflyte
Currently Offline
|
Post by Dad Rambles on Nov 19, 2016 10:01:32 GMT -8
I'm thinking we are on the same track. I had thought about it a little more and came up to this.  Basically trimming up as far as the line I drew, that's to the top of the wheel well. I would replace the inside panel below this and horizontally to the framing on the left and right of the wheel well (and patch with metal ad you suggested). No, not a show camper by any means, I just want it to look like I knew what I was doing when all is said and done. I agree as well, I'm going to beef up a lot of that framing along the bottom as well as adding a couple cross members in the middle where there isn't support on the inside buy the cabinets or such. Thank you for the guidance. Brian |
|
Dad Rambles
Active Member
Posts: 246
Likes: 140
62 Shasta Airflyte
Currently Offline
|
Post by Dad Rambles on Nov 19, 2016 10:22:45 GMT -8
And.... That should do it.  So my plan is to repair the metal with rivets, paint it, and seal with gutter sealant. I can replace the panel and its all hidden behind the counter. |
|
nccamper
Administrator
Posts: 7,745
Likes: 2,872
1962 Forester- 1956 Shasta
Currently Offline
|
Post by nccamper on Nov 19, 2016 10:24:59 GMT -8
A good plan.
I'll let the museum know you're keeping your camper.
|
|
|
|
Post by bigbill on Nov 19, 2016 14:50:29 GMT -8
I would trim the rusted portion off then paint the remaining area with rust convertor. Next cut a patch panel as large as the inside of the wheel well using steel not aluminum because of the dissimilar metal effect and paint both sides. Then I would run butyl tape along all edges of original panel to form a complete seal, then insert new panel and rivet it in place. Finally I would caulk all edges just to insure the seal.
Make sure you use plenty of rivets to stitch it in including a few in middle of panel to prevent it from moving apart/warping. Also make sure that you seal bottom edge to prevent water splash from entering wall.
|
|
Ten
3K Member

Posts: 3,432
Likes: 1,467
70 Shasta 16SC + 1964 Airflyte
Currently Offline
|
Post by Ten on Nov 19, 2016 16:44:06 GMT -8
Damn, bigbill ... I have a set of those that look just the same... Wanna come over and do mine?? 😆 |
|
mobiltec
5K Member
I make mistakes so you don't have to...
Posts: 9,824
Likes: 3,751
1954 Jewel In Progress...
Currently Offline
|
Post by mobiltec on Nov 19, 2016 17:58:55 GMT -8
Discolored wood doesn't always mean "ruined".. If it will hold a staple or a screw then it can be saved. Sometimes that's ok and other times it's not worth the effort. Many times it's easier to just replace all the lower skirt boards and be done with it.
|
|
Dad Rambles
Active Member
Posts: 246
Likes: 140
62 Shasta Airflyte
Currently Offline
|
Post by Dad Rambles on Nov 20, 2016 5:37:11 GMT -8
Discolored wood doesn't always mean "ruined".. If it will hold a staple or a screw then it can be saved. Sometimes that's ok and other times it's not worth the effort. Many times it's easier to just replace all the lower skirt boards and be done with it. Thank you to all for the suggestions bigbill @ten nccamperI didn't know about the AL-Steel reaction. I will find a small piece of galvanized. I think I am going to remove the lower 1x2 on the wheel well, and the lower 1x2 (on the left side) that runs to the front of the trailer and replace with 1x4 or 1x6. Everything above that mid-trailer looks ok. The front corner on that side is completely rotten.
|
|
Vintagehotdog
Active Member
Hi, we are Paul and Irvina, Currently rebuilding a 12' 1958 Easy Traveler
Posts: 129
Likes: 40
1962 Oasis 18'
Currently Offline
|
Post by Vintagehotdog on Nov 25, 2016 16:04:08 GMT -8
Definitely agree with bigbill about removing all of the rusted area.
|
|
hairba11
Active Member
Posts: 116
Likes: 56
Currently Offline
|
Post by hairba11 on Nov 27, 2016 16:15:56 GMT -8
Thin galvanized is easy to scrounge. Check with heating and cooling places for new drop (sheared leftovers), or used sections. If you bring a drawing and measurements (and have some pics of the camper to show off) you can get stuff cut to size.
|
|
theresa
1K Member
 from Northern Maine ~ Proud new owner of Lola, a 1960 Shasta Airflyte and Pearl, a 1962 Mobile Scout
Posts: 1,055 
Likes: 347
Currently Offline
|
Post by theresa on Nov 27, 2016 17:18:34 GMT -8
And.... That should do it. So my plan is to repair the metal with rivets, paint it, and seal with gutter sealant. I can replace the panel and its all hidden behind the counter. Looking at this photo specifically, can you tell me what the wheel well is attached to in the front, rear and wall side? I'm in the process of getting ready to install mine on my '60 Airflyte and I want to know if it attaches completely underneath to the subfloor or somewhere sandwiched in between layers. |
|
Dad Rambles
Active Member
Posts: 246
Likes: 140
62 Shasta Airflyte
Currently Offline
|
Post by Dad Rambles on Nov 27, 2016 18:07:40 GMT -8
And.... That should do it. So my plan is to repair the metal with rivets, paint it, and seal with gutter sealant. I can replace the panel and its all hidden behind the counter. Looking at this photo specifically, can you tell me what the wheel well is attached to in the front, rear and wall side? I'm in the process of getting ready to install mine on my '60 Airflyte and I want to know if it attaches completely underneath to the subfloor or somewhere sandwiched in between layers. I think there is a flange on it on those 3 sides that attaches underneath with screws or nails through it, the sound board, and into the floor... I think. |
|
theresa
1K Member
from Northern Maine ~ Proud new owner of Lola, a 1960 Shasta Airflyte and Pearl, a 1962 Mobile Scout
Posts: 1,055
Likes: 347
Currently Offline
|
Post by theresa on Nov 27, 2016 18:09:26 GMT -8
Looking at this photo specifically, can you tell me what the wheel well is attached to in the front, rear and wall side? I'm in the process of getting ready to install mine on my '60 Airflyte and I want to know if it attaches completely underneath to the subfloor or somewhere sandwiched in between layers. I think there is a flange on it on those 3 sides that attaches underneath with screws or nails through it, the sound board, and into the floor... I think. That sounds reasonable. I had new ones recreated from my originals with the flange, I just wasn't sure what they attached to, but that was my gut instinct was the bottom of the subfloor. Thanks for your quick reply. |
|


