gary350
Full Member
 We should have gone camping today it is going to snow 6" tonight.
Posts: 573 
Likes: 170
1964 FAN
Currently Offline
|
Post by gary350 on Sept 29, 2015 18:56:57 GMT -8
I bought a 1955 Phoenix. It has a good aluminum body, good frame, good windows but the insides have been gutted and there are parts missing.
I need the front window Close Open device  what every that might be. The window is 6 feet wide and opens in the center. Pictures will be very helpful. I have a work shop with a lathe, mill, drill press, band saw, belt sander, grinder, 2 welders, air compressor, and too many hand tools to list them all. I can pretty much make anything if I have a part to copy or photos or drawing. what every that might be. The window is 6 feet wide and opens in the center. Pictures will be very helpful. I have a work shop with a lathe, mill, drill press, band saw, belt sander, grinder, 2 welders, air compressor, and too many hand tools to list them all. I can pretty much make anything if I have a part to copy or photos or drawing.
I need Running Marker lights they are 2.5" diameter, amber and red.
Some idiot before me has put 2" of tar on the roof. Tar is old and dry and cracked. Some is chipping off. Tar is heavy as cement. A hot clothes iron will not melt it. A torch will not melt it. Kerosene soaked rags are not doing much. Any secret to getting this tar off the roof. The roof vent is tared over and can not be used.
|
|
nccamper
Administrator 
Posts: 7,744
Likes: 2,871
1962 Forester- 1956 Shasta
Currently Offline
|
Post by nccamper on Sept 29, 2015 19:07:56 GMT -8
|
|
gary350
Full Member
We should have gone camping today it is going to snow 6" tonight.
Posts: 573
Likes: 170
1964 FAN
Currently Offline
|
Post by gary350 on Sept 29, 2015 19:20:30 GMT -8
Here is the the front window. I spent 2 days building this kitchen. OK darn there is a curtain on this picture. Tomorrow when sun is up I will take a close up.  |
|
nccamper
Administrator
Posts: 7,744
Likes: 2,871
1962 Forester- 1956 Shasta
Currently Offline
|
Post by nccamper on Sept 29, 2015 19:37:42 GMT -8
You've been busy. A close up of the mechanism (area) and the outside of the window will help. Have you tried Vintage Trailer Supply for the Running Marker lights? www.vintagetrailersupply.com/If you have a photo of the tar it may get a response from a member who has dealt with it before. I had some thick sealer on a camper that came off (slowly) with Jasco stripper. |
|
|
|
Post by vintagebruce on Sept 29, 2015 19:59:54 GMT -8
 to VTT. Here is a thread to a facebook page for people with 60's Phoenix campers...I think there are some comments by people who own 50's Phoenix campers. Might be able to connect with one of them. Almost any 1955 vintage camper with a 6 foot wide front window would have had the center section push open. The lever, when closed is usually held in place by a king of hook the flat pusher slots into, when you want to open it you free it from it's holder and push on the hinged arm and the window swings open, and you can open it to various degrees because there are notches on the flat pusher that nest along the bottom edge. If you open any number of blogs of people who are rebuilding a 1955 camper you will see what I mean. www.facebook.com/1960sPhoenixTravelTrailersK, OK...so I bombed on the above explanation. Here is a photo from mobiltec's 57 Shasta rebuild showing the front window in the open position. It shows the opening mechanism. The '55 window should open in a similar fashion. Thankx mobiltec. www.cannedhamtrailers.com/57shastaphotos/build349.jpg
|
|
|
|
Post by vikx on Sept 29, 2015 21:53:39 GMT -8
Tar is horrible. If it is true tar, gasoline will melt it. Obviously, that's not a safe solution. I would test several chemicals to see what lifts it.
Also, silver slop roof sealant is tar based. It dries like cement and will turn black if melted or treated chemically. A 2" coating of this stuff will not come off.
A new roof is the best and safest option.
|
|
gary350
Full Member
We should have gone camping today it is going to snow 6" tonight.
Posts: 573
Likes: 170
1964 FAN
Currently Offline
|
Post by gary350 on Sept 30, 2015 5:47:32 GMT -8
Here are some pictures.
First 2 pictures are the front window. Notice there is no hole in the aluminum square for a bolt to attach the handle. The slot in the steel piece appears to be made for a handle but there is only 2 bolts instead 3 needs to hold the locking bracket. There must be some parts missing. It appears something was sliding inside the aluminum part on the window. There is no place for a locking bracket to attach to the steel U shape steel part.
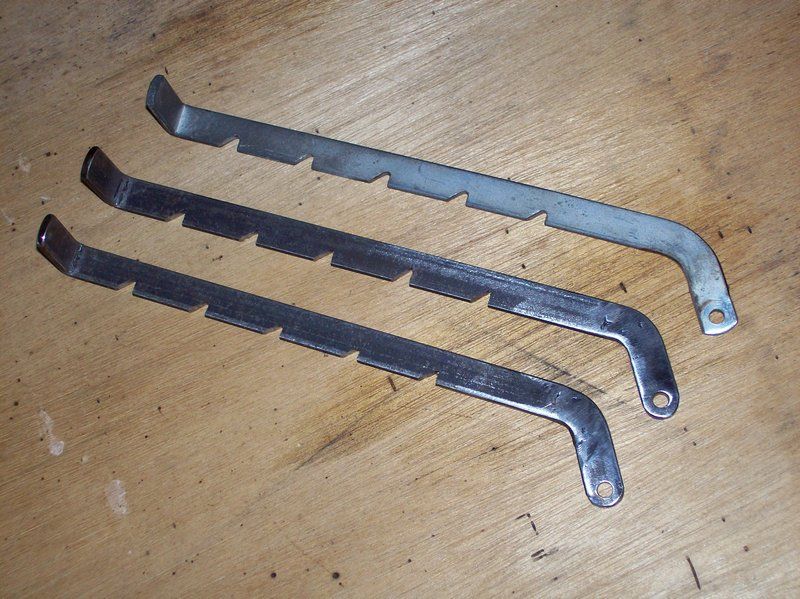
Third photo shows the original handle for back window and the 2 new handles that I made.
Photo 4 and 5 are the back window with the handle you can see how it bolts on and the locking bracket inside.

I thought this window should have a screen but there is no way to do that the screen will need 2 holes for the window opening handle to go through the screen. I have an aluminum screen frame that the previous owner had duct taped to the window. Window was wired shut and the screen taped on from the inside. I wonder how this should really be made? I also thought this window needs 3 small screens but there is not track for screens to fit in the window will not close and if it does close screens will fall out if the window is opened. I can probably rid something to work but I want it original.

The square aluminum on the window slides inside the steel U shape part on the window frame. It is a very close fit no room for a bolt head or hex nut even if I were to drill a hole to mount the handle. The aluminum is a box shape like a square shape C with a slot in the side. It appears there was something inside the aluminum you can see a dark area inside where something had been in both of these aluminum pieces. There is no way to bolt on a locking bracket like the back window unless I drill holes in the correct places.

The back window is totally different from the front window.

I also have a track for an awning. What slides in this track? Where do I buy an awning?

|
|
|
|
Post by vikx on Sept 30, 2015 21:22:50 GMT -8
Please post a photo of the front of the trailer and window. It might be a newer window; why it operates differently than the original back window.
As far as the awning rail, Marti's Awnings makes an awning that will slide into the C channel. A good seamstress can make you a nice awning as well; the material is sewn around a cord the right size to fit the C channel.
|
|
gary350
Full Member
We should have gone camping today it is going to snow 6" tonight.
Posts: 573
Likes: 170
1964 FAN
Currently Offline
|
Post by gary350 on Oct 1, 2015 7:11:43 GMT -8
Please post a photo of the front of the trailer and window. It might be a newer window; why it operates differently than the original back window. As far as the awning rail, Marti's Awnings makes an awning that will slide into the C channel. A good seamstress can make you a nice awning as well; the material is sewn around a cord the right size to fit the C channel. I have photos of the front window in the above post. Here they are again PLUS 2 additional photos.
I would like to buy a ready made awning that I can attach to the trailer. Some I have seen at camp grounds are held up by several 6 foot tall poles and some push away from the side of the trailer with 2 arms. I don't know advantages and disadvantages of each one?
The amber running/marker lights are no longer amber. Is there any way to make them amber again???


|
|
mobiltec
5K Member
 I make mistakes so you don't have to...
Posts: 9,822
Likes: 3,749
1954 Jewel In Progress...
Currently Offline
|
Post by mobiltec on Oct 1, 2015 12:33:48 GMT -8
From what I can see the push out part of the front window is just missing parts. It needs two push handles just like the one in the rear. It will also need the locking strips to hold the two levers open. Just like the rear. I've made all these parts in the past. It's not hard to replicate them. Use the rear parts for replication. There should be a lip for the screen to wrap around on the edges all the way around the push out. The screen goes over the two uprights and wraps around the entire push out part on the inside. The locks for the levers go over the screen and are held in place by rivets. Look at your rear window and how it all goes together and you will see how the front goes together and works. At least that's what it looks like to me from what I can see of the photos. It looks just like a 59 Shasta front window. I'm rebuilding one now.
|
|
gary350
Full Member
We should have gone camping today it is going to snow 6" tonight.
Posts: 573
Likes: 170
1964 FAN
Currently Offline
|
Post by gary350 on Oct 1, 2015 17:22:45 GMT -8
From what I can see the push out part of the front window is just missing parts. It needs two push handles just like the one in the rear. It will also need the locking strips to hold the two levers open. Just like the rear. I've made all these parts in the past. It's not hard to replicate them. Use the rear parts for replication. There should be a lip for the screen to wrap around on the edges all the way around the push out. The screen goes over the two uprights and wraps around the entire push out part on the inside. The locks for the levers go over the screen and are held in place by rivets. Look at your rear window and how it all goes together and you will see how the front goes together and works. At least that's what it looks like to me from what I can see of the photos. It looks just like a 59 Shasta front window. I'm rebuilding one now.
No that's not right. The front window is made different. There is no bolt hole for the level arms to bolt to the front window. Front window has 2 screws, the back window has 3 rivets. The slot in front window is different shape and different location compared to back window. My CSI investigation has determined front window never had level arms. I could re drill holes and cut slots different and make the level arms work but that will not be original. I have the original aluminum screen frame for the front window it has a slotted hole and 2 screw holes on each side for the mystery hardware. The aluminum screen frame has metal clips that hold it to the window.
Experimenting with the 2 level arms, if I hold them in place with the window open 25 degrees the slot is too high, I can only use notch 1 and 2 and the windows don't not open very much. If I cut the slot longer or make a new slot then I can use the 3rd notch in the arm like the back window. If I drill holes in the aluminum square to attach the level arms. I also have to make 2 of the brackets that hold the levels tight and lock them in place. This will make the front window open at 45 degrees like the back window. At this point I am not willing to make any serious changes like that. I hope to find the correct parts.
|
|
|
|
Post by trailertrasher on Oct 1, 2015 20:14:42 GMT -8
Hi Gary, Respectfully disagreeing with Larry ,on my first post non the less (ouch). That front window uses cranks. It is a Hehr 1700 series window. The cranks are available from VTS here: www.vintagetrailersupply.com/Window_Operator_Gear_7_11_16_p/vts-323.htmYou will also need these for each crank: www.vintagetrailersupply.com/Nylon_Friction_Pad_p/vts-348.htm That's what slides in the glass support. Those windows did use a screen. They were simply butted against the window frame and held on by "s" like clips. You would just cut the screen for the crank arms to go through before mounting the cranks. Don't know where your gonna get those clips. Probably have to fabricate. Just FYI: The screen frames offered by VTS will not work in this case due to the lip on them.. As far as I know those windows and the Hehr 2400 series on the side of your trailer were not available until 1959/60. You know what that means..... |
|
|
|
Post by vikx on Oct 1, 2015 20:55:40 GMT -8
Thanks Larry, I was thinking the same thing. Welcome Trailer Trasher! We appreciate your input very much.
|
|
mountainsounds
Active Member
Posts: 314
Likes: 104
1957 Rainbow & 1955 Starfire
Currently Offline
|
Post by mountainsounds on Oct 1, 2015 21:02:29 GMT -8
Hello!
Interesting window mystery.
Did you remove the J-rail? I'm seeing it's missing in your photo of the awning rail.
In terms of awnings, there was a thread(s) on the forum here about how make an inexpensive awning.
|
|
gary350
Full Member
We should have gone camping today it is going to snow 6" tonight.
Posts: 573
Likes: 170
1964 FAN
Currently Offline
|
Post by gary350 on Oct 2, 2015 4:29:04 GMT -8
Hi Gary, Respectfully disagreeing with Larry ,on my first post non the less (ouch). That front window uses cranks. It is a Hehr 1700 series window. The cranks are available from VTS here: www.vintagetrailersupply.com/Window_Operator_Gear_7_11_16_p/vts-323.htmYou will also need these for each crank: www.vintagetrailersupply.com/Nylon_Friction_Pad_p/vts-348.htm That's what slides in the glass support. Those windows did use a screen. They were simply butted against the window frame and held on by "s" like clips. You would just cut the screen for the crank arms to go through before mounting the cranks. Don't know where your gonna get those clips. Probably have to fabricate. Just FYI: The screen frames offered by VTS will not work in this case due to the lip on them.. As far as I know those windows and the Hehr 2400 series on the side of your trailer were not available until 1959/60. You know what that means.....
The crank arm screw hole dimensions line up with the screw holes on the front window and the crank arm matches up with the slot and the arm will fit the window. The plastic piece on the tip of the arm must be the slider for the inside of the 1/2" square tubing on the window I can see something has been sliding inside there in the past. That appears to be the mystery parts that are missing. I ordered 2 crank arms hope they work. There does not seem to be any other parts missing to this window but I will know for sure when the crank arms arrive.
I will look for the thread about making your own awning. At the moment we want to go camping so a 9x11 tarp will have to do. I don't know what the J rail is? Is that part of the awning or the window? The arm on the back window is J shaped? The awning track is C shaped.
|
|


 what every that might be. The window is 6 feet wide and opens in the center. Pictures will be very helpful. I have a work shop with a lathe, mill, drill press, band saw, belt sander, grinder, 2 welders, air compressor, and too many hand tools to list them all. I can pretty much make anything if I have a part to copy or photos or drawing.


 to VTT. Here is a thread to a facebook page for people with 60's Phoenix campers...I think there are some comments by people who own 50's Phoenix campers. Might be able to connect with one of them. Almost any 1955 vintage camper with a 6 foot wide front window would have had the center section push open. The lever, when closed is usually held in place by a king of hook the flat pusher slots into, when you want to open it you free it from it's holder and push on the hinged arm and the window swings open, and you can open it to various degrees because there are notches on the flat pusher that nest along the bottom edge. If you open any number of blogs of people who are rebuilding a 1955 camper you will see what I mean.


