|
|
Post by Teachndad on Jun 8, 2015 5:17:00 GMT -8
Hi,
I have to remove the roof to work on a bulge on one wall. My 57 Westerner, Andy, has a 4 piece roof.
Once the roof is free from the army of staples, I can remove it.
I can float it to one side, but, it's going to eventually be completely removed to work on the water damaged ceiling and probably some warped rafters. I will assume that I do not roll the roof because it is not a one piece roof.
Here is my assumption of how I remove the roof. Correct me, please.
1. remove all staples attaching the roof to the walls
2. Use a Sharpie to mark the parts of the roof on the underside with numbers to confirm placement for re-attachment
3. loosen and remove roof vent
4. flatten the tabs(bent roof side edges) of the roof
5. separate the roof sections at the each Pittsburgh seam
6. Stack on the ground - I can place the roof sections under my pop up trailer which is in my carport
Do I need to flatten the curved fore and aft sections of the roof or leave them curved, but flatten the tabs(bent edge)?
Thanks,
Rod
|
|
maddan
Junior Member

Posts: 71 
Likes: 21
57 Westerner
Currently Offline
|
Post by maddan on Jun 8, 2015 19:46:39 GMT -8
Rod,
The roof on my 57 Westerner has factory seams. If yours is the same, not sure you want to mess with trying to separate the sections. When I removed my roof, all the sections stayed intact. The whole roof was supported using lumber, rope and pulleys. Let me know if you need some pix.
Dan
|
|
|
|
Post by vikx on Jun 8, 2015 21:14:39 GMT -8
Dan is correct. Don't take the roof apart, they aren't Pittsburg seams, but factory crimped.
If you are concerned that the seams are "iffy", place sticky waterproofing tape on the underside of the seams. Rolling your roof should work well.
|
|
RinTin
Full Member
Posts: 760
Likes: 292
Currently Offline
|
Post by RinTin on Jun 9, 2015 8:50:16 GMT -8
As others have said, the crimped seams are not to be separated. When I removed the roof metal from my trailers, it curled up and away from the trailer.  Resulting in this split at a screw hole:  I got smart fast and strapped it down:  Then continued to loosen the metal and straighten the edges:  I used a hand seamer to straighten the edges and consider it a must have tool for metal working:  I also like to clean up the old putty before removing the metal from the trailer. Tough to take the time to do so at this time but much easier in the long run. I slid some 1x4 boards under it, made a frame and hung the roof metal of the Jewel from the rafters:  Being my first one, and since I will be re-using it, I wanted to play it safe and subject it to as little stress as possible. As vikx says, you should be fine to roll it up.  |
|
|
|
Post by Teachndad on Jun 9, 2015 10:31:15 GMT -8
Thanks Greg and all of you! Greg, I am very grateful that you took the time to post your pix and tips on this thread. It will definately help a lot of folks. I am riding on the Common Sense Train which can be iffy at times.  LOL. I had a split happen as well. It looks just like the one pictured. I have some questions below which anyone can chime in to answer. 1. Greg, when you rolled the roof, did the split get bigger even if the edges are flattened? 2. Do I need to reinforce the split with a clamp or something similar when rolling? 3. What's the appropriate diameter for the roll? 4. When using the waterproof tape - (link please), do we just leave it on and never take it off after when replacing the roof back on to the top of the trailer? 5. Did you roll it up while it was on top of the trailer or did you lower and move the entire rack with roof on it down to the ground and roll it up? 6. I can make a rack and place it on top of my pop up with the roof on it, but it's going to have be moved when we go camping, so is it just best to roll it up? BTW, there is one place in the roof near a seam where there is a wrinkle and a dent. I don't know if that will impact the rolling. I will search and see if I have a picture of the dent. THANKS! Rod |
|
RinTin
Full Member
Posts: 760
Likes: 292
Currently Offline
|
Post by RinTin on Jun 9, 2015 13:18:40 GMT -8
Rod,
1: Once the edges are flattened, the stress is relieved from the split so it stabilizes. Handle it carefully.
If you don't have a hand seamer, buy one. There is nothing better for working the edges and getting them nice and flat. Get one with a forged head, not cast as the forged head is thinner and stronger. I have two, a 3" and a 6". If you can only but one, get the 3". It's the one I use 90% of the time. Malco is the brand pictured and what I use.
2: Can't hurt to reinforce it, but not absolutely necessary in my opinion. It comes down to how comfortable you are handling sheet metal. A long time ago I used to be a roofing contractor and did a lot of sheet metal roofing so I am very comfortable with it.
3: The rolled up roof metal is about 24" diameter. It more or less determined what it wanted to be while rolling it up. Bigger is better. I had to keep it small enough to clear my shop lights.
4: I believe the waterproof tape vikx is referring to is standard aluminum repair tape. Apply it to the underside, which is easy to do while unrolling the metal, and leave it permanently.
5: The rolled up metal is from my 65 Aloha. I rolled it up with a helper while it was on the trailer. One of us on each side on step ladders. The spring clamps are invaluable for this so you can clamp the metal and get down to re-position the ladder while the other holds the metal steady.
The roof metal in the rack is from my 57 Jewel. Over 2 years later it is still hanging from the rafters, LOL.
6: In your situation, working outside in the open, I would attempt what John Palmer does. Loosen the entire roof metal and flatten the edges, then lift whatever end you start working on and roll it back over and onto the opposite end. This way the roof metal never has to leave the trailer and makes it easy to button it up in the event of an unexpected rain shower. Just flop it back over and cover with a tarp. You have experience with that now don't you?
The wrinkle and dent should not pose a problem as long as the edges are nice and flat. If the ends of the roof metal are cut out for a window like you see in my picture, you may want to fasten a piece of 1x2 across the cutout along the entire end of the metal to help keep you from accidentally tearing out the metal in the inside corner of the cutout. This would also make it easier to flop the metal back and forth or roll it up.
|
|
|
|
Post by Teachndad on Jun 11, 2015 6:16:51 GMT -8
Thanks again tenfold, Greg! In your final paragraph of your response, you mentioned adding a piece of wood to stop rips in the corners of the window openings. Well, I took your suggestion and applied it to the upper streetside skin because if all the openings it has. I repurposed some old excess wood. When I bought my new sill wood at the lumber yard a while back, I asked to keep the excess part of the 2 x 4 that was ripped away from what would become the sill board wood. It's about 3/8" thick. I had enough to do the full upper skin as well as the rear of the roof just above the rear window. Below are pix of the final product. Cheers Rod 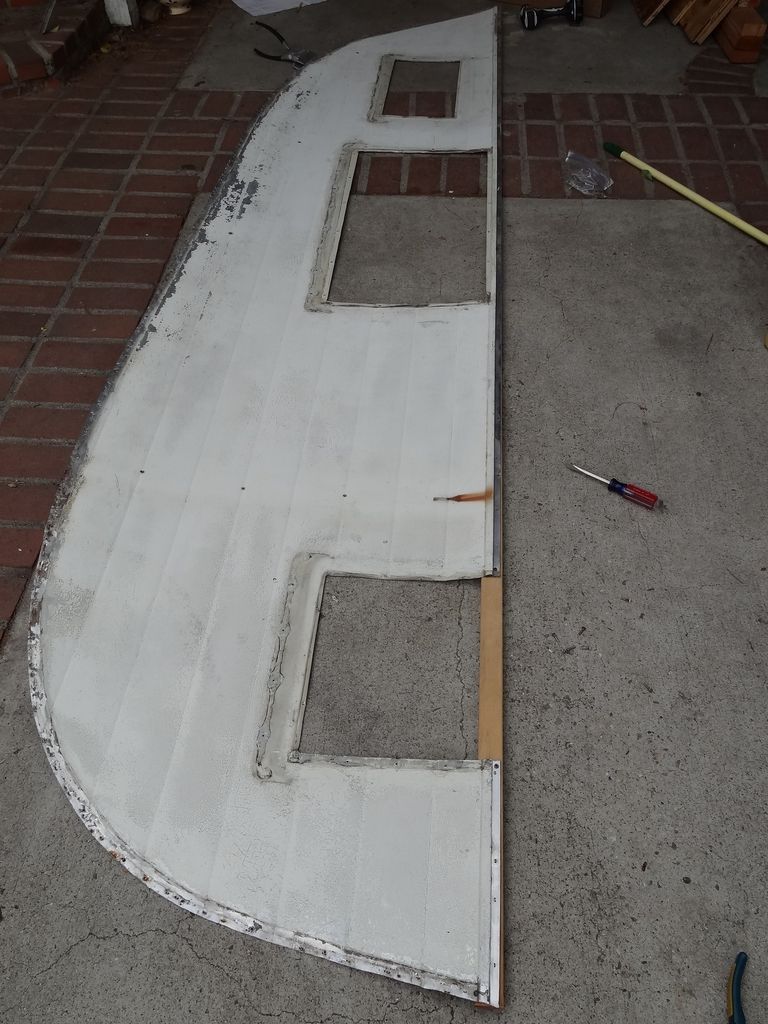 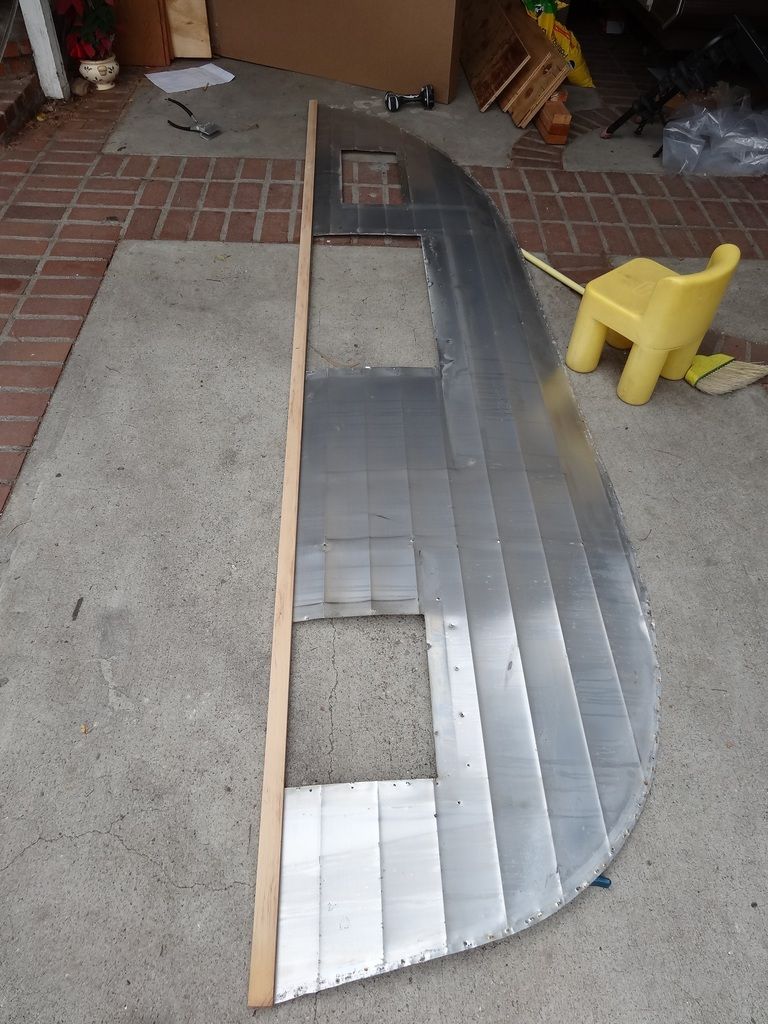 |
|
|
|
Post by Teachndad on Jun 11, 2015 6:18:20 GMT -8
Hi All, BTW, what's the best way to attach the wood strip to the skin? I made the assumption that using some old skin screws into the tab of the Pittsburgh seam would work instead of staples. Let me know if that's a no-no.  Thanks, Rod |
|
|
|
Post by Teachndad on Jun 11, 2015 6:23:41 GMT -8
Hi Again,
When I purchased my tools before starting on this journey, I bought this 3 1/2" wide sheet metal seam sealer from Harbor Freight. Clearly, it's not as nice as the one Greg posted above. Will it do the job, or should I reinvest in something a little better? I am sure it doesn't have a forged head like Greg recommends.
|
|
RinTin
Full Member
Posts: 760
Likes: 292
Currently Offline
|
Post by RinTin on Jun 11, 2015 7:34:10 GMT -8
Thanks again tenfold, Greg! In your final paragraph of your response, you mentioned adding a piece of wood to stop rips in the corners of the window openings. Well, I took your suggestion and applied it to the upper streetside skin because if all the openings it has. I repurposed some old excess wood. When I bought my new sill wood at the lumber yard a while back, I asked to keep the excess part of the 2 x 4 that was ripped away from what would become the sill board wood. It's about 3/8" thick. I had enough to do the full upper skin as well as the rear of the roof just above the rear window. Below are pix of the final product. Cheers Rod Perfect, that's exactly what I was talking about. Small #6 or #8 pan head screws through the tab are fine. |
|
RinTin
Full Member
Posts: 760
Likes: 292
Currently Offline
|
Post by RinTin on Jun 11, 2015 7:41:50 GMT -8
Hi Again, When I purchased my tools before starting on this journey, I bought this 3 1/2" wide sheet metal seam sealer from Harbor Freight. Clearly, it's not as nice as the one Greg posted above. Will it do the job, or should I reinvest in something a little better? I am sure it doesn't have a forged head like Greg recommends. All that matters is that it gets the job done. The meeting surfaces look a little skinny but it should work just fine. I have a lot of professional grade tools because I used to make my living that way. |
|
nccamper
Administrator 
Posts: 7,745
Likes: 2,872
1962 Forester- 1956 Shasta
Currently Offline
|
Post by nccamper on Jun 11, 2015 14:23:45 GMT -8
Hi Again, When I purchased my tools before starting on this journey, I bought this 3 1/2" wide sheet metal seam sealer from Harbor Freight. Clearly, it's not as nice as the one Greg posted above. Will it do the job, or should I reinvest in something a little better? I am sure it doesn't have a forged head like Greg recommends. All that matters is that it gets the job done. The meeting surfaces look a little skinny but it should work just fine. I have a lot of professional grade tools because I used to make my living that way. RinTin, What do you think of an offset seamer? www.amazon.com/Malco-Redline-Offset-Seamer-Forged/dp/B002JAUOV4/ref=sr_1_2?s=hi&ie=UTF8&qid=1434061069&sr=1-2&keywords=malco+s3r |
|
RinTin
Full Member
Posts: 760
Likes: 292
Currently Offline
|
Post by RinTin on Jun 11, 2015 16:34:21 GMT -8
An offset seamer would work just fine. They do the same thing but are designed to reach into areas that you cannot get to with a standard seamer. Mostly used in the HVAC trade for duct work. Mine are standard and I have never had a need for an offset seamer. |
|
mobiltec
5K Member
 I make mistakes so you don't have to...
Posts: 9,824
Likes: 3,750
1954 Jewel In Progress...
Currently Offline
|
Post by mobiltec on Jun 16, 2015 5:45:48 GMT -8
I suppose I got here to late with an answer. I Just happen to have a video on this subject.
|
|
|
|
Post by Teachndad on Jun 16, 2015 6:37:22 GMT -8
Hi Larry, Thanks for posting that! I have been messing around with my wall bulge and wall sag, so it wasn't too late. Rod |
|


 LOL.
LOL.


