SusieQ
Global Moderator 
Posts: 4,781 
Likes: 1,197
'62 Shasta Compact
Currently Offline
|
Post by SusieQ on Aug 22, 2014 10:53:20 GMT -8
Cute trailer. You are making great Progress.
|
|
pam
Junior Member

Posts: 61
Likes: 15
Serro Scotty 69
Currently Offline
|
Post by pam on Aug 22, 2014 16:22:43 GMT -8
Great job repairing the floor and the four corners! It looks as though the repair party is about to move upstairs to the roof. Thanks for sharing the video  . |
|
wolvenwood
Member
Posts: 45 
Likes: 5
Currently Offline
|
Post by wolvenwood on Aug 24, 2014 12:45:57 GMT -8
Thanks for the feedback. We'll be on vacation for a couple weeks, but when I get back it'll be time to fix the roof structure and order the skin from Mac's in Tulsa. I want it closed in and watertight before winter.
|
|
wolvenwood
Member
Posts: 45
Likes: 5
Currently Offline
|
Post by wolvenwood on Aug 27, 2014 7:28:08 GMT -8
And now the front wall is done. Won't be able to work on it for a couple weekends, but next on the list is to re-frame the front side windows and the door. I will be using a modern toy-hauler door that is a little tall, but it was the perfect width, the price was right and it has a built in screen door. But this is a refurbish for glamping, not a factory restoration, so I'm ok with a few anachronisms. 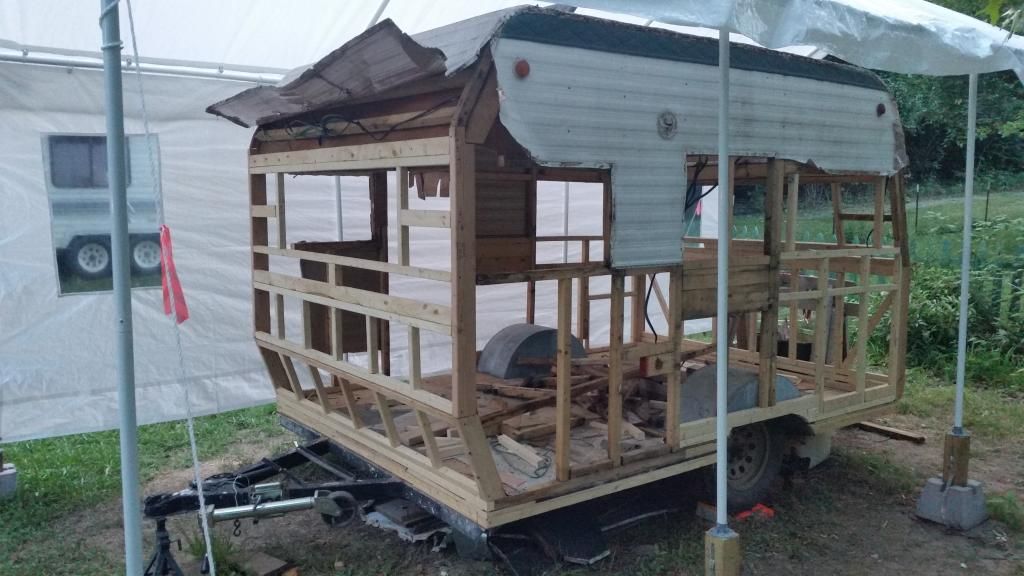 |
|
|
|
Post by sixtyoneshastagal on Aug 27, 2014 8:22:41 GMT -8
Hi there must say you got right to it. Be sure you check out those tires and wheels we had to do that first thing on ours. Also needed a smaller spare tire which we just learned as you may not be able to jack it up on the road to change tires without damaging the new sides. Les Schwab was told they were to deflate our new tires to get them on and they did NOT...damage occurred.
|
|
John Palmer
Senior Member
 Hi, From a vintage trailer guy located in Santa Ana, CA. It's good to see lots of activity here.
Posts: 1,629
Likes: 576
Currently Offline
|
Post by John Palmer on Aug 27, 2014 9:31:54 GMT -8
Hi there must say you got right to it. Be sure you check out those tires and wheels we had to do that first thing on ours. Also needed a smaller spare tire which we just learned as you may not be able to jack it up on the road to change tires without damaging the new sides. Les Schwab was told they were to deflate our new tires to get them on and they did NOT...damage occurred. I would start by going after the tire store for the damage repairs! NO DAMAGE is acceptable in changing a tire. How you do it is the question, and a professional dealership should be held to a high standard? How would deflating a tire "to squeeze it in" help you out when your on the side of the highway changing a flat tire in the middle of the night? Are you also going to carry a air compressor?
First every one should do a practice run or two, of making a tire change "in your driveway" to figure out the exact tools to carry and the methods needed to safely remove and replace a flat tire on your trailer. It may sound strange, but every trailer is a little different, and many are different from side to side because of fender clearance and new replacement tire sizes being sold which have wider cross sections than the original tires used on these trailers back in the day.
Hubcap Removal, It's a very good practice to carry a small block of wood such as a 1x2 about three inches long to use as a "protection" fulcrum in removing you hubcaps. Nothing worse than newly painted or powder coated wheels getting all scratched up as you try to remove the caps with your flat blade screwdriver.
Lug Nut Removal, make sure you have a good quality lug wrench, or I like to use a 1/2" breaker bar to "break loose" the lug nuts "before" you jack up the trailer. (source at Garage Sales)
Rug or Carpet scrap, Keep something in the trailer that you can use to slide under the trailer and lay on while in the dirt/mud/wet grass/etc. (source at Garage Sales)
Visibility, Make sure you carry some roadside safety reflectors for changing a tire at night. Also have a dedicated "decent sized", "fully charged" flashlight in your tool box for roadside repairs. (source at Garage Sales)
Jacking the Trailer, Leave the trailer attached to the tow vehicle for stability, and your safety. Your going to need "at least two" jacks to get the job done (source at Garage Sales). One of the jacks should be a small scissors screw jack that can fit between the frame and the axle/springs to force the axle down. You should also have at least two jack stands (source at garage Sales) and some 12" squares of 3/4" plywood and small 2 by 4's. You need to raise the trailer high enough that "a fully inflated" tire is off the ground then support the trailer frame on the jack stands, again making sure that "a fully inflated" tire will still be off of the ground after you lower the jack. Yes it sounds strange, but you need it higher to install the new inflated spare tire compared to the flat tire your will be removing. It's hard to describe, but the single biggest concept to remember is the axle needs to drop down out of the fender well for the tire to come off. You might even need to jack up the opposite side of the trailer, which is the reason why you need multiple jacks, multiple stands, and boards. Also, plan for the fact that you will never be changing to tire on a completely flat and hard surface like your driveway. The road shoulder will have a water runoff slope.
Spare Tire, Make sure the spare tire that you are carrying "actually fits your trailer". Wheels have many different dimensions. You have the bolt circle diameter, the number of lug holes, the rim back spacing, the tire diameter, the tire width (cross section), that ALL have to be correct. If one is incorrect for your trailer the spare wheel/tire will not fit.
This is likely more than you want to think about, but at least find out in your driveway, and not on the side of a two lane highway, some night, while it's raining. Murphy's law states, tires never go flat in your driveway, on a sunny day.
|
|
wolvenwood
Member
Posts: 45
Likes: 5
Currently Offline
|
Post by wolvenwood on Aug 27, 2014 9:42:53 GMT -8
Thanks for the spare tire info. It's on my list. I am having a bumper fabricated so that we can mount a spare outside.
|
|
John Palmer
Senior Member
Hi, From a vintage trailer guy located in Santa Ana, CA. It's good to see lots of activity here.
Posts: 1,629
Likes: 576
Currently Offline
|
Post by John Palmer on Aug 27, 2014 9:48:15 GMT -8
Thanks for the spare tire info. It's on my list. I am having a bumper fabricated so that we can mount a spare outside. This might be a problem?
On a single axle trailer, weight distribution (tongue weight balance) is a very important consideration.
Adding a strong enough bumper to support the spare, bumper brackets, a tire mount, and a spare tire "extended" to the extreme end of the trailer is a huge change in the trailer balance. Make sure you do not create a towing problem, in trying to resolve a space problem.
|
|
wolvenwood
Member
Posts: 45
Likes: 5
Currently Offline
|
Post by wolvenwood on Aug 27, 2014 10:05:26 GMT -8
Good point. I am planning to add all of my appliances to the front half of the trailer: on-board battery, AC mounted under a bench, minifridge, etc. The only thing going in back is the frame and such for the gaucho. I'll have to do the math before I get too far and see if mounting the spare overdoes it. If so, the spare can be carried in the tow vehicle. I really do want the bumper to protect against bad backups, fender benders, etc, and to hold a couple stabilizer jacks. Thanks for all your feedback on this thread.
|
|
|
|
Post by vikx on Aug 27, 2014 21:57:17 GMT -8
Hi there must say you got right to it. Be sure you check out those tires and wheels we had to do that first thing on ours. Also needed a smaller spare tire which we just learned as you may not be able to jack it up on the road to change tires without damaging the new sides. Les Schwab was told they were to deflate our new tires to get them on and they did NOT...damage occurred. 61's trailer was damaged pretty badly by the flunkies. I "sorta" repaired it but they should be held accountable. This is in my instructions for new owners: Wheels and Tires: NOTE: Vintage trailers have very tight wheel wells; the wheels and tires clear the hub with minimal gap. It is often necessary to flatten the tire to mount the wheel. Do not force the wheel into the wheel well; it can damage the trailer. The Little Dipper has enough clearance to mount the tire. The trailer must be jacked high enough to facilitate mounting. Repair people MUST be informed of the tight wheel wells described above. Do not assume they know or understand how to work on a vintage trailer. Talk to the manager before work is performed and be sure they understand this issue. Perhaps initials on the work order would be prudent... |
|
wolvenwood
Member
Posts: 45
Likes: 5
Currently Offline
|
Post by wolvenwood on Apr 27, 2015 9:44:43 GMT -8
Been a while since I posted progress. I spent the winter refurbishing the windows. This week I cut the openings for the vents, baggage door, and windows.
<a href="http://s1144.photobucket.com/user/wolvenwood1/media/WindowsIn1_zpsnbc0xorn.jpg.html" target="_blank"><img src="http://i1144.photobucket.com/albums/o481/wolvenwood1/WindowsIn1_zpsnbc0xorn.jpg" border="0" alt=" photo WindowsIn1_zpsnbc0xorn.jpg"/></a>
<a href="http://s1144.photobucket.com/user/wolvenwood1/media/WindowsIn2_zpsygierfdc.jpg.html" target="_blank"><img src="http://i1144.photobucket.com/albums/o481/wolvenwood1/WindowsIn2_zpsygierfdc.jpg" border="0" alt=" photo WindowsIn2_zpsygierfdc.jpg"/></a>
<a href="http://s1144.photobucket.com/user/wolvenwood1/media/WindowsIn3_zps3gsbxbkp.jpg.html" target="_blank"><img src="http://i1144.photobucket.com/albums/o481/wolvenwood1/WindowsIn3_zps3gsbxbkp.jpg" border="0" alt=" photo WindowsIn3_zps3gsbxbkp.jpg"/></a>
|
|
Hamlet
2K Member
Posts: 2,820
Likes: 925
Currently Offline
|
Post by Hamlet on Apr 27, 2015 10:29:10 GMT -8
Nice work and nice pics wolvenwood!
|
|
RinTin
Full Member
Posts: 760
Likes: 292
Currently Offline
|
Post by RinTin on Apr 27, 2015 11:24:44 GMT -8
Looks like you replaced all the skins too. Nice and clean looking. The rounded corners on the baggage door balances out the modern door styling. Good work.
|
|
ladywendolyn
2K Member
Posts: 2,315
Likes: 928
1964 Golden Falcon
Currently Offline
|
Post by ladywendolyn on Apr 27, 2015 14:10:07 GMT -8
Beautiful!
|
|
mobiltec
5K Member
 I make mistakes so you don't have to...
Posts: 9,824
Likes: 3,750
1954 Jewel In Progress...
Currently Offline
|
Post by mobiltec on Apr 27, 2015 15:47:13 GMT -8
Good job!  |
|


 .
.


