pam
Junior Member

Posts: 61 
Likes: 15
Serro Scotty 69
Currently Offline
|
Post by pam on May 16, 2014 8:35:19 GMT -8
Hi - This is my 1960's 12' Wildcat shortly after purchase: 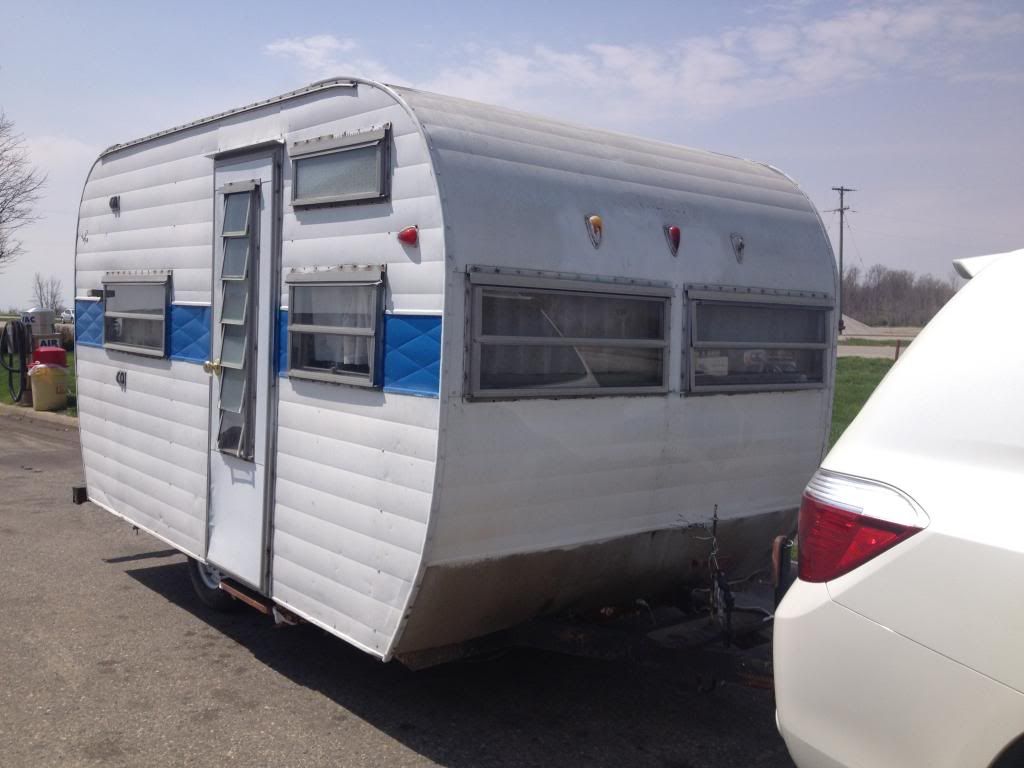 Picked it up in Michigan and on my way home to Wisconsin. If ever there was an example of "Putting Lipstick on a Pig" ...you are looking at it. I think that the guy used a paint roller on most of it and used pottery paint on the blue. Yes, I honestly did months and months of reading and research on the do's and dont's of first time camper trailer purchasing. I was not surprised to find Ms. Wildcat wearing lots of surface makeup to look nice for her photos. None the less, it is still weird knowing that the smiling person standing in front of you, taking your money and telling you that "it just needs some superficial repairs", is a con artist. Because the buying market is so flooded with folks who will pay foolish money for these old ladies, it comes down to doing the best you can to minimize the screwing that you know you are going to get. On that point, I think I did rather well. I am so thankful to Soup's wonderful thread and photos of his Wildcat restoration! I like "girl stuff" but I also L-o-v-e carpentry and building and restoring. If there are any Vintage Camper Purists reading, you might want to stop here, this won't be an authentic style restoration but I plan on keeping it as close to the original footprint as possible. I found these posted on another forum and they have been very helpful. 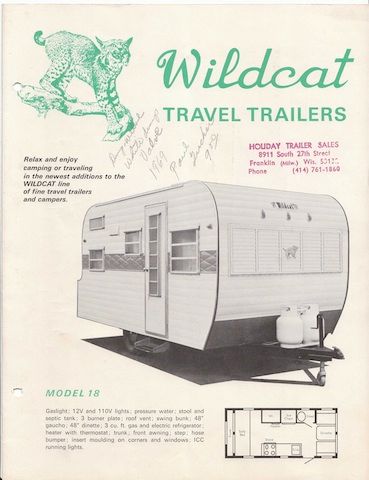 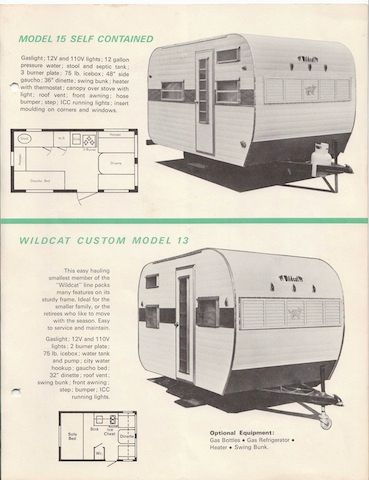 I'll do a proper post when I'm farther along! |
|
Hamlet
2K Member

Posts: 2,820 
Likes: 925
Currently Offline
|
Post by Hamlet on May 16, 2014 11:37:15 GMT -8
Good on 'ya for being aware of the lipstick up front. We'd have been tempted to call the seller on it, but then again, no reason to tick anybody off. Congrats on your purchase, and good luck on the restore, even if you do make modifications!
|
|
soup
1K Member
"I hate cold Soup"
Posts: 1,237
Likes: 204
Currently Offline
|
Post by soup on May 16, 2014 16:04:10 GMT -8
Mee-yow Baby!
LOL Welcome to VTT Pam! 
soup |
|
cheri
Active Member
Posts: 163
Likes: 46
1967 Vanbrook Trunkback
Currently Offline
|
Post by cheri on May 16, 2014 16:33:49 GMT -8
Hi Pam,
I think you replied to a post I put on the TnTT site, but I missed. Sorry about that. I'm glad you have joined this site. It is awesome. I've been working like crazy on my Wildcat. I've got all the rot fixed and am starting to put her back together. I would love to follow your journey!!
Cheri
|
|
camperlady
New Member
Posts: 2
1971 Wildcat
Currently Offline
|
Post by camperlady on Aug 5, 2014 12:26:47 GMT -8
Hi Pam, I think you replied to a post I put on the TnTT site, but I missed. Sorry about that. I'm glad you have joined this site. It is awesome. I've been working like crazy on my Wildcat. I've got all the rot fixed and am starting to put her back together. I would love to follow your journey!! Cheri |
|
camperlady
New Member
Posts: 2
1971 Wildcat
Currently Offline
|
Post by camperlady on Aug 5, 2014 12:30:16 GMT -8
Cheri and Pam,
I am yet another new "wildcat" owner in Wisconsin. I think mine is a 66 but I'm not sure how to really know this. I have also removed all the rotten wood. I think there is probably one original stick of wood left in the old girl. I am now ready to tackle the interior and the first order of business is the electrical. I tore out all the old wiring (may have been a mistake) and now I need to replace everything. Also, since the trailer was stripped of all interior, I don't know what the layout of the interior should look like. Any photos you can send my way to show me where to start? Nancy
|
|
cheri
Active Member
Posts: 163
Likes: 46
1967 Vanbrook Trunkback
Currently Offline
|
Post by cheri on Aug 5, 2014 17:14:17 GMT -8
Hi Nancy, I think my camper may be an imposter, (a Vanbrook actually), but she looks just like the 17 foot Wildcat. Here is a link to an actual wildcat rebuild that looks a lot like mine Elizabeth Freyseth's rebuild. Here is a link to my photobucket folder 67 VanbrookI look forward to seeing your trailer. I redid the electric in mine, and it is well worth the effort. I was a bit intimidated after I tore it out, but no regrets!! Please keep me posted on your progress. I still feel a part of the Wildcat group even though my camper is a wanna-be. Cheri |
|
chametzoo
Full Member
Posts: 585
Likes: 128
1960 Mobile Scout
Currently Offline
|
Post by chametzoo on Aug 5, 2014 17:23:11 GMT -8
None the less, it is still weird knowing that the smiling person standing in front of you, taking your money and telling you that "it just needs some superficial repairs", is a con artist. ….it comes down to doing the best you can to minimize the screwing that you know you are going to get. PAM… your characterization is too funny! Funny but true. Funny but sad. I'm convinced that many of these folks truly do not know that they are doing the wrong thing. They're the uninformed ones. Kudos to you for your perseverance and interest in restoring your Wildcat in the proper way, regardless. It's a handsome trailer; I'm a sucker for the jalousie window doors! |
|
pam
Junior Member
Posts: 61
Likes: 15
Serro Scotty 69
Currently Offline
|
Post by pam on Aug 7, 2014 20:31:43 GMT -8
![]() UPDATE on my New/Old Wildcat in Wisconsin: I found it necessary to rip out the entire subfloor and install a new one...without doing a total rebuild. At one point I had the frame suspended in mid-air and hanging by ropes that I snaked through a garage attic window. <img style="max-width:100%;" alt="" src=" !["]() "> 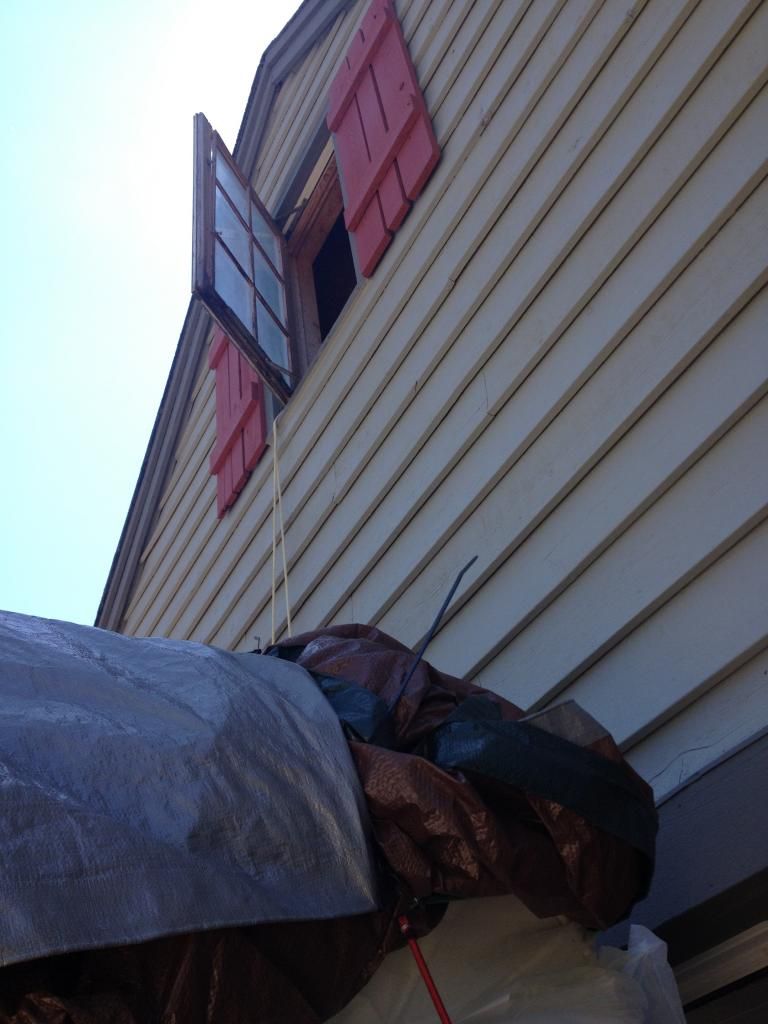 The old flooring was beyond repair and areas sitting on the frame that had rusted through. The repair on the flooring took me the better part of a month - complicated by the fact that I had never used Bondo, Liquid Weld, or Epoxy before  .....The resulting repair work is far from perfect, but there are no longer holes through the aluminum bottom and it's sealed tighter than the hull of a ship! The left side is installed and the wheel cover has been repaired. 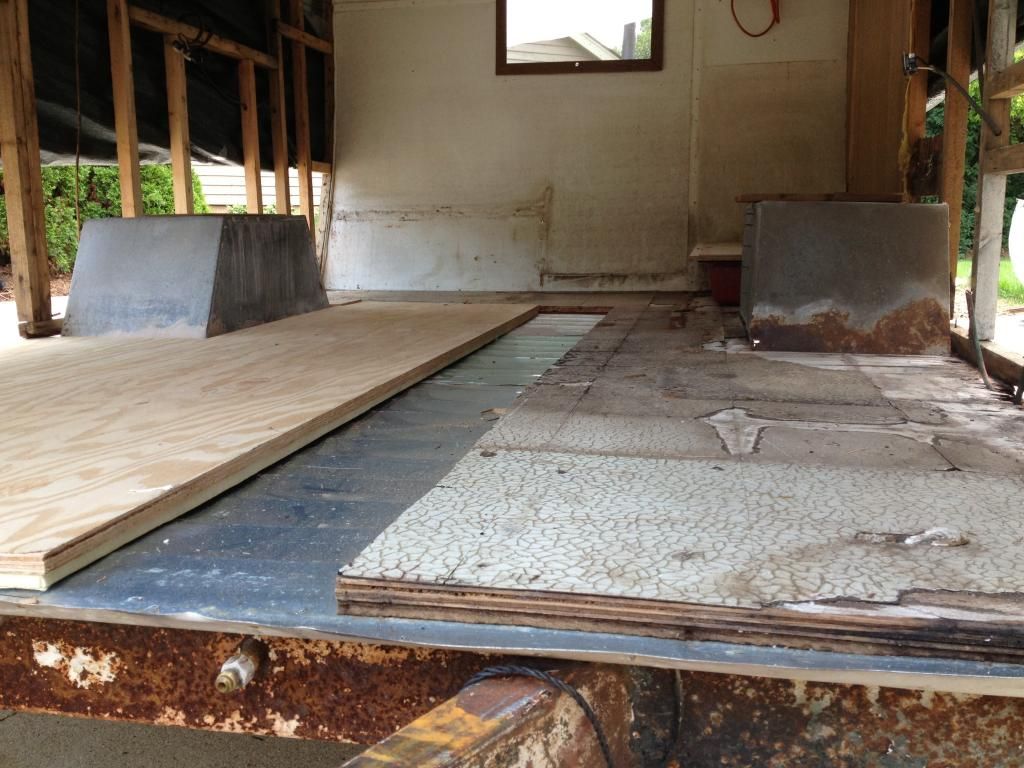 This side photo shows why repairing the existing floor was not an option: 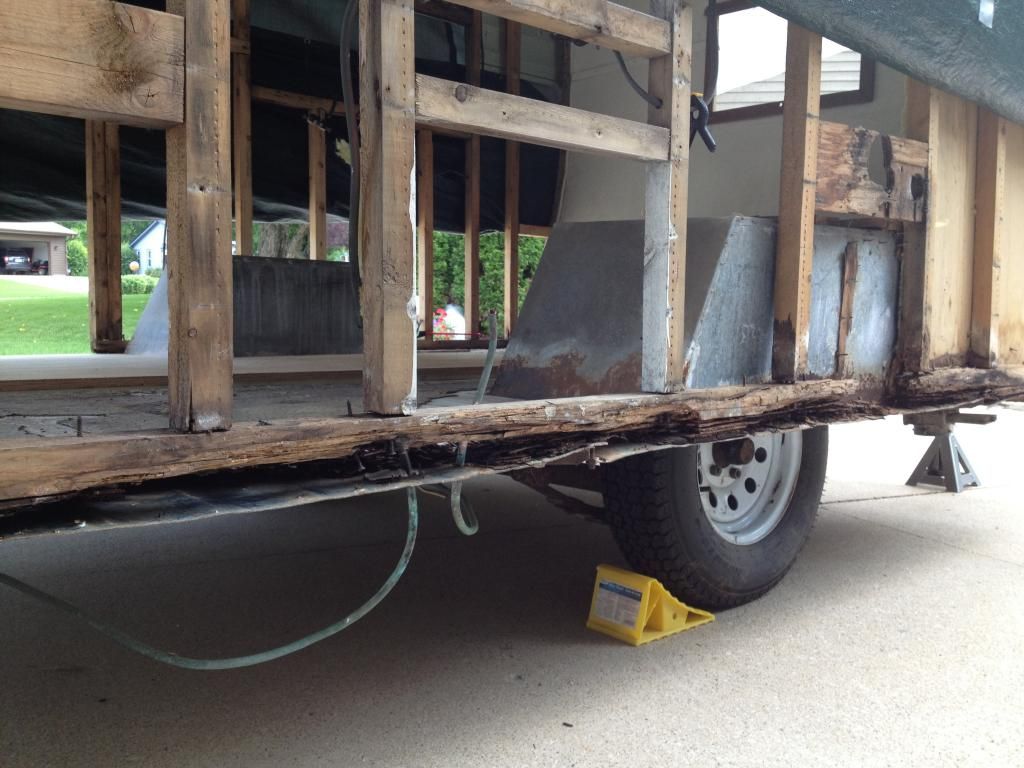 Installed a new 2 X 2 across the bottom prior to installing the new sub floor and will hope things line back up when I reattach the skin!  Back on track now and working on the roof. My roof looks exactly the same as yours Cheri along with paneling, fiber board and everything else stuffed up there to add support. Unfortunately, the existing roof had dips and waves and puncture holes in one area so I rolled it up and tossed it. It looks at though the previous owners tried to use the roof to stack bicycles, and other cargo while traveling. Big deep dents into the roof in a number of areas. I'm lucky to have a place locally to purchase a replacement and will have that in hand in two days. Several of the cross beams were rotted and warped along with the long 2 X 2's that they rested on. I replace all of those and reinforced the sides. Thanks for getting in touch Nancy! I am looking forward to reading about your project! Cheri - your slide show on Photobucket is amazing! You're my idol! |
|
cheri
Active Member
Posts: 163
Likes: 46
1967 Vanbrook Trunkback
Currently Offline
|
Post by cheri on Aug 8, 2014 3:32:44 GMT -8
Wow, Pam thanks so much for the reply and pictures, I was so happy to hear from you. You are rockin it out. My trailer does not have the aluminum underneath, and there were only a couple pieces of the plywood floor that needed to be replaced, so I didn't have to do as much as you did. I did lift the frame up to replace the bottom board and patched plywood on one side. It wasn't that much of a problem as much of the side framing had to be replaced there as well. I feel better knowing that the bolts holding the camper to the frame are new and attached to solid wood.
I struggled with getting things lined up when attaching the skin until I remembered why I had purchased a bunch of clamps. I was getting really frustrated with the back end until a vision of one of mobiletech's videos flashed into my head. In the video he used a bunch of clamps to hold it in place. I used pliers to get a good grip, pulled the skin (hard) to where it needed to be and applied a clamp at the window opening. It was amazing how well it worked.
I wish I had a local source of roofing, but I haven't found one, and the price was way above my budget. (Maybe next summer) My plan is to replace everything above the front and rear windows with new aluminum to eliminate the front and rear seams, so it is an awfully big piece. Are you getting rid of the seams or just replacing the center?
You are in the most thankless part of the restoration. My sister came over to help me attach the skin, and I kept asking her to look at my roof. I never did get her to climb up and look. After she saw the before pictures, she was a whole lot more interested. This site is great because we can all truly understand and appreciate all the hard and important work no one will ever see. !! Keep the faith, she is going to be awesome.
Cheri
|
|
pam
Junior Member
Posts: 61
Likes: 15
Serro Scotty 69
Currently Offline
|
Post by pam on Aug 8, 2014 5:52:16 GMT -8
Thanks for the great suggestion on dealing with the skin! I will check out the video and invest in some additional clamps!
The local source for roofing is "Speedy Metals" and they are about 20 minutes away. They deliver to a industrial complex that is 5 minutes away and I know someone at one of the businesses there. They are letting me piggyback my delivery to their place.
Your roof looks nice and flat in the pictures, and all of the newer seal products ought to help keep everything dry.
Attention to detail is the guiding principle that I have picked up from the pro's on this site. It seems to be the overlooked "little stuff" that can come back to bite ya:) lol
|
|


 .....The resulting repair work is far from perfect, but there are no longer holes through the aluminum bottom and it's sealed tighter than the hull of a ship! The left side is installed and the wheel cover has been repaired.