slider
Junior Member

Posts: 90 
Likes: 16
Currently Offline
|
Post by slider on Feb 1, 2014 16:50:13 GMT -8
Here are a few pics as I got it (repeat of some previous pics)    After a little work today:  Had to brace the roof/air conditioner because of rotted wood in the ceiling.  Rot, yeah I got that: 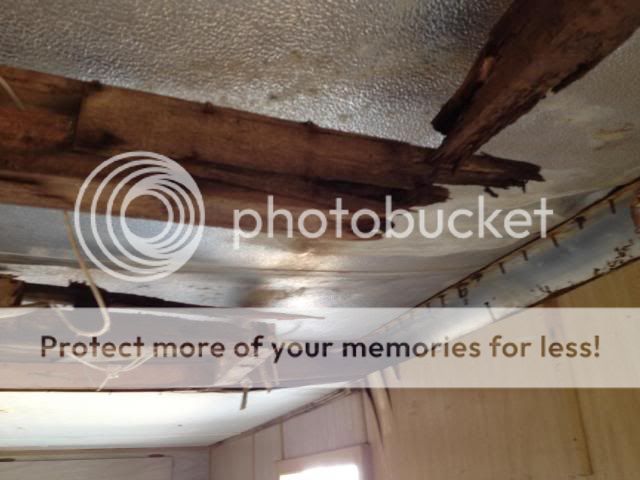 so now that I've got most of the old insides out, next step removing the skin. Not sure when I'll tackle that. Looking forward to my project.... |
|
|
|
Post by vikx on Feb 1, 2014 20:22:56 GMT -8
You might rescue the stove; people are always looking for a stove...
Also, keep everything until you are done. Some of the old parts are impossible to replace.
Good luck on your build.
|
|
slider
Junior Member
Posts: 90
Likes: 16
Currently Offline
|
Post by slider on Feb 1, 2014 23:59:14 GMT -8
I'm keeping all of the appliances for now. Looks haphazardly tossed in the yard but I made sure not to damage them. Wood is now stacked on my utility trailer and appliances in my storage shed.
I will probably go ahead and toss the wet bath components but I kept them too.
I never could find a driver to work. Turns out it was not a clutch bit, it really looks like one but the clutch bits I bought didn't work (I don't think its just the wrong size). I was able to grind down some square bits and may them work okay but before I do the skin, I need a solid bit connection.
|
|
kathleenc
Active Member
Posts: 419 
Likes: 101
Currently Offline
|
Post by kathleenc on Feb 2, 2014 6:55:16 GMT -8
Slider, what are the wet bath components? I am sure someone might be interested in them if they are reusable. I am- but I have no idea where you are located.
|
|
slider
Junior Member
Posts: 90
Likes: 16
Currently Offline
|
Post by slider on Feb 2, 2014 11:24:55 GMT -8
It's a toilet sitting in a shower pan. There is a tank underneath but its cracked. Also a small sink with a "port" for what I am assuming was a handheld shower head/hose.
All pretty rough, but I am in Florence AL (extreme NW AL) if anyone wants them, let me know and you can come by and get them, but they are not worth a long trip even for free (unless somehow it is specifically what you're looking for). When it stops raining I'll take a few pics.
|
|
slider
Junior Member
Posts: 90
Likes: 16
Currently Offline
|
Post by slider on Feb 22, 2014 18:22:13 GMT -8
Did a little work on the camper today, not much but I got in a couple hours. I got windows out of one side and started taking off some of the other trim pieces.  Doesn’t seem like the best build design. There is simply a piece of aluminum that fits between the AL under the rear window and the part that goes down to the bottom. There is a lip somewhat "protecting" the seam, but mostly relying on caulk. I will come up with something different as I build it back. No wonder, the wood was so rotted in the back.   Took these pieces off. The side seams are much better than the one under the rear window, the top piece overlaps the bottom and that seam is hidden under these trim pieces.  This is what's left of what I am assuming 45 years ago was wood, as I pulled the piece (pictured above) out some, the chips all fell out. There was no wood left, just mud.  Pretty much all I got done today, I may take a vacation day sometime in the next couple weeks and just take that day to get the skin off. |
|
|
|
Post by vikx on Feb 22, 2014 21:48:22 GMT -8
Looks familiar to a lot of us, Slider!
|
|
slider
Junior Member
Posts: 90
Likes: 16
Currently Offline
|
Post by slider on Mar 2, 2014 15:31:59 GMT -8
A few more hours today. Took out what seems like a couple hundred screws  Got the rest of the windows out and the rest of the trim pieces.  Next I'll finish cleaning up the residual of the butyl tape. Then off with the skin. Here's a shot of the part I have stripped with Citristrip, probably need to do another coat but its looking pretty good.  |
|
lamacki1
Active Member
Posts: 121
Likes: 17
1957 Shasta 1500 - Sundance
Currently Offline
|
Post by lamacki1 on Mar 3, 2014 7:49:27 GMT -8
Slider - this can be a beautiful trailer. There was one out of Florida I think that went up for sale around 2012. It was in amazing, nearly mint condition. I wanted it so badly. I thought I had saved photos but I can't find them. I can't wait to see how your restore progresses.
|
|
slider
Junior Member
Posts: 90
Likes: 16
Currently Offline
|
Post by slider on Mar 8, 2014 16:47:53 GMT -8
Almost done stripping it. One more coat should do it  |
|
CorvettCrzy
Full Member
Posts: 934
Likes: 273
'58 Corvette, '64 Franklin
Currently Offline
|
Post by CorvettCrzy on Mar 30, 2014 20:42:30 GMT -8
Hi, where did you get that citristrip? How do you use it, spray it on, then what? It looks like does a good job. It looks really good!
|
|
Ten
3K Member

Posts: 3,432
Likes: 1,467
70 Shasta 16SC + 1964 Airflyte
Currently Offline
|
Post by Ten on Mar 31, 2014 5:47:12 GMT -8
You mentioned earlier about getting the right bit for the screws...might I suggest just replacing the screws? Most cases, it would be a #6 or maybe a #8 screw, and a Phillips or even hex head woudl be easier to work with. www.boltdepot.com/Sheet_metal_screws.aspx?nv=l |
|
slider
Junior Member
Posts: 90
Likes: 16
Currently Offline
|
Post by slider on Apr 12, 2014 4:28:04 GMT -8
Reply to last two posts:
Citristrip I got at HD. You brush it on with a cheap paint brush, wait a couple hours and then find your best way to scrape off. Majority of mine I have scraped off with a slightly stiff brush I used to clean my car tires with. A non-scratch scothbrite pad gets the tougher spots. I have found it is easier to do process twice instead of extra elbow grease.
Yep, whenever I get all of these out I will not be finding the "authentic" replacements. Will go with some kind of low profile, common bit screws.
BTW, haven't touched the camper (other than to move to the new shed) in over a month. Bout to start changing that.
|
|
slider
Junior Member
Posts: 90
Likes: 16
Currently Offline
|
Post by slider on May 6, 2014 17:46:22 GMT -8
Finally after more than a month I got to do some work on the camper. Work and daughter's sports have been keeping me on the road but hard to complain about either of those.... Anyway, ready to pull some skin. Wow, this is going to be lots of work (about 350 screws all covered in white tar).  It took about 1.5 mins to scrape the gunk off/around each screw, then about 1.5 secs to take them out. At least they're not rusted up clutch head screws.   Got one side done tonight and calling it quits for now. Again, not a hard task but very tedious. Here's a shot of what the top and sides look like under the edge cap. I think when I replace roof, I am going to have the top overlap the sides and fold it down some for added water protection. (Then cover all with edge caps of course).  |
|
slider
Junior Member
Posts: 90
Likes: 16
Currently Offline
|
Post by slider on May 9, 2014 17:36:07 GMT -8
Took 3 hours to get the cap off one side. Thank goodness the rot wasn't as bad as I originally thought.   I haven't taken out any wood yet in this pic, I only took off the end cap and peeled back the roofing (which I don't intend to reuse). |
|


