Darrylthe67Scotty
New Member
Posts: 7
Likes: 1
Darryl - 1967 Serro Scotty
Currently Offline
|
Post by Darrylthe67Scotty on Apr 15, 2024 20:26:21 GMT -8
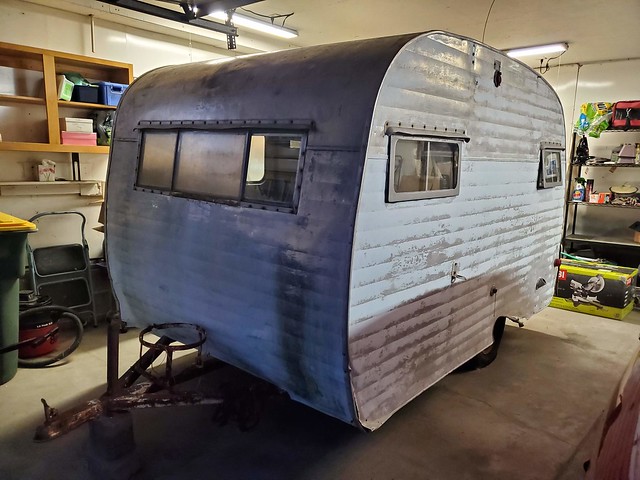
Note: This initial post was first placed in the "Introduce Your Camper" section. I decided I wanted the full story in one place, and this looked like the right section for it, so I've re-posted it here, with new posts added after it. My uncle actually did an initial clean before bringing him up, and this photo is after that "clean," so I really hate to imagine the condition he was in before!  20210704_104342 20210704_104342
Some interior photos after removing all of the crap and doing some cleaning.
 20230920_193957 20230920_193957True to Scotty form, there are significant rotting issues.  20240104_163242 20240104_163242 Where I'm currently at: windows and doors are all carefully removed, and most interior trim and fixtures are taken out. I've got the j-rails (or whatever they are *really* called!) off. I think the next step is skin removal, but for some reason I am terrified to do this. I think I'm afraid he's just going to collapse into splinters once the skin is off! |
|
Darrylthe67Scotty
New Member
Posts: 7
Likes: 1
Darryl - 1967 Serro Scotty
Currently Offline
|
Post by Darrylthe67Scotty on Apr 15, 2024 21:03:03 GMT -8
On to the new stuff: skinning the trailer! I was worried about taking the skins off, but it was both an easier process than I feared, and one which did not see my worst apprehensions brought to life (namely, Darryl did not collapse into a pile of splinters once his skins came off, woohoo!) Here's how this went down.
First panel of skin taken off!
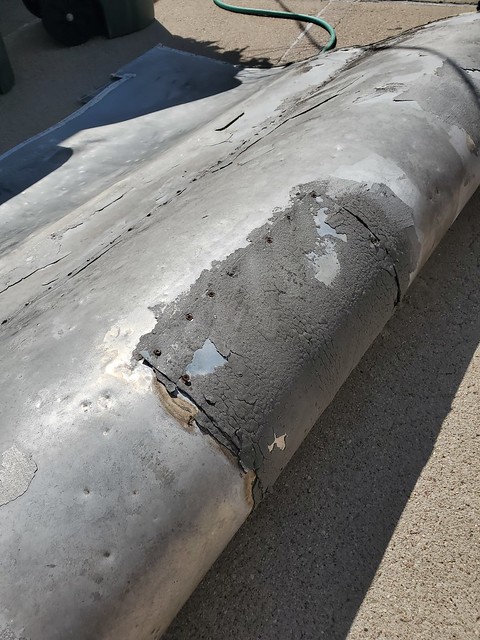
I knew the rear end was pretty rotten, but it was still really something to see how little there is holding this thing together in the back!
The front looks more solid, but it really isn't, at least at the bottom.
Finally, all of the skin is off! (Except those two little bits at the bottom, I see now, haha.)
In places (this is with the roof metal still on), all of the side rails (kerfing? Not sure what the proper term is) were completely rotted away!
But the roof was really in a league of its own! It actually looks like either something or someone was on top of it at some point. It's a hot mess up here. Serro Scotty Skylight model?
The roof metal is pretty messy, but I'm saving it (and literally everything else) for patterns and reference.
I'd love any ideas you have for next steps: taking out the ceiling, and the right process for removing cabinets/walls. I'm curious if any of you braced the walls while doing that, and if that's something worth doing... or really not so much at this point.
|
|
nccamper
Administrator 
Posts: 7,744 
Likes: 2,871
1962 Forester- 1956 Shasta
Currently Offline
|
Post by nccamper on Apr 15, 2024 23:27:53 GMT -8
Wow, that's a great first step. Demo is fun but saving the pieces take patience.
I've never worked on a Scotty. They did things differently. Hopefully somebody with experience will chime in.
The skin looks in good shape.
|
|
John Palmer
Senior Member
 Hi, From a vintage trailer guy located in Santa Ana, CA. It's good to see lots of activity here.
Posts: 1,629
Likes: 576
Currently Offline
|
Post by John Palmer on Apr 16, 2024 7:17:56 GMT -8
Wow, that's a great first step. Demo is fun but saving the pieces take patience.
I've never worked on a Scotty. They did things differently. Hopefully somebody with experience will chime in.
The skin looks in good shape.
It's a plywood wall, no wall framing is present. Skin looks in good shape. Really? I'd be curious how he was able to remove the side wall skins "without removing the roof skin first? It appears in the photos that the roof skin did not lap over the side wall skins. Maybe we need better detailed photos of how the roof to wall edge seam was done originally. Did this trailer have "Edge Cap Trim"? When it comes time to install the roof back on, why would you "chance" having an edge water leak because the roof does not lap over the sidewall? In the photos, I cannot see any place he had to straighten the roof edge before it was laid flat. I'm sure I'm missing something; inquiring minds need to know. The process of taking apart a trailer should be renamed DECONSTRUCTION. It is one of the most important steps in restoration. It's a slow process that allows you to Analize the detail of how it was originally constructed. It's the point where you make the decisions of how you will be rebuilding it. You write your own instruction sheet. The way the manufacturer originally built the trailer is not always the BEST WAY. In fact, on the 1950-60's trailer's it was usually the "fastest, and cheapest way" because they were under "pricing pressure" to build low-cost trailers. In today's world, all materials are expensive. It's going to take hundreds of hours of labor to rebuild a Stick and Tin trailer. It's in the restorer's best interest, to adopt Best Practices Methods of construction. Just my view, John Palmer |
|
Darrylthe67Scotty
New Member
Posts: 7
Likes: 1
Darryl - 1967 Serro Scotty
Currently Offline
|
Post by Darrylthe67Scotty on Apr 16, 2024 13:12:40 GMT -8
Skin looks in good shape. Really? I'd be curious how he was able to remove the side wall skins "without removing the roof skin first? It appears in the photos that the roof skin did not lap over the side wall skins. Maybe we need better detailed photos of how the roof to wall edge seam was done originally. Did this trailer have "Edge Cap Trim"? When it comes time to install the roof back on, why would you "chance" having an edge water leak because the roof does not lap over the sidewall? In the photos, I cannot see any place he had to straighten the roof edge before it was laid flat. Hi John!
Your guess is correct - the roof skin was not lapped over the side wall skins. The skins met more or less at a 90-degree angle and were covered with putty and a rail. I think the photos below may show that a bit more clearly:
As for the shape of the skins... I'm still debating on that. I'm definitely replacing the roof -- it's in tough shape, and the many seams on it don't appear to have been the best idea! So I'd love to get a continuous piece over it in the end. The sides are a different story. Right now, I'm hoping I can repair them into usability, both for cost purposes and for philosophy purposes (I'd like to re-use all I can of the original trailer.) But its previous owners put quite a lot of additional holes through it during its time as a hunting trailer. Most of these are pretty small, but some of them are not. So, we'll see where I eventually land on that. Luckily, that's a long way away and I have much to do and learn before I get to that point!
|
|
John Palmer
Senior Member
Hi, From a vintage trailer guy located in Santa Ana, CA. It's good to see lots of activity here.
Posts: 1,629
Likes: 576
Currently Offline
|
Post by John Palmer on Apr 16, 2024 17:33:03 GMT -8
Thank you for the additional detail photos. They confirm that it was put together with an Edge Cap. The black gooey putty is I believe Butyl Rubber. It's a PITA to clean off. You can cut it with WD-40 and Acetone, it's really messy to work around. A heat gun just makes a bigger mess.
Roof skins are normally seamed from 4' rolled aluminum. They call it a Paneled Roof and the type of seams are called ACME seams. Frankly, I've never seen an ACME seam leak.
From my view, the problem with the roof is not the seams, but that it was cut "Too Narrow" to allow you to properly bend it over to form the watertight lap seam. On my trailers I first bent the wall metal over the edge, THEN bend the roof metal over the wall edge. Double lapped. Then the edge seam is sealed with a urethane seam sealer like you would use on body panel replacement on a car/truck.
The problem with the high cost for RV aluminum is in the cost to crate it, and the freight cost. Compound the problems of shipping damage and it's a tough issue to overcome. If you have any access to a buddy with a mechanical air conditioning/heating shop your golden. You need a 12' long sheet metal brake. You can buy the aluminum sheet metal at any metal supply store in nominal lengths of either 10' or 12'. It looks like your trailer has a 3" or 4" brake pattern which you can easily replicate on a sheet metal brake. The cost to buy a 4' by 12' .032" is between $125 and a $150. Your real savings is in being able to pick up the raw metal and not having to ship it.
If I were rebuilding a plywood walled trailer, I would switch the wall framing construction over to a normal 1 1/2" stick and tin wall. Lots of advantages over the solid plywood. Leave the plywood walls for the teardrop guys.
Good luck with your project.
John Palmer
|
|
nccamper
Administrator
Posts: 7,744
Likes: 2,871
1962 Forester- 1956 Shasta
Currently Offline
|
Post by nccamper on Apr 16, 2024 18:04:12 GMT -8
On a 2x2 screen it looks like the skin, except for the roof, can be saved. But I believe new skin is usually worth the money if you’re going through the effort of a full rebuild. Easier too.
|
|


 ) to come home with me.