newmexicogal
Junior Member

Posts: 77 
Likes: 25
Currently Offline
|
Post by newmexicogal on Jan 18, 2014 15:56:58 GMT -8
Hi All, Upon all your good advice I removed the PO's hack job water tank. I've purchased the new one and now I'm stuck. I don't know how to install it. According to the place I ordered it the new tank is LDPE. The PO had a pvc pipe from the old plastic tank that stuck out through the lovely exterior hole he cut in the skin and a pvc cap screwed on to the outside. (No beloved filler cap.) The new tank's fill tube OD is 1 1/4. Any advice, pointers to info would be much appreciated! paula  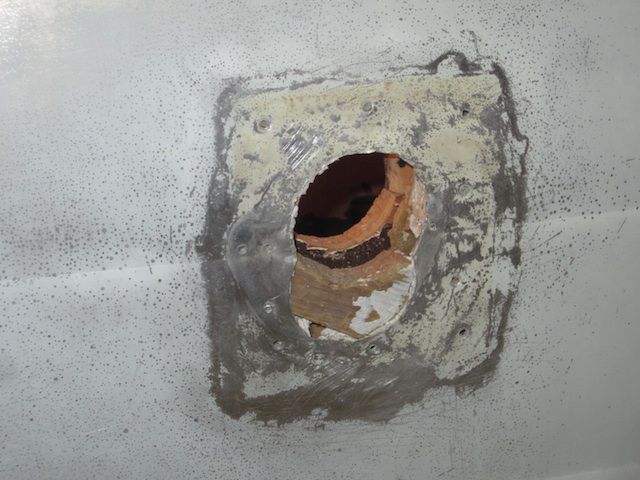 |
|
pirateslife
Active Member
Posts: 426 
Likes: 137
1969 Shasta Compact
Currently Offline
|
Post by pirateslife on Jan 18, 2014 18:28:22 GMT -8
Best place to start is with a new gravity fill inlet to cover most of the hole up on the outside. Attach the biggest opening of the tank to the gravity fill There should be a smaller. Outlet on the tank for a vent, attach the to the small barb on the gravity fill. If you have a barb at the bottom of the tank, that will be the drain to hook to a small outside plastic valve or if there is a 3 one up close to the fill neck, that will be the overflow just run it out the floor , the other will be your outlet to your sink
|
|
|
|
Post by bigbill on Jan 18, 2014 20:39:40 GMT -8
if the butchered hole is to large to be covered by the new gravity fill get piece of alum sheet and cut a plate large enough to cover all the damaged area then cut the opening for the new fill in the plate and secure both to the trailer with screws or pop rivets but be sure to seal between each piece, you don't want a leak into the wall. The alum plate can be painted to match or polished. if that doesn't appeal to you then the next option is to purchase a new section of siding.
Once the fill is installed you will connect with plastic food grade hose available at most big box stores and Ace hardware. the hose most likely won't bend that sharp with out kinking so you may need a pvc 90 degree elbow to place in the hose.
|
|
|
|
Post by vikx on Jan 18, 2014 23:38:26 GMT -8
|
|
Ten
3K Member

Posts: 3,432
Likes: 1,467
70 Shasta 16SC + 1964 Airflyte
Currently Offline
|
Post by Ten on Jan 19, 2014 6:39:14 GMT -8
Another option here, although maybe not as desirable, may be to use a vent cover to cover the butcher-job on the aluminum, and then run your inlet through the end wall, straight to the tank. You could use a gravity fill or a filler like Vikx shows here, either one, then the barbed fittings and plastic tubing to connect.
|
|
newmexicogal
Junior Member
Posts: 77
Likes: 25
Currently Offline
|
Post by newmexicogal on Jan 19, 2014 16:40:56 GMT -8
Thanks so much to everyone for the help. Vikx, photos were superb -- as embarrassing as it is to admit, I just had no idea what I was trying to shoot for. I appreciate all the good advice.  |
|
|
|
Post by vikx on Jan 19, 2014 21:21:15 GMT -8
I agree with Number 10. An elbow from the "hole" to the tank won't allow for easy filling. Unless you can move the tank forward enough to relax the bend in the fill...
I'd check out fills at the RV shop and figure out what you want. There are two different barb/hose sizes (1 1/4" and 1 1/2") but they are NOT PLUMBING FITTINGS. In other words, you must get the fittings at the RV store. Try to use all the same size fittings and hose. (match the tank) Reducers are impossible to find.
Once you have the parts, place the fill above the tank. Don't forget you will need a vent tube as well. Some modern fills come with a handy little tube connection for the vent. Otherwise, you can vent thru the floor.
|
|
|
|
Post by 62shastacrazymom on Jun 3, 2014 9:30:39 GMT -8
This site is amazing. I am the husband of 62shastacrazymom and since our shasta just returned home 1/2 restored (long story), I am jumping in to do plumbing. Thank you for these great pictures. I just purchased a new water tank from vintagetrailersupply and parts to go along with, but I wanted to know what is the best way to secure the tank to the floor. Do most people just do straps across the top of tank or go crazy and use epoxy or adhesive to hold to floor. any help would be great. thanks
|
|
|
|
Post by vikx on Jun 6, 2014 22:59:29 GMT -8
Just a couple of blocking sticks to hold the tank in place and then straps. No need for heavy duty stuff. LOL. Don't forget you'll need a drain which goes thru the floor. That helps hold the tank in place as well. Good question!
|
|


